2000 MERCEDES-BENZ E430 Rear
[x] Cancel search: RearPage 170 of 341

167 Interior equipment
Te ch n ica l
data Instruments
and controlsOperationDrivingInstrument
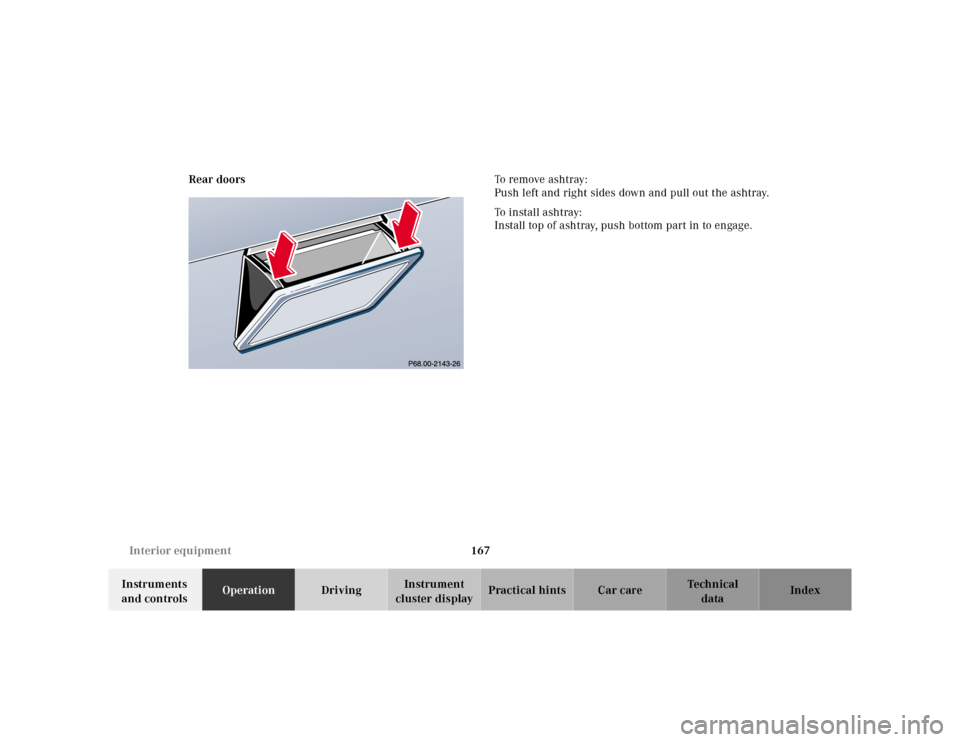
cluster displayPractical hints Car care Index Rear doorsTo remove ashtray:
Push left and right sides down and pull out the ashtray.
To i n st a l l a s h t r ay :
Install top of ashtray, push bottom part in to engage.
Page 173 of 341

170 Interior equipment
Te ch n ica l
data Instruments
and controlsOperationDrivingInstrument
cluster displayPractical hints Car care Index
Cellular telephone
The vehicle is prepared for the installation of a cellular
telephone. For further information and installation
contact your authorized Mercedes-Benz Center.Shelf below rear window
Wa r n i n g !
Some jurisdictions prohibit the driver from using a
cellular telephone while driving a vehicle. Whether
or not prohibited by law, for safety reasons, the
driver should not use the cellular telephone while
the vehicle is in motion. Stop the vehicle in a safe
location before answering or placing a call.
Wa r n i n g !
The shelf below the rear window should not be
used to carry objects. This will avoid such objects
from being thrown about and injuring vehicle
occupants during an accident or sudden maneuver.The trunk is the preferred place to carry objects.
Page 175 of 341

172 Garage door opener
Te ch n ica l
data Instruments
and controlsOperationDrivingInstrument
cluster displayPractical hints Car care Index
Programming or reprogramming the integrated
remote control:
1. Turn electronic key in steering lock to position 1
or 2.
2. Hold the end of the hand-held transmitter of the
device you wish to train approximately 2 to 5 inches
(5 cm to 12 cm) away from the surface of the
integrated remote control located on the inside rear
view mirror, keeping the indicator lamp in view.
3. Using both hands, simultaneously push the hand-
held transmitter button and the desired integrated
remote control button. Do not release the buttons
until completing step 4.
4. The indicator lamp on the integrated remote control
will flash, first slowly and then rapidly. When the
indicator lamp flashes rapidly, both buttons may be
released (the rapid flashing lamp indicates
successful programming of the new frequency
signal). To program the remaining two buttons,
follow steps 1 through 4.Note:
If, after repeated attempts, you do not successfully
program the integrated remote control device to learn
the signal of the hand-held transmitter, the garage door
opener could be equipped with the “rolling code
feature”.
Rolling code programming:
To train a garage door opener (or other rolling code
devices) with the rolling code feature, follow these
instructions after completing the “Programming”
portion of this text. (A second person may make the
following training procedures quicker and easier.)
1. Locate training button on the garage door opener
motor head unit. Exact location and color of the
button may vary by garage door opener brand. If
there is difficulty locating the transmitting button,
reference to garage door opener operator’s manual.
2. Press “training” button on the garage door opener
motor head unit (which activated the “training
light”).
Page 182 of 341

179 Tele Aid
Te ch n ica l
data Instruments
and controlsOperationDrivingInstrument
cluster displayPractical hints Car care Index Important!
Always make sure that the indicator lamps in the
“SOS” button, in the “Roadside Assistance” button and
in the “Information” button do not remain illuminated
constantly in red and the message “TELE AID – VISIT
WORKSHOP” is not displayed in the multifunction
display after the system self check.
If a malfunction is indicated as outlined above, have the
system checked at the nearest Mercedes-Benz Center as
soon as possible.
Emergency calls
An emergency call is initiated automatically:
•following an accident in which the Emergency
Tensioning Retractors (ETR’s) or airbags deploy,
•if the antitheft alarm or the tow away alarm stays on
for more than 20 seconds, see pages 43 and 45.
An emergency call can also be initiated manually by
opening the cover next to the inside rear view mirror
labeled “SOS”, then pressing the button (for longer than
2 seconds) located under the cover. See below for
instructions on initiating an emergency call manually.Once the emergency call is in progress, the indicator
lamp in the “SOS” button will begin to f lash. The
message “EMERGENCY CALL – CONNECTING CALL”
appears in the multifunction display. When the
connection is established, the message “EMERGENCY
CALL – CALL CONNECTED” appears in the
multifunction display. All information relevant to the
emergency, such as the location of the vehicle
(determined by the GPS satellite location system),
vehicle model, identification number and color are
generated.
A voice connection between the Response Center and
the occupants of the vehicle will be established
automatically soon after the emergency call has been
initiated. When a voice connection is established the
audio system mutes and the message “TELE AID –
EMERGENCY CALL ACTIVE” appears in the
multifunction display. The Response Center will attempt
to determine more precisely the nature of the accident
provided they can speak to an occupant of the vehicle.
Page 194 of 341

191 Steering lock
Te ch n ica l
data Instruments
and controlsOperationDrivingInstrument
cluster displayPractical hints Car care Index Important!
If the electronic key is left in the steering lock position 0
for an extended period of time, it can no longer be
turned in the lock. In this case, remove electronic key
from steering lock and reinsert.
Caution!
To prevent accelerated battery discharge and a possible
dead battery, always remove the electronic key from the
steering lock. Do not leave the electronic key in steering
lock position 0.Notes:
A warning sounds when the driver’s door is opened
while the electronic key is in steering lock position 1
or 0.
With the engine at idle speed, the charging rate of the
alternator (output) is limited.
It is therefore recommended that you turn off
unnecessary electrical consumers while driving in
stop-and-go traffic. This precaution helps to avoid
draining of the battery.
Unnecessary strain on the battery and charging system
may be minimized by turning off the following power
consumers, for example:
Heated seats, rear window defroster. In addition, the
automatic climate air volume control should be set to
the lowest position.
The steering lock can only be unlocked with the vehicle
battery properly charged and connected.
Page 211 of 341

208 Driving instructions
Te ch n ica l
data Instruments
and controlsOperationDrivingInstrument
cluster displayPractical hints Car care Index
Tire speed rating
E 320 and E 430:
Your vehicle is factory equipped with “H”-rated tires,
which have a speed rating of 130 mph (210 km / h).
An electronic speed limiter for models E 320 and E 430
prevents your vehicle from exceeding the speed rating.
Model E 55 AMG:
Your vehicle is factory equipped with “Z”-rated tires.
An electronic speed limiter prevents your vehicle from
exceeding a speed of 155 mph (250 km / h).
Despite the tire rating, local speed limits should be
obeyed. Use prudent driving speeds appropriate to
prevailing conditions.Snow chains
Use only snow chains that are tested and recommended
by Mercedes-Benz. Your authorized Mercedes-Benz
Center will be glad to advise you on this subject.
Chains should only be used on the rear wheels. Follow
the manufacturer’s mounting instructions.
Snow chains should only be driven on snow covered
roads at speeds not to exceed 30 mph (50 km / h).
Remove chains as soon as possible when driving on
roads without snow.
When driving with snow chains, press the ESP control
switch to OFF, see page 220.
Model E 55 AMG:
Use of snow chains is not permissible with tire size
275 / 35 ZR 18.
Wa r n i n g !
Even when permitted by law, never operate a
vehicle at speeds greater than the maximum speed
rating of the tires.Exceeding the maximum speed for which tires are
rated can lead to sudden tire failure causing loss of
vehicle control and resulting in personal injury
and possible death.
Page 222 of 341

219 Driving systems
Te ch n ica l
data Instruments
and controlsOperationDrivingInstrument
cluster displayPractical hints Car care Index Four Wheel Electronic Traction System (4MATIC)
with Electronic Stability Program (ESP)
(Model with All Wheel Drive [AWD])
The 4MATIC improves vehicle’s ability to use available
traction, e.g. during winter operation in mountains
under snowy conditions, by applying power to all four
wheels.
Important!
If the ESP warning lamp flashes:
•during take-off, apply as little throttle as possible,
•while driving, ease up on the accelerator.
Adapt your speed and driving to the prevailing road
conditions.Caution!
Operational tests with the engine running can only be
conducted on a 2-axle dynamometer.Otherwise the ESP
will immediately be engaged and will apply the brakes
to the spinning wheels.
If the vehicle is towed with one axle raised (see
page 282), or when testing the parking brake on a brake
test dynamometer, the engine must be shut off
(electronic key in steering lock position 0 or 1).
If one or more wheels tend to spin, ESP will apply the
brakes to them. The traction control for the front axle
wheels deactivate at approximately 50 mph (80 km / h),
and for the rear axle wheels at approximately 80 mph
(130 km / h).
The warning lamp in the speedometer blinks at any
speed as soon as one tire loses traction.
Note:
In winter operation, the maximum effectiveness of the
4MATIC is only achieved with Mercedes-Benz
recommended M+S rated radial-ply tires and / or snow
chains.
Page 223 of 341

220 Driving systems
Te ch n ica l
data Instruments
and controlsOperationDrivingInstrument
cluster displayPractical hints Car care Index
Electronic stability program (ESP)
The ESP enhances directional control and reduces
driving wheel spin of the vehicle under various driving
conditions.
Over / understeering of the vehicle is counteracted by
applying brakes to the appropriate wheel to create a
countervailing vehicle movement. Engine torque is also
limited. The ESP warning lamp, located in the
speedometer dial, starts to flash when ESP is in
operation.Important!
If the ESP warning lampv flashes:
•During take-off apply as little throttle as possible.
•While driving ease up on the accelerator.
•Adapt your speed and driving to the prevailing road
conditions.
•Do not switch off the ESP.
Caution!
If the vehicle is towed with the front axle raised (see
page 282), the engine must be shut off (electronic key in
steering lock position 0 or 1). Otherwise, the ESP will
immediately be engaged and will apply the rear wheel
brakes.
Wa r n i n g !
ESP cannot prevent the natural laws of physics
from acting on the vehicle, nor can it increase the
traction afforded. The ESP cannot prevent
accidents, including those resulting from excessive
speed in turns, or aquaplaning. Only a safe,
attentive, and skillful driver can prevent accidents.
The capabilities of an ESP equipped vehicle must
never be exploited in a reckless or dangerous
manner which could jeopardize the user’s safety or
the safety of others.