2000 MERCEDES-BENZ CLK-CLASS brake light
[x] Cancel search: brake lightPage 4 of 299

Operation Audio and telephone 123
DrivingBrakes 185
Power windows 141 Driving off 186
Sliding/pop-up roof 143 Control and operation of radio Parking 187
Interior lighting 145 transmitters 162 Tires 187
Rear window sunshade 146 COMAND, radio, telephone and Snow chains 190
Sun visors 146 two-way radio 162 Winter driving instructions 190
Illuminated vanity mirrors 147 Maintenance 163 Deep water 191
Interior 147 Catalytic converter 164 Passenger compartment 192
Storage compartments, armrest and
cup holder 147Emission control 165 Travelling abroad 192
Glove box 148 Tele Aid 166 Cruise control 193
Ashtrays 150 Steering lock 172 Brake assist system (BAS) 196
Lighter 151 Starting and turning off the engine 174 Antilock brake system (ABS) 198
Enlarged cargo area – split folding rear
seat backrest 152Automatic transmission 175
Electronic stability program (ESP)
200
Loading instructions 153 Parking brake 184 What you should know at the
Cargo tie down rings 155 Driving instructions 184 gas station 203
Parcel net in front passenger footwell 155 Drive sensibly – save fuel 184 Check regularly and before a
long trip 205
Telephone, general 156 Drinking and driving 185
Cellular telephone 156 Pedals 185
Garage door opener 157 Power assistance 185
4
ProCarManuals.com
Page 5 of 299

Instrument cluster displayBRAKE FLUID 217 Coolant level 236
PARKING BRAKE 218 Adding coolant 237
Malfunction and indicator lamps in the
instrument cluster 208ENGINE FAN 218 Windshield washer / headlamp
clean.system 238
On-board diagnostic systemCheck engine malfunction indicator lamp
208COOLANT (coolant level) 219 Windshield and headlamp
washer fluid mixing ratio 238
Brake warning lamp 209 COOLANT (coolant temp.) 220 Wheels 239
Supplemental restraint system STEER. WHEEL ADJUST. 221 Tire replacement 239
(SRS) indicator lamp 210 LIGHT SENSOR 221 Rotating wheels 240
Fuel reserve and fuel cap LIGHTING SYSTEM 222 Spare wheel 241
placement warning 210 WASHER FLUID 223 Changing wheels 242
Electronic stability program(ESP) OIL TEMP. (engine oil temperature) 224 Tire inflation pressure 247
warning lamp 211 ENGINE OIL LEVEL 224 Battery 249
BAS/ESP malfunction indicator lamp 211 ELEC. STABIL. PROG. (Electronic Jump starting 251
ABS malfunction indicator lamp 211 stability program) 226 Towing the vehicle 253
Telescoping steering column – Transmission selector lever,
indicator lamp 212
Practical hintsmanually unlocking 255
Seat belt warning lamp 212 Bulbs 256
Malfunction and indicator lamps in the First aid kit 228 Adjusting headlamp aim 261
center console 212 Shelf below rear window 228 Changing batteries in the
AIRBAG OFF indicator lamp 212 Stowing things in the vehicle 228 electronic main key 264
Roll bar warning lamp 221 Spare wheel, vehicle tools, storage Synchronizing remote control 266
Malfunction and warning messages in compartment 229 Emergency operation of
the multifunction display 213 Vehicle jack 230 sliding/pop-up roof 267
DISPLAY DEFECTIVE 214 Fuses 231
Manual release for fuel filler flap
268
BATTERY/ALTERNATOR 215 Hood 233 Replacing wiper blade insert 268
ABS-SYSTEM 216 Checking engine oil level 234 Trunk lamp 270
BRAKE ASSIST 216 Automatic transmission fluid level 236 Roof rack 270
BRAKE LINING WEAR 217
5
ProCarManuals.com
Page 6 of 299

Vehicle care Technical data
Cleaning and care of the vehicle 272 Spare parts service 278
Engine cleaning 273 Warranty coverage 278
Vehicle washing 273 Identification labels 279
Plastic and rubber parts 273 Layout of poly-V-belt drive 280
Tar stains 274 Technical data 281
Window cleaning 274 Fuels, coolants, lubricants etc. –
capacities 284
Headlamps, taillamps, turn signal Engine oils additives 285
lenses 274 Engine oil 285
Wiper blade 274 Air conditioner refrigerant 285
Seat belts 274 Brake fluid 285
Headliner and shelf below rear window 275 Premium unleaded gasoline 286
Instrument cluster 275 Fuel requirements 286
Steering wheel and gear selector lever 275 Gasoline additives 287
Hard plastic trim items 275 Coolants 287
Upholstery 275 Consumer information 289
Paintwork, painted body components 276 Uniform tire quality grading 289
Light alloy wheels 276
Ornamental Moldings 276
Index291
6
ProCarManuals.com
Page 19 of 299

Instruments and controls
Te ch n ica l
data Instruments
and controlsOperation DrivingInstrument
cluster displayPractical hints Car care Index For more detailed descriptions see Index on page
For adjustment of air outlets, refer to automatic climate
control, see page 1
2
116
.
1Side air outlet, adjustable
2Air volume control for side air outlet
3Exterior lamp switch, see page 11
0
4Parking brake release, see page 184
5Parking brake pedal, see page 184
6Hood lock release, see page 2339
7Combination switch, see page 113
8Cruise control switch, see page 193
9Multifunction steering wheel, see page 84
Horn (with electronic key in steering lock
position 1 or 2)
10Instrument cluster, see page 78
11Voice recognition system switch, see separate
operating instructions
12Steering lock with ignition/starter switch,
see page17213Center air outlets, adjustable
14Air volume control for center air outlets
15Left front seat heater switch, see page 53
16Headlamp washer switch, see page 112
17Switch for rear seat head restraints, see page 50
18Hazard warning flasher switch
19Central locking switch, see page 35
20Switch for tow-away alarm, see page43
Indicator lamp for antitheft alarm system,
see page41
21Right front seat heater switch, see page 53
22Automatic climate control, see page 116
Rear window defroster switch
23Glove box (illuminated with electronic key in
steering lock position 1 or 2), see page 148
24Audio system,
25Storage compartment
26Ashtray with lighter, see page 150
19
ProCarManuals.com
Page 45 of 299

Seats
Te ch n ica l
data Instruments
and controlsOperationDrivingInstrument
cluster displayPractical hints Car care Index
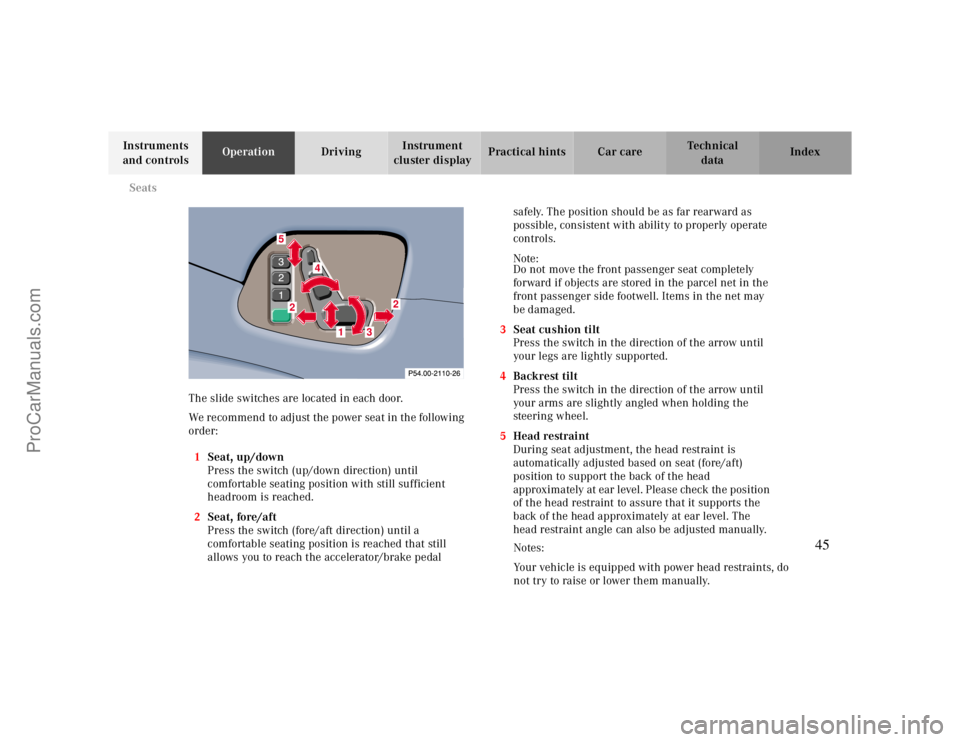
The slide switches are located in each door.
We recommend to adjust the power seat in the following
order:
1Seat, up/down
Press the switch (up/down direction) until
comfortable seating position with still sufficient
headroom is reached.
2Seat, fore/aft
Press the switch (fore/aft direction) until a
comfortable seating position is reached that still
allows you to reach the accelerator/brake pedal safely. The position should be as far rearward as
possible, consistent with ability to properly operate
controls.
Note:
Do not move the front passenger seat completely
forward if objects are stored in the parcel net in the
front passenger side footwell. Items in the net may
be damaged.
3Seat cushion tilt
Press the switch in the direction of the arrow until
your legs are lightly supported.
4Backrest tilt
Press the switch in the direction of the arrow until
your arms are slightly angled when holding the
steering wheel.
5Head restraint
During seat adjustment, the head restraint is
automatically adjusted based on seat (fore/aft)
position to support the back of the head
approximately at ear level. Please check the position
of the head restraint to assure that it supports the
back of the head approximately at ear level. The
head restraint angle can also be adjusted manually.
87
4
52
2
1
3
Notes:
Your vehicle is equipped with power head restraints, do
not try to raise or lower them manually.
45
ProCarManuals.com
Page 150 of 299

Interior equipment
Te ch n ica l
data Instruments
and controlsOperationDrivingInstrument
cluster displayPractical hints Car care Index
Ashtray
Center console, front
By touching the bottom of the cover lightly, the ashtray
opens automatically.Prior to removing the ashtray insert, move the gear
selector lever to position “N”.
To remove ashtray:
Push sliding knob (1) toward the right to eject the
insert.
To i n st a l l a s h t r ay :
Install insert into ashtray frame and push down to
engage.
Wa r n i n g !
Remove front ashtray only with vehicle standing
still. With the gear selector lever in position “N”,
turn off the engine and set the parking brake.
Otherwise the vehicle might move as a result of
unintended contact with the gear selector lever.
150
ProCarManuals.com
Page 177 of 299

Automatic transmission
Te ch n ica l
data Instruments
and controlsOperationDrivingInstrument
cluster displayPractical hints Car care Index Stopping
For brief stops, e.g. at traffic lights, leave the
transmission in gear and hold vehicle with the service
brake.
For longer stops with the engine idling, shift into “N”
or “P” and hold the vehicle with the service brake.
When stopping the vehicle on an uphill gradient, do not
hold it with the accelerator, use the brake. This avoids
unnecessary transmission heat build up.
Maneuvering
To maneuver in tight areas, e.g. when pulling into a
parking space, control the vehicle speed by gradually
releasing the brakes. Accelerate gently and never
abruptly step on the accelerator.
To rock a vehicle out of soft ground (mud or snow),
alternately shift from forward to reverse, while applying
slight partial throttle.Rocking a vehicle free in this manner may cause the
ABS or traction system malfunction indicator lamp to
come on. Turn off and restart the engine to clear the
malfunction indication.
Wa r n i n g !
Getting out of your vehicle with the selector lever
not fully engaged in position “P” is dangerous.
Also, when parked on an incline, position “P” alone
may not prevent your vehicle from moving,
possibly hitting people or objects.Always set the parking brake in addition to shifting
to position “P”, see page 204 for parking brake. When parked on an incline, also turn front wheel
against curb.
177
ProCarManuals.com
Page 190 of 299

Driving instructions
Te ch n ica l
data Instruments
and controlsOperationDrivingInstrument
cluster displayPractical hints Car care Index
Snow chains
Use only snow chains that are tested and recommended
by Mercedes-Benz. Your authorized Mercedes-Benz
Center will be glad to advise you on this subject.
Chains should only be used on the rear wheels. Follow
the manufacturer’s mounting instructions.
Snow chains should only be driven on snow covered
roads at speeds not to exceed 30 mph (50 km/h).
Remove chains as soon as possible when driving on
roads without snow.
When driving with snow chains, press the ESP control
switch to OFF, refer to page201.
Wa r n i n g !
If the vehicle becomes stuck in snow, make sure
that snow is kept clear of the exhaust pipe and
from around the vehicle with engine running.
Otherwise, deadly carbon monoxide (CO) gases may
enter vehicle interior resulting in unconsciousness
and death.To assure sufficient fresh air ventilation, open a
window slightly on the side of the vehicle not
facing the wind. Winter driving instructions
The most important rule for slippery or icy roads is to
drive sensibly and to avoid abrupt acceleration, braking
and steering maneuvers. Do not use the cruise control
system under such conditions.
When the vehicle is in danger of skidding, move
selector lever to position “N”. Try to keep the vehicle
under control by corrective steering action.Road salts and chemicals can adversely affect braking
efficiency. Increased pedal force may become necessary
to produce the normal brake effect. We therefore
recommend depressing the brake pedal periodically
when traveling at length on salt-strewn roads. This can
bring road salt impaired braking efficiency back to
normal. A prerequisite is, however, that this be done
without endangering other drivers on the road. If the vehicle is parked after being driven on salt treated
roads, the braking efficiency should be tested as soon as
possible after driving is resumed while observing the
safety rules in the previous paragraph.
190
ProCarManuals.com