2000 LINCOLN TOWN CAR low beam
[x] Cancel search: low beamPage 10 of 224
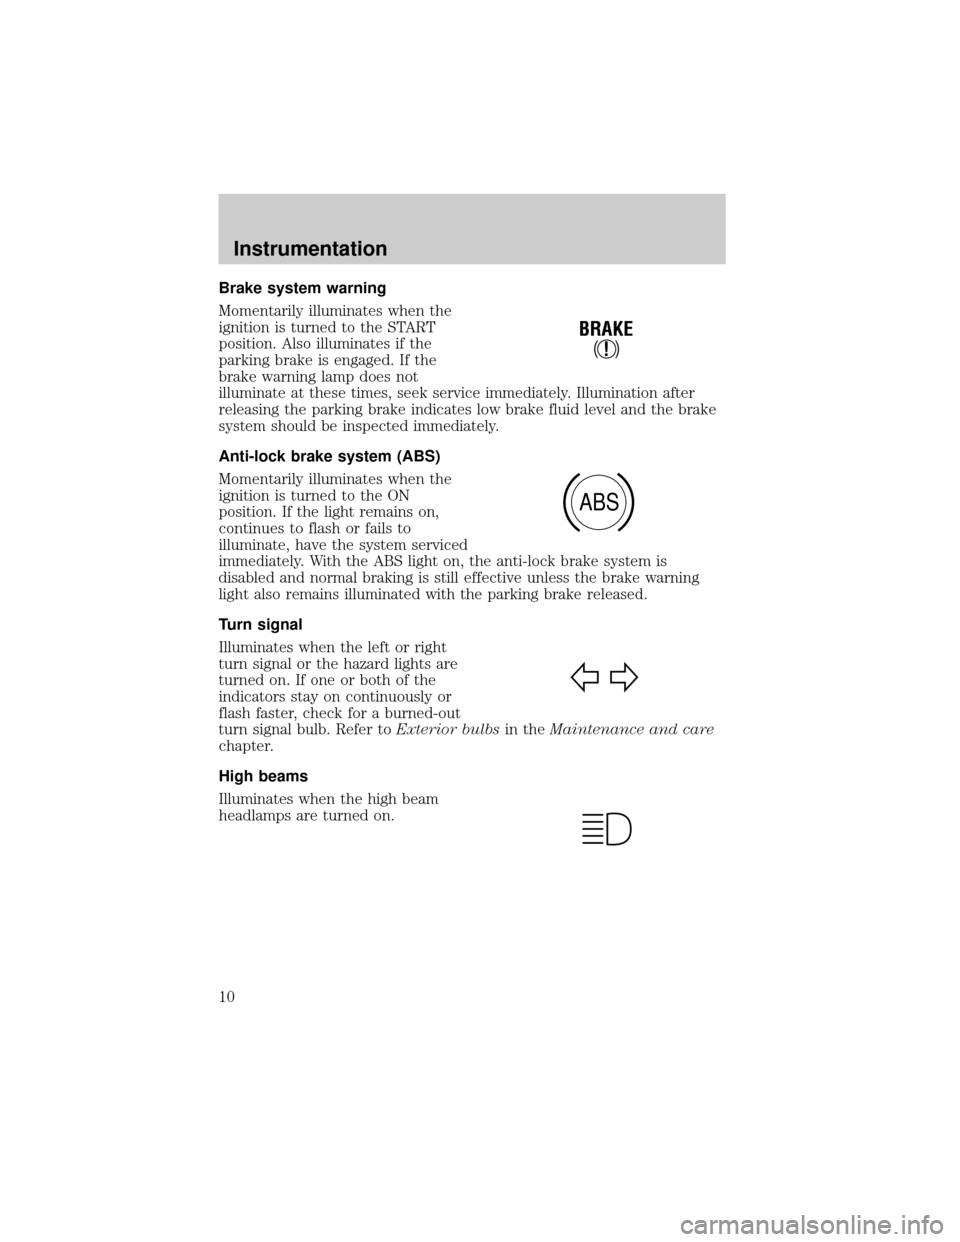
Brake system warning
Momentarily illuminates when the
ignition is turned to the START
position. Also illuminates if the
parking brake is engaged. If the
brake warning lamp does not
illuminate at these times, seek service immediately. Illumination after
releasing the parking brake indicates low brake fluid level and the brake
system should be inspected immediately.
Anti-lock brake system (ABS)
Momentarily illuminates when the
ignition is turned to the ON
position. If the light remains on,
continues to flash or fails to
illuminate, have the system serviced
immediately. With the ABS light on, the anti-lock brake system is
disabled and normal braking is still effective unless the brake warning
light also remains illuminated with the parking brake released.
Turn signal
Illuminates when the left or right
turn signal or the hazard lights are
turned on. If one or both of the
indicators stay on continuously or
flash faster, check for a burned-out
turn signal bulb. Refer toExterior bulbsin theMaintenance and care
chapter.
High beams
Illuminates when the high beam
headlamps are turned on.
!
BRAKE
ABS
Instrumentation
10
Page 24 of 224
²the headlamp system is not turned on by another feature such as
using the headlamp control or Autolamp.
The Daytime Running Light (DRL) system will automatically illuminate
the tail lamps and parking lamps at dusk (when the headlamp control is
in the OFF position). Since the instrument panel will not be illuminated,
turn on the headlamps using the headlamp control.
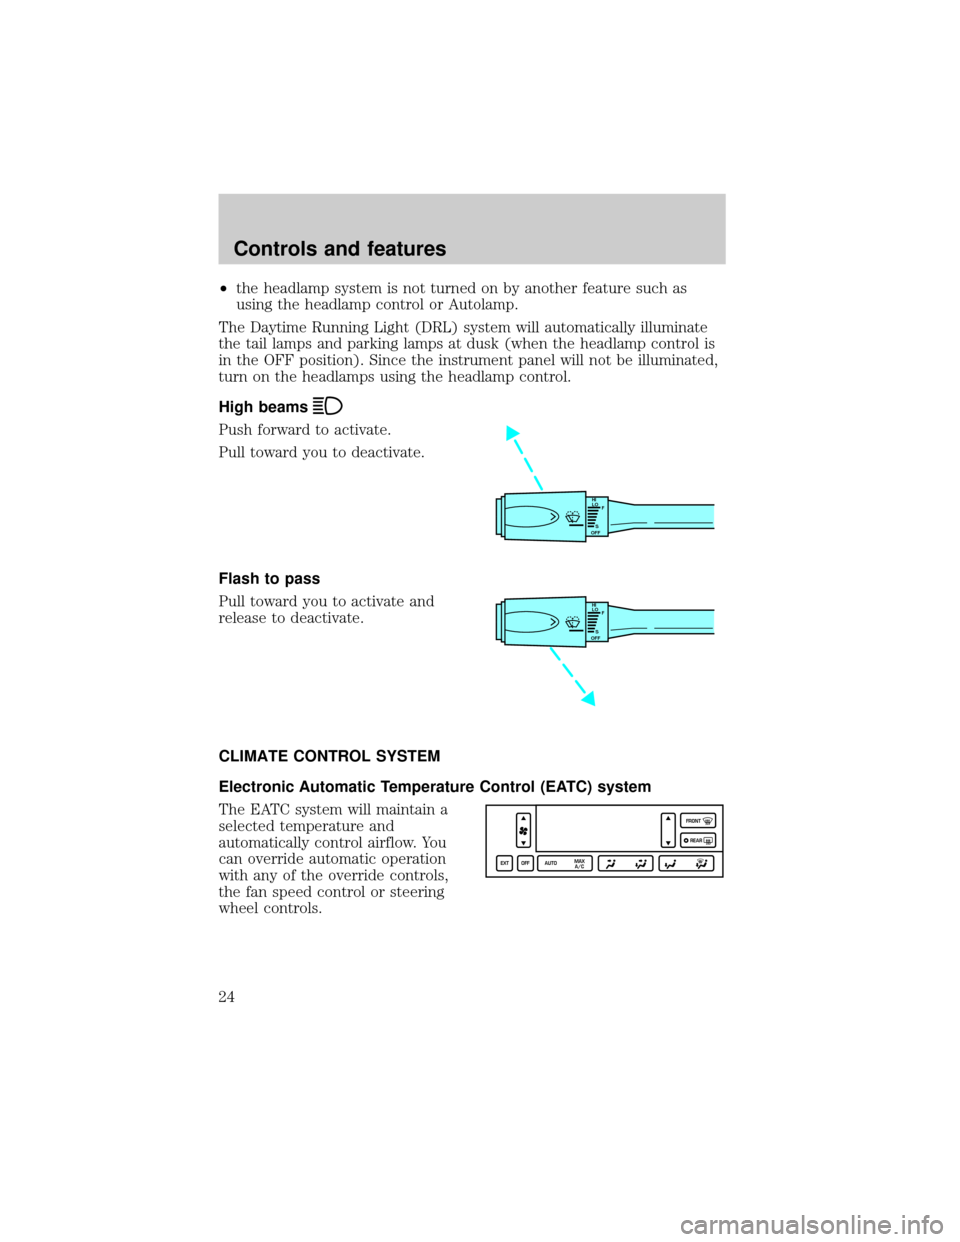
High beams
Push forward to activate.
Pull toward you to deactivate.
Flash to pass
Pull toward you to activate and
release to deactivate.
CLIMATE CONTROL SYSTEM
Electronic Automatic Temperature Control (EATC) system
The EATC system will maintain a
selected temperature and
automatically control airflow. You
can override automatic operation
with any of the override controls,
the fan speed control or steering
wheel controls.
HI
LO
F
S
OFF
HI
LO
F
S
OFF
EXT OFF AUTOMAX
A/CFRONT
REAR
Controls and features
24
Page 51 of 224
Radio power must be turned on to play the CDs in the changer. The
magazine may be stored in the glove compartment when not being used.
The CD magazine may be inserted or ejected with the radio power off.
Do not insert any promotional (odd shaped or sized) discs into
the CD changer as that jamming may occur.
Troubleshooting the CD changer (if equipped)
The laser beam used in the compact disc player is harmful to the
eyes. Do not attempt to disassemble the case.
If sound skips:
²You may be traveling on a rough road, playing badly scratched discs or
the disc may be dirty. Skipping will not scratch the discs or damage
the player.
If your changer does not work, it may be that:
²A disc is already loaded where you want to insert a disc.
²The disc is inserted with the label surface downward.
²The disc is dusty or defective.
²The player's internal temperature is above 60ÉC (140ÉF). Allow the
player to cool down before operating.
²A disc with format and dimensions not within industry standards is
inserted.
Cleaning compact discs
Inspect all discs for contamination before playing. If necessary, clean
discs only with an approved CD cleaner and wipe from the center out to
the edge. Do not use circular motion.
CD and CD changer care
²Handle discs by their edges only. Never touch the playing surface.
²Do not expose discs to direct sunlight or heat sources for extended
periods of time.
²Do not insert more than one disc into each slot of the CD changer
magazine.
Controls and features
51
Page 136 of 224
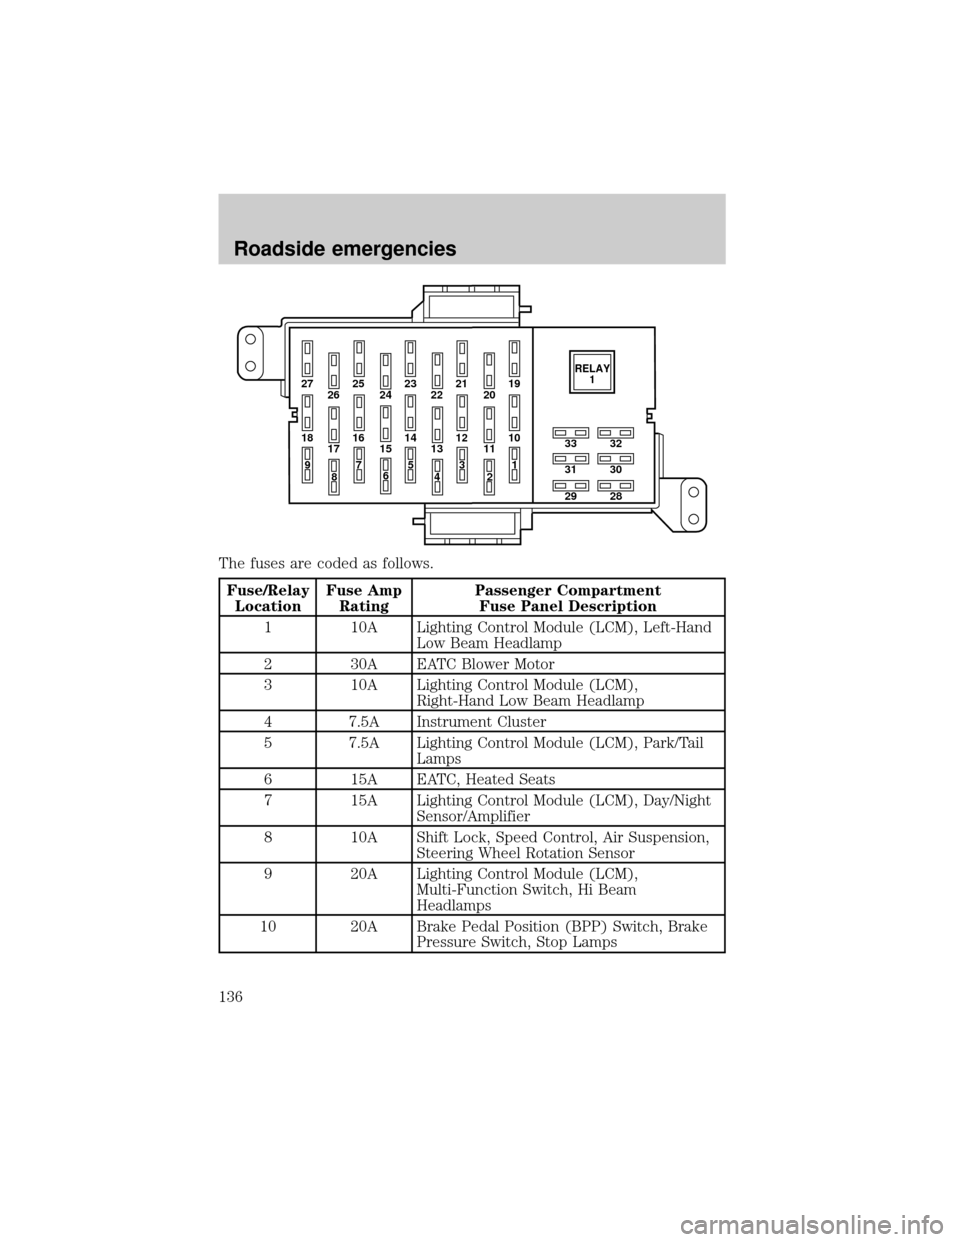
The fuses are coded as follows.
Fuse/Relay
LocationFuse Amp
RatingPassenger Compartment
Fuse Panel Description
1 10A Lighting Control Module (LCM), Left-Hand
Low Beam Headlamp
2 30A EATC Blower Motor
3 10A Lighting Control Module (LCM),
Right-Hand Low Beam Headlamp
4 7.5A Instrument Cluster
5 7.5A Lighting Control Module (LCM), Park/Tail
Lamps
6 15A EATC, Heated Seats
7 15A Lighting Control Module (LCM), Day/Night
Sensor/Amplifier
8 10A Shift Lock, Speed Control, Air Suspension,
Steering Wheel Rotation Sensor
9 20A Lighting Control Module (LCM),
Multi-Function Switch, Hi Beam
Headlamps
10 20A Brake Pedal Position (BPP) Switch, Brake
Pressure Switch, Stop Lamps
27 25
26 2423 21
2219
20
18 16
17 1514 12
1310
33
31
2932
30
28 11
97
8653
41
2RELAY
1
Roadside emergencies
136
Page 189 of 224
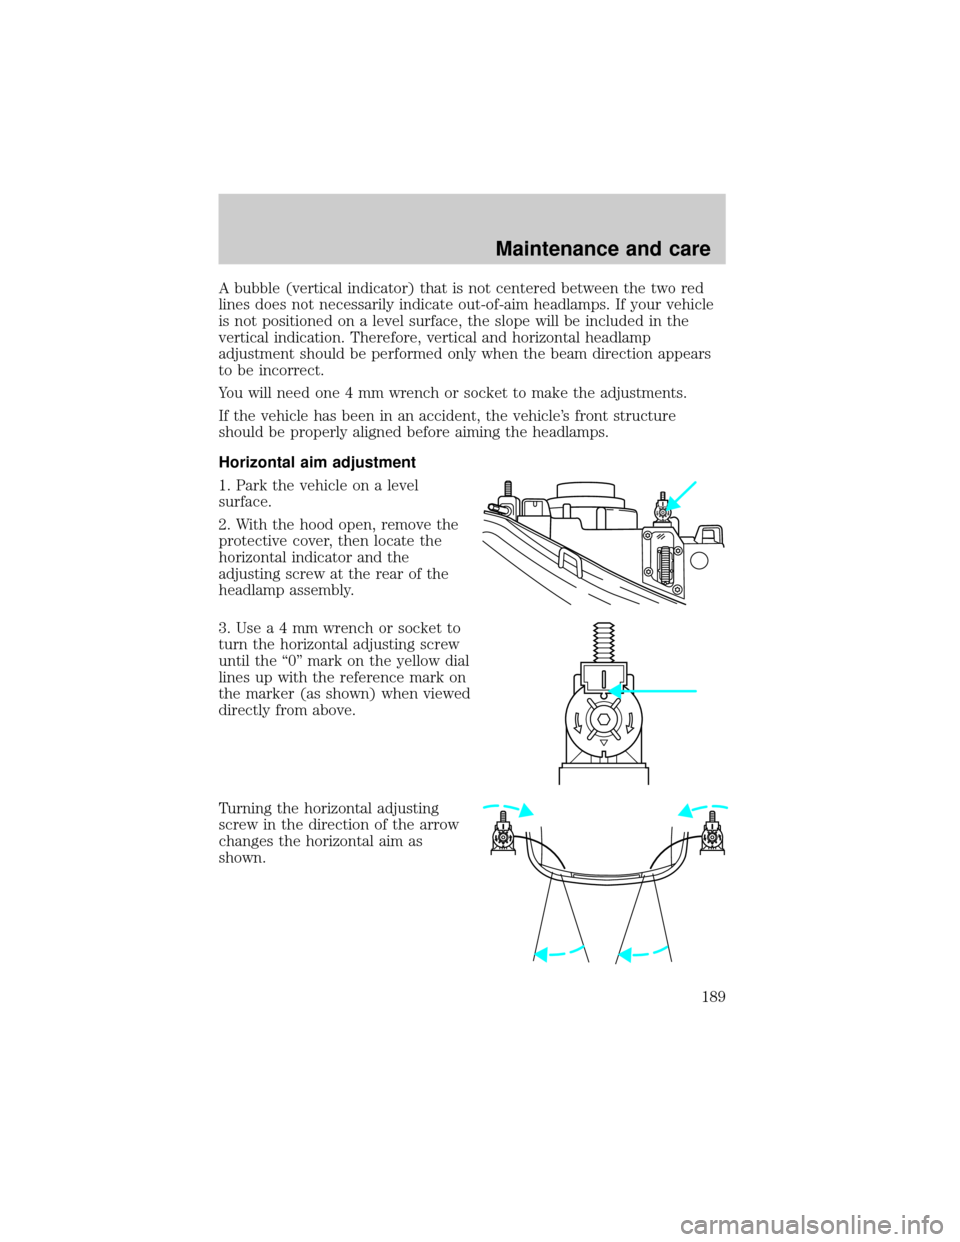
A bubble (vertical indicator) that is not centered between the two red
lines does not necessarily indicate out-of-aim headlamps. If your vehicle
is not positioned on a level surface, the slope will be included in the
vertical indication. Therefore, vertical and horizontal headlamp
adjustment should be performed only when the beam direction appears
to be incorrect.
You will need one 4 mm wrench or socket to make the adjustments.
If the vehicle has been in an accident, the vehicle's front structure
should be properly aligned before aiming the headlamps.
Horizontal aim adjustment
1. Park the vehicle on a level
surface.
2. With the hood open, remove the
protective cover, then locate the
horizontal indicator and the
adjusting screw at the rear of the
headlamp assembly.
3.Usea4mmwrench or socket to
turn the horizontal adjusting screw
until the ª0º mark on the yellow dial
lines up with the reference mark on
the marker (as shown) when viewed
directly from above.
Turning the horizontal adjusting
screw in the direction of the arrow
changes the horizontal aim as
shown.
Maintenance and care
189
Page 217 of 224

air bag ..........................................9
air suspension ...........................12
anti-lock brakes (ABS) .....10,119
brake ..........................................10
charging system ........................11
cruise indicator .........................13
door ajar ....................................12
high beam .................................10
liftgate ajar ................................12
low coolant ................................11
low washer fluid .......................14
oil pressure ...............................11
safety belt ...................................9
service engine soon ....................8
speed control ............................59
traction control system .......11,13
turn signal indicator .................10
Load limits .................................127
GAWR ......................................127
GVWR ......................................127
trailer towing ..........................127
Locks
autolock .....................................75
childproof ..................................69
doors ..........................................68
Lubricant specifications ....197,198
Lug nuts, anti-theft ...................144
Lumbar support, seats ...............87
Message center ...........................16
english/metric button ...............22
reset button ..............................18
Mirrors
automatic dimming
rearview mirror .........................65
cleaning ...................................192
heated ........................................69
programmable memory ............76
side view mirrors (power) .......68
Moon roof ....................................65
Motorcraft parts .................178,195
Octane rating ............................177
Odometer .....................................15Oil (see Engine oil) ..................153
Overdrive ..............................60,125
Panic alarm feature,
remote entry system ..................73
Parking brake ............................119
Parts (see Motorcraft parts) ....195
Power distribution box
(see Fuses) ...............................138
Power door locks ........................68
Power steering ..........................122
fluid, checking and adding ....163
fluid, refill capacity ................195
fluid, specifications ..........197,198
Radio ............................................30
Relays ........................................134
Remote entry system ............72,73
illuminated entry ......................75
locking/unlocking doors ...........72
opening the trunk .....................73
panic alarm ...............................73
replacement/additional
transmitters ...............................75
replacing the batteries .............74
Safety belts (see Safety
restraints) ................14,89,90,91,92
Safety defects, reporting ..........213
Safety restraints ...........89,90,91,92
belt minder ...............................94
cleaning the safety belts ...98,194
extension assembly ..................94
for adults .........................90,91,92
for children .............................106
lap belt ......................................93
warning light and chime ..9,14,94
Safety seats for children ..........107
Seat belts
(see Safety restraints) ...............89
Seats ............................................84
child safety seats ....................107
cleaning ...................................194
easy access/easyout feature ....88
heated ........................................86
Index
217