2000 LINCOLN TOWN CAR headlamp
[x] Cancel search: headlampPage 136 of 224
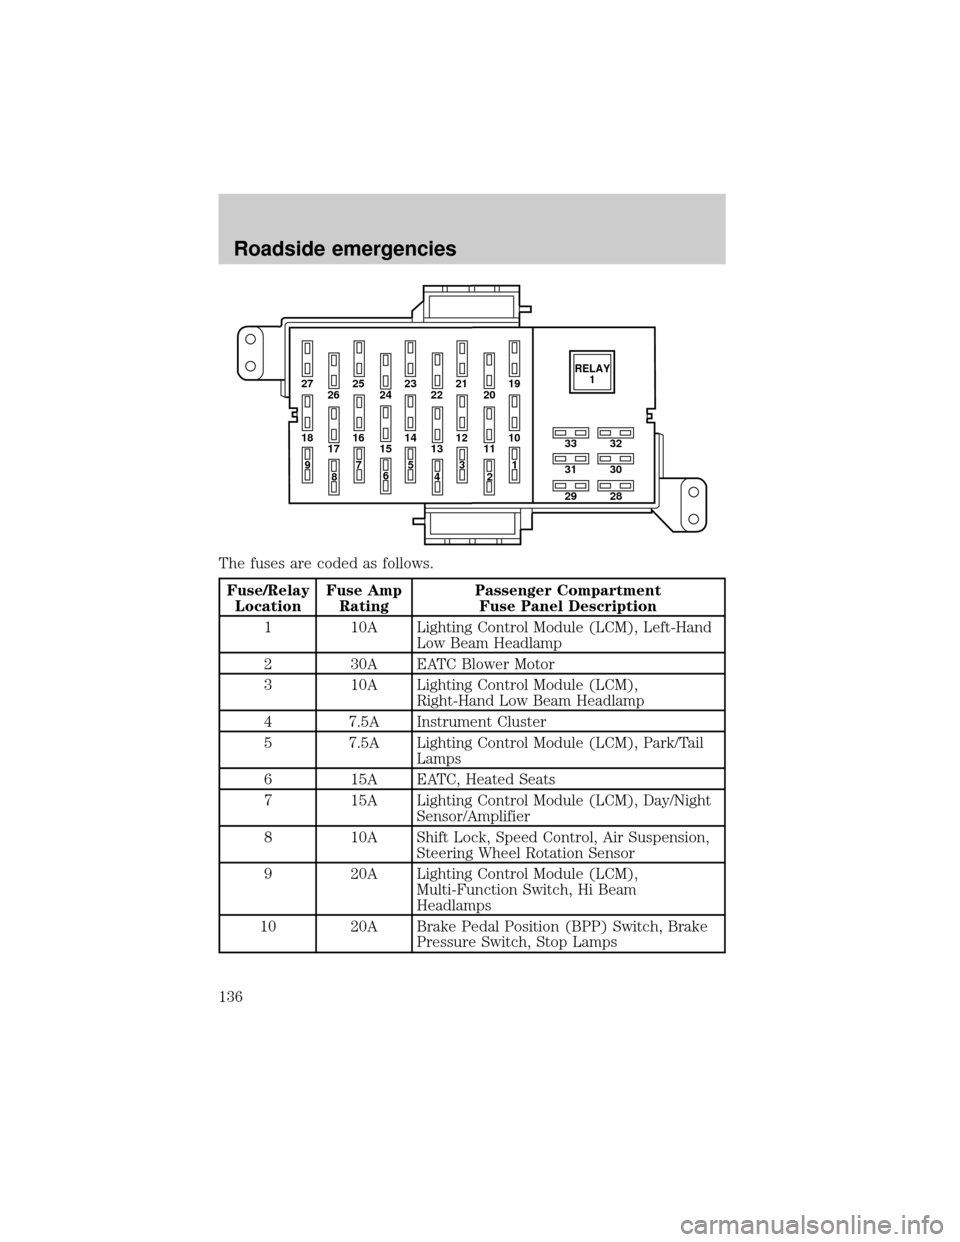
The fuses are coded as follows.
Fuse/Relay
LocationFuse Amp
RatingPassenger Compartment
Fuse Panel Description
1 10A Lighting Control Module (LCM), Left-Hand
Low Beam Headlamp
2 30A EATC Blower Motor
3 10A Lighting Control Module (LCM),
Right-Hand Low Beam Headlamp
4 7.5A Instrument Cluster
5 7.5A Lighting Control Module (LCM), Park/Tail
Lamps
6 15A EATC, Heated Seats
7 15A Lighting Control Module (LCM), Day/Night
Sensor/Amplifier
8 10A Shift Lock, Speed Control, Air Suspension,
Steering Wheel Rotation Sensor
9 20A Lighting Control Module (LCM),
Multi-Function Switch, Hi Beam
Headlamps
10 20A Brake Pedal Position (BPP) Switch, Brake
Pressure Switch, Stop Lamps
27 25
26 2423 21
2219
20
18 16
17 1514 12
1310
33
31
2932
30
28 11
97
8653
41
2RELAY
1
Roadside emergencies
136
Page 184 of 224
BULBS
Replacing exterior bulbs
Check the operation of the following lamps frequently:
²Headlamps
²Tail lamps
²Brakelamps
²High-mount brakelamp
²Turn signals
²Backup lamps
²License plate lamp
Do not remove lamp bulbs unless they will be replaced immediately. If a
bulb is removed for an extended period of time, contaminants may enter
the lamp housings and affect performance.
Replacing headlamp bulbs
To remove the headlamp bulb:
1. Make sure headlamp switch is in OFF position.
2. Open the hood.
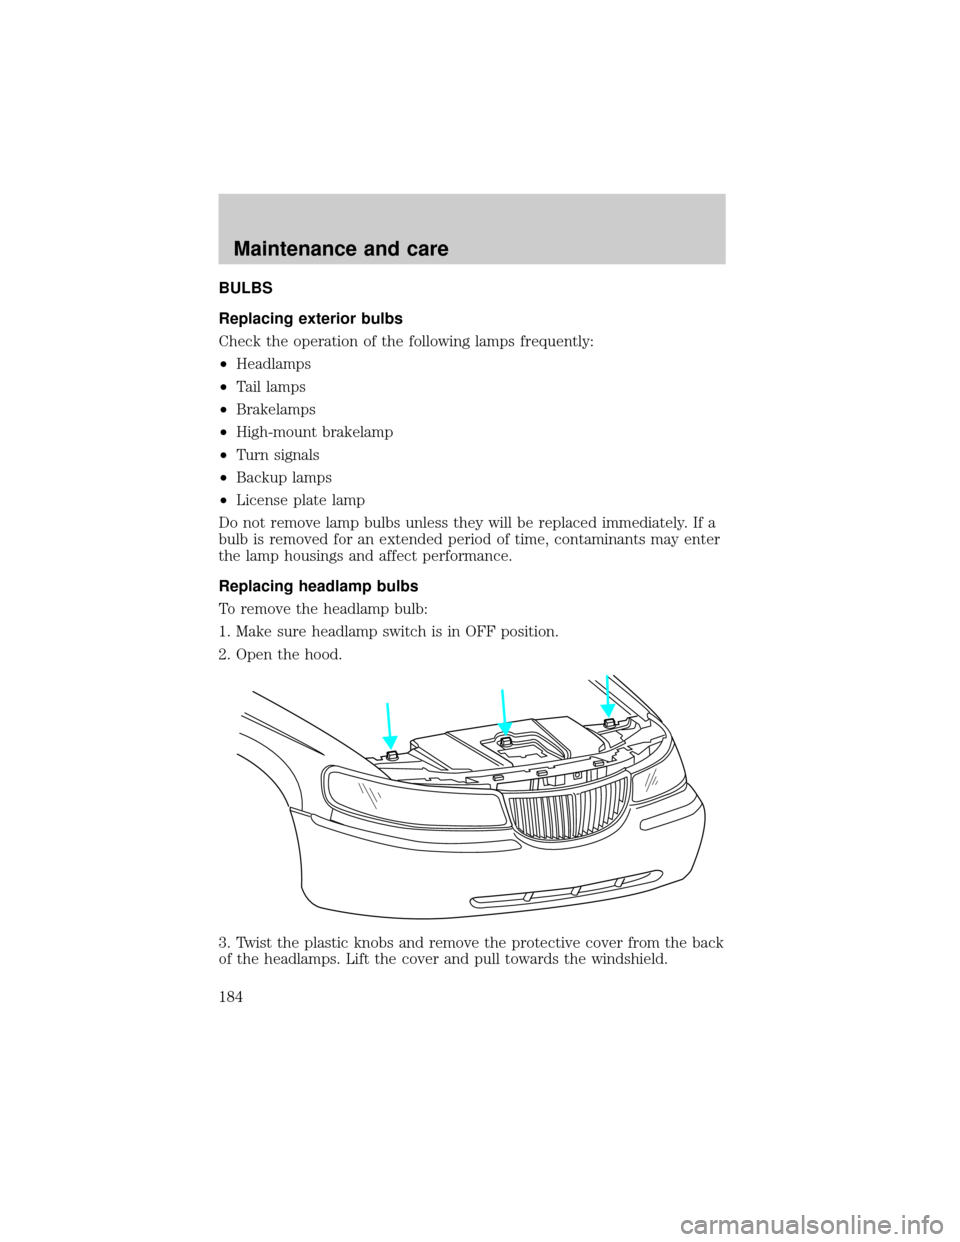
3. Twist the plastic knobs and remove the protective cover from the back
of the headlamps. Lift the cover and pull towards the windshield.
Maintenance and care
184
Page 185 of 224
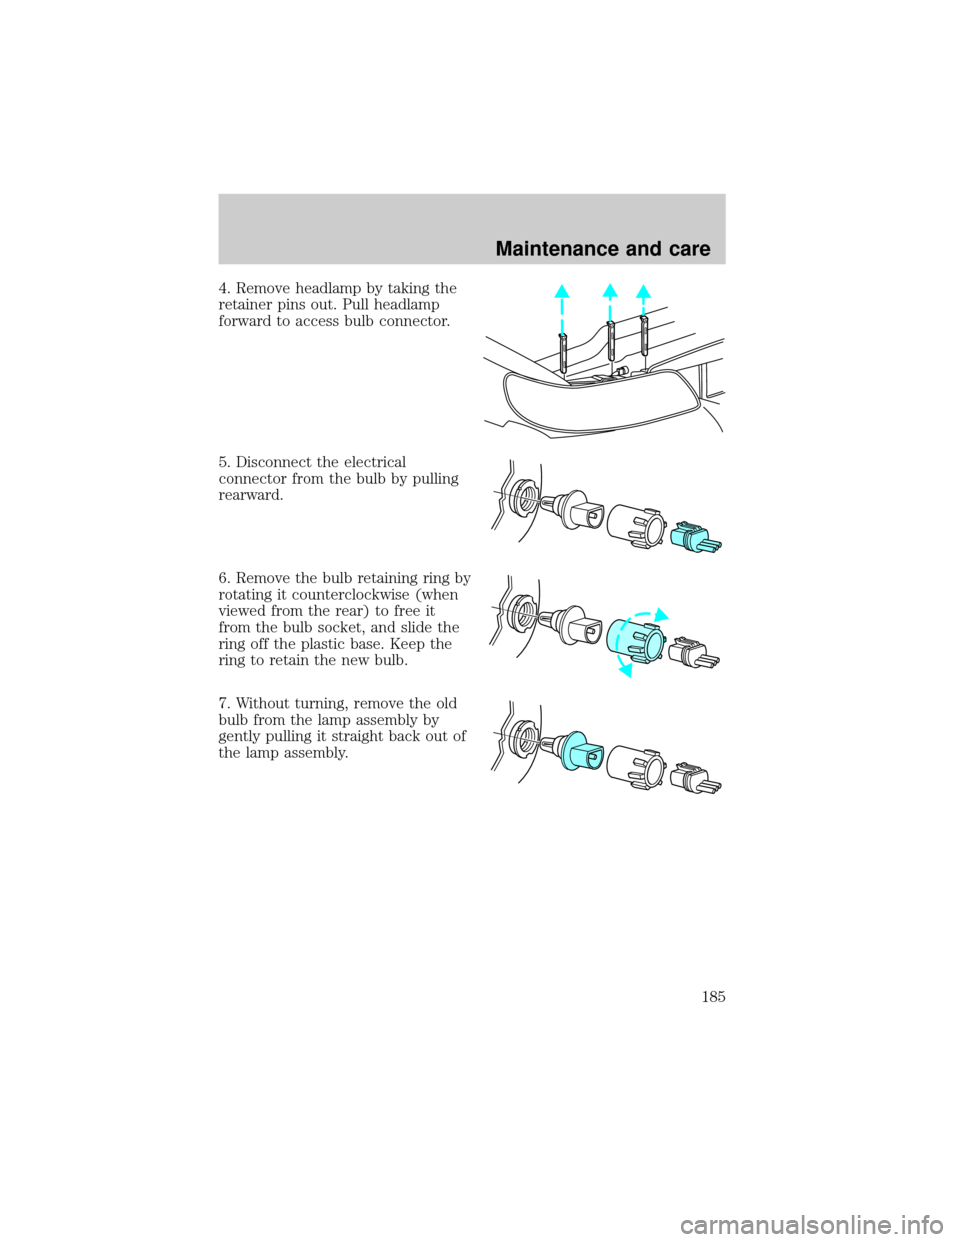
4. Remove headlamp by taking the
retainer pins out. Pull headlamp
forward to access bulb connector.
5. Disconnect the electrical
connector from the bulb by pulling
rearward.
6. Remove the bulb retaining ring by
rotating it counterclockwise (when
viewed from the rear) to free it
from the bulb socket, and slide the
ring off the plastic base. Keep the
ring to retain the new bulb.
7. Without turning, remove the old
bulb from the lamp assembly by
gently pulling it straight back out of
the lamp assembly.
Maintenance and care
185
Page 186 of 224
To install the new bulb:
Handle a halogen headlamp bulb carefully and keep out of
children's reach. Grasp the bulb only by its plastic base and do
not touch the glass. The oil from your hand could cause the bulb to
break the next time the headlamps are operated.
1. Insert the glass end of the new bulb into the lamp assembly. Turn the
bulb left or right to align the grooves in the plastic base with the tabs in
the lamp assembly. When the grooves are aligned, push the bulb into the
lamp assembly until the plastic base contacts the rear of the lamp
assembly.
2. Install the bulb retaining ring over the plastic base until it contacts the
rear of the socket by rotating it clockwise until you feel a ªstop.º
3. Connect the electrical connector into the rear of the plastic base until
it snaps, locking it into position.
4. Turn the headlamps on and make sure they work properly. If the
headlamp was correctly aligned before you changed the bulb, you should
not need to align it again.
5. Carefully insert the headlamp assembly into the vehicle making sure
the retainer pins are inserted into the proper holes and into the guides.
6. Install protective cover on vehicle locking it in place with knobs.
Replacing front parking lamp/turn signal lamp bulbs
1. Make sure the headlamp control is in the OFF position.
2. Open the hood.
3. Twist the plastic knobs and remove the protective cover from the back
of the headlamps. Lift the cover and pull towards the windshield.
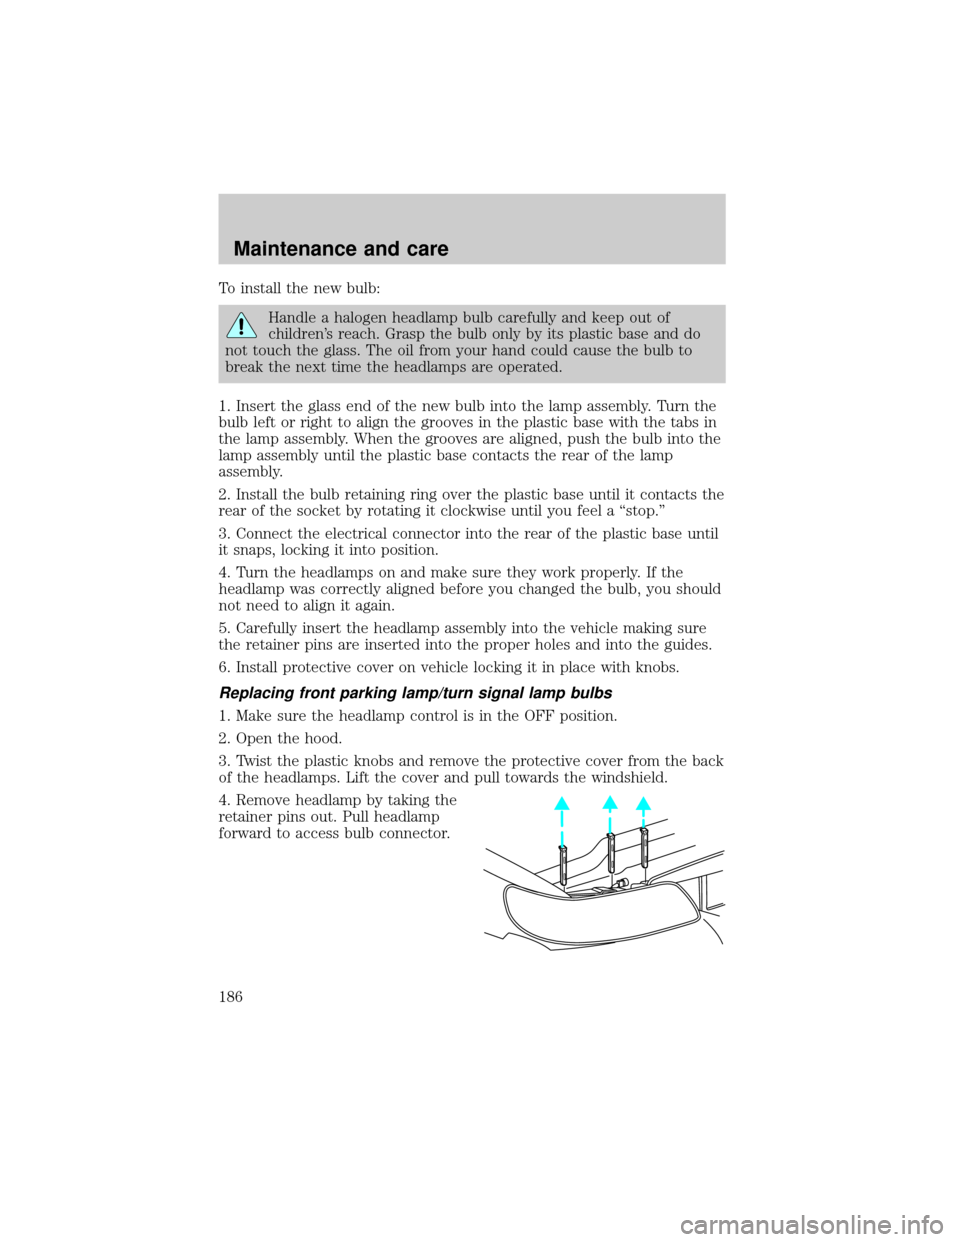
4. Remove headlamp by taking the
retainer pins out. Pull headlamp
forward to access bulb connector.
Maintenance and care
186
Page 188 of 224
Replacing the interior bulbs
Check the operation of the following interior bulbs frequently:
²interior overhead lamp
²map lamp
For bulb replacement, see a dealer or qualified technician.
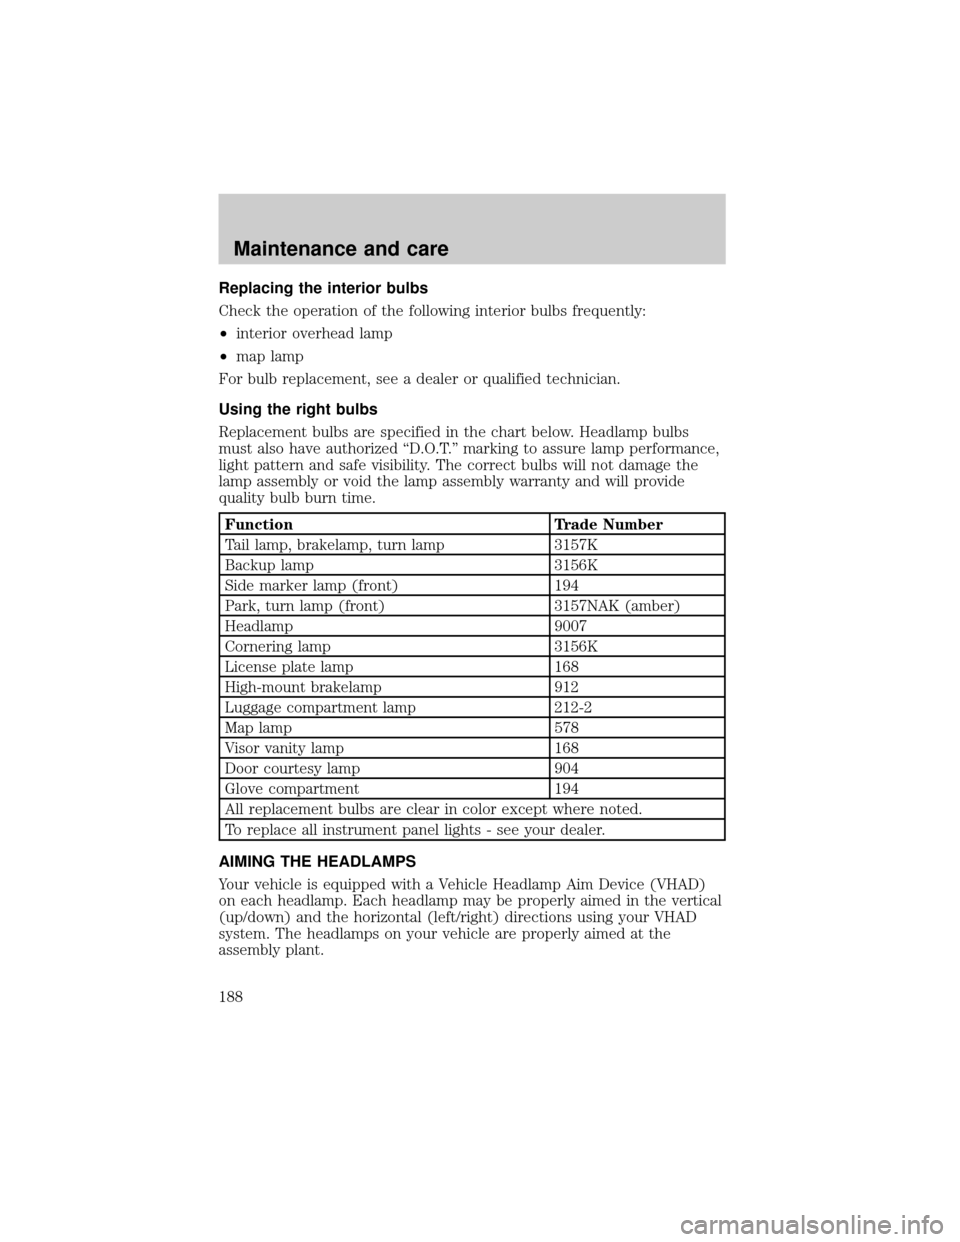
Using the right bulbs
Replacement bulbs are specified in the chart below. Headlamp bulbs
must also have authorized ªD.O.T.º marking to assure lamp performance,
light pattern and safe visibility. The correct bulbs will not damage the
lamp assembly or void the lamp assembly warranty and will provide
quality bulb burn time.
Function Trade Number
Tail lamp, brakelamp, turn lamp 3157K
Backup lamp 3156K
Side marker lamp (front) 194
Park, turn lamp (front) 3157NAK (amber)
Headlamp 9007
Cornering lamp 3156K
License plate lamp 168
High-mount brakelamp 912
Luggage compartment lamp 212-2
Map lamp 578
Visor vanity lamp 168
Door courtesy lamp 904
Glove compartment 194
All replacement bulbs are clear in color except where noted.
To replace all instrument panel lights - see your dealer.
AIMING THE HEADLAMPS
Your vehicle is equipped with a Vehicle Headlamp Aim Device (VHAD)
on each headlamp. Each headlamp may be properly aimed in the vertical
(up/down) and the horizontal (left/right) directions using your VHAD
system. The headlamps on your vehicle are properly aimed at the
assembly plant.
Maintenance and care
188
Page 189 of 224
A bubble (vertical indicator) that is not centered between the two red
lines does not necessarily indicate out-of-aim headlamps. If your vehicle
is not positioned on a level surface, the slope will be included in the
vertical indication. Therefore, vertical and horizontal headlamp
adjustment should be performed only when the beam direction appears
to be incorrect.
You will need one 4 mm wrench or socket to make the adjustments.
If the vehicle has been in an accident, the vehicle's front structure
should be properly aligned before aiming the headlamps.
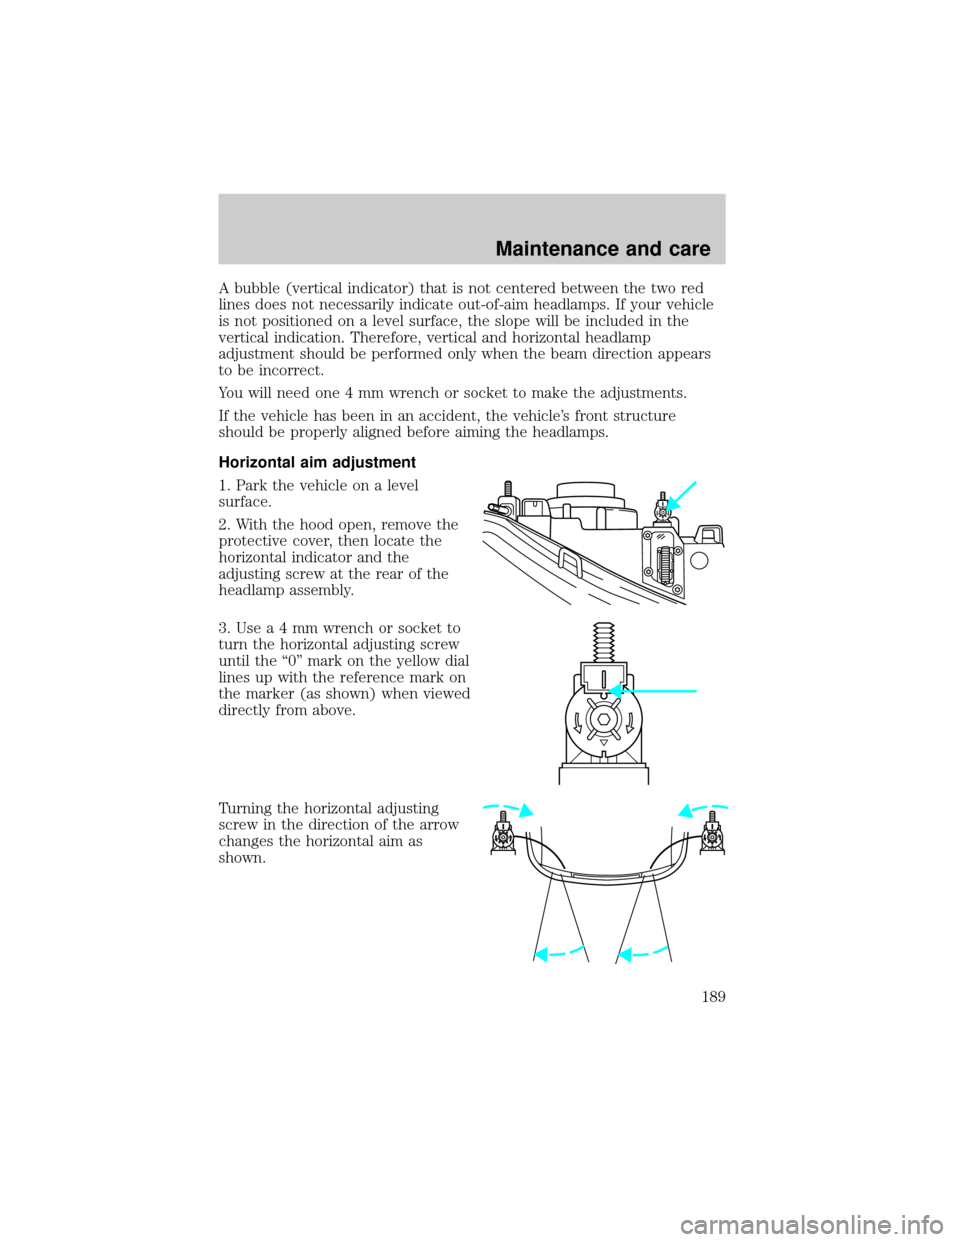
Horizontal aim adjustment
1. Park the vehicle on a level
surface.
2. With the hood open, remove the
protective cover, then locate the
horizontal indicator and the
adjusting screw at the rear of the
headlamp assembly.
3.Usea4mmwrench or socket to
turn the horizontal adjusting screw
until the ª0º mark on the yellow dial
lines up with the reference mark on
the marker (as shown) when viewed
directly from above.
Turning the horizontal adjusting
screw in the direction of the arrow
changes the horizontal aim as
shown.
Maintenance and care
189
Page 190 of 224
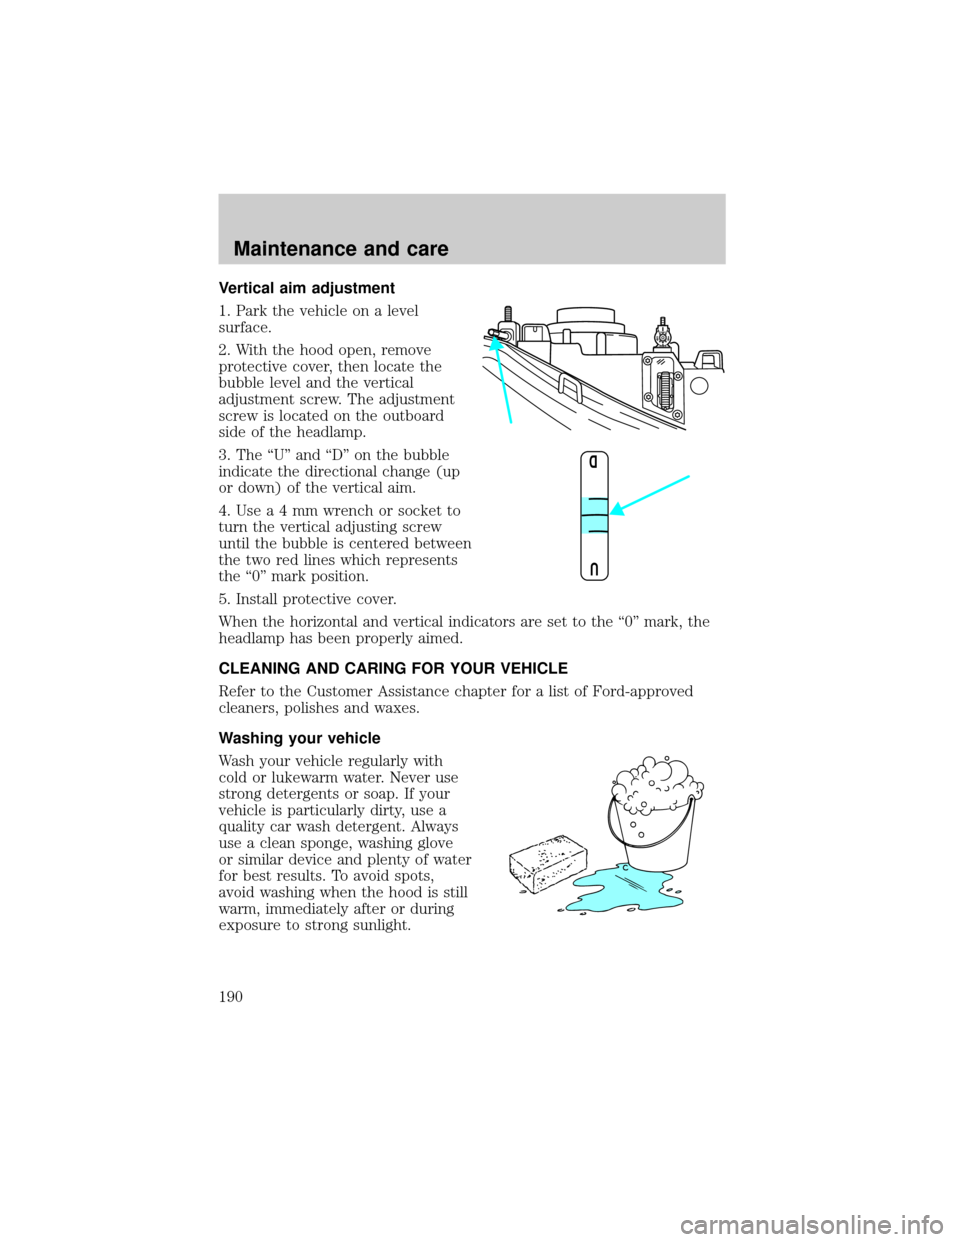
Vertical aim adjustment
1. Park the vehicle on a level
surface.
2. With the hood open, remove
protective cover, then locate the
bubble level and the vertical
adjustment screw. The adjustment
screw is located on the outboard
side of the headlamp.
3. The ªUº and ªDº on the bubble
indicate the directional change (up
or down) of the vertical aim.
4.Usea4mmwrench or socket to
turn the vertical adjusting screw
until the bubble is centered between
the two red lines which represents
the ª0º mark position.
5. Install protective cover.
When the horizontal and vertical indicators are set to the ª0º mark, the
headlamp has been properly aimed.
CLEANING AND CARING FOR YOUR VEHICLE
Refer to the Customer Assistance chapter for a list of Ford-approved
cleaners, polishes and waxes.
Washing your vehicle
Wash your vehicle regularly with
cold or lukewarm water. Never use
strong detergents or soap. If your
vehicle is particularly dirty, use a
quality car wash detergent. Always
use a clean sponge, washing glove
or similar device and plenty of water
for best results. To avoid spots,
avoid washing when the hood is still
warm, immediately after or during
exposure to strong sunlight.
D U
Maintenance and care
190
Page 216 of 224
filter, specifications .........178,195
fuel filler door override ............67
fuel filler door release ..............66
fuel pump shut-off switch .....133
gauge .........................................15
improving fuel economy ........179
octane rating ....................177,198
quality ......................................177
running out of fuel .................178
safety information relating
to automotive fuels ................174
Fuses ...................................134,135
Garage door opener ....................61
Gas cap (see Fuel cap) ............176
Gas mileage
(see Fuel economy) .................179
Gauges .........................................15
engine coolant
temperature gauge ...................16
fuel gauge ..................................15
odometer ...................................15
speedometer .............................16
GAWR
(Gross Axle Weight Rating) .....127
definition .................................127
driving with a heavy load ......127
location ....................................127
GVWR (Gross Vehicle
Weight Rating) ..........................127
calculating ...............................127
definition .................................127
driving with a heavy load ......127
location ....................................127
Hazard flashers .........................133
Head restraints ...........................84
Headlamps ...................................23
aiming ........................188,189,190
autolamp system .......................23
bulb specifications ..................188
daytime running lights .............23
flash to pass ..............................24
high beam ............................10,24replacing bulbs .......................184
turning on and off ....................23
warning chime ..........................14
Heating ........................................24
HomeLink universal
transceiver (see
Garage door opener) ...61,62,63,64
Hood ..........................................151
Ignition .......................................198
positions of the ignition ...........54
Infant seats
(see Safety seats) .....................107
Inspection/maintenance
(I/M) testing ..............................183
Instrument panel
cleaning ...................................193
cluster ..........................................8
lighting up
panel and interior .....................23
location of components ..............8
Jump-starting your vehicle ......144
Keyless entry system .................77
autolock .....................................75
keypad .......................................77
programming entry code .........78
Keys .............................................55
key in ignition chime ...............14
positions of the ignition ...........54
Lamps
autolamp system .......................23
bulb replacement
specifications chart ................188
cargo lamps ...............................23
daytime running light ...............23
headlamps .................................23
headlamps, flash to pass ..........24
instrument panel, dimming .....23
interior lamps ....................65,188
replacing bulbs .........184,186,187
Lane change indicator
(see Turn signal) ........................55
Lights, warning and indicator ......8
Index
216