2000 LINCOLN LS ignition
[x] Cancel search: ignitionPage 109 of 272

Procedure to program spare SecuriLockYkeys to your vehicle
New SecuriLockykeys must have the correct mechanical key cut for
your vehicle.
Conventional (non-SecuriLocky) keyscannotbe programmed to your
vehicle.
The correct type of SecuriLockykey for your vehicle is identifiable by
the alphanumeric characters stamped on the key blade. The
SecuriLockykey identification for your vehicle is: one letter of the
English alphabet followed by the number ª1º (for example, ªS1º or ªI1º
on the key blade indicate you have the correct type of SecuriLocky
key). If the SecuriLockykey does not have this information stamped on
the key blade, the key will not operate your vehicle.
You will need to have two previously programmed SecuriLockykeys and
the new unprogrammed SecuriLockykey readily accessible for timely
implementation of each step in the procedure. Please read and
understand the entire procedure before you begin.
1. Insert the first previously programmed SecuriLockykey into the
ignition and turn the ignition from OFF to RUN (maintain ignition in
RUN for at least one second).
2. Turn ignition to OFF and remove the first SecuriLockykey from the
ignition.
3. Within five seconds of turning the ignition to OFF, insert the second
previously programmed SecuriLockykey into the ignition and turn the
ignition from OFF to RUN (maintain ignition in RUN for at least one
second but no more than five seconds).
4. Turn the ignition to OFF and remove the second SecuriLockykey
from the ignition.
5. Within 10 seconds of turning the ignition to OFF, insert the
unprogrammed SecuriLockykey (new key/valet key) into the ignition
and turn the ignition from OFF to RUN (maintain ignition in RUN for at
least one second). This step will program your new SecuriLockykey.
6. To program additional SecuriLockykey(s), repeat this procedure from
step 1.
If the programming procedure was successful, the new SecuriLocky
key(s) will start the vehicle's engine. The theft indicator (located on the
instrument panel) will light for three seconds and then go out.
Controls and features
109
Page 114 of 272

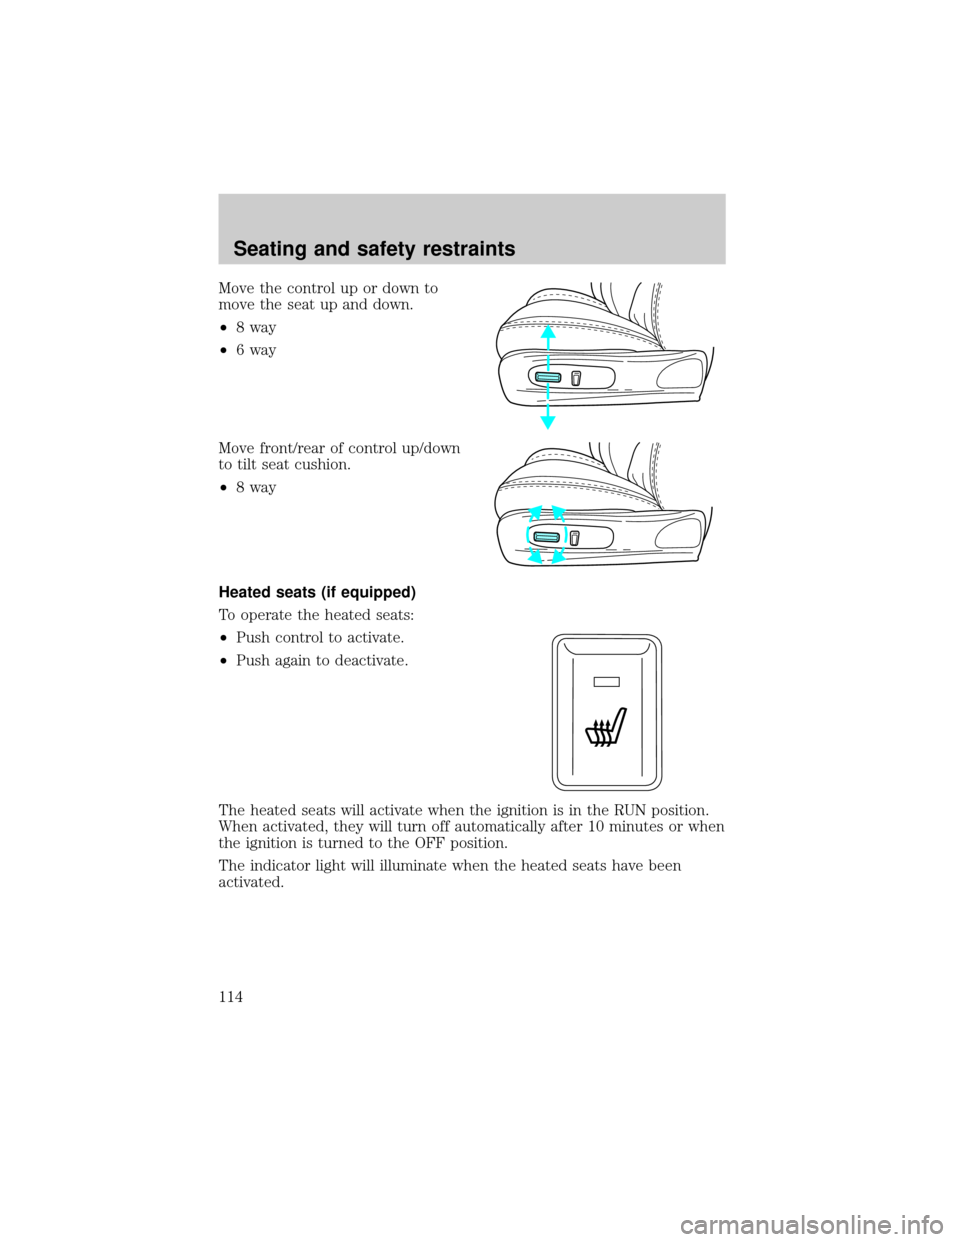
Move the control up or down to
move the seat up and down.
²8 way
²6 way
Move front/rear of control up/down
to tilt seat cushion.
²8 way
Heated seats (if equipped)
To operate the heated seats:
²Push control to activate.
²Push again to deactivate.
The heated seats will activate when the ignition is in the RUN position.
When activated, they will turn off automatically after 10 minutes or when
the ignition is turned to the OFF position.
The indicator light will illuminate when the heated seats have been
activated.
Seating and safety restraints
114
Page 115 of 272

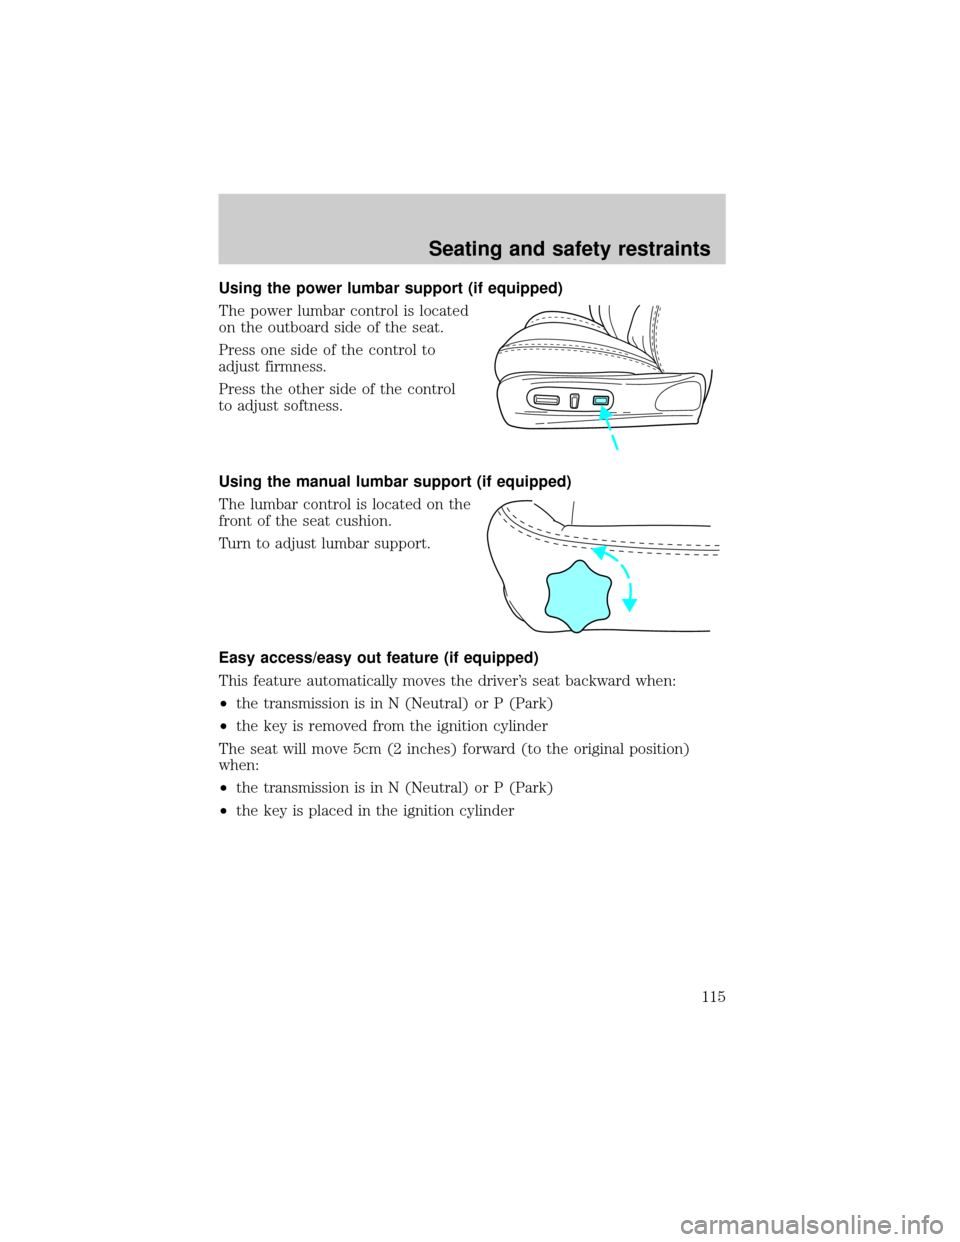
Using the power lumbar support (if equipped)
The power lumbar control is located
on the outboard side of the seat.
Press one side of the control to
adjust firmness.
Press the other side of the control
to adjust softness.
Using the manual lumbar support (if equipped)
The lumbar control is located on the
front of the seat cushion.
Turn to adjust lumbar support.
Easy access/easy out feature (if equipped)
This feature automatically moves the driver's seat backward when:
²the transmission is in N (Neutral) or P (Park)
²the key is removed from the ignition cylinder
The seat will move 5cm (2 inches) forward (to the original position)
when:
²the transmission is in N (Neutral) or P (Park)
²the key is placed in the ignition cylinder
Seating and safety restraints
115
Page 124 of 272

Safety belt warning light and indicator chime
The seat belt warning light illuminates in the instrument cluster and a
chime sounds to remind the occupants to fasten their safety belts.
Conditions of operation
If... Then...
The driver's safety belt is not
buckled before the ignition switch
is turned to the RUN position...The safety belt warning light
illuminate1-2 minutes and the
warning chime sound 4-8 seconds.
The driver's safety belt is buckled
while the indicator light is
illuminated and the warning chime
is sounding...The safety belt warning light and
warning chime turn off.
The driver's safety belt is buckled
before the ignition switch is turned
to the RUN position...The safety belt warning light and
indicator chime remain off.
Belt minder (if equipped)
The Belt Minder feature is a supplemental warning to the safety belt
warning function. This feature provides additional reminders to the
driver that the driver's safety belt is unbuckled by intermittently
sounding a chime and illuminating the safety belt warning lamp in the
instrument cluster.
If... Then...
The driver's safety belt is not
buckled before the vehicle has
reached at least 5 km/h (3 mph)
and 1-2 minutes have elapsed
since the ignition switch has been
turned to ON...The Belt Minder feature is
activated - the safety belt warning
light illuminates and the warning
chime sounds for 6 seconds every
30 seconds, repeating for
approximately 5 minutes or until
safety belt is buckled.
The driver's safety belt is buckled
while the safety belt indicator light
is illuminated and the safety belt
warning chime is sounding...The Belt Minder feature will not
activate.
The driver's safety belt is buckled
before the ignition switch is turned
to the ON position...The Belt Minder feature will not
activate.
Seating and safety restraints
124
Page 126 of 272

Do not sit on top of a buckled safety belt to avoid the Belt
Minder chime. Sitting on the safety belt will increase risk of
injury in an accident. To disable (one time) or deactivate the Belt
Minder feature please follow the directions stated below.
One time disable
Anytime the safety belt is buckled and then unbuckled during an ignition
ON cycle, Belt Minder will be disabled for that ignition cycle only.
Deactivating/activating the belt minder feature
Read steps1-9thoroughly before proceeding with the
deactivation/activation programming procedure.
The Belt Minder feature can be deactivated/activated by performing the
following procedure:
Before following the procedure, make sure that:
²the parking brake is set
²the gearshift is in P (Park) (automatic transmission) or the neutral
position (manual transmission).
²the ignition switch is in the OFF position
²all vehicle doors are closed
²the driver's safety belt is unbuckled
²the parklamps/headlamps are in OFF position (If vehicle is equipped
with Autolamps, this will not affect the procedure.)
To reduce the risk of injury, do not deactivate/activate the Belt
Minder feature while driving the vehicle.
1. Turn the ignition switch to the RUN (or ON) position. (DO NOT
START THE ENGINE)
2. Wait until the safety belt warning light turns off. (Approximately 1±2
minutes)
²Steps 3±5 must be completed within 60 seconds or the procedure will
have to be repeated.
3. Buckle then unbuckle the safety belt three times, ending with the
safety belt unbuckled. This can be done before or during Belt Minder
warning activation.
Seating and safety restraints
126
Page 132 of 272

properly restrained as far away from the air bag module as possible while
maintaining vehicle control.
Several air bag system components get hot after inflation. Do not
touch them after inflation.
If the air bag is inflated,the air bag will not function again
and must be replaced immediately.If the air bag is not
replaced, the unrepaired area will increase the risk of injury in a
collision.
The SRS consists of:
²driver and passenger air bag modules (which include the inflators and
air bags).
²side air bags (if equipped). Refer toSide air bag systemlater in this
chapter.
²safety belt pretensioners.
²one or more impact and safing sensors.
²a readiness light and tone.
²and the electrical wiring which connects the components.
The diagnostic module monitors its own internal circuits and the
supplemental air bag electrical system warning (including the impact
sensors), the system wiring, the air bag system readiness light, the air
bag back up power, the air bag ignitors and safety belt pretensioners.
Determining if the system is operational
The SRS uses a readiness light in the instrument cluster or a tone to
indicate the condition of the system. Refer to theAir bag readiness
section in theInstrumentationchapter. Routine maintenance of the air
bag is not required.
A difficulty with the system is indicated by one or more of the following:
²The readiness light will either
flash or stay lit.
²The readiness light will not
illuminate immediately after
ignition is turned to the RUN
position.
Seating and safety restraints
132
Page 135 of 272

Several air bag system
components get hot after
inflation. Do not touch them after
inflation.
If the side air bag has
deployed,the air bag will
not function again. The side
air bag system (including the
seat) must be inspected and
serviced by a qualified
technician in accordance with
the vehicle service manual.If
the air bag is not replaced, the
unrepaired area will increase the
risk of injury in a collision.
Determining if the system is operational
The SRS uses a readiness light in the instrument cluster or a tone to
indicate the condition of the system. Refer to theAir bag readiness
section in theInstrumentationchapter. Routine maintenance of the air
bag is not required.
A difficulty with the system is indicated by one or more of the following:
²The readiness light (same light as used for front air bag system) will
either flash or stay lit.
²The readiness light will not illuminate immediately after ignition is
turned to the RUN position.
²A series of five beeps will be heard. The tone pattern will repeat
periodically until the problem and light are repaired.
If any of these things happen, even intermittently, have the SRS serviced
at your dealership or by a qualified technician immediately. Unless
serviced, the system may not function properly in the event of a
collision.
Seating and safety restraints
135
Page 150 of 272

ABS warning lampABS
TheABSwarning lamp in the instrument cluster momentarily illuminates
when the ignition is turned to the RUN position. If the light does not
illuminate momentarily at start up, remains on or continues to flash, the
ABS needs to be serviced.
With the ABS light on, the anti-lock
brake system is disabled and normal
braking is still effective unless the
brake warning light also remains
illuminated with parking brake
released. (If your brake warning lamp illuminates, have your vehicle
serviced immediately.)
Using ABS
²In an emergency or when maximum efficiency from the ABS is
required, apply continuous force on the brake. The ABS will be
activated immediately, thus allowing you to retain full steering control
of your vehicle and, providing there is sufficient space, will enable you
to avoid obstacles and bring the vehicle to a controlled stop.
²The Anti-Lock system does not decrease the time necessary to apply
the brakes or always reduce stopping distance. Always leave enough
room between your vehicle and the vehicle in front of you to stop.
²We recommend that you familiarize yourself with this braking
technique. However, avoid taking any unnecessary risks.
Parking brake
Apply the parking brake whenever
the vehicle is parked. To set the
parking brake, apply the brake pedal
and pull the handle up as far as
possible.
The BRAKE warning lamp in the
instrument cluster illuminates and
remains illuminated (when the
ignition is turned to to the RUN
position) until the parking brake is
released.
P!
BRAKE
P!
BRAKE
Driving
150