Page 79 of 502
GAUGES, METERS AND SERVICE REMINDER INDICATORS
62This meter displays the odometer and two trip
meters. To change the mode indication, push the
ºODO/TRIPº button.
The odometer records the total distance the vehicle
has been driven. The twin trip meter records two
different distances independently.
For example, you can use one meter to calculate the fuel
economy
and the other to measure the distance on each
trip.
To change the trip meter indication from one trip to
the other, push the ºODO/TRIPº button. To set the
A trip meter to zero, display the A meter reading,
then push the ºRESETº button. The same applies
for the B trip meter.
The data of trip meters will be cancelled if the electrical
power source is disconnected.
SERVICE REMINDER
INDICATORS AND WARNING BUZZERS
Page 115 of 502
 INTERIOR EQUIPMENT
98Do not use the HomeLink
� universal transmitter with
any garage door opener that lacks the safety stop and
reverse feature as required by Federal Safety
Standards. This includes")
INTERIOR EQUIPMENT
98Do not use the HomeLink
� universal transmitter with
any garage door opener that lacks the safety stop and
reverse feature as required by Federal Safety
Standards. This includes any garage door opener
model manufactured before April 1, 1982.
CAUTION
When programming or operating the garage door
opener, make sure there is no one around the moving
door. It is dangerous if someone is caught.
(b) Operating the garage door opener
Push the appropriate button to activate the garage door
opener. The indicator light comes on. The garage door
opener continues to send the signal for up to 20 seconds
as long as the button is pushed.
(c) Erasing the garage door opener memory
Push and hold down the 2 outside buttons for about 20
seconds until the indicator light flashes. All memorized
data will be erased. FCC ID: CB2V94800
CANADA: 1763 102 264
This device complies with FCC Rules Part 15.
Operation is subject to the following two
conditions: (1) This device may not cause
harmful interference, and (2) this device must
accept any interference that may be received,
including interference that may cause undesired
operation. WARNING: This transmitter has
been tested and complies with FCC and
DOC/MDC rules. Changes or modifications
not expressly approved by the party
responsible for compliance could void the
user's authority to operate the device.
Page 159 of 502
COMFORT ADJUSTMENT
142Adjust the m
irror so that you can just see the rear of
your vehicle in the mirror.
Pushing the switch changes the mode between
ºAUTOº and ºDAYº.
The indicator comes on when the ºAUTOº mode is
selected.
ºDAYº mode: The mirror surface is normal.
ºAUTOº mode: If the mirror detects light from the
headlights of the vehicle behind you, the mirror
surface darkens slightly to reduce the reflected
light.
When the inside rear view mirror surface changes, the
outside rear view mirror surfaces will also become
darker.
When the ignition key is inserted and turned on, the
inside rear view mirror always turns on in the ºAUTOº
mode. When the outside air temperature is low, it may take a
little longer for the mirror to darken in response to the
detection of headlights.
CAUTION
Do not adjust the mirror while the vehicle is moving. It
may cause the driver to mishandle the vehicle and an
accident may occur resulting in personal injuries.
Page 250 of 502
 AIR CONDITIONING
233
21L044
When you push either side of the ºTEMPº button several
times, the sensitivity changes from º+3º down to º±3º. If
you do not operate any button for a few seconds, t")
AIR CONDITIONING
233
21L044
When you push either side of the ºTEMPº button several
times, the sensitivity changes from º+3º down to º±3º. If
you do not operate any button for a few seconds, the
previous display returns.
If manual on±off of the air conditioning is desired ±
Push the ºA/Cº button to turn the air conditioning on and
push it again to turn the air conditioning off. If you turn
off the air conditioning manually, the EXHAUST GAS
AUTOMATIC mode will be cancelled.
If the outside temperature is lowered down to around
0 �C ( 3 2 �F), the air conditioning will turn off
automatically. At this time, the indicator on the A/C
button is off and the EXHAUST GAS AUTOMATIC
indicator light remains on. However, the EXHAUST
GAS AUTOMATIC mode does not operate. When the
air conditioning turns on as with the raised temperature,
the EXHAUST GAS AUTOMATIC mode resumes. If the system is used for ventilation, heating in dry
weather or removing frost or exterior fog on the
windshield, turn the air conditioning off once it is no
longer
required. This will improve fuel economy. The air
conditioning can be used for year±round automatic
temperature control including cooling and dehumidifying
operation.
If the air conditioning compressor does not operate, the
indicator of the ºA/Cº button will blink. If the indicator of
the ºA/Cº button blinks even when the ºA/Cº button is
pushed again, have the compressor checked by your
nearest Lexus dealer.
Page 254 of 502
 AIR CONDITIONING
237
(d) Operating tips
�Make sure the air inlet grilles in front of the windshield
are not blocked by leaves or other obstructions.
� If air flow control is not satisfactory, check t")
AIR CONDITIONING
237
(d) Operating tips
�Make sure the air inlet grilles in front of the windshield
are not blocked by leaves or other obstructions.
� If air flow control is not satisfactory, check the
dashboard vents. (See ºCenter ventsº, ºSide ventsº,
ºLower ventº and ºRear ventsº.)
� To help cool down the interior after parking in the hot
sun, drive for the first few minutes with the windows
open. After the excess heat has blown away, close
the windows.
� When driving on dusty roads, close all windows. If
dust thrown up by the vehicle is still drawn into the
vehicle after closing the windows, it is recommended
that the air intake control button be left to the
OUTSIDE AIR mode and the fan speed control button
be pressed to anywhere except the ºOFFº button.
� If following another vehicle on a dusty road, or driving
in windy and dusty conditions, it is recommended that
the air intake control button be temporarily pressed in
to the RECIRCULATED AIR mode, which will close
off the outside passage and prevent outside air and
dust from entering the vehicle interior.
Page 264 of 502
AUDIO
247
In the ºTAPEº or ºCDº mode, the applicable
functions
are shown in the lowest part of the display.
Push the switch just below to turn on each function.
(b) Tone and balance
How good an audio program sounds to you is largely
determined by the mix of the treble, mid±range, and
bass levels. In fact, different kinds of music and vocal
programs usually sound better with different mixes of
treble, mid±range, and bass.
A good balance of the left and right stereo channels and
of the front and rear sound levels is also important.
Keep in mind that if you are listening to a stereo
recording or broadcast, changing the right/left balance
will increase the volume of one group of sounds while
decreasing the volume of another.
20L044-2
Page 265 of 502
AUDIO
248ºBASSº knob: Use this knob to adjust low±pitched
tones.
ºMIDº
knob: Use this knob to adjust mid±pitched tones.
ºTREBLEº knob: Use this knob to adjust high±pitched
tones.
ºBALANCEº knob: Use this knob to adjust the sound
balance between the right and left speakers.
ºFADERº knob: Use this knob to adjust the sound
balance between the front and rear speakers. (c) Automatic sound levelizer (Except Nakamichi
model)
20L111
When
the audio sound becomes difficult to be heard due
to road noise, wind noise, etc. during driving, the system
adjusts to the optimum volume and tone quality
according to the noise level.
Page 274 of 502
AUDIO
257
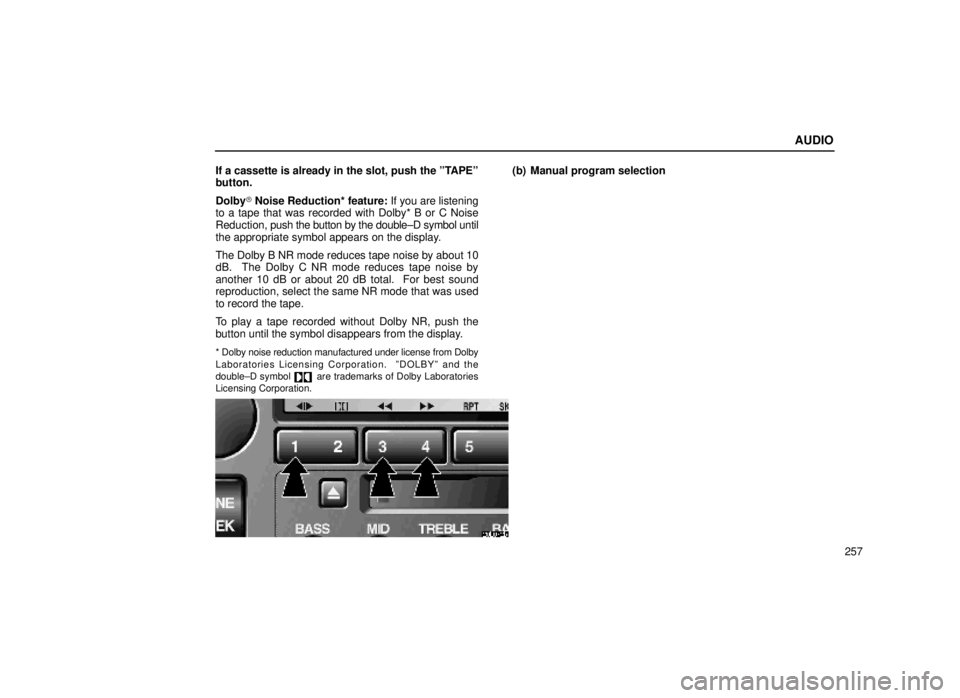
If a cassette is already in the slot, push the ºTAPEº
button.
Dolby�
Noise Reduction* feature: If you are listening
to a tape that was recorded with Dolby* B or C Noise
Reduction, push the button by the double±D symbol until
the appropriate symbol appears on the display.
The Dolby B NR mode reduces tape noise by about 10
dB. The Dolby C NR mode reduces tape noise by
another 10 dB or about 20 dB total. For best sound
reproduction, select the same NR mode that was used
to record the tape.
To play a tape recorded without Dolby NR, push the
button until the symbol disappears from the display.
* Dolby noise reduction manufactured under license from Dolby
Laboratories Licensing Corporation. ºDOLBYº and the
double±D symbol
are trademarks of Dolby Laboratories
Licensing Corporation.
(b) Manual program selection
20L072b
 GAUGES, METERS AND SERVICE REMINDER INDICATORS
62This meter displays the odometer and two trip
meters. To change the mode indication, push the
ºODO/TRIPº button.
The odometer records the total dist")
 COMFORT ADJUSTMENT
142Adjust the m
irror so that you can just see the rear of
your vehicle in the mirror.
Pushing the switch changes the mode between
ºAUTOº and ºDAYº.
The indicator comes on when")
 AUDIO
247
In the ºTAPEº or ºCDº mode, the applicable
functions
are shown in the lowest part of the display.
Push the switch just below to turn on each function.
(b) Tone and balance
How good an")
 AUDIO
248ºBASSº knob: Use this knob to adjust low±pitched
tones.
ºMIDº
knob: Use this knob to adjust mid±pitched tones.
ºTREBLEº knob: Use this knob to adjust high±pitched
tones.
ºBALAN")