2000 HONDA S2000 lock
[x] Cancel search: lockPage 205 of 273

Storing Your Car
If you need to park your car for an
extended period (more than one
month), there are several things you
should
do to prepare it for storage.
Proper preparation helps prevent
deterioration and makes it easier to
get your car back on the road.
If
possible, store your car indoors.
• Fill the fuel tank.
• Change the engine oil and filter
(see page 159).
• Wash and dry the exterior
completely.
• Clean the interior. Make sure the
carpeting, floor mats, etc. are
completely dry.
• Raise the convertible top cover.
• Leave the parking brake off. Put
the transmission in Reverse.
202 Maintenance
• Block the rear wheels.
• If the car is to be stored for a
longer period, it should be
supported on jackstands so the
tires are off the ground.
• Leave one window open slightly (if
the car is being stored indoors).
• Disconnect the battery.
• Support the front wiper blade
arms with a folded towel or rag so
they
do not touch the windshield.
• To minimize sticking, apply a
silicone spray lubricant to
all door
and trunk seals. Also, apply a
vehicle body wax to the painted
surfaces that mate with the door
and trunk seals.
• Cover the car with a "breathable"
cover, one made from a porous
material such as cotton.
Nonporous materials, such as
plastic sheeting, trap moisture,
which can damage
the paint.
• If possible, run the engine for a
while periodically (preferably once
a month).
If you store your car for 12 months
or longer, have your Honda dealer
perform the inspections called for
in
the 24 months/30,000 miles (48,000
km) maintenance schedule as soon
as you take it out of storage (see
page
148 ). The replacements called
for
in the maintenance schedule are
not needed unless the car has
actually reached that time or mileage.
Page 216 of 273

If you have a flat tire while driving,
stop in a safe place to change it.
Stopping in traffic
or on the shoulder
of a busy road is dangerous. Drive
slowly along
the shoulder until you
get to an exit or an area to stop that
is far away from the traffic lanes.
The car can easily roll off the
jack,
seriously injuring anyone
underneath.
Follow the directions for
changing a tire
exactly, and
never get under the car when it
is supported only by the jack.
The compact spare tire is smaller
than a standard tire, which
will affect
the vehicle's handling. Drive
cautiously when this spare is
mounted on your vehicle.
The size difference may also cause
damage to
the rear differential, so do
not mount
the compact spare on the
rear. If either rear tire goes flat,
remove
the front tire on that same
side, mount
the compact spare tire
on
the front, then mount the front
tire on
the rear.
1. Park the car on firm, level, non
slippery ground away from traffic.
Put the transmission in Reverse.
Apply
the parking brake.
2. Turn on the hazard warning lights
and turn
the ignition switch to
LOCK (O). Have your passenger
get out of the car while you
change
the tire.
Changing a Flat Tire
3. Open the trunk. Lift up the tool
box lid and take
the jack, wheel
wrench and extension out of
the
tool box.
NOTICE
Use the jack that came on your car. If
you try to raise another car by this jack
or use another jack to raise your car,
the car
or jack can be damaged.
CONTINUED
Taking Care of the Unexpected 213
Page 217 of 273

Changing a Flat Tire
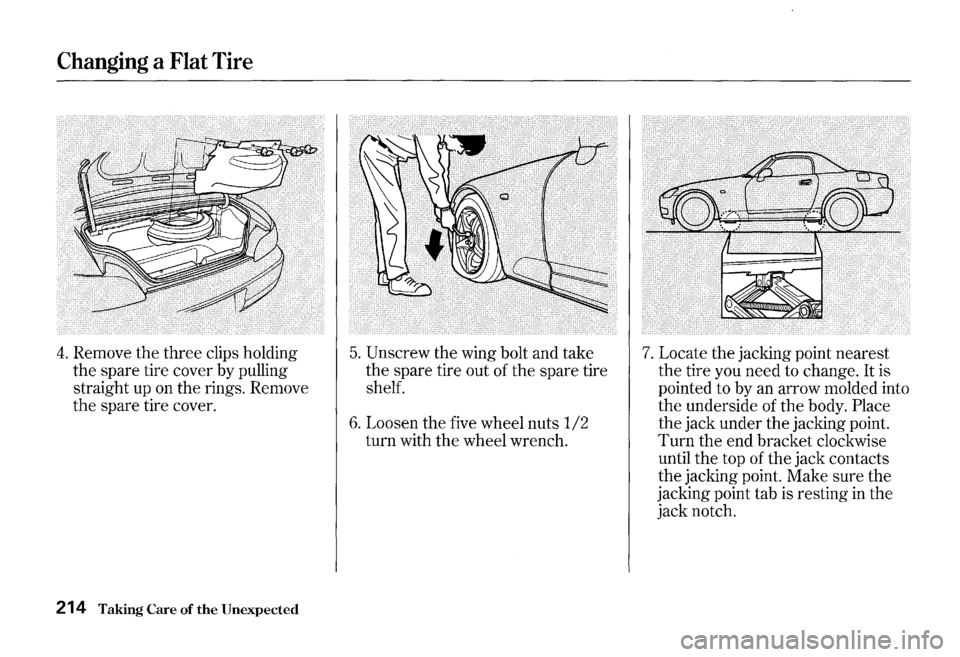
4. Remove the three clips holding
the spare tire cover by pulling
straight up on the rings. Remove
the spare tire cover.
214 Taking Care of the Unexpected
5. Unscrew the wing bolt and take
the spare tire out of the spare tire
shelf.
6. Loosen the five wheel nuts 1/2
turn with the wheel wrench.
7. Locate the jacking point nearest
the tire you need to change.
It is
pointed to by an arrow molded into
the underside of the body. Place
the jack under the jacking point.
Turn the end bracket clockwise
until the top of the jack contacts
the jacking point. Make sure the
jacking point tab is resting
in the
jack notch.
Page 227 of 273

If Your Engine Overheats
6. Look for any obvious coolant leaks,
such as a split radiator hose.
Everything is still extremely hot,
so use caution.
If you find a leak, it
must be repaired before you
continue driving (see
Emergency
Towing on page 238 ) .
Removing the radiator cap
while the engine is hot can
cause the
coolant to spray out,
seriously scalding you.
Always let the engine and
radiator
cool down before
removing the radiator cap.
224 Taking Care of the Unexpected
7. If you don't find an obvious leak,
check the coolant level in
the
radiator reserve tank (see page
120 ) . If the level is below the
MIN mark, add coolant to halfway
between the MIN and
MAX marks.
8. If there was no coolant in the
reserve tank, you may also have to
add coolant to the radiator. Let the
engine cool down until the reading
reaches the middle of the
temperature gauge, or lower,
before checking the radiator.
9. Using gloves or a large heavy
cloth, turn
the radiator cap
counterclockwise, without pushing
down, to
the first stop. This
releases any remaining pressure
in
the cooling system. After the
pressure releases, push down on
the cap and turn it until it comes
off.
Page 235 of 273

Fuses
The auxiliary fuse box is located on
the driver's side near the brake fluid
reservoir. To open it, push the tab on
each side and remove the
lid.
232 Taking Care of the Unexpected
Checking and Replacing Fuses
If something electrical in your car
stops working, the first thing you
should check for is a blown fuse.
Determine from the chart on pages
234 and 235 , or the diagram on the
fuse box lid, which fuse or fuses
control that component. Check those
fuses first, but check
all the fuses
before deciding that a blown fuse is
not the cause. Replace any blown
fuses and check
the component's
operation.
1. Turn the ignition switch to LOCK
(0). Make sure the headlights and
all other accessories are off.
2. Remove the cover from the fuse
box.
3. Check each of the large fuses in
the under-hood fuse box by
looking through the top at the wire
inside. Removing these fuses
requires a Phillips-head screw
driver.
Page 246 of 273

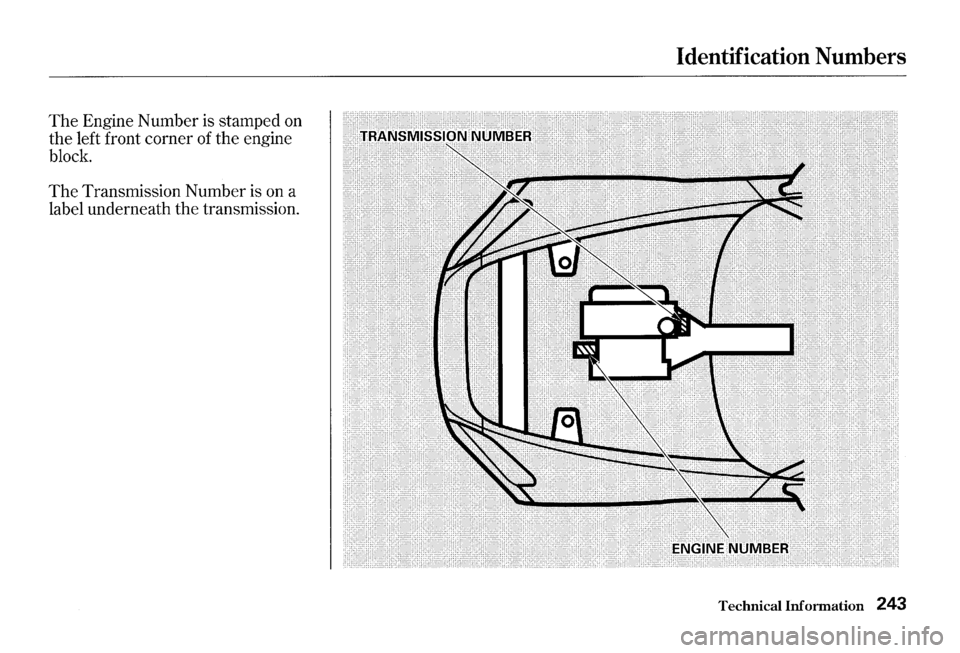
The Engine Number is stamped on
the left front corner of the engine
block.
The Transmission Number is on a
label underneath the transmission.
Identification Numbers
Technical Information 243
Page 258 of 273

ZONE 15
ZONE2
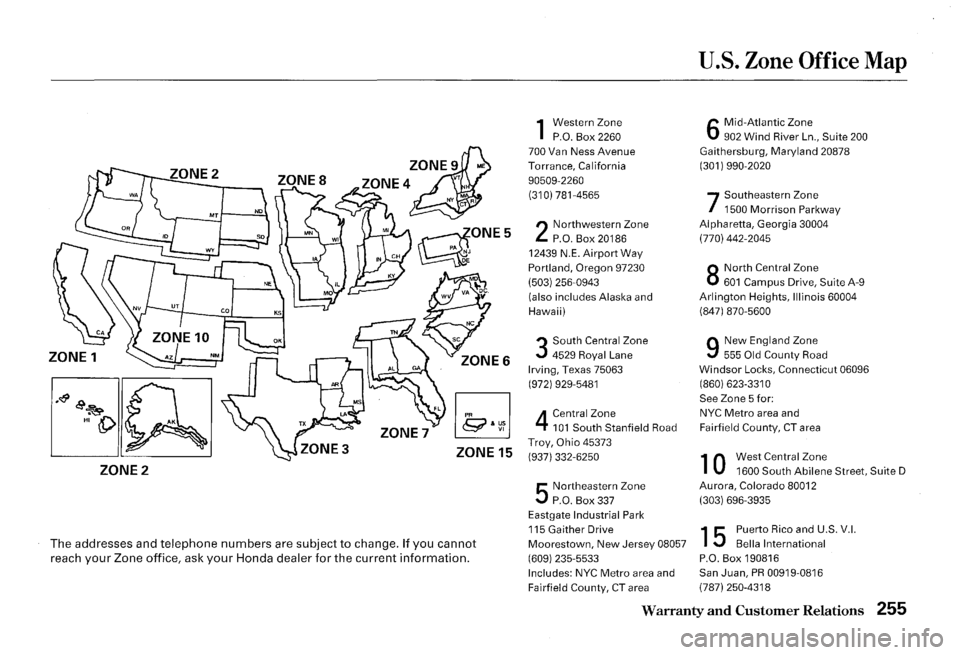
The addresses and telephone numbers are subject to change. If you cannot reach your Zone office, ask your Honda dealer for the current information.
1 Western Zone P.O. Box 2260
700 Van Ness Avenue
Torrance, California
90509-2260
(310) 781-4565
2 Northwestern Zone P.O. Box 20186 12439 N .E. Airport Way Portland, Oregon 97230 I 503 I 256-0943
(also includes Alaska and
Hawaii)
3 South Central Zone
4529 Royal Lane Irving, Texas 75063 (972) 929-5481
4 Central Zone 101 South Stanfield Road Troy, Ohio 45373
(937) 332-6250
5 Northeastern Zone P.O. Box 337
Eastgate Industrial Park 115 Gaither Drive Moorestown, New Jersey 08057
(609) 235-5533 Includes: NYC Metro area and Fairfield County, CT area
U.S. Zone Office Map
6 Mid-Atlantic Zone 902 Wind River Ln., Suite 200 Gaithersburg, Maryland 20878 (301 I 990-2020
7 Southeastern Zone 1500 Morrison Parkway
Alpharetta, Georgia 30004
(770) 442-2045
8 North Central Zone 601 Campus Drive, Suite A-9 Arlington Heights, Illinois 60004 (847) 870-5600
9 New England Zone
555 Old County Road Windsor Locks, Connecticut 06096
(860) 623-3310
See
Zone 5 for: NYC Metro area and Fairfield County, CT area
1 0 West Central Zone 1600 South Abilene Street, SuiteD Aurora, Colorado 80012
(303) 696-3935
15 Puerto Rico and U.S. V.I.
Bella International
P.O. Box 190816
San Juan, PR 00919-0816 (787) 250-4318
Warranty and Customer Relations 255
Page 264 of 273

A
Accessories Installation .................................. 122
Accessory
Power Socket ................ 81
ACCESSORY (Ignition Key
Position) ........................................
61
Adding
Brake Fluid ................................. 170
Clutch Fluid ................................ 171
Engine Coolant.. ......................... 161
Engine
Oil ................................... 157
Manual Transmission Fluid ..... 168
Windshield
Washer Fluid ......... 167
Additional Information About
Your
Seat Belts ........................ 33
Lap/Shoulder Belt.. ..................... 33
Seat Belt Maintenance ................ 34
Seat Belt System Components
... 33
Additional Information About
Your SRS ...................................
37
Additional Safety Precautions .... 38
How
the Automatic Seat Belt
Tensioners Work ..................... 37
How Your Airbags Work ............ 35
How the SRS Indicator
Works ........................................ 37
SRS Components ......................... 35
Additives, Engine Oil... .................. 158
Adjustments
Mirrors ..........................................
79
Seats .............................................. 68
Airbag (SRS) ...................................... 9
Air Cleaner Element.. ....................
l72
Air Conditioning ............................... 86
Maintenance ............................... 182
Usage ............................................. 86
Air Outlets (Vents) .......................... 88
Air Pressure,
Tires ........................ 185
Alarm, Anti-theft.. .......................... 113
Alcohol in Gasoline ........................ 248
Aluminum Wheels, Cleaning ........
206-
Antifreeze ....................................... 161
Anti-lock
Brakes (ABS)
Indicator Light ..................... 45, 138
Operation .................................... 136
Anti-theft Steering Column Lock
.. 60
Anti-theft System ........................... 113
Appearance Care ...........................
203
Audio Panel. ...................................... 82
Audio System ................................... 94
Index
Automatic Car Washes ................. 204
Automatic Speed Control.. .............. 55
IB
Back-up Lamp Replacement.. ....... 198
Battery Charging System
Indicator.. .......................... 44, 227
Jump Starting ............................. 220
Maintenance ............................... 177
Specifications ............................. 245
Before Driving ............................... 115
Belts, Seat ........................................... 8
Beverage Holder ..............................
81
Body Repair .................................... 210
Brakes ............................................. 136
Anti-lock System (ABS) ............ 137
Break-in, New Linings .............. 116
Fluid ............................................
170
Light, Burned-out ...................... 198
Parking .......................................... 80
System Indicator .......................... 44
Wear Indicators, Disc ............... 136
CONTINUED