2000 HONDA PASSPORT CD changer
[x] Cancel search: CD changerPage 118 of 267
Comfor
t an d Convenienc e Feature s
The heating and air conditioning system in your vehicle provides a
comfortable driving environmentin all weather conditions.
The audio system has many
features. This section describes
those features and how to use
them.
Heating and Cooling ...... 116
Ventilation .............. 118
Audio System ............ 121 AM/FM/Cassette StereoAudio System (LX, EX) 121 Operating the Radio .. 121
Adjusting the Sound .. 123
Operating the
Cassette Player ..... 124
Caring for the
Cassette Player ..... 126
Operating the Optional CD Changer ........ 127
AM/FM/Cassette/ CD Changer StereoAudio System (EX-L) . 129 Operating the Radio . . 129
Adjusting the Sound . . 131
Radio Frequencies ... 132Operating the Cassette Player ..... 134
Caring for the Cassette Player ..... 137 Operating the
CD Changer ........ 138
Protecting
Compact Discs ...... 142
Cruise Control ........... 143
Keyless Entry ........... 147
Anti-Theft System ........ 148
Digital Clock ............ 149
Comfor t an d Convenienc e Feature s
Page 130 of 267

Operatin
g th e Optiona l C D
Change r
An in-dash Compact Disc changer is available through your dealer. It
holds up to six discs, providing several hours of continuous
entertainment. You operate the
CD changer with the controls on
the front of the changer and on the
front of the radio.
To operate the CD changer, the ignition switch must be in
ACCESSORY (I) or ON (II).
Loading the CDs in the Changer
To load a CD in the changer, press
the button on the front of the
changer for the CD number you
want to load (1, for example). The
light next to the button will beginflashing. When the green lights
next to the CD slot begin flashing, insert the CD part way into the
Comfort an d Convenienc e Feature s
C
D BUTTO N
FORWAR
D
BUTTO N BACKWAR
D
BUTTO N
TRAC K SELECTO R BUTTON S
C D LOADIN G SLO T
EJEC
T BUTTO N
C D SELECTO R BUTTON S
Page 131 of 267

slot. The drive will pull it in the
rest of the way, and begin playing the first track. The light next to
the button will stay on as a
reminder that a CD is loaded in
that position.
Repeat this procedure to load CDsin the remaining positions in the
changer. The positions that
contain CDs will display a green
light next to their buttons. The CD
position that is currently loaded and ready to play will display an
orange light.
Playing CDs Press the CD button on the frontof the radio. The CD that is
currently loaded will begin
playing. The disc and track
numbers will be shown in the
radio display. When the system
reaches the end of that CD, it will load and play the next CD. To select a different disc, push the
appropriate button (1-6) on the
front of the CD changer. The light next to the button will flash as the
current CD is stored and the new
CD is loaded. The light will thenturn orange, and the CD will
begin playing from the first track.
You can also press the
TUNE/DISC button on the front of
the radio:
to select the
previous disc, or to select the
next disc.
To change tracks, press and
release either the button
(preset 4), or the button
(preset 6). Each time you press
the system will advance one
track. Pressing once will
return the system to the beginning
of the current track. Press it again
to select the previous track.To move rapidly within a track, press and hold the button
(preset 3) to move forward, or the
button (preset 1) to move
backward. Release the button
when the system reaches the point you want.
You can switch to the radio or
cassette player by pressing the
FM/AM or TAPE buttons on the
front of the radio. To switch back
to the CD changer, press the CD
button. The CD will begin playing
where it left off.
To eject a CD, select it with the
button on the front of the CD
changer (the light turns to orange), then press the EJECT
button.
Protectin g Compac t Disc s
For information on how to handle and protect compact discs, see
page 142.
Comfor t an d Convenienc e Feature s
Page 132 of 267
AM/FM/Cassette/C
D
Change r Stere o
Audi o Syste m
For EX-L model
Your Honda's audio system
provides clear reception on both AM and FM bands, while the
preset buttons allow you to easily select your favorite stations.
The CD changer holds up to six
discs, providing several hours of
continuous entertainment.
The cassette system features
Dolby B* noise reduction, automatic sensing of chromium-
dioxide (CrO 2) tape, and
autoreverse for continuous play.
* Dolby noise reduction manufactured under license from Dolby Laboratories Licensing Corporation. "DOLBY" and the symbol
are trademarks of Dolby Laboratories
Licensing Corporation. Operatin
g th e Radi o
The ignition switch must be in ACCESSORY or ON. Turn the
system on by pressing the
PWR/VOL knob. Adjust the
volume by turning the PWR/VOL
knob.
The band and frequency that the
radio was last tuned to is
displayed. To change bands, press the AM or FM button. Press the
FM button again to switch between FM1 and FM2. On the
FM band, ST will be displayed if the station is broadcasting in
stereo. Stereo reproduction on
AM is not available.
You can use any of four methods
to find radio stations on the
selected band: TUNE , SEEK ,
SCAN , or the Prese t buttons.
TUN E — Use the TUNE bar to
tune the radio to a desired frequency. Press the right side to tune to a higher frequency,
or the left side to tune to a
lower frequency. The frequency
numbers will start to change
rapidly. Release the bar when the display reaches the desired
frequency. To change the frequency in small increments,
press and release the TUNE bar quickly.
SEE K — The SEEK function
searches the band for a station
with a strong signal. To activate it,
press and release the SEEK/SCAN button. The systemscans up the band from the current
frequency. It stops when it finds a station with a strong signal.
SCA N — The SCAN function
samples all the stations with
strong signals on the selected
band. To activate it, press and
hold the SEEK/SCAN button until
Comfor t an d Convenienc e Feature s
Page 137 of 267
Operatin
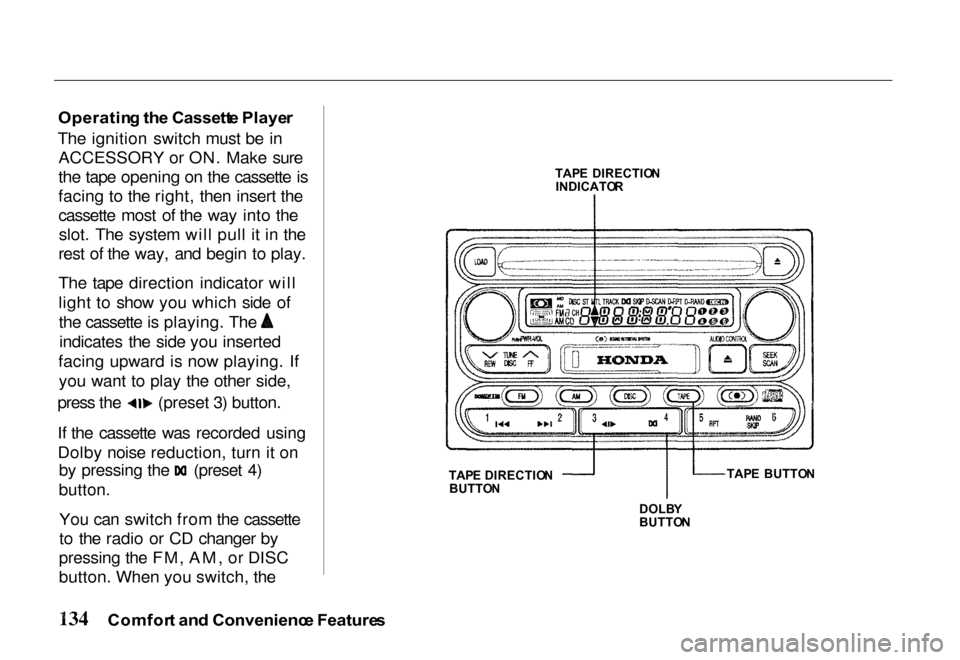
g th e Cassett e Playe r
The ignition switch must be in ACCESSORY or ON. Make sure
the tape opening on the cassette is
facing to the right, then insert the
cassette most of the way into theslot. The system will pull it in the
rest of the way, and begin to play.
The tape direction indicator will
light to show you which side of the cassette is playing. The
indicates the side you inserted
facing upward is now playing. If you want to play the other side, press the (preset 3) button.
If the cassette was recorded using
Dolby noise reduction, turn it on
by pressing the (preset 4)
button.
You can switch from the cassette
to the radio or CD changer by
pressing the FM, AM, or DISC
button. When you switch, the
Comfor t an d Convenienc e Feature s
TAP
E DIRECTIO N
INDICATO R
TAP E DIRECTIO N
BUTTO N
DOLBY
BUTTO N TAP
E BUTTO N
Page 141 of 267
Operatin
g th e C D Change r
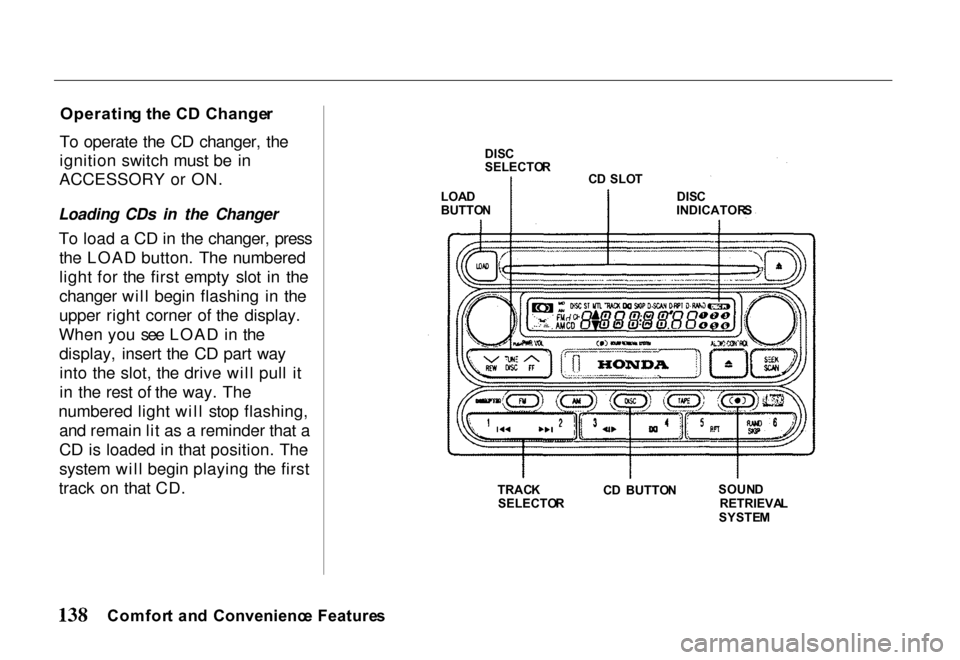
To operate the CD changer, the
ignition switch must be in
ACCESSORY or ON.
Loading CDs in the Changer
To load a CD in the changer, pressthe LOAD button. The numbered
light for the first empty slot in the
changer will begin flashing in the
upper right corner of the display.
When you see LOAD in the display, insert the CD part wayinto the slot, the drive will pull it
in the rest of the way. The
numbered light will stop flashing, and remain lit as a reminder that a
CD is loaded in that position. The
system will begin playing the first
track on that CD.
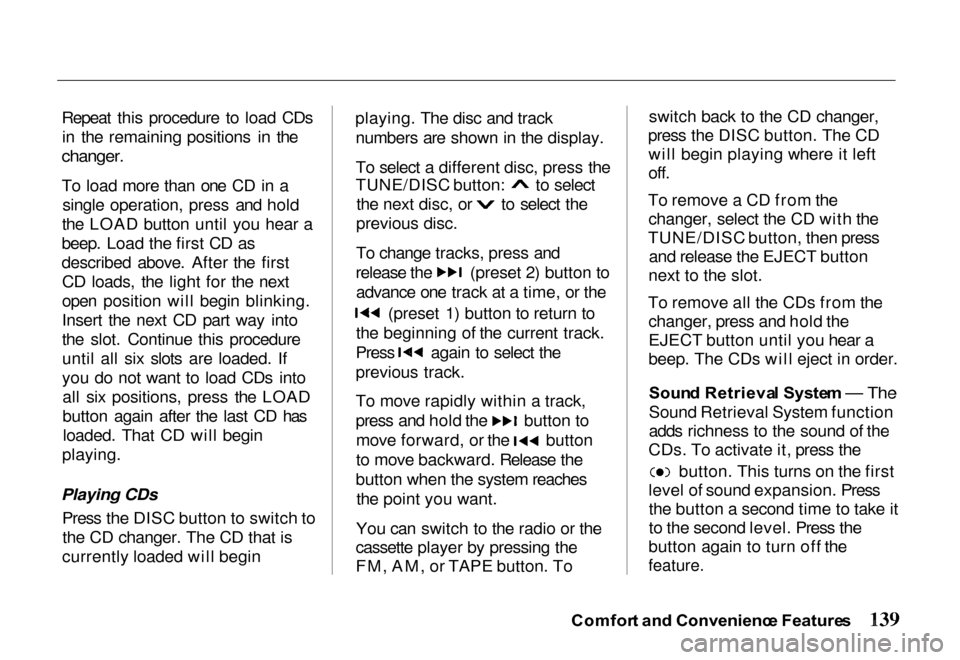
Comfor t an d Convenienc e Feature s TRAC
K
SELECTO RC
D BUTTO N SOUN
D
RETRIEVA L
SYSTE M
LOA
D
BUTTO NDIS
C
SELECTO R
CD SLO T
DISC
INDICATOR S
Page 142 of 267
Repeat this procedure to load CDs
in the remaining positions in the
changer.
To load more than one CD in a single operation, press and hold
the LOAD button until you hear a
beep. Load the first CD as
described above. After the first CD loads, the light for the next
open position will begin blinking.
Insert the next CD part way into
the slot. Continue this procedure
until all six slots are loaded. If
you do not want to load CDs intoall six positions, press the LOAD
button again after the last CD hasloaded. That CD will begin
playing.
Playing CDs Press the DISC button to switch tothe CD changer. The CD that is
currently loaded will begin playing. The disc and track
numbers are shown in the display.
To select a different disc, press the TUNE/DISC button: to select
the next disc, or to select the
previous disc.
To change tracks, press and release the (preset 2) button to
advance one track at a time, or the (preset 1) button to return to
the beginning of the current track. Press again to select the
previous track.
To move rapidly within a track,
press and hold the button to
move forward, or the button
to move backward. Release the
button when the system reaches the point you want.
You can switch to the radio or the
cassette player by pressing the
FM, AM, or TAPE button. To switch back to the CD changer,
press the DISC button. The CD will begin playing where it left
off.
To remove a CD from the changer, select the CD with the
TUNE/DISC button, then press and release the EJECT button
next to the slot.
To remove all the CDs from the changer, press and hold the
EJECT button until you hear a
beep. The CDs will eject in order.
Soun d Retrieva l Syste m — The
Sound Retrieval System function
adds richness to the sound of the
CDs. To activate it, press the button. This turns on the first
level of sound expansion. Press the button a second time to take it
to the second level. Press the
button again to turn off the
feature.
Comfor t an d Convenienc e Feature s
Page 143 of 267
SCA
N — Use the SEEK/SCAN
button to sample the tracks on a disc, or to sample all the discs in
the changer.
To sample the tracks on the CD currently loaded, press and release
the SEEK/SCAN button. You willsee SCAN in the display. The
system will play the first track on
the disc for approximately ten seconds. If you do nothing, it will
select the second track and play
that for ten seconds. When it
plays a track that you want to continue listening to, press the
SEEK/SCAN button again.
To sample the discs, press and hold the SEEK/SCAN button until
you hear a beep. You will see
D-SCAN in the display. Thesystem loads the next disc in the
changer, and plays the first track
on that disc for approximately
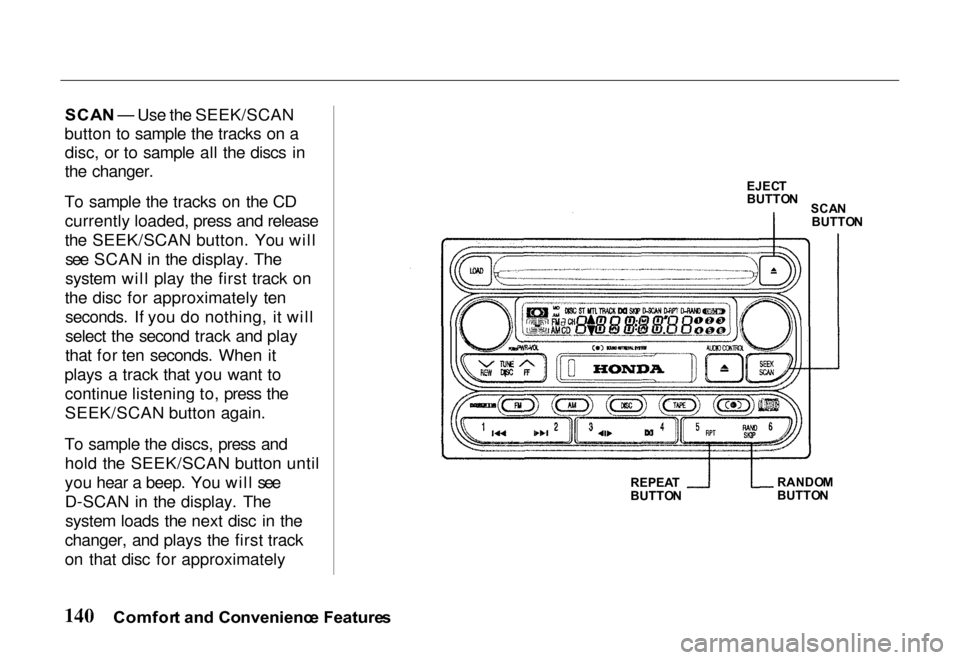
EJEC
T
BUTTO N
SCA N
BUTTO N
RANDO M
BUTTO N
Comfor t an d Convenienc e Feature s
REPEA
T
BUTTO N