Page 180 of 352

Audio Syste m
Operatin g th e C D Change r
(Optional )
A Compact Disc changer is available for your vehicle. It holds up to six discs, providing several hours of
continuous entertainment. You
operate this CD changer with thesame controls used for the in-dash
CD player.
Load the desired CDs in the
magazine and load the magazine in
the changer according to the instructions that came with the unit.
Play only standard round discs. Odd-shaped CDs may jam in the drive or
cause other problems.
To select the CD changer, press the CD button. The disc and track
numbers will be displayed. To select a different disc, press the
appropriate preset button (1 — 6). If
you select an empty slot in the magazine, the changer will, after
finding that slot empty, try to load the CD in the next slot. This
continues until it finds a CD to load
and play.
If you load a CD in the in-dash player
while the changer is playing a CD, the system will stop the changer and
begin playing the in-dash CD. Toselect the changer again, press theCD button. Play will begin where it
left off. Use the CD button to switch
between the player and the changer.
If you eject the in-dash CD while it is
playing, the system will automatically switch to the CD changer and begin
play where it left off. If there are no CDs in the changer, the display will
flash. You will have to select another mode (AM or FM) with the button. When you switch back to CD mode,
the system selects the same unit (in-dash or changer) that was playing
when you switched out of CD mode.
To use the SKIP, REPEAT, and RANDOM functions, refer to the in-
dash player operating instructions.
Comfor t an d Convenienc e Feature s
Page 184 of 352
Audi
o Syste m
Operatin g th e Cassett e Playe r
(Optional )
The cassette system features Dolby B* noise reduction, automaticsensing of chromium-dioxide (CrO 2
)
tape, and autoreverse for continuous
play.
Make sure the tape opening on the
cassette is facing to the right, then
insert the cassette most of the way
into the slot. The system will pull it
in the rest of the way, and begin to
play.
* Dolby noise reduction manufactured under
license from Dolby Laboratories Licensing Corpo-
ration. "DOLBY" and the double-D symbol are trademarks of Dolby Laboratories
Licensing Corporation.
CONTINUED
Comfor t an d Convenienc e Feature s
PWR/VO
L
KNO B
AM/F
M
BUTTO N
C D
BUTTO N
TAP E DIRECTIO N INDICATO R
TUN
E BA R
SEEK/SKI
P BA R
PLA Y
BUTTO N
PRO G
BUTTO N
N
R
BUTTO N
REPEAT BUTTO N
Page 185 of 352

Audio Syste m
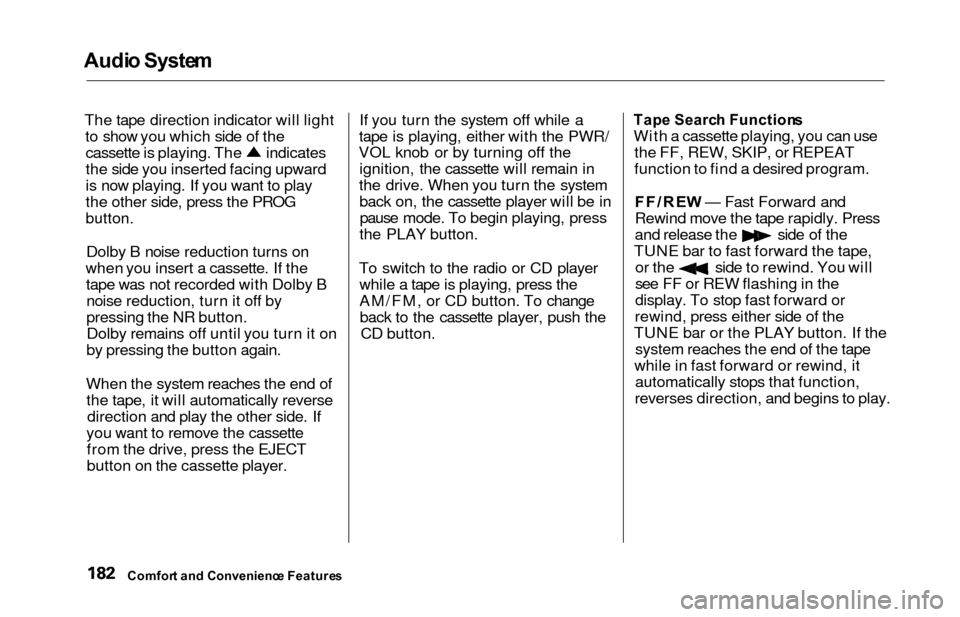
The tape direction indicator will light
to show you which side of the
cassette is playing. The indicates
the side you inserted facing upward
is now playing. If you want to play
the other side, press the PROG
button.
Dolby B noise reduction turns on
when you insert a cassette. If the tape was not recorded with Dolby Bnoise reduction, turn it off by
pressing the NR button.Dolby remains off until you turn it on
by pressing the button again.
When the system reaches the end of the tape, it will automatically reverse direction and play the other side. If
you want to remove the cassette from the drive, press the EJECT
button on the cassette player. If you turn the system off while a
tape is playing, either with the PWR/
VOL knob or by turning off the ignition, the cassette will remain in
the drive. When you turn the system back on, the cassette player will be inpause mode. To begin playing, press
the PLAY button.
To switch to the radio or CD player while a tape is playing, press the
AM/FM, or CD button. To changeback to the cassette player, push the CD button.
Tap e Searc h Function s
With a cassette playing, you can use
the FF, REW, SKIP, or REPEAT
function to find a desired program.
FF/RE W — Fast Forward and
Rewind move the tape rapidly. Press
and release the side of the
TUNE bar to fast forward the tape,
or the side to rewind. You will
see FF or REW flashing in the
display. To stop fast forward or
rewind, press either side of the
TUNE bar or the PLAY button. If the system reaches the end of the tape
while in fast forward or rewind, it automatically stops that function,
reverses direction, and begins to play.
Comfor t an d Convenienc e Feature s
Page 186 of 352

Audi
o Syste m
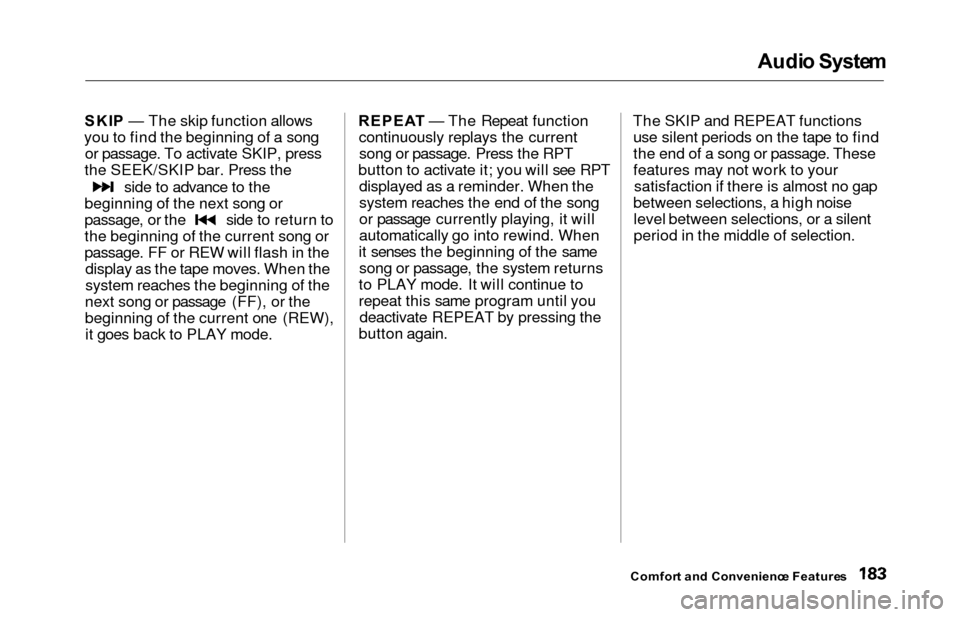
SKI P — The skip function allows
you to find the beginning of a song or passage. To activate SKIP, press
the SEEK/SKIP bar. Press the side to advance to the
beginning of the next song or passage, or the side to return to
the beginning of the current song or
passage. FF or REW will flash in the
display as the tape moves. When the
system reaches the beginning of the
next song or passage (FF), or the
beginning of the current one (REW), it goes back to PLAY mode. REPEA
T — The Repeat function
continuously replays the current song or passage. Press the RPT
button to activate it; you will see RPT displayed as a reminder. When the
system reaches the end of the song
or passage currently playing, it will
automatically go into rewind. When
it senses the beginning of the same song or passage, the system returns
to PLAY mode. It will continue to
repeat this same program until you deactivate REPEAT by pressing the
button again. The SKIP and REPEAT functions
use silent periods on the tape to find
the end of a song or passage. These
features may not work to your satisfaction if there is almost no gap
between selections, a high noise level between selections, or a silent
period in the middle of selection.
Comfor t an d Convenienc e Feature s
Page 193 of 352

Service Statio n Procedure s
3. Remove the fuel fill cap slowly.
You may hear a hissing sound aspressure inside the tank escapes.
Place the cap in the holder on the
fuel fill door.
4. Stop filling the tank after the fuel nozzle automatically clicks off. Do
not try to "top off" the tank, leavesome room for the fuel to expand
with temperature changes.
5. Screw the fuel fill cap back on, tighten it until it clicks several
times. If you do not properly
tighten the cap, the Malfunction
Indicator Lamp may come on (seepage 309 ).
6. Push the fuel fill door closed until it latches.Openin g th e Hoo d
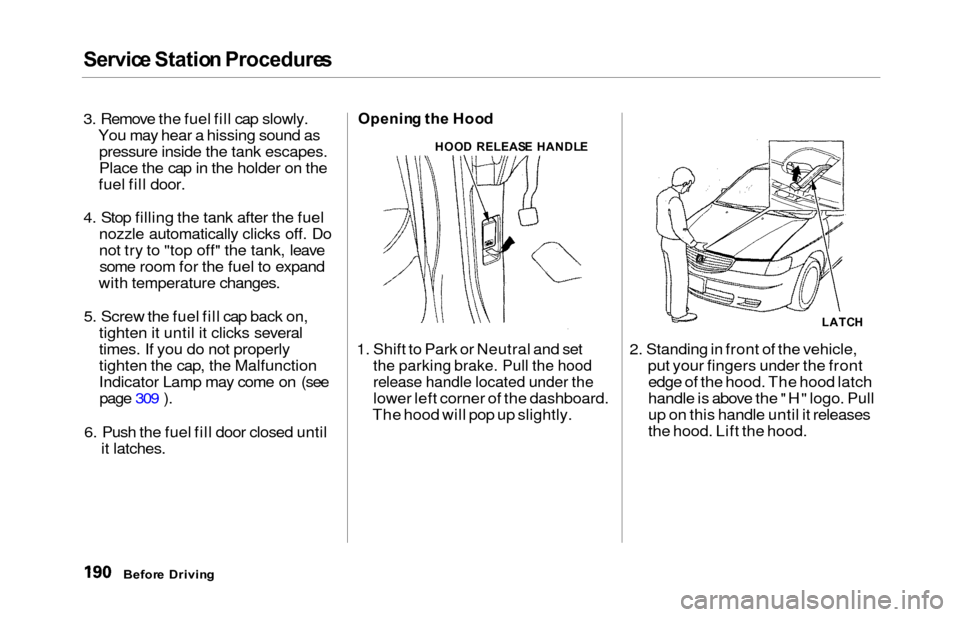
1. Shift to Park or Neutral and set
the parking brake. Pull the hood
release handle located under the
lower left corner of the dashboard.
The hood will pop up slightly. 2. Standing in front of the vehicle,
put your fingers under the frontedge of the hood. The hood latch
handle is above the "H" logo. Pull
up on this handle until it releases
the hood. Lift the hood.
Befor e Drivin g
HOOD RELEAS E HANDL E
LATCH
Page 204 of 352

Drivin
g
This section gives you tips on starting the engine under various
conditions, and how to operate the
automatic transmission. It also
includes important information on
parking your vehicle, the braking system, the Traction Control System,
and facts you need if you are
planning to tow a trailer. Preparing to Drive......................... 202
Starting the Engine........................ 203
Starting in Cold Weatherat High Altitude..................... 203
Automatic Transmission............... 204 Shift Lever Position Indicator.. 204
Shift Lever Positions................. 205
Engine Speed Limiter............... 207
Shift Lock Release..................... 207
Parking............................................ 209
The Braking System...................... 210 Brake Wear Indicators.............. 210
Brake System Design................ 211
Anti-lock Brakes........................ 211
Important SafetyReminders.......................... 212
ABS Indicator......................... 212
Traction Control System............... 213 TCS ON/OFF Switch................ 214TCS Indicator............................. 215
Driving in Bad Weather................ 216
Towing a Trailer............................ 218
Driving
Page 207 of 352
Automatic Transmissio n
Your Honda's transmission has four
forward speeds, and is electronicallycontrolled for smoother shifting. It
also has a "lock-up" torque converter
for better fuel economy. You may
feel what seems like another shift
when the converter locks. Shif
t Leve r Positio n Indicato r
This indicator on the instrument panel shows which position the shift
lever is in. The "D4" indicator comes on for a
few seconds when you turn the ignition switch ON (II). If it flashes
while driving (in any shift position), it indicates a possible problem in the
transmission. Avoid rapid acceler- ation and have the transmission
checked by an authorized Honda
dealer as soon as possible.
The malfunction indicator lamp may come on along with the "D
4"
indicator if there is a problem in the
automatic transmission control
system.
Drivin g
Page 208 of 352
Automatic Transmissio n
Shift Leve r Position s
The shift lever has seven positions.
It must be in Park or Neutral to start
the engine. When you are stopped in
D4, D3, 2,1, N or R, press firmly on
the brake pedal, and keep your foot
off the accelerator pedal.
Park (P ) — This position mechani-
cally locks the transmission. Use
Park whenever you are turning off or starting the engine. To shift out of
Park, you must press on the brake
pedal and have your foot off the
accelerator pedal. Pull the shift lever
towards you, then move it out of
Park.
If you have done all of the above and still cannot move the lever out of
Park, see Shift Lock Release on page
208.
You must also pull the shift lever towards you to shift into Park. Toavoid transmission damage, come to
a complete stop before shifting into
Park. The shift lever must be in Park
before you can remove the key from the ignition switch.
CONTINUED
Drivin g
SHIFT LEVE R