2000 HONDA ODYSSEY child seat
[x] Cancel search: child seatPage 42 of 352
Protecting Childre n
Additional Precautions for Small
Children
Never hold a small child on your
lap. If you are not wearing a seat
belt in a crash, you could be thrown forward into thedashboard and crush the child.
If you are wearing a seat belt, the
child can be torn from your armsduring a crash. For example, if
your vehicle crashes into a parked
vehicle at 30 mph (48 km/h), a 30-lb (14 kg) child will become a
900-lb (410 kg) force, and you will
not be able to hold on.
Never put a seat belt over yourself
and a child. During a crash, the
belt could press deep into the child
and cause very serious injuries.
Protectin g Large r Childre n
When a child reaches the recommended weight or height limit
for a forward-facing child seat, thechild should sit in the back seat and
wear a lap/shoulder belt.
If a child is too short for the shoulder
part of the belt to properly fit, we
recommend that the child use a
booster seat until tall enough to use the seat belt without a booster.
The following pages give instructions on how to check properseat belt fit, what kind of booster
seat to use if one is needed, and
important precautions for children
who must sit in the front seat.
CONTINUED
Drive r an d Passenge r Safet y
Allowing a larger child to sit
improperly in the front seat can
result in injury or death if the
airbags inflate.
If a larger child must sit in front,
make sure the child moves the
seat as far back as possible
and wears the seat belt properly.
Page 43 of 352
Protecting Childre n
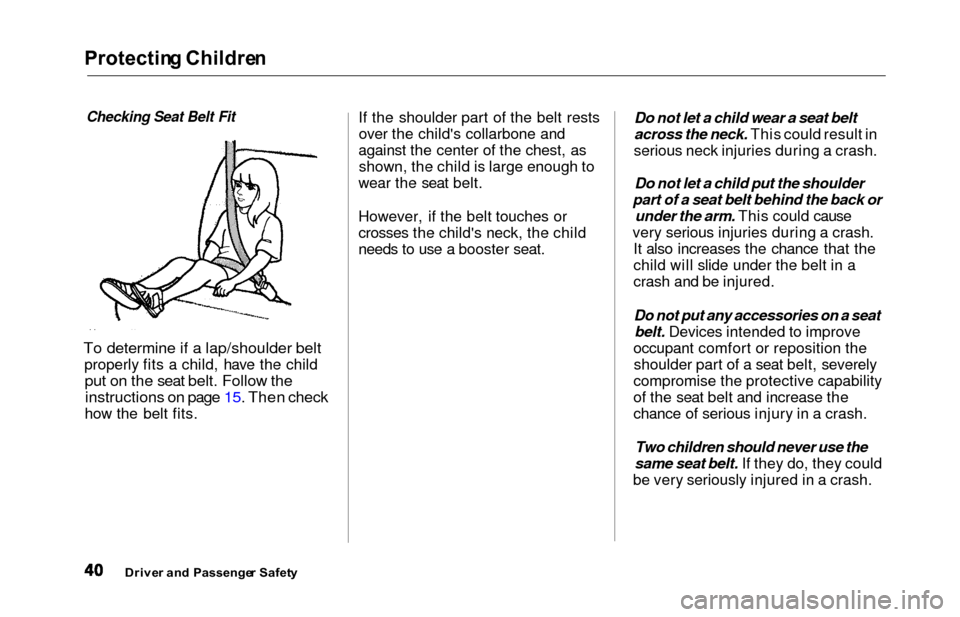
Checking Seat Belt Fit
To determine if a lap/shoulder belt
properly fits a child, have the child
put on the seat belt. Follow the
instructions on page 15. Then check
how the belt fits. If the shoulder part of the belt rests
over the child's collarbone and
against the center of the chest, as shown, the child is large enough to
wear the seat belt.
However, if the belt touches or
crosses the child's neck, the child
needs to use a booster seat. Do not let a child wear a seat belt
across the neck. This could result in
serious neck injuries during a crash.
Do not let a child put the shoulder
part of a seat belt behind the back or under the arm. This could cause
very serious injuries during a crash. It also increases the chance that the
child will slide under the belt in a
crash and be injured.
Do not put any accessories on a seat
belt. Devices intended to improve
occupant comfort or reposition the shoulder part of a seat belt, severely
compromise the protective capability
of the seat belt and increase the
chance of serious injury in a crash.
Two children should never use the
same seat belt. If they do, they could
be very seriously injured in a crash.
Drive r an d Passenge r Safet y
Page 44 of 352
Protectin
g Childre n
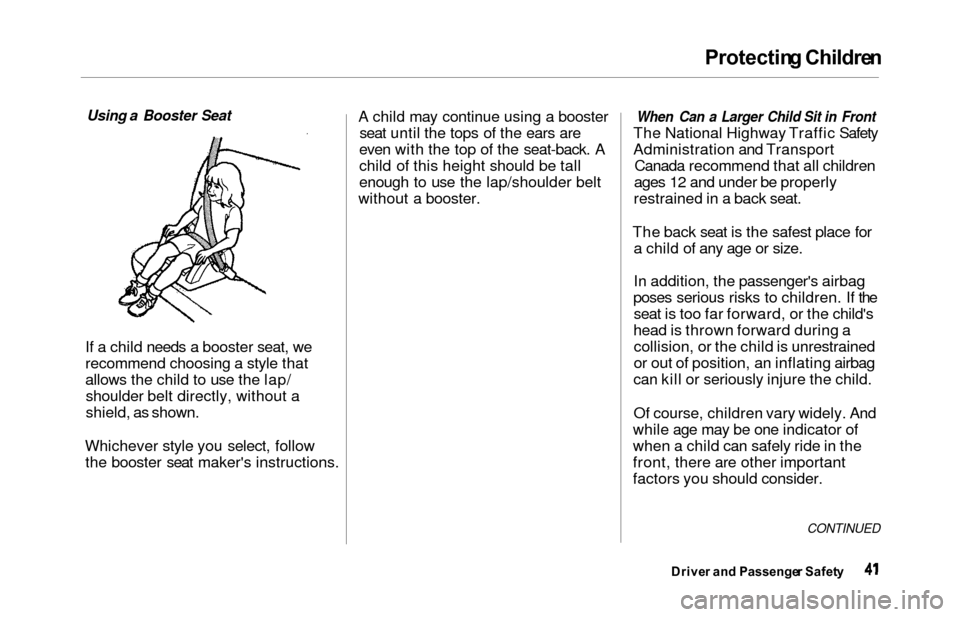
Using a Booster Seat
If a
child needs a booster seat, we
recommend choosing a style that
allows the child to use the lap/ shoulder belt directly, without a
shield, as shown.
Whichever style you select, follow the booster seat maker's instructions. A child may continue using a booster
seat until the tops of the ears are
even with the top of the seat-back. A
child of this height should be tall
enough to use the lap/shoulder belt
without a booster.
When Can a Larger Child Sit in Front
The Nationa
l Highway Traffic Safety
Administration and Transport Canada recommend that all children
ages 12 and under be properly
restrained in a back seat.
The back seat is the safest place for a child of any age or size.
In addition, the passenger's airbag
poses serious risks to children. If the seat is too far forward, or the child's
head is thrown forward during a collision, or the child is unrestrained
or out of position, an inflating airbag
can kill or seriously injure the child.
Of course, children vary widely. And
while age may be one indicator of
when a child can safely ride in the
front, there are other important
factors you should consider.
CONTINUED
Drive r an d Passenge r Safet y
Page 45 of 352
Protecting Childre n
Physical Size
Physically, a child must be large
enough for the lap/shoulder belt to
properly fit over the hips, chest, and shoulder (see pages 15 and 39). If
the seat belt does not fit properly,
the child should not sit in the front.
Maturity
To safely ride in front, a child must be able to follow the rules, including sitting properly and wearing the seat
belt properly throughout a ride. If you decide that a child can safely
ride up front, be sure to:
Carefully read the owner's manual
and make sure you understand all
seat belt instructions and all safety
information.
Move the vehicle seat to the rear-
most position.
Have the child sit up straight, back
against the seat, and feet on or
near the floor.
Check that the child's seat belt is
properly positioned and secured.
Supervise the child. Even mature
children sometimes need to be
reminded to fasten the seat beltsor sit properly.
Drive r an d Passenge r Safet y
Page 46 of 352
Protecting Childre n
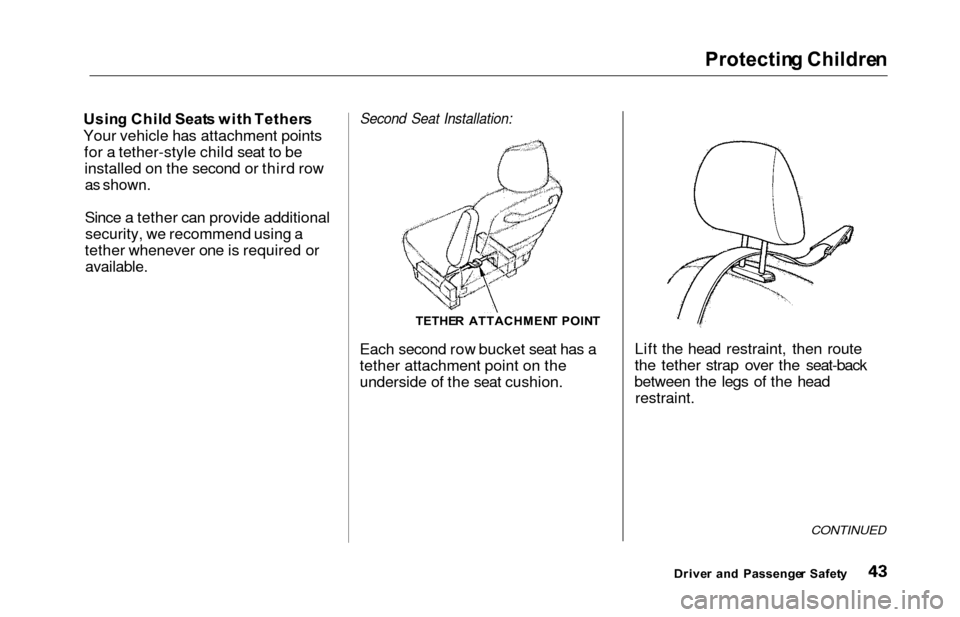
Using Chil d Seat s wit h Tether s
Your vehicle has attachment points for a tether-style child seat to beinstalled on the second or third row
as shown.
Since a tether can provide additionalsecurity, we recommend using a
tether whenever one is required or
available.
Second Seat Installation:
TETHE R ATTACHMEN T POIN T
Each second row bucket seat has a
tether attachment point on the
underside of the seat cushion. Lift the head restraint, then route
the tether strap over the seat-back
between the legs of the head restraint.
CONTINUED
Drive r an d Passenge r Safet y
Page 47 of 352
Protecting Childre n
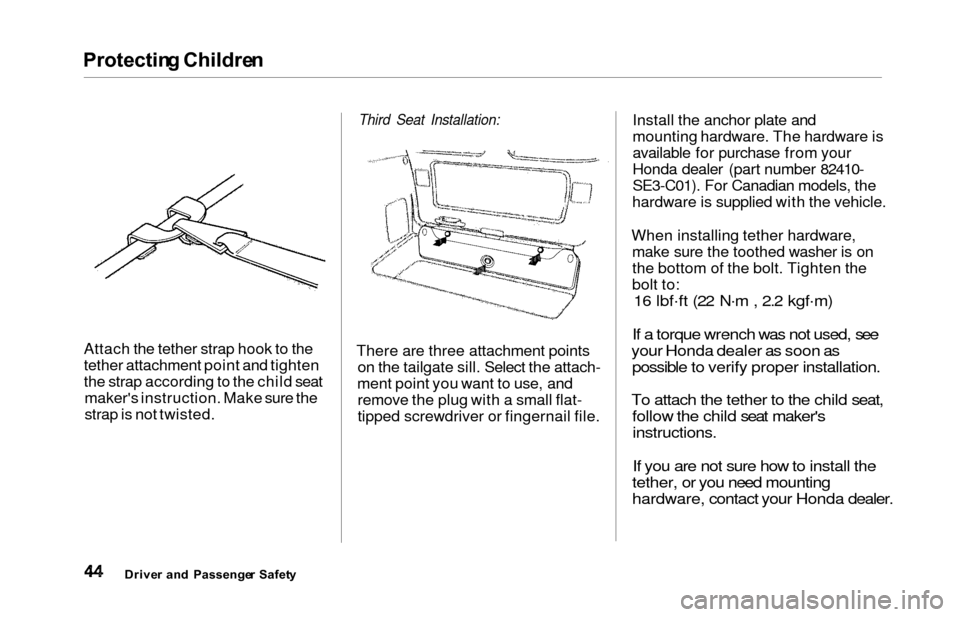
Attach the tether strap hook to the
tether attachment point and tighten
the strap according to the child seat
maker's instruction. Make sure the
strap is not twisted.
Third Seat Installation:
There are three attachment points on the tailgate sill. Select the attach-
ment point you want to use, and remove the plug with a small flat-
tipped screwdriver or fingernail file. Install the anchor plate and
mounting hardware. The hardware is
available for purchase from your
Honda dealer (part number 82410-
SE3-C01). For Canadian models, the
hardware is supplied with the vehicle.
When installing tether hardware, make sure the toothed washer is on
the bottom of the bolt. Tighten the
bolt to:
16 lbf .
ft (22 N .
m , 2.2 kgf .
m)
If a torque wrench was not used, see
your Honda dealer as soon as possible to verify proper installation.
To attach the tether to the child seat, follow the child seat maker's
instructions.
If you are not sure how to install the
tether, or you need mounting
hardware, contact your Honda dealer.
Drive r an d Passenge r Safet y
Page 49 of 352
Additional Informatio n Abou t You r Sea t Belt s
The seat belts in all positions except
the driver's and the center positionof the third seat have an additional
locking mechanism that must be activated to secure a child seat. (See
pages 31 and 36 for instructions on
how to secure child seats with this
type of seat belt.)
If the shoulder part of the belt is
pulled all the way out, the locking
mechanism will activate. The belt
will retract, but it will not allow thepassenger to move freely.
To deactivate the locking
mechanism, unlatch the buckle and
let the seat belt fully retract. To
refasten the belt, pull it out only as
far as needed.
See page 15 for instructions on how
to wear the lap/shoulder belt
properly.
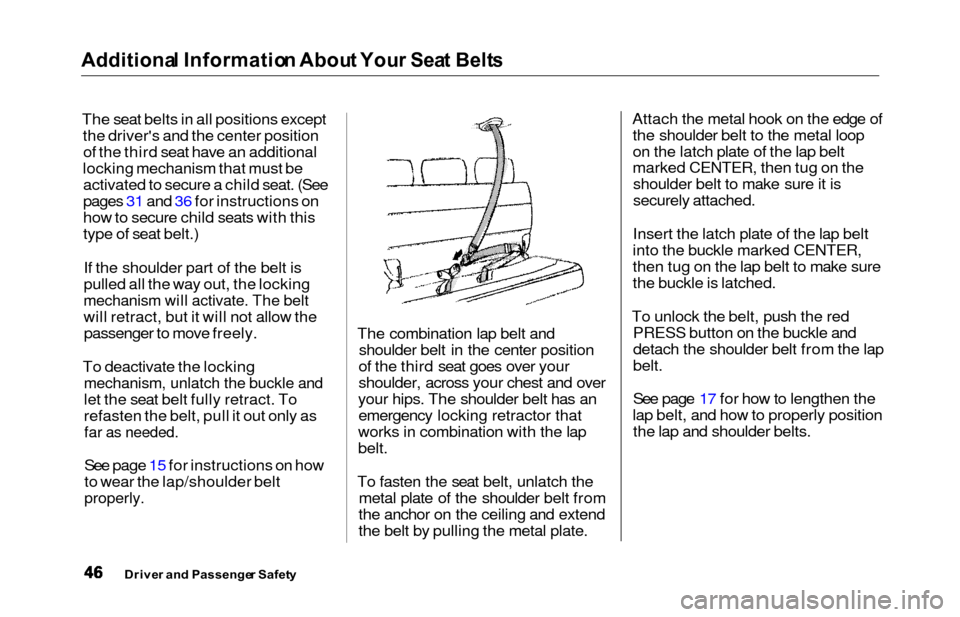
The combination lap belt and shoulder belt in the center position
of the third seat goes over your
shoulder, across your chest and over
your hips. The shoulder belt has an emergency locking retractor that
works in combination with the lap
belt.
To fasten the seat belt, unlatch the metal plate of the shoulder belt from
the anchor on the ceiling and extend
the belt by pulling the metal plate. Attach the metal hook on the edge of
the shoulder belt to the metal loop
on the latch plate of the lap belt
marked CENTER, then tug on theshoulder belt to make sure it is
securely attached.
Insert the latch plate of the lap belt
into the buckle marked CENTER,
then tug on the lap belt to make sure
the buckle is latched.
To unlock the belt, push the red PRESS button on the buckle and
detach the shoulder belt from the lap
belt.
See page 17 for how to lengthen the
lap belt, and how to properly position the lap and shoulder belts.
Drive r an d Passenge r Safet y
Page 58 of 352

Instrument
s an d Control s
This section gives information about
the controls and displays that
contribute to the daily operation of
your Honda. All the essential
controls are within easy reach.
Control Locations............................
56
Indicator Lights...............................
. 57
Gauges.............................................. 62
Controls Near the Steering
Wheel........................................ 65
Headlights.................................... 66
Automatic Lighting Off
Feature......................................
67
Daytime Runnin
g Lights.............
67
Instrument
Pane
l Brightness.....
67
Turn
Signals................................
.
68
Windshield
Wipers.....................
. 68
Windshield Washers................... 70
Rear Window Wiper and Washer...................................... 70
Hazard Warning........................ 70
Rear Windo
w Defogger.............. 71
Steering Wheel Adjustment....... 72
Steering Wheel Controls................ 73
Cruise Control.............................. 73
Remote Audio Controls .............. 76
Keys and Locks................................ 76
Keys............................................... 76
Immobilizer System..................... 77
Ignition Switch............................. 78
Power Door Locks....................... 79
Remote Transmitter.................... 81
Childproof Door Locks............... 85
Tailgate......................................... 85
Glove Box..................................... 87
Manual Sliding Doors...................... 88
Power Sliding Doors........................ 89
HomeLink Universal Transmitter.................................. 95
Seats.................................................. 99
Passenger Seating....................... 99
Seat Adjustments....................... 100
Driver's Seat Power
Adjustments........................... 102
Armrests..................................... 103
Head Restraints......................... 104
Third Seat Access...................... 105 Moving the Second Row Bucket Seat............................ 106
Removing the Bucket Seats in the Second Row................. 108
Folding the Third Seat.............. 109
Power Windows............................. 112
Mirrors............................................ 115
Parking Brake................................ 116
Digital Clock................................... 117 Center Table................................... 117
Beverage Holder............................ 118
Sunglasses Holder......................... 120
Sun Visor......................................... 121
Vanity Mirror................................. 121 Rear Compartment........................ 122
Center Pocket................................ 122Coin Holder.................................... 122
Storage Box.................................... 123
Coat Hook....................................... 123
Accessory Power Sockets............. 124 Interior Lights................................ 125
Instrument s an d Control s