Page 223 of 352
Towing a Traile r
Towin g Equipmen t an d
Accessorie s
Towing can require a variety of equipment, depending on the size of
your trailer, how it will be used, and how much load you are towing.
Discuss your needs with your trailer
sales or rental agency, and follow the
guidelines in the rest of this section.
Also make sure that all equipment is properly installed and that it meets
federal, state, province, and local
regulations.
Hitches
Any hitch used on your vehicle mustbe properly bolted to the underbody, using the six threaded holes
provided. A hitch designed especially
for your Odyssey can be obtained
from your Honda dealer.
Weight Distributing Hitch
If the total trailer weight is more
than 2,000 Ibs (900 kg), you must
also use a weight distributing hitch.
This device transfers weight from the vehicle's rear wheels to the front
wheels, and to the trailer's wheels. Carefully follow the hitch maker's
instructions for proper installation
and adjustment.
Safety Chain
Always use a safety chain. Make sure that it is secured to both the
trailer and hitch, and that it crosses under the tongue so it can catch the
trailer if it becomes unhitched. Leave enough slack to allow the
trailer to turn corners easily, but do not let the chain drag on the ground.
Sway Control
If the total trailer weight exceeds
2,000 Ibs (900 kg), you should install
a sway control device to minimize swaying that can occur in crosswinds
and in normal and emergency
driving maneuvers. Your trailer
maker can tell you what kind of sway
control you need and how to install it.
Transmission Fluid Cooler
If the total trailer weight is more
than 2,000 Ibs (900 kg), you must also have a transmission fluid cooler
installed. This device will help
prevent transmission overheating,
which could cause serious damage.
A transmission fluid cooler designed for your Odyssey can be obtained
from your Honda dealer.
Drivin g
Page 224 of 352
Towing a Traile r
Trailer Brakes
Honda recommends that any trailer
having a total weight of 1,000 Ibs (450 kg) or more be equipped with
its own electric or surge-type brakes.
If you choose electric brakes, be sure they are electronically actuated.
Do not attempt to tap into your
vehicle's hydraulic system. No matter how successful it may seem,any attempt to attach trailer brakes
to your vehicle's hydraulic system
will lower braking effectiveness and create a potential hazard.
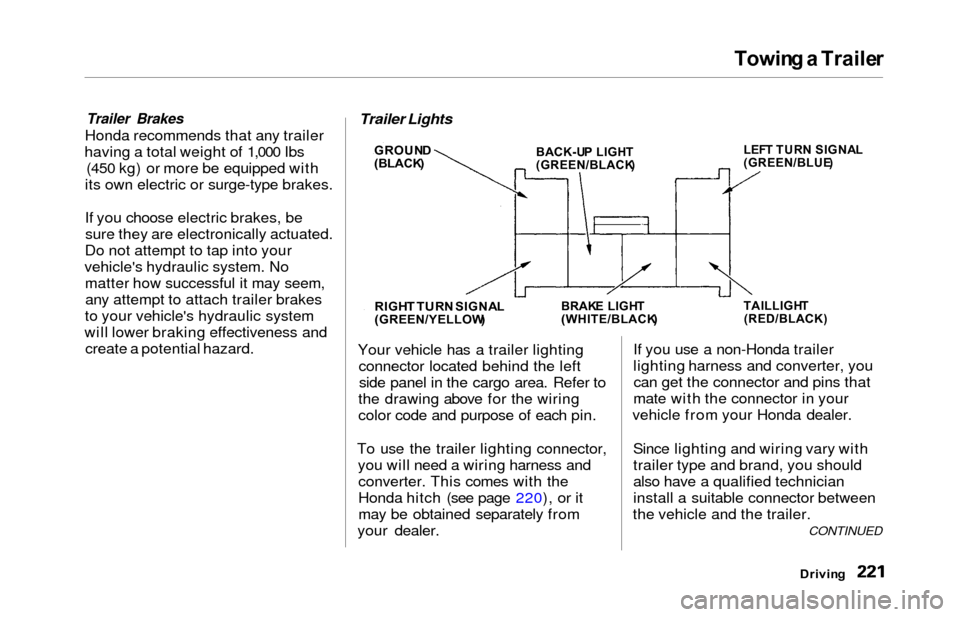
Your vehicle has a trailer lightingconnector located behind the leftside panel in the cargo area. Refer to
the drawing above for the wiring
color code and purpose of each pin.
To use the trailer lighting connector, you will need a wiring harness andconverter. This comes with the
Honda hitch (see page 220), or it
may be obtained separately from
your dealer. If you use a non-Honda trailer
lighting harness and converter, you
can get the connector and pins that
mate with the connector in your
vehicle from your Honda dealer.
Since lighting and wiring vary with
trailer type and brand, you should
also have a qualified technician
install a suitable connector between
the vehicle and the trailer.
Drivin g
CONTINUED
Trailer Lights
GROUN
D
(BLACK )
RIGHT TUR N SIGNA L(GREEN/YELLOW )
BACK-UP LIGH T(GREEN/BLACK ) LEF
T TUR N SIGNA L
(GREEN/BLUE )
BRAKE LIGH T(WHITE/BLACK )TAILLIGHT(RED/BLACK)
Page 225 of 352
Towing a Traile r
Spare Vehicle Tire
When towing a trailer, you should
carry a full-size wheel and tire as a
spare in case you have a flat. If you
use the compact spare tire that came
with the vehicle, it may adversely affect vehicle handling. See page 317 for information on proper tire
size, and page 299 for information on
how to store a full-size tire. When storing a full-size spare tire in the
trailer, follow the trailer maker's
instructions.
Additional Trailer Equipment
Many states and Canadian provinces
require special outside mirrors when
towing a trailer. Even if they don't,
you should install special mirrors if
you cannot clearly see behind you, or if the trailer creates a blind spot.
Ask your trailer sales or rental agency if any other items are
recommended or required for your
towing situation. Pre-To
w Checklis t
When preparing to tow, and before driving away, be sure to check the
following:
The vehicle has been properlyserviced, and the tires, brakes,
suspension, and cooling system
are in good operating condition.
All weights and loads are within limits (see pages 218 and 219).
The hitch, safety chain, and any other attachments are secure.
All items on and in the trailer are properly secured and cannot shift
while you drive.
The lights and brakes on your vehicle and the trailer are workingproperly. Your vehicle tires and spare are
properly inflated (see page 323),and the trailer tires and spare are
inflated as recommended by the
trailer maker.
You may want to fill the fuel tank with premium fuel. Premium fuel
provides improved performance.
Drivin g
Page 226 of 352
Towing a Traile r
Drivin g Safel y Wit h a Traile r
The added weight, length, and height of a trailer will affect your
vehicle's handling and performance, so driving with a trailer requires
some special driving skills and
techniques.
For your safety and the safety of
others, take time to practice driving
maneuvers before heading for the
open road, and follow the guidelines
discussed below.
Towing Speeds and Gears
Driving slower than normal in all
driving situations, and obey postedspeed limits for vehicles with trailers.
Use the D
4 position when towing a
trailer on level roads. D3 is the
proper shift lever position to use
when towing a trailer in hilly terrain.
(See "Driving on Hills" in the next
column for additional gear
information.)
Making Turns and Braking
Make turns more slowly and wider
than normal. The trailer tracks a smaller arc than your vehicle, and it
can hit or run over something the
vehicle misses. Allow more time and distance for braking. Do not brake or
turn suddenly as this could cause the
trailer to jackknife or turn over.
Driving on Hills
When climbing hills, closely watch your temperature gauge. If it nearsthe red mark, turn the air
conditioning off, reduce speed and, if
necessary, pull to the side of the
road to let the engine cool.
If the automatic transmission shifts
frequently between 3rd and 4th
gears while going up a hill, shift to D
3. If you must stop when facing uphill,
use the foot brake or parking brake.
Do not try to hold the vehicle in
place by pressing on the accelerator,
as this can cause the automatic
transmission to overheat.
When driving down hills, reduce
your speed and shift down to 2nd
gear. Do not "ride" the brakes, and
remember it will take longer to slowdown and stop when towing a trailer.
Drivin g
CONTINUED
Page 227 of 352
Towing a Traile r
Handling Crosswinds and Buffeting
Crosswinds and air turbulence
caused by passing trucks can disrupt
your steering and cause trailer swaying. When being passed by a
large vehicle, keep a constant speed and steer straight ahead. Do not try
to make quick steering or braking corrections.
Backing Up
Always drive slowly and have someone guide you when backing up.
Grip the bottom of the steering
wheel; then turn the wheel to the left
to get the trailer to move to the left, and turn the wheel right to move the
trailer to the right.
Parking
Follow all normal precautions when
parking, including putting the
transmission in Park and firmly setting the parking brake. Also, place
wheel chocks at each of the trailer's
tires.
Drivin g
Page 235 of 352
U.S. Owner s
Follow the Severe Conditions
Maintenance Schedule if you
drive your vehicle MAINLY
under one or more of the
following conditions: Driving less than 5 miles (8
km) per trip or, in freezing
temperatures, driving less than 10 miles (16 km) per trip.Driving in extremely hot [over 90°F (32°C)] conditions.
Extensive idling or long
periods of stop-and-go driving.
Trailer towing, driving with a roof top carrier, or driving in
mountainous conditions.Driving on muddy, dusty, or
de-iced roads.
*1: Refer to page 263 for replacement
information under special driving
conditions.
*2: Refer to page 262 for replacement
information under special driving
conditions.
# : See page 229.
Canadia n Owner s
Follow the Maintenance
Schedule for Severe Conditions.
Maintenanc e
Page 236 of 352
Use this schedule if your vehicle is MAINLY driven in any of the following Severe Conditions, or normally driven in Canada; otherwise use the Normal
Schedule. Service at the indicated distance or time, whichever comes first. Do the items in A , B , C , D as required for each distance/time.
Sever e Conditions :
Driving less than 5 miles (8 km) per trip or, in freezing temperatures, driving less than 10 miles (16 km) per trip.
Driving in extremely hot (over 90°F/32°C) conditions.
Extensive idling or long periods of stop-and-go driving.
Trailer towing, driving with a rooftop carrier, or driving in mountainous conditions.Driving on muddy, dusty, or de-iced roads.
Maintenanc e
CONTINUED
page 266
Page 275 of 352
Lights
Headligh t Aimin g
The headlights were properly aimed when your vehicle was new. If youregularly carry heavy items in the
cargo area or pull a trailer,
readjustment may be required.
Adjustment of the headlights should be performed by a Honda technicianor other qualified mechanic. Replacin
g a Headligh t Bul b
Your vehicle has halogen headlight bulbs, one on each side. When
replacing a bulb, handle it by its steel
base and protect the glass fromcontact with your skin or hard
objects. If you touch the glass, clean
it with denatured alcohol and a clean
cloth.
Halogen headlight bulbs get very hot
when lit. Oil, perspiration, or a scratch
on the glass can cause the bulb to
overheat and shatter.
1. Open the hood.
If you need to change the head-
light bulb on the driver's side,
remove the air intake cover (see
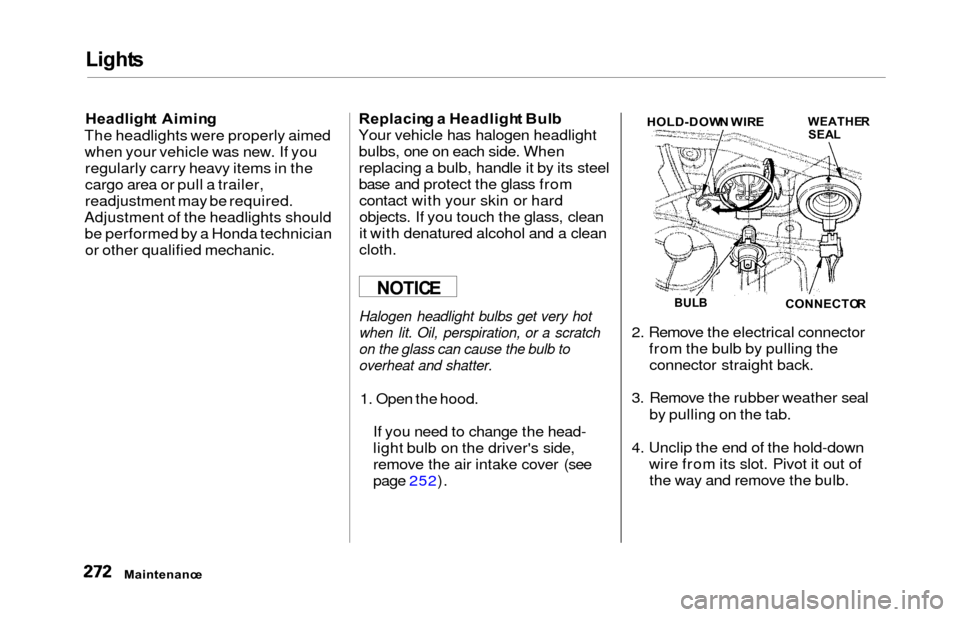
page 252). 2. Remove the electrical connector
from the bulb by pulling theconnector straight back.
3. Remove the rubber weather seal by pulling on the tab.
4. Unclip the end of the hold-down wire from its slot. Pivot it out ofthe way and remove the bulb.
Maintenanc e
NOTICEBULBCONNECTO R
WEATHERSEALHOLD-DOW N WIR E