2000 HONDA ODYSSEY brake light
[x] Cancel search: brake lightPage 193 of 352
Service Statio n Procedure s
3. Remove the fuel fill cap slowly.
You may hear a hissing sound aspressure inside the tank escapes.
Place the cap in the holder on the
fuel fill door.
4. Stop filling the tank after the fuel nozzle automatically clicks off. Do
not try to "top off" the tank, leavesome room for the fuel to expand
with temperature changes.
5. Screw the fuel fill cap back on, tighten it until it clicks several
times. If you do not properly
tighten the cap, the Malfunction
Indicator Lamp may come on (seepage 309 ).
6. Push the fuel fill door closed until it latches.Openin g th e Hoo d
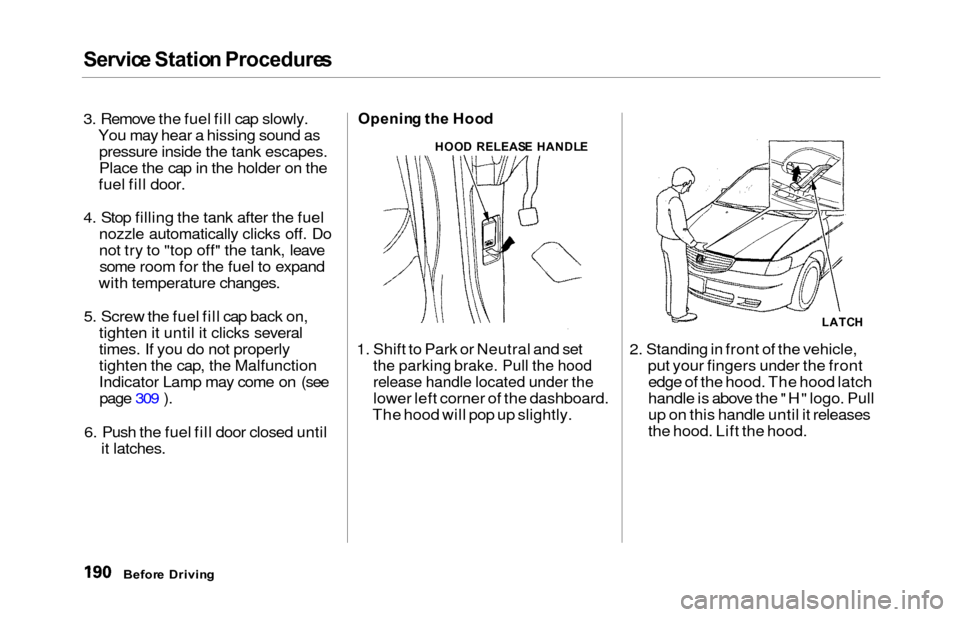
1. Shift to Park or Neutral and set
the parking brake. Pull the hood
release handle located under the
lower left corner of the dashboard.
The hood will pop up slightly. 2. Standing in front of the vehicle,
put your fingers under the frontedge of the hood. The hood latch
handle is above the "H" logo. Pull
up on this handle until it releases
the hood. Lift the hood.
Befor e Drivin g
HOOD RELEAS E HANDL E
LATCH
Page 198 of 352
Accessorie
s an d Modification s
Modifying your vehicle, or installing
some non-Honda accessories, can
make your vehicle unsafe. Before
you make any modifications or add any accessories, be sure to read the
following information.
Accessorie s
Your dealer has Genuine Honda accessories that allow you to
personalize your vehicle. These accessories have been designed and
approved for your vehicle, and are
covered by warranty.
Non-Honda accessories are usually
designed for universal applications.
Although aftermarket accessories may fit on your vehicle, they may not
meet factory specifications, andcould adversely affect your vehicle's
handling and stability. (See "Modifications" on page 196 for
additional information.) When properly installed, cellular
phones, alarms, two-way radios, and
low-powered audio systems should
not interfere with your vehicle's
computer-controlled systems, such
as the SRS and anti-lock brake
system.
However, if electronic accessories
are improperly installed, or exceed
your vehicle's electrical system capacity, they can interfere with the operation of your vehicle, or even
cause the airbags to deploy.
Before installing any accessory:
Make sure the accessory does notobscure any lights, or interfere
with proper vehicle operation or performance.
Be sure electronic accessories do
not overload electrical circuits (see page 311). Have the installer contact your
Honda dealer for assistance before
installing any electronic accessory.
If possible, have your dealer inspect
the final installation.
Before Drivin g
Improper accessories or
modifications can affect your
vehicle's handling, stability and performance, and cause a
crash in which you can be hurt
or killed.
Follow all instructions in this
owner's manual regarding
accessories and modifications.
Page 212 of 352
Parking
Always use the parking brake when
you park your vehicle. The indicator on the instrument panel shows that
the parking brake is not fully
released; it does not indicate that the
parking brake is firmly set. Makesure the parking brake is set firmly
or your vehicle may roll if it is
parked on an incline.
Set the parking brake before you put
the transmission in Park. This keeps
the vehicle from moving and putting
pressure on the parking mechanismin the transmission — making it
easier to move the shift lever out of
Park when you want to drive away. If the vehicle is facing uphill, turn
the front wheels away from the curb.
If the vehicle is facing downhill, turn
the front wheels toward the curb.Make sure the parking brake is fully
released before driving away. Driving with the parking brake
partially set can overheat or damage
the rear brakes. Parkin
g Tip s
Make sure the windows are closed.
Turn off the lights.
Place any packages, valuables, etc.,
in the cargo area or take them
with you.
Lock the doors with the key or the
remote transmitter.
Never park over dry leaves, tall
grass, or other flammable materials. The three way catalytic
converter gets very hot, and could
cause these materials to catch on
fire.
Drivin g
Page 213 of 352
The Brakin g Syste m
Your Honda is equipped with front
disc brakes. The brakes on the rear
wheels are drum. A power assist helps reduce the effort needed on
the brake pedal. The ABS helps you
retain steering control when braking
very hard.
Put your foot on the brake pedal only
when you intend to brake. Resting
your foot on the pedal keeps the brakes applied lightly, causing them
to build up heat. Heat build-up canreduce how well your brakes work. It
also keeps your brake lights on all
the time, confusing drivers behind
you.
Constant application of the brakes
when going down a long hill builds up heat and reduces their effective-
ness. Use the engine to assist the
brakes by downshifting to a lower
gear and taking your foot off the accelerator pedal.
Check your brakes after driving
through deep water. Apply the
brakes moderately to see if they feel normal. If not, apply them gently and
frequently until they do. Since a
longer distance is needed to stop
with wet brakes, be extra cautious and alert in your driving. Brak
e Wea r Indicator s
The front disc brakes on all vehicles have audible brake wear indicators.
When the brake pads need replacing,
you will hear a distinctive metallic "screeching" sound when you apply
the brakes. If you do not have the
brake pads replaced, they will begin screeching all the time.
Your brakes may sometimes squeal or squeak when you apply them
lightly. Do not confuse this with the
brake wear indicators. They make a
very audible "screeching."
Drivin g
Page 217 of 352
Traction Contro l Syste m
When starting out or driving at low
speeds on a loose or slippery road
surface, you may notice that the
vehicle does not respond to the accelerator in the same way it does
at other times. This is a sign the TCS
is activating. You will see the TCS
indicator light flash.
You should still install winter tires on your vehicle during the winter. Makesure to use the same size originally
supplied with vehicle. Exercise the
same caution in winter driving as you
would if your vehicle was not
equipped with TCS.
Driving with the compact spare tire
installed (see page 292) may activate the TCS. You should turn off
the system. If the brakes overheat while the TCS
is activating, the TCS indicator will stop flashing and stay on temporarily.
This indicates that the TCS system has turned off. After the brakes havecooled down (usually for about 10
minutes), the TCS will turn back onand the indicator will turn off.
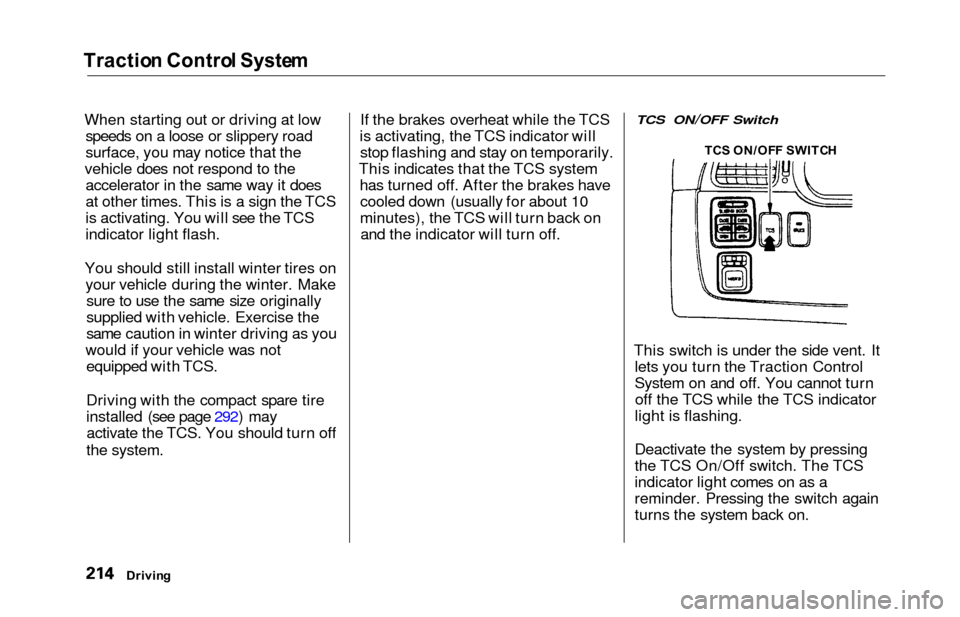
TCS ON/OFF Switch
This switch is under the side vent. It lets you turn the Traction Control
System on and off. You cannot turnoff the TCS while the TCS indicator
light is flashing.
Deactivate the system by pressing
the TCS On/Off switch. The TCS
indicator light comes on as a
reminder. Pressing the switch again
turns the system back on.
Drivin g TC
S ON/OF F SWITC H
Page 219 of 352
Driving in Ba d Weathe r
Rain, fog, and snow conditions re-
quire a different driving technique
because of reduced traction and
visibility. Keep your vehicle well- maintained and exercise greater
caution when you need to drive in
bad weather. The cruise control should not be used in these condi-
tions.
Drivin g Techniqu e — Always drive
slower than you would in dry
weather. It takes your vehicle longer to react, even in conditions that mayseem just barely damp. Apply
smooth, even pressure to all the
controls. Abrupt steering wheel
movements or sudden, hard appli- cation of the brakes can cause loss of
control in wet weather. Be extra
cautious for the first few miles (kilometers) of driving while you
adjust to the change in driving
conditions. This is especially true in snow. A person can forget some
snow-driving techniques during the
summer months. Practice is needed
to relearn those skills.
Exercise extra caution when driving
in rain after a long dry spell. After
months of dry weather, the first
rains bring oil to the surface of the
roadway, making it slippery. Visibilit
y — Being able to see
clearly in all directions and being
visible to other drivers are important in all weather conditions. This ismore difficult in bad weather. To be
seen more clearly during daylight
hours, turn on your headlights.
Inspect your windshield wipers and
washers frequently. Keep the
windshield washer reservoir full of the proper fluid. Have the windshield
wiper blades replaced if they start to streak the windshield or leave parts
unwiped. Use the defroster and air conditioning to keep the windows
from fogging up on the inside (see pages 135 and 145/150).
Drivin g
Page 224 of 352
Towing a Traile r
Trailer Brakes
Honda recommends that any trailer
having a total weight of 1,000 Ibs (450 kg) or more be equipped with
its own electric or surge-type brakes.
If you choose electric brakes, be sure they are electronically actuated.
Do not attempt to tap into your
vehicle's hydraulic system. No matter how successful it may seem,any attempt to attach trailer brakes
to your vehicle's hydraulic system
will lower braking effectiveness and create a potential hazard.
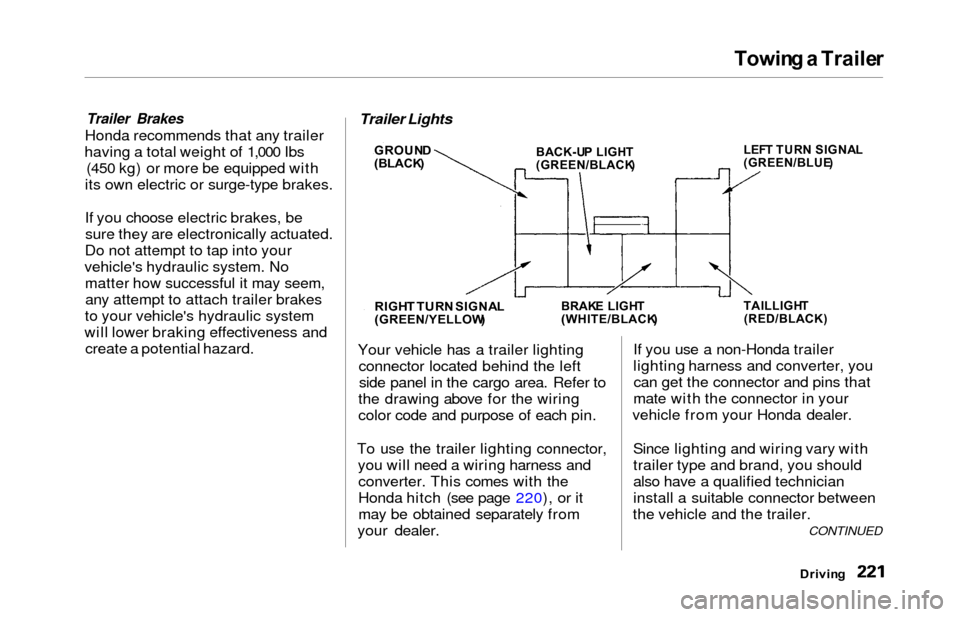
Your vehicle has a trailer lightingconnector located behind the leftside panel in the cargo area. Refer to
the drawing above for the wiring
color code and purpose of each pin.
To use the trailer lighting connector, you will need a wiring harness andconverter. This comes with the
Honda hitch (see page 220), or it
may be obtained separately from
your dealer. If you use a non-Honda trailer
lighting harness and converter, you
can get the connector and pins that
mate with the connector in your
vehicle from your Honda dealer.
Since lighting and wiring vary with
trailer type and brand, you should
also have a qualified technician
install a suitable connector between
the vehicle and the trailer.
Drivin g
CONTINUED
Trailer Lights
GROUN
D
(BLACK )
RIGHT TUR N SIGNA L(GREEN/YELLOW )
BACK-UP LIGH T(GREEN/BLACK ) LEF
T TUR N SIGNA L
(GREEN/BLUE )
BRAKE LIGH T(WHITE/BLACK )TAILLIGHT(RED/BLACK)
Page 225 of 352
Towing a Traile r
Spare Vehicle Tire
When towing a trailer, you should
carry a full-size wheel and tire as a
spare in case you have a flat. If you
use the compact spare tire that came
with the vehicle, it may adversely affect vehicle handling. See page 317 for information on proper tire
size, and page 299 for information on
how to store a full-size tire. When storing a full-size spare tire in the
trailer, follow the trailer maker's
instructions.
Additional Trailer Equipment
Many states and Canadian provinces
require special outside mirrors when
towing a trailer. Even if they don't,
you should install special mirrors if
you cannot clearly see behind you, or if the trailer creates a blind spot.
Ask your trailer sales or rental agency if any other items are
recommended or required for your
towing situation. Pre-To
w Checklis t
When preparing to tow, and before driving away, be sure to check the
following:
The vehicle has been properlyserviced, and the tires, brakes,
suspension, and cooling system
are in good operating condition.
All weights and loads are within limits (see pages 218 and 219).
The hitch, safety chain, and any other attachments are secure.
All items on and in the trailer are properly secured and cannot shift
while you drive.
The lights and brakes on your vehicle and the trailer are workingproperly. Your vehicle tires and spare are
properly inflated (see page 323),and the trailer tires and spare are
inflated as recommended by the
trailer maker.
You may want to fill the fuel tank with premium fuel. Premium fuel
provides improved performance.
Drivin g