2000 HONDA ODYSSEY service
[x] Cancel search: servicePage 1 of 352

2000 Odyssey Online Reference Owner's Manual Use these links (and links throughout this manual) to navigate through this reference.
For a printed owner's manual, click on authorized manuals or go to www.helminc.com.
Contents
Owner's Identification Form
Introduction ........................................................................\
............................................................................. i
A Few Words About Safety ........................................................................\
.................................................. ii
Your Vehicle at a Glance ........................................................................\
....................................................... 2
Driver and Passenger Safety ........................................................................\
............................................... 5
Proper use and care of your vehicle's seat belts, and Supplemental Restraint System.
Instruments and Controls........................................................................\
...................................................55
Instrument panel indica tor and gauge, and how to use dashboard and steering column controls.
Comfort and Convenience Features........................................................................\
...............................129
How to operate the climate control system, the audio system, and other convenience features.
Before Driving ........................................................................\
.....................................................................187
What gasoline to use, how to break-in your new vehicle, and how to load luggage and other cargo.
Driving........................................................................\
...................................................................................201
The proper way to start the engine, shift the transmission, and park, plus towing a trailer.
Maintenance........................................................................\
.........................................................................225
The Maintenance Schedule shows you when you need to take your vehicle to the dealer.
Appearance Care........................................................................\
.................................................................283
Tips on cleaning and protecting your vehicle. Things to look for if your car ever needs body repairs.
Taking Care of the Unexpected........................................................................\
.......................................291
This section covers several problems motorists sometimes experience, and how to handle them.
Technical Information........................................................................\
.......................................................319
ID numbers, dimensions, capaciti es, and technical information.
Warranty and Customer Relations (U.S. and Canada)......................................................................331
A summary of the warranties covering your new Honda, and how to contact us.
Authorized Manuals (U.S. only)........................................................................\
.......................................337
How to order manuals and other technical literature.
Index ........................................................................\
......................................................................................... I
Service Information Summary
A summary of information you need when you pull up to the fuel pump.
Page 8 of 352

Driver an d Passenge r Safet y
This sectio
n gives you important
information about how to protect
yourself and your passengers. It
shows you how to use seat belts
properly. It explains your Supple-
mental Restraint System. And it tells
you how to properly restrain infants
and children in your vehicle.
Important Safety Precautions ..........
6
Your Vehicle'
s Safety Features........
7
Seat
Belts.......................................
.
8
Airbags............................................
9
Seat
s & Seat-Backs......................
10
Head
Restraints..........................
. 10
Door Locks................................... 10
Pre-Drive Safety Checklist......... 11
Protecting Adults............................. 12
1. Close and Lock the Doors...... 12
2. Adjust the Front Seats............ 12 3. Adjust the Seat-Backs............. 13
4. Adjust the Head Restraints.... 14 5. Fasten and Position the Seat
Belts...................................... 15
6. Adjust the Steering Wheel.....
19
7. Maintai
n a Proper Sitting
Position................................. 19
Advice for Pregnant Women...... 20
Additional Safety Precautions.... 20
Protecting Children......................... 22 All Children Must Be
Restrained................................ 22
Children Should Sit in the Back
Seat............................................ 23
The Passenger's Airbag Poses Serious Risks to Children....... 23
If You Must Drive with Several Children.................................... 25
If a Child Requires Close Attention................................... 25 Additional Safety Precautions.... 25
General Guidelines for Using Child Seats................................ 26
Protecting Infants........................ 30
Protecting Small Children.......... 35
Protecting Larger Children........ 39
Using Child Seats with Tethers......................................
43
Additional Informatio
n About Your
Seat Belts.................................. 45
Seat Belt System Components... 45
Lap/Shoulder Belt....................... 45
Seat Belt Maintenance................ 47
Additional Information About Your
SRS............................................
48
SRS Components........................
.
48
How
You
r Airbags Work............ 48
How the Automatic Seat Belt
Tensioners Work..................... 50
How the SRS Indicator Light
Works........................................ 50
SRS Service...................................
51
Additional Safet
y Precautions.... 52
Carbon Monoxide Hazard.............. 53
Safety Labels.................................... 54
Driver an d Passenge r Safet y
Page 54 of 352

Additional Informatio n Abou t You r SR S
If the light comes on or flashes on
and off while you drive.
If you see any of these indications,
your airbags and seat belt tensioners may not deploy when you need them.See your Honda dealer as soon as
possible. SR
S Servic e
Your Supplemental Restraint System is virtually maintenance-free, and
there are no parts you can safelyservice. However, you must have
your vehicle serviced if:
Your airbags ever inflate. The
airbags, seat belt tensioners, and
control unit must be replaced. Do
not try to remove or replace the
airbags yourself.
This must be done by a Honda dealer or a knowledgeable body
shop.
The SRS indicator light alerts you
to a problem. Take your vehicle to
an authorized Honda dealer as soon as possible. If you ignore this
indication, the airbags might not
inflate when you need them (see
page 50).
Drive r an d Passenge r Safet y
Ignoring the SRS indicator light
can result in serious injury or
death if the airbags do not inflate when needed.
Have your vehicle checked by a
dealer as soon as possible if
the SRS light alerts you to a potential problem.
Page 190 of 352

Befor
e Drivin g
Before you begin driving your Honda,
you should know what gasoline to use, and how to check the levels of
important fluids. You also need to
know how to properly store luggage or packages. The information in this
section will help you. If you plan to
add any accessories to your vehicle,
please read the information in this section first. Break-in Period.............................. 188
Gasoline.......................................... 188
Service Station Procedures .......... 189 Filling the Fuel Tank................. 189Opening the Hood..................... 190 Oil Check................................ 192
Engine Coolant Check.......... 193
Fuel Economy................................ 194 Vehicle Condition...................... 194
Driving Habits............................ 194
Accessories and Modifications.... 195 Carrying Cargo.............................. 197
Before Drivin g
Page 192 of 352

Gasoline, Servic e Statio n Procedure s
In Canada, some gasolines contain
an octane-enhancing additive called
MMT. If you use such gasolines,
your emission control system performance may deteriorate and
the Malfunction Indicator Lamp on
your instrument panel may turn on. If this happens, contact yourauthorized Honda dealer for service.Fillin g th e Fue l Tan k
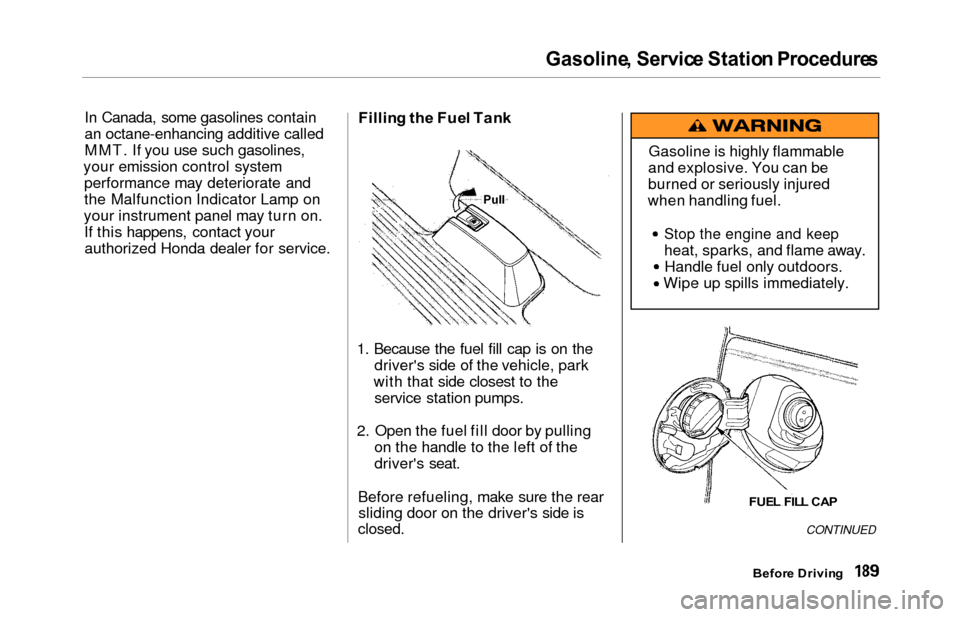
1. Because the fuel fill cap is on the
driver's side of the vehicle, park
with that side closest to the service station pumps.
2. Open the fuel fill door by pulling on the handle to the left of the
driver's seat.
Before refueling, make sure the rear sliding door on the driver's side is
closed.CONTINUED
Befor e Drivin g
Gasoline is highly flammable
and explosive. You can be
burned or seriously injured
when handling fuel.
Stop the engine and keep
heat, sparks, and flame away. Handle fuel only outdoors.
Wipe up spills immediately.
FUE L FIL L CA P
Pull
Page 193 of 352

Service Statio n Procedure s
3. Remove the fuel fill cap slowly.
You may hear a hissing sound aspressure inside the tank escapes.
Place the cap in the holder on the
fuel fill door.
4. Stop filling the tank after the fuel nozzle automatically clicks off. Do
not try to "top off" the tank, leavesome room for the fuel to expand
with temperature changes.
5. Screw the fuel fill cap back on, tighten it until it clicks several
times. If you do not properly
tighten the cap, the Malfunction
Indicator Lamp may come on (seepage 309 ).
6. Push the fuel fill door closed until it latches.Openin g th e Hoo d
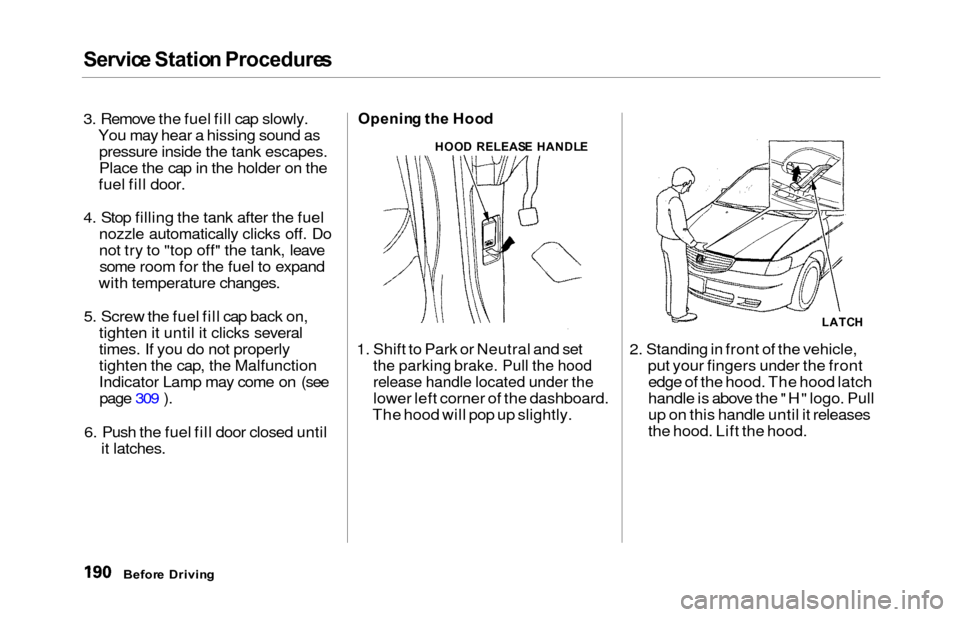
1. Shift to Park or Neutral and set
the parking brake. Pull the hood
release handle located under the
lower left corner of the dashboard.
The hood will pop up slightly. 2. Standing in front of the vehicle,
put your fingers under the frontedge of the hood. The hood latch
handle is above the "H" logo. Pull
up on this handle until it releases
the hood. Lift the hood.
Befor e Drivin g
HOOD RELEAS E HANDL E
LATCH
Page 195 of 352

Service Statio n Procedure s
Oil Check
Check the engine oil level every time
you fill the vehicle with fuel. Wait a few minutes after turning the engine off before you check the oil.
1. Remove the dipstick (orange
handle).
2. Wipe the dipstick with a clean cloth or paper towel. 3. Insert it all the way back in its tube.
Befor
e Drivin g
DIPSTIC K
Page 196 of 352

Service Statio n Procedure s
4. Remove the dipstick again and
check the level. It should be
between the upper and lower marks.
If it is near or below the lower mark, see Addin g Oi l on page 239 .
Engine Coolant Check
MA X RESERV E TAN K
Look at the coolant level in the
radiator reserve tank. Make sure it is
between the MAX and MIN lines. If
it is below the MIN line, see Addin g
Engin e Coolan t on page 243 for
information on adding the proper
coolant. Refer to Owne
r Maintenanc e
Check s on page 237 for information
on checking other items in your
Honda.
Befor e Drivin g
MIN
UPPE R MAR K
LOWE R MAR K