2000 HONDA CIVIC COUPE check engine
[x] Cancel search: check enginePage 61 of 293
Gauge
s
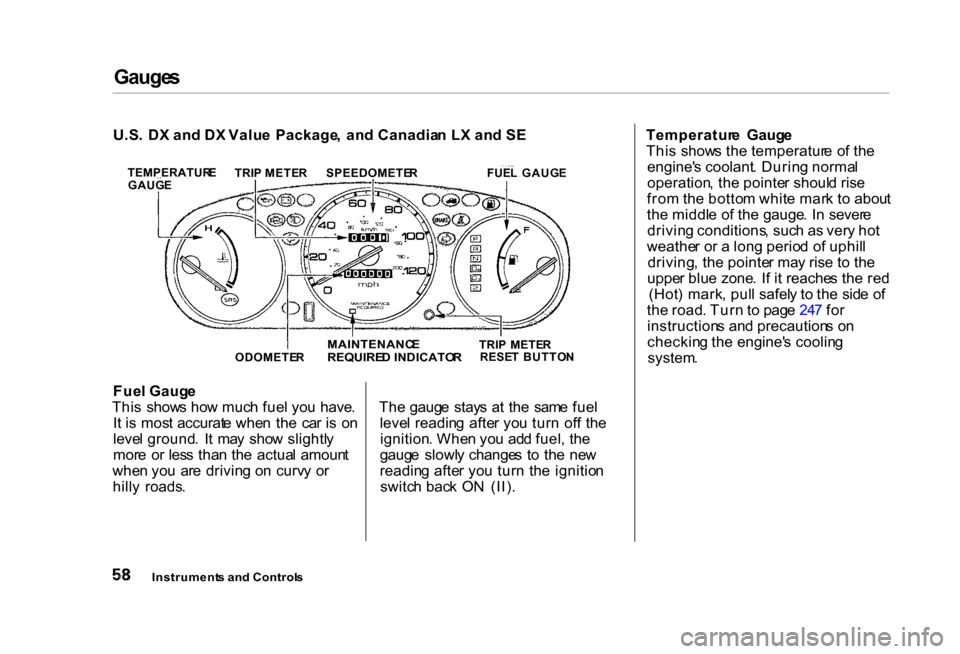
Fue l Gaug e
Thi s show s ho w muc h fue l yo u have .
I t i s mos t accurat e whe n th e ca r i s o n
leve l ground . I t ma y sho w slightl y
mor e o r les s tha n th e actua l amoun t
whe n yo u ar e drivin g o n curv y o r
hill y roads . Th
e gaug e stay s a t th e sam e fue l
leve l readin g afte r yo u tur n of f th e
ignition . Whe n yo u ad d fuel , th e
gaug e slowl y change s t o th e ne w
readin g afte r yo u tur n th e ignitio n
switc h bac k O N (II) . Temperatur
e Gaug e
Thi s show s th e temperatur e o f th e
engine' s coolant . Durin g norma l
operation , th e pointe r shoul d ris e
fro m th e botto m whit e mar k t o abou t
th e middl e o f th e gauge . I n sever e
drivin g conditions , suc h a s ver y ho t
weathe r o r a lon g perio d o f uphil l
driving , th e pointe r ma y ris e t o th e
uppe r blu e zone . I f i t reache s th e re d
(Hot ) mark , pul l safel y t o th e sid e o f
th e road . Tur n t o pag e 24 7 fo r
instruction s an d precaution s o n
checkin g th e engine' s coolin g
system .
Instrument s an d Control s
U.S
. D X an d D X Valu e Package , an d Canadia n L X an d S E
TEMPERATUR E
GAUG E TRI
P METE RSPEEDOMETE RFUEL GAUG E
ODOMETE R
MAINTENANC
E
REQUIRE D INDICATO R
TRI
P METE R
RESE T BUTTO N
Page 150 of 293
Servic
e Statio n Procedure s
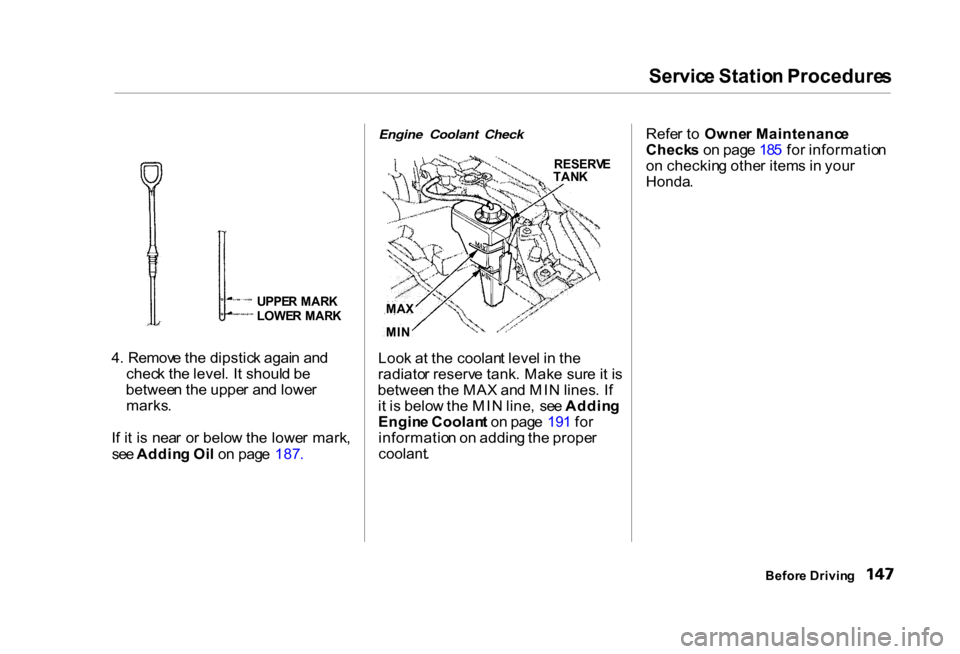
UPPE R MAR K
LOWE R MAR K
4 . Remov e th e dipstic k agai n an d
chec k th e level . I t shoul d b e
betwee n th e uppe r an d lowe r
marks .
I f i t i s nea r o r belo w th e lowe r mark ,
se e Addin g Oi l o n pag e 187 .
Engine Coolant Check
RESERVE
TAN K
Loo k a t th e coolan t leve l i n th e
radiato r reserv e tank . Mak e sur e it i s
betwee n th e MA X an d MI N lines . I f
i t i s belo w th e MI N line , se e Addin g
Engin e Coolan t o n pag e 19 1 fo r
informatio n o n addin g th e prope r
coolant .
Refe
r t o Owne r Maintenanc e
Check s o n pag e 18 5 fo r informatio n
o n checkin g othe r item s i n you r
Honda .
Before Drivin g
MA
X
MI N
Page 151 of 293
Fue
l Econom y
Th e conditio n o f you r ca r an d you r
drivin g habit s ar e th e tw o mos t
importan t thing s tha t affec t th e fue l
mileag e yo u get .
Vehicl e Conditio n
Alway s maintai n you r ca r accordin g
t o th e maintenanc e schedule . Thi s
wil l kee p it i n to p operatin g condition .
A n importan t par t o f tha t mainte -
nanc e is th e Owne r Maintenanc e
Check s (se e pag e 185 ). Fo r
example , a n underinflate d tir e
cause s mor e "rollin g resistance, "
whic h use s fuel . I t als o wear s ou t
faster , s o chec k th e tir e pressur e a t
leas t monthly .
I n winter , th e build-u p o f sno w o n
you r car' s undersid e add s weigh t an d
rollin g resistance . Frequen t cleanin g
help s you r fue l mileag e an d reduce s
th e chanc e o f corrosion . Drivin
g Habit s
Yo u ca n improv e fue l econom y b y
drivin g moderately . Rapi d acceler -
ation , abrup t cornering , an d har d
brakin g us e mor e fuel .
Alway s driv e i n th e highes t gea r tha t
allow s th e engin e t o ru n an d acceler -
at e smoothly .
Dependin g o n traffi c conditions , tr y
t o maintai n a constan t speed . Ever y
tim e yo u slo w dow n an d spee d up ,
you r ca r use s extr a fuel . Us e th e
cruis e control , whe n appropriate , t o
increas e fue l economy . A
col d engin e use s mor e fue l tha n a
war m engine . I t i s no t necessar y t o
"warm-up " a col d engin e b y lettin g it
idl e fo r a lon g time . Yo u ca n driv e
awa y i n abou t a minute , n o matte r
ho w col d it i s outside . Th e engin e
wil l war m u p faster , an d yo u ge t
bette r fue l economy . T o cu t dow n o n
th e numbe r o f "col d starts, " tr y t o
combin e severa l shor t trip s int o one .
Th e ai r conditionin g put s a n extr a
loa d o n th e engin e whic h make s i t
us e mor e fuel . Tur n of f th e A/ C to
cu t dow n o n ai r conditionin g use .
Us e th e flow-throug h ventilatio n
whe n th e outsid e ai r temperatur e i s
moderate .
Befor e Drivin g
Page 167 of 293
Automati
c Transmissio n
Shif t Loc k Releas e
Thi s allow s yo u t o mov e th e shif t
leve r ou t o f Par k i f th e norma l
metho d o f pushin g o n th e brak e
peda l an d pressin g th e releas e
butto n doe s no t work .
1 . Se t th e Parkin g brake .
2 . Remov e th e ke y fro m th e ignitio n
switch .
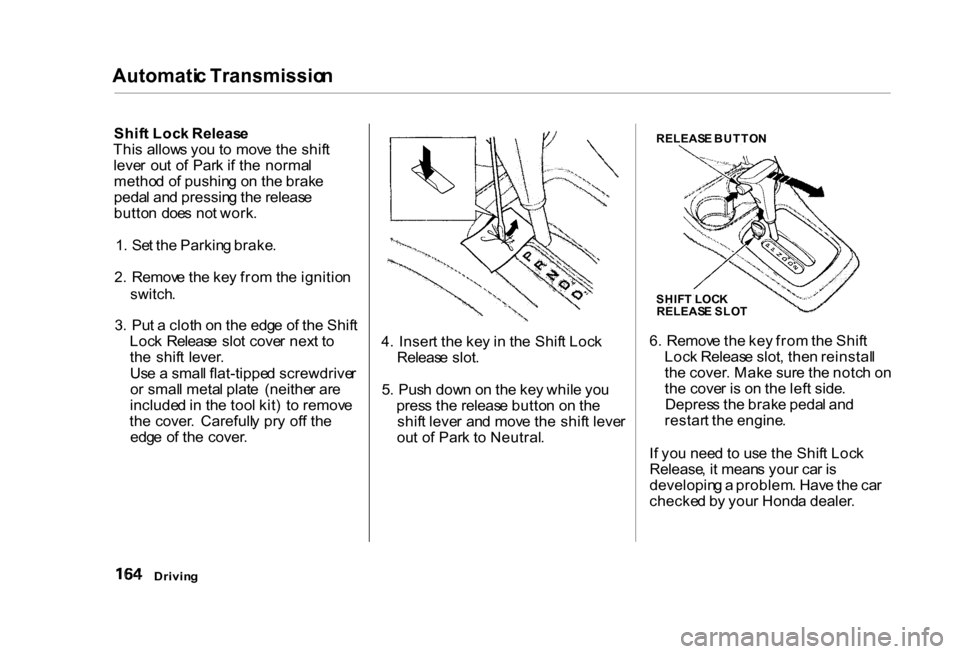
3 . Pu t a clot h o n th e edg e o f th e Shif t
Loc k Releas e slo t cove r nex t t o
th e shif t lever .
Us e a smal l flat-tippe d screwdrive r
o r smal l meta l plat e (neithe r ar e
include d in th e too l kit ) t o remov e
th e cover . Carefull y pr y of f th e
edg e o f th e cover . 4
. Inser t th e ke y i n th e Shif t Loc k
Releas e slot .
5 . Pus h dow n o n th e ke y whil e yo u
pres s th e releas e butto n o n th e
shif t leve r an d mov e th e shif t leve r
ou t o f Par k t o Neutral . 6
. Remov e th e ke y fro m th e Shif t
Loc k Releas e slot , the n reinstal l
th e cover . Mak e sur e th e notc h o n
th e cove r i s o n th e lef t side .
Depres s th e brak e peda l an d
restar t th e engine .
I f yo u nee d t o us e th e Shif t Loc k
Release , i t mean s you r ca r i s
developin g a problem . Hav e th e ca r
checke d b y you r Hond a dealer .
Drivin g
RELEAS
E BUTTO N
SHIF T LOC K
RELEAS E SLO T
Page 172 of 293
Th
e Brakin g Syste m
Drivin g
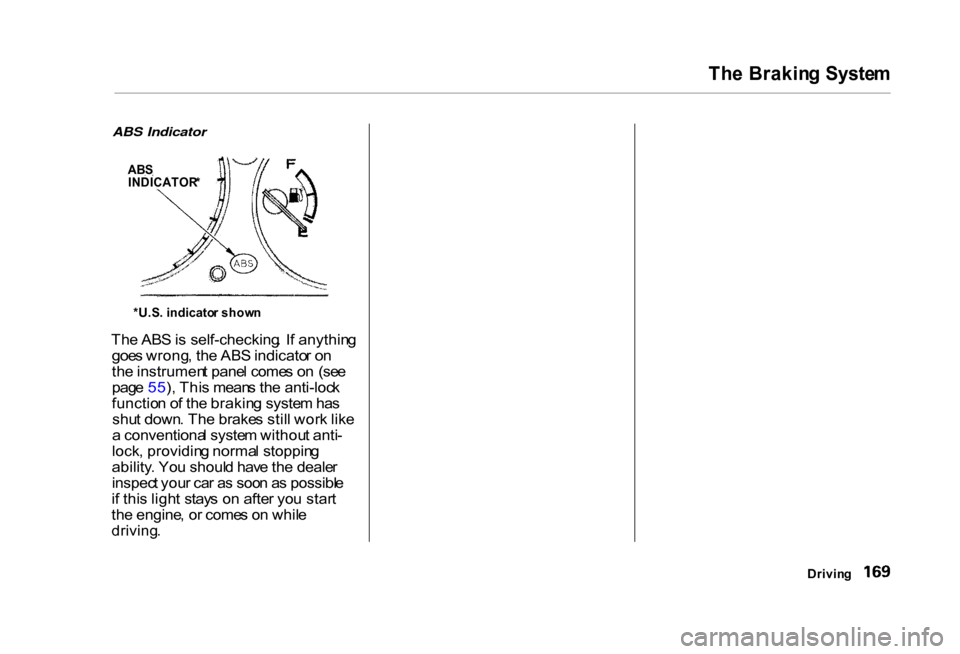
ABS Indicator
Th e AB S is self-checking . I f anythin g
goe s wrong , th e AB S indicato r o n
th e instrumen t pane l come s o n (se e
pag e 55 ), Thi s mean s th e anti-loc k
functio n o f th e brakin g syste m ha s
shu t down . Th e brake s stil l wor k lik e
a conventiona l syste m withou t anti -
lock , providin g norma l stoppin g
ability . Yo u shoul d hav e th e deale r
inspec t you r ca r a s soo n a s possibl e
i f thi s ligh t stay s o n afte r yo u star t
th e engine , o r come s o n whil e
driving .
AB
S
INDICATOR *
*U.S . indicato r show n
Page 251 of 293
I
f You r Engin e Overheat s
4 . I f th e temperatur e gaug e stay s a t
th e re d mark , tur n of f th e engine .
5 . Wai t unti l yo u se e n o mor e sign s
o f stea m or spray , the n ope n th e
hood .
6 . Loo k fo r an y obviou s coolan t leaks ,
suc h a s a spli t radiato r hose .
Everythin g is stil l extremel y hot ,
s o us e caution . I f yo u fin d a leak , i t
mus t b e repaire d befor e yo u
continu e drivin g (se e Emergenc y
Towin g o n pag e 259 ).
7 . I f yo u don' t fin d a n obviou s leak ,
chec k th e coolan t leve l i n th e
radiato r reserv e tan k (se e pag e
147 ). I f th e leve l i s belo w th e
MI N mark , ad d coolan t t o halfwa y
betwee n th e MI N an d MA X marks .
8 . I f ther e wa s n o coolan t i n th e
reserv e tank , yo u ma y als o hav e to
ad d coolan t t o th e radiator . Le t th e
engin e coo l dow n unti l th e pointe r reache
s th e middl e o f th e tempera -
tur e gauge , o r lower , befor e check -
in g th e radiator .
9 . Usin g glove s o r a larg e heav y
cloth , tur n th e radiato r ca p
counterclockwise , withou t pushin g
down , t o th e firs t stop . Thi s
release s an y remainin g pressur e in
th e coolin g system . Afte r th e
pressur e releases , pus h dow n o n
th e ca p an d tur n it unti l i t come s
off . 10.Star
t th e engin e an d se t th e
temperatur e contro l dia l t o
maximum . Ad d coolan t t o th e
radiato r u p to th e bas e o f th e fille r
neck . I f yo u d o no t hav e th e
prope r coolan t mixtur e available ,
yo u ca n ad d plai n water .
Remembe r t o hav e th e coolin g
syste m draine d an d refille d wit h
th e prope r mixtur e a s soo n a s yo u
can .
11.Pu t th e radiato r ca p bac k o n
tightly . Ru n th e engin e an d watc h
th e temperatur e gauge . I f i t goe s
bac k t o th e re d mark , th e engin e
need s repair . (Se e Emergenc y
Towin g o n pag e 25 9 .)
12.I f th e temperatur e stay s normal ,
chec k th e coolan t leve l i n th e
radiato r reserv e tank . I f i t ha s
gon e down , ad d coolan t t o th e
MA X mark . Pu t th e ca p bac k o n
tightly .
Takin g Car e o f th e Unexpecte d
Removin
g th e radiato r ca p
whil e th e engin e i s ho t ca n
caus e th e coolan t t o spra y out ,
seriousl y scaldin g you .
Alway s le t th e engin e an d
radiato r coo l dow n befor e
removin g th e radiato r cap .
Page 254 of 293
Malfunctio
n Indicato r Lam p
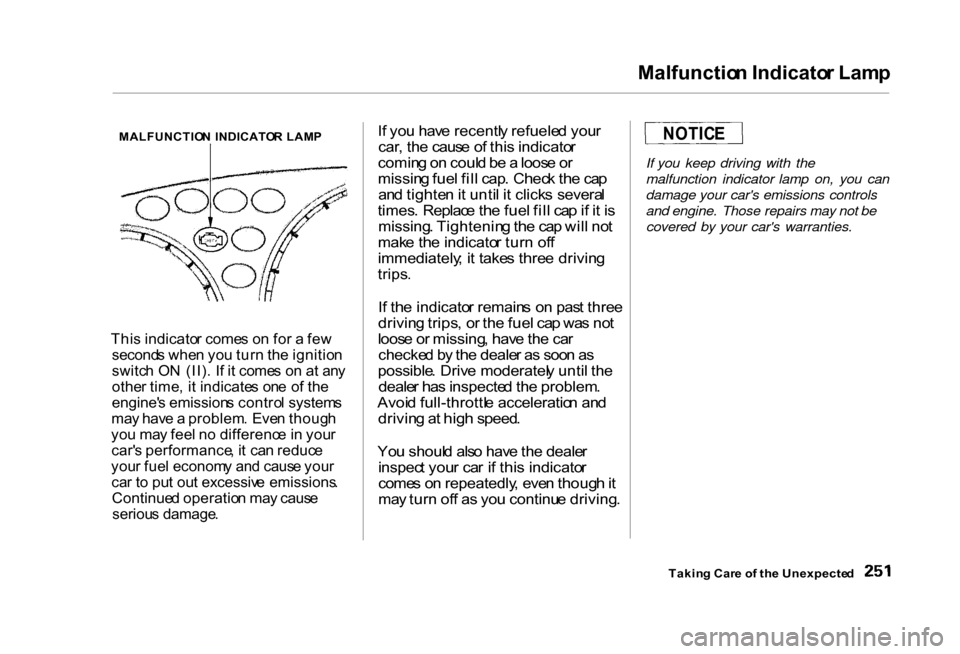
MALFUNCTIO N INDICATO R LAM P
Thi s indicato r come s o n fo r a fe w
second s whe n yo u tur n th e ignitio n
switc h O N (II) . I f i t come s o n a t an y
othe r time , i t indicate s on e o f th e
engine' s emission s contro l system s
ma y hav e a problem . Eve n thoug h
yo u ma y fee l n o differenc e in you r
car' s performance , i t ca n reduc e
you r fue l econom y an d caus e you r
ca r t o pu t ou t excessiv e emissions .
Continue d operatio n ma y caus e
seriou s damage .
I
f yo u hav e recentl y refuele d you r
car , th e caus e o f thi s indicato r
comin g o n coul d b e a loos e o r
missin g fue l fil l cap . Chec k th e ca p
an d tighte n it unti l i t click s severa l
times . Replac e th e fue l fil l ca p if i t i s
missing . Tightenin g th e ca p wil l no t
mak e th e indicato r tur n of f
immediately ; i t take s thre e drivin g
trips .
I f th e indicato r remain s o n pas t thre e
drivin g trips , o r th e fue l ca p wa s no t
loos e o r missing , hav e th e ca r
checke d b y th e deale r a s soo n a s
possible . Driv e moderatel y unti l th e
deale r ha s inspecte d th e problem .
Avoi d full-throttl e acceleratio n an d
drivin g a t hig h speed .
Yo u shoul d als o hav e th e deale r
inspec t you r ca r i f thi s indicato r
come s o n repeatedly , eve n thoug h it
ma y tur n of f a s yo u continu e driving .If you keep driving with the
malfunction indicator lamp on, you can
damage your car's emissions controls
and engine. Those repairs may not be
covered by your car's warranties.
Takin g Car e o f th e Unexpecte d
NOTIC
E
Page 286 of 293
Inde
x
Clutc h Fluid................................... . 19 9
C O in th e Exhaust........................ . 27 0
Col d Weather , Startin g in............ . 15 7
Compac t Spare.............................. . 23 8
Consume r Information*............... . 27 4
Controls , Instrument s and............. .
51
Coolan t
Adding........................................ . 19 1
Checking.................................... .
14
7
Prope r Solution......................... . 19 1
Replacing................................... . 19 3
Temperatur e Gauge................... . 5 8
Corrosio n Protection.................... . 23 5
Crankcas e Emission s Contro l
System........................................ . 27 0
Cruis e Contro l Operation.............. . 6 6
Custome r Relation s Office.......... . 27 4
DANGER , Explanatio n of................ . i i
Dashboard................................... . 2 , 5 2
Daytim e Runnin g Lights................ . 6 1
Dea d Battery , Wha t t o Do........... . 24 5
Defects , Reportin g Safety............ . 28 0
Defo g an d Defrost.......................... . 9 5 Defogger
, Rea r Window................ . 6 4
Defrostin g th e Windows................ . 9 5
DEXRON ® II I Automati c
Transmissio n Fluid................... . 19 7
Dimensions.................................... . 26 4
Dimmin g th e Headlights............... . 6 1
Dipstic k
Automati c Transmission.......... . 19 7
Engin e Oil.................................. . 14 6
Directiona l Signals.......................... . 6 2
Disabled , Towin g You r Ca r If..... . 25 9
Dis c Brak e Wea r Indicators........ . 16 6
Disposa l o f Use d Oil..................... . 19 0
Door s
Lockin g an d Unlocking.............. . 7 1
Powe r Doo r Locks...................... . 7 2
DO T Tir e Qualit y Grading.......... . 26 6
Downshifting , 5-spee d Manua l
Transmission............................. . 15 8
Driv e Belts..................................... . 21 0
Drive r an d Passenge r Safety........... . 5
Driving........................................... . 15 5
Economy.................................... . 14 8
I n Ba d Weather......................... . 17 0
I n Foreig n Countries................ . 26 9 Economy
, Fuel.............................. . 14 8
Emergencie s o n th e Road............ . 23 7
Battery , Jum p Starting............. . 24 5
Brak e Syste m Indicator............ 252
Changin g a Fla t Tire................ . 23 9
Chargin g Syste m Indicator..... . 25 0
Checkin g th e Fuses.................. . 25 5
Lo w Oi l Pressur e Indicator..... . 24 9
Malfunctio n Indicato r Lamp... . 25 1
Manuall y Closin g Moonroof... . 25 3
Overheate d Engine.................. . 24 7
Emergenc y Brake........................... . 8 5
Emergenc y Flashers...................... . 6 4
Emergenc y Towing...................... . 25 9
Emission s Controls....................... . 27 0
Engin e
Coolan t Temperatur e Gaug e .... . 5 8
Driv e Belts................................. . 21 0
Malfunctio n Indicato r
Lamp................................ .56, 25 1
Oi l Pressur e Indicator........ . 55 , 24 9
Oil , Wha t Kin d to Use.............. . 18 7
CONTINUED