Page 3 of 398
ii
Table of Contents
Keys and Door Locks
Keyless Entry System
Automatic Transmission
Parking Brake
Windows
Tilt Wheel (Option)
Turn Signal/Multifunction LeverWindshield Wipers
Cruise Control (Option)
Interior and Exterior Lamps
Mirrors
Storage Compartments
Accessory Power Outlets
Instrument Panel, Warning Lights and Gages Seats and Seat Controls
Safety BeltsAir Bag System
Child Restraints
Section
1
Section
2
Seats and Restraint Systems
Features and Controls
Page 10 of 398
yellowblue
ix
For example,
these symbols
are used on an
original battery:
CAUTION
POSSIBLE
INJURY
PROTECT
EYES BY
SHIELDING
CAUSTIC
BATTERY
ACID COULD
CAUSE
BURNS
AVOID
SPARKS OR
FLAMES
SPARK OR
FLAME
COULD
EXPLODE
BATTERY
These symbols
are important
for you and
your passengers
whenever your
vehicle is
driven:
DOOR LOCK
UNLOCK
FASTEN
SEAT
BELTS
POWER
WINDOW
AIR BAG
These symbols
have to do with
your lamps:
MASTER
LIGHTING
SWITCH
TURN
SIGNALS
PARKING
LAMPS
HAZARD
WARNING
FLASHER
DAYTIME
RUNNING
LAMPS
FOG LAMPS
These symbols
are on some of
your controls:
WINDSHIELD
WIPER
WINDSHIELD
WASHER
WINDSHIELD
DEFROSTER
REAR
WINDOW
DEFOGGER
VENTILATING
FAN
These symbols
are used on
warning and
indicator lights:
ENGINE
COOLANT
TEMP
BATTERY
CHARGING
SYSTEM
BRAKE
COOLANT
ENGINE OIL
PRESSURE
ANTI-LOCK
BRAKES
Here are some
other symbols
you may see:
FUSE
LIGHTER
HORN
SPEAKER
FUEL
Vehicle Symbols
These are some of the symbols you may find on your vehicle.
Page 12 of 398
Service Station Guide
Oil Viscosity
Engine Oil
See Section 6*
Engine Oil Dipstick
See Section 6*Fuel
Use unleaded gas only,
87 Octane or higher.
See Section 6*
Cooling System
See Section 5*
Hood Release
See Section 6
Windshield Washer
Fluid
See Section 6
Spare Tire Pressure
See Section 5
Alternate
Fuel Door Release
See Section 6
Battery
See Section 6Remote Fuel
Release Door
See Section 6
Tire Pressure
See Section 6
For
a More
Detailed Look at
What's Under the Hood
See Section 6*
*For vehicles equipped with diesel engine, see the Diesel Engine Supplement
Page 19 of 398
yellowblue
1-7
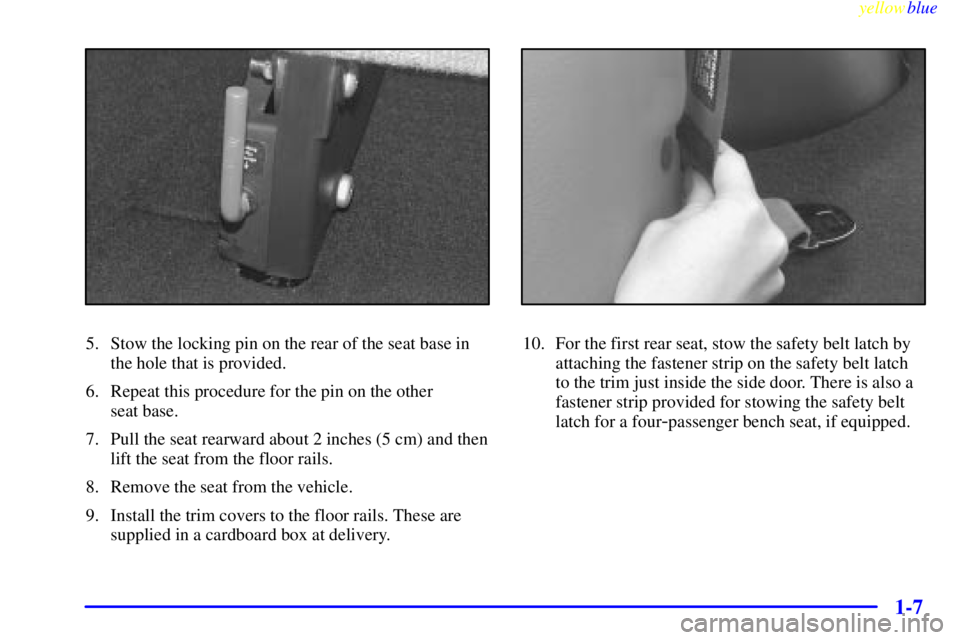
5. Stow the locking pin on the rear of the seat base in
the hole that is provided.
6. Repeat this procedure for the pin on the other
seat base.
7. Pull the seat rearward about 2 inches (5 cm) and then
lift the seat from the floor rails.
8. Remove the seat from the vehicle.
9. Install the trim covers to the floor rails. These are
supplied in a cardboard box at delivery.10. For the first rear seat, stow the safety belt latch by
attaching the fastener strip on the safety belt latch
to the trim just inside the side door. There is also a
fastener strip provided for stowing the safety belt
latch for a four
-passenger bench seat, if equipped.
Page 28 of 398
yellowblue
1-16
Driver Position
This part describes the driver's restraint system.
Lap-Shoulder Belt
The driver has a lap-shoulder belt. Here's how to wear
it properly.
1. Close and lock the door.
2. Adjust the seat (to see how, see ªSeatsº in the Index)
so you can sit up straight.
3. Pick up the latch plate and pull the belt across you.
Don't let it get twisted.
4. Push the latch plate into the buckle until it clicks.
Pull up on the latch plate to make sure it is secure.
If the belt isn't long enough, see ªSafety Belt
Extenderº at the end of this section.
Make sure the release button on the buckle is
positioned so you would be able to unbuckle the
safety belt quickly if you ever had to.
Page 36 of 398
yellowblue
1-24
To unlatch the belt, just push the button on the buckle.
The belt should go back out of the way.
Before you close the door, be sure the belt is out of the
way. If you slam the door on it, you can damage both the
belt and your vehicle.
Safety Belt Use During Pregnancy
Safety belts work for everyone, including pregnant
women. Like all occupants, they are more likely to be
seriously injured if they don't wear safety belts.
A pregnant woman should wear a lap-shoulder belt, and
the lap portion should be worn as low as possible, below
the rounding, throughout the pregnancy.
Page 43 of 398

yellowblue
1-31
How does an air bag restrain?
In moderate to severe frontal or near
-frontal collisions,
even belted occupants can contact the steering wheel or
the instrument panel. Air bags supplement the protection
provided by safety belts. Air bags distribute the force of
the impact more evenly over the occupant's upper body,
stopping the occupant more gradually. But air bags
would not help you in many types of collisions,
including rollovers, rear impacts and side impacts,
primarily because an occupant's motion is not toward
those air bags. Air bags should never be regarded as
anything more than a supplement to safety belts,
and then only in moderate to severe frontal or
near
-frontal collisions.
What will you see after an air bag inflates?
After an air bag inflates, it quickly deflates, so quickly that
some people may not even realize the air bag inflated.
Some components of the air bag module
-- the steering
wheel hub for the driver's air bag, or the instrument panel
for the right front passenger's bag
-- will be hot for a short
time. The parts of the bag that come into contact with you
may be warm, but not too hot to touch. There will be
some smoke and dust coming from vents in the deflated
air bags. Air bag inflation doesn't prevent the driver from
seeing or from being able to steer the vehicle, nor does it
stop people from leaving the vehicle.
CAUTION:
When an air bag inflates, there is dust in the air.
This dust could cause breathing problems for
people with a history of asthma or other
breathing trouble. To avoid this, everyone in the
vehicle should get out as soon as it is safe to do so.
If you have breathing problems but can't get out
of the vehicle after an air bag inflates, then get
fresh air by opening a window or door.
�Air bags are designed to inflate only once. After they
inflate, you'll need some new parts for your air bag
system. If you don't get them, the air bag system
won't be there to help protect you in another crash.
A new system will include air bag modules and
possibly other parts. The service manual for your
vehicle covers the need to replace other parts.
Page 77 of 398

2-
yellowblue
2-1
Section 2 Features and Controls
Here you can learn about the many standard and optional features on your vehicle, and information on starting,
shifting and braking. Also explained are the instrument panel and the warning systems that tell you if everything is
working properly
-- and what to do if you have a problem.
2
-2 Keys
2
-3 Door Locks
2
-6 Keyless Entry System (If Equipped)
2
-14 Rear Doors
2
-15 Theft
2
-16 Passlock�
2-17 New Vehicle ªBreak-Inº
2
-17 Ignition Positions
2
-18 Starting Your Gasoline Engine
2
-20 Engine Coolant Heater (If Equipped)
2
-21 Automatic Transmission Operation
2
-24 Parking Brake
2
-25 Shifting Into PARK (P)
2
-28 Shifting Out of PARK (P)
2
-28 Parking Over Things That Burn
2
-29 Engine Exhaust2
-29 Running Your Engine While You're Parked
2
-30 Locking Rear Axle
2
-30 Windows
2
-33 Horn
2
-33 Tilt Wheel (Option)
2
-33 Turn Signal/Multifunction Lever
2
-39 Exterior Lamps
2
-41 Interior Lamps
2
-43 Mirrors
2
-46 Storage Compartments
2
-46 Cigarette Lighter/Ashtray
2
-47 Sun Visors
2
-48 The Instrument Panel - Your
Information System
2
-49 Instrument Panel Cluster
2
-51 Warning Lights, Gages and Indicators