Page 99 of 280
Rear dome lamp
The dome lamp lights when:
²any door is opened.
²the instrument panel dimmer
switch is held up until the
courtesy lamps come on.
²any of the remote entry controls
are pressed and the ignition is
OFF.
With the ignition key in the ACC or ON position, the rear dome lamp can
be turned ON or OFF by sliding the control.
OVERHEAD CONSOLE (IF EQUIPPED)
The appearance of your vehicle's overhead console will vary according to
your option package.
Forward storage bins and conversation mirror (if equipped)
The storage compartments may be
used to store sunglasses or similar
objects. The conversation mirror
allows the driver to view the rear
seating area. This does not replace
your rear view mirror. Refer to
Power Sliding Doors (PSD)(if
equipped)in this chapter for
operation of doors.
Installing a garage door opener (if equipped)
The storage compartment can be converted to accommodate a variety of
aftermarket garage door openers:
Controls and features
99
Page 110 of 280

This device complies with part 15 of the FCC rules and with RS-210 of
Industry Canada. Operation is subject to the following two conditions:
(1) This device may not cause harmful interference, and (2) This device
must accept any interference received, including interference that may
cause undesired operation.
Changes or modifications not expressly approved by the party
responsible for compliance could void the user's authority to
operate the equipment.
Illuminated entry
The interior lights will illuminate when the remote entry Unlock or Panic
control is pressed with the doors closed or when unlocking or opening a
power sliding door (if equipped).
The system automatically turns off after 25 seconds or when the ignition
is turned to the RUN position. The panel dimmer control mustnotbe
set to the OFF position for the illuminated entry to operate.
The inside lights will not turn off if:
²they have been turned on with the instrument panel dimmer control
or
²any door is open.
The battery saver will shut off the interior lamps 30 minutes after the
last door is closed even if the panel dimmer control is left on.
Illuminated exit
The interior lights will illuminate when the key is removed from the
ignition. When the headlamp control is on the ªsleeping baby modeº, only
the lower interior lights will illuminate.
The system automatically turns off after 25 seconds or when the driver's
door is opened. The panel dimmer control mustnotbe set to the OFF
position for the illuminated entry to operate.
Replacing the battery
The remote transmitter is powered by one coin type three-volt lithium
battery CR2032 or equivalent. Typical operating range will allow you to
be up to 10 meters (33 feet) away from your vehicle. A decrease in
operating range can be caused by:
²weather conditions
²nearby radio towers
Controls and features
110
Page 116 of 280

Procedure to program spare SecuriLockYkeys to your vehicle
New coded keys must have the correct mechanical key cut for your
vehicle.
Conventional (non-coded) keyscannotbe programmed to your vehicle.
You will need to have two previously programmed coded keys and the
new unprogrammed SecuriLockykey readily accessible for timely
implementation of each step in the procedure. Please read and
understand the entire procedure before you begin.
1. Insert the first previously programmed coded key into the ignition and
turn the ignition from OFF to ON (maintain ignition in ON for at least
one second).
2. Turn ignition to OFF and remove the first coded key from the ignition.
3. Within five seconds of turning the ignition to OFF, insert the second
previously programmed coded key into the ignition and turn the ignition
from OFF to ON (maintain ignition in ON for at least one second but no
more than five seconds).
4. Turn the ignition to OFF and remove the second coded key from the
ignition.
5. Within 10 seconds of turning the ignition to OFF, insert the new
unprogrammed key (new key/valet key) into the ignition and turn the
ignition from OFF to ON (maintain ignition in ON for at least one
second). This step will program your new key to a coded key.
6. To program additional new unprogrammed key(s), repeat this
procedure from step 1.
If the programming procedure was successful, the new coded key(s) will
start the vehicle's engine. The theft indicator (located on the instrument
panel) will light for three seconds and then go out.
If the programming procedure was not successful, the new coded key(s)
will not operate the vehicle's engine. The theft indicator will flash on and
off. Wait at least one minute and then repeat the procedure from step 1.
If failure repeats, bring your vehicle to your dealership to have the new
spare key(s) programmed.
AUXILIARY POWER POINT
The power point is an additional power source for electrical accessories.
An additional power point is located in the rear cargo area.
Controls and features
116
Page 154 of 280

Tether anchorage hardware
Children should be placed in the rear in an appropriate child
safety seat that is properly secured to the vehicle.
Rear-facing infant seats must always be secured in the rear seat.
In vehicles without a rear seat, a rear-facing infant seat should
be secured in the front seat only if your vehicle does not have a
passenger side air bag or your vehicle is equipped with a passenger air
bag deactivate switch and the switch is turned to ªOFF.º
When using forward-facing child safety seats in vehicles with
only two seating positions so the forward-facing child safety seat
cannot be placed in the rear of the vehicle, move the passenger seat as
far back from the instrument panel as possible.
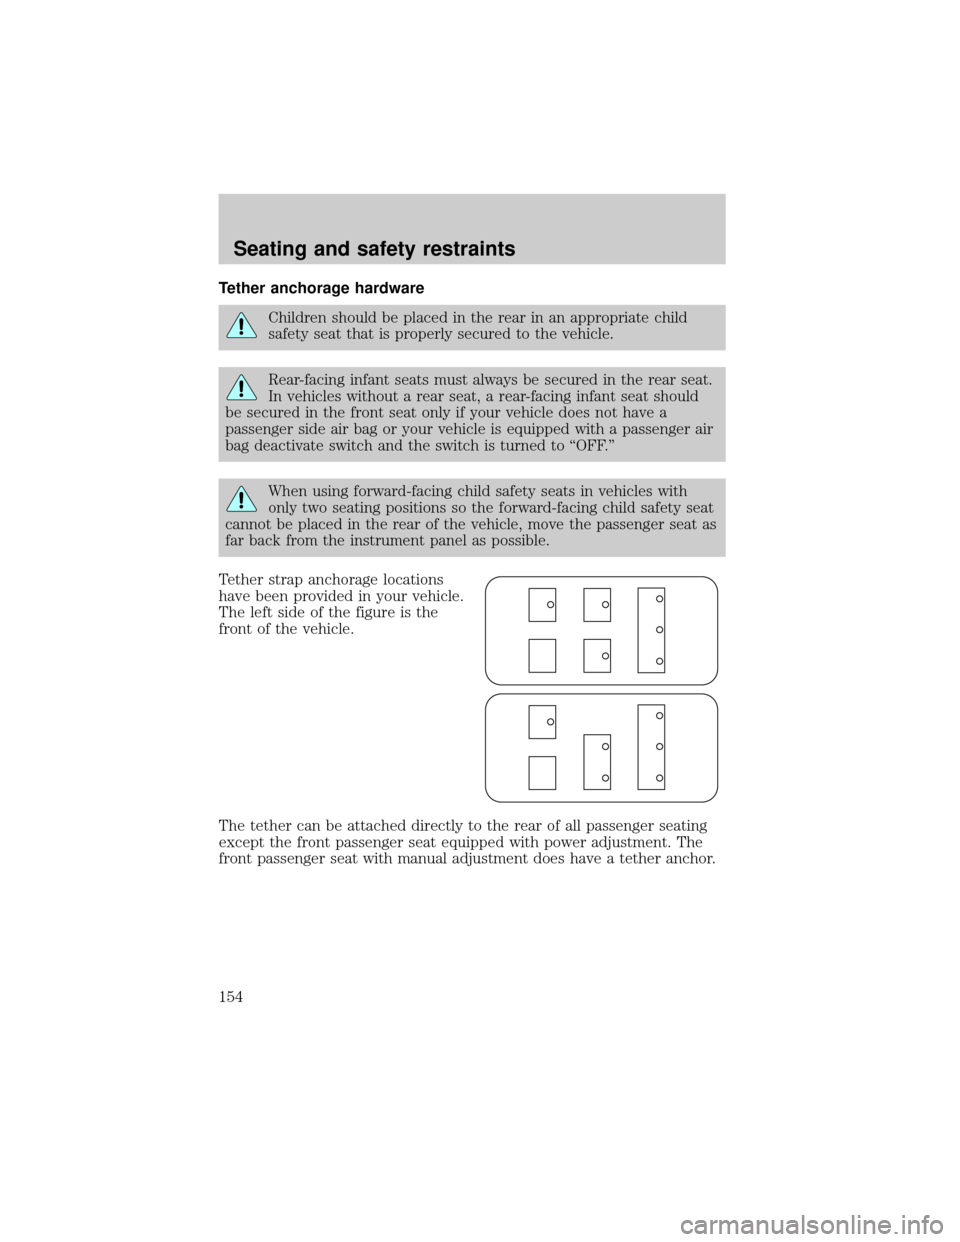
Tether strap anchorage locations
have been provided in your vehicle.
The left side of the figure is the
front of the vehicle.
The tether can be attached directly to the rear of all passenger seating
except the front passenger seat equipped with power adjustment. The
front passenger seat with manual adjustment does have a tether anchor.
Seating and safety restraints
154
Page 176 of 280

²Service your vehicle more frequently if you tow a trailer. Refer to
Special Operating Conditions in the Scheduled Maintenance Guide.
²Do not tow a trailer until your vehicle has been driven at least 800 km
(500 miles).
²Refer to the instructions included with towing accessories for the
proper installation and adjustment specifications.
If your vehicle is equipped with the optional heavy duty trailer tow
wiring, it is pre-wired for trailer towing. An electrical connector is
provided under the instrument panel for installing a customer-supplied
electric brake controller. Another electrical connector is provided at the
hitch. This connector provides power to the trailer for taillamps, stop
and turn lamps, back up lamps, battery charge, electric brakes (when a
customer provided controller is installed) and ground. The kit included
with your vehicle provides you with adaptors to attach the brake
controller and convert the hitch connector for Class I trailer usage.
TRAILER TOWING TABLE
Engine Maximum GCWRTrailer weight range
(0 - maximum)
Va n
3.0L 2 971 kg (6 550 lbs.) 0-907 kg (0-2 000 lbs.)
3.8L 3 175 kg (7 000 lbs.) 0-907 kg (0-2 000 lbs.)
Wagon
3.0L 2 971 kg (6 550 lbs.) 0-907 kg (0-2 000 lbs.)
3.8L 3 175 kg (7 000 lbs.) 0-907 kg (0-2 000 lbs.)
3.8L with
Trailer Tow
Option3 856 kg (8 500 lbs.) 0-1 588 kg (0-3 500 lbs.)
Do not exceed the maximum loads listed on the Safety Compliance
Certification label. For load specification terms found on the label, refer
toVehicle loadingin this chapter. Remember to figure in the tongue
load of your loaded trailer when figuring the total weight.
Towing trailers beyond the maximum recommended gross trailer
weight exceeds the limit of the vehicle and could result in
engine damage, transmission damage, structural damage, loss of control
and personal injury.
Driving
176
Page 184 of 280
The pull fuse is located under the instrument panel and is visible from
the exterior of the fuse panel cover.
The fuse holder is designed to allow you to pull the fuse (#6) from the
fuse panel circuit without having to completely remove it from the fuse
panel. The fuse and fuse holder will remain in the fuse panel.
If the fuse (#6) must be replaced, the fuse and fuse holder can be
removed by pulling it completely out from the fuse panel cover.
With the fuse (#6) removed, the following systems will not be functional:
²radio
²power sliding door(s) ± (if equipped)
²keyless entry system± (if equipped)
When the pull fuse is reinstalled, the following features will need to be
reset.
²radio pre-sets
²power sliding door(s) ± (if equipped)
Please refer to theUsing Your Audio SystemandPower Sliding Door
sections in theControls and Featureschapter for instructions to reset
these features.
Roadside emergencies
184
Page 204 of 280
Do not start your engine with the air cleaner removed and do
not remove it while the engine is running.
OPENING THE HOOD
1. Inside the vehicle, pull the hood
release handle located under the
bottom left corner of the instrument
panel.
2. Go to the front of the vehicle and release the auxiliary latch that is
located under the front center of the hood.
3. Lift the hood and secure it with the prop rod. Your vehicle's hood has
two locations for the prop rod to be placed. These locations provide two
different hood opening positions. Use the location which best suits your
needs.
HOOD
Maintenance and care
204
Page 245 of 280
Using the right bulbs
Replacement bulbs are specified in the chart below. Headlamp bulbs
must be marked with an authorized ªD.O.T.º for North America and an
ªEº for Europe to assure lamp performance, light brightness and pattern
and safe visibility. The correct bulbs will not damage the lamp assembly
or void the lamp assembly warranty and will provide quality bulb burn
time.
Function Trade Number
Front park/turn lamps 3157 NAK (amber)
Cornering lamps 3156K
Headlamps 9007
Rear license plate lamps 168
High-mount brake lamp 921
Rear turn lamps 3156K
Backup lamps 3156K
Brake/tail lamps 3157K
Dome lamp 921
Cargo liftgate lamp T-562
Map lamps/dome 578 (opt)
Stepwell lamp T-562
Front seat footwell 194
Front door mounted courtesy lamp 168
Second row reading lamp 578
All replacement bulbs are clear in color except where noted.
To replace all instrument panel lights - see your dealer.
Maintenance and care
245