Page 38 of 232
Shuffle feature
The shuffle feature operates in CD
mode and plays all tracks on the
current disc in random order.
If equipped with the CD changer, the shuffle feature continues to the
next disc after all tracks are played.
Press the SHUFFLE control to start this feature. Random order play will
continue until the SHUFFLE control is pressed again.
Setting the clock
To set the hour, press and hold the
hour (H) control. When the desired
hour appears, release the control.
To set the minute, press and hold
the minute (M) control. When the
desired minute appears, release the
control.
Your vehicle is equipped with a special feature that allows you to access
clock mode when the vehicle is not running. Press the H or M control to
engage the clock at this time.
CD changer (if equipped)
Your CD changer is either located in the trunk, the console or the right
side cargo area storage compartment.
1. Slide the door to access the CD
changer magazine.
Controls and features
38
Page 40 of 232

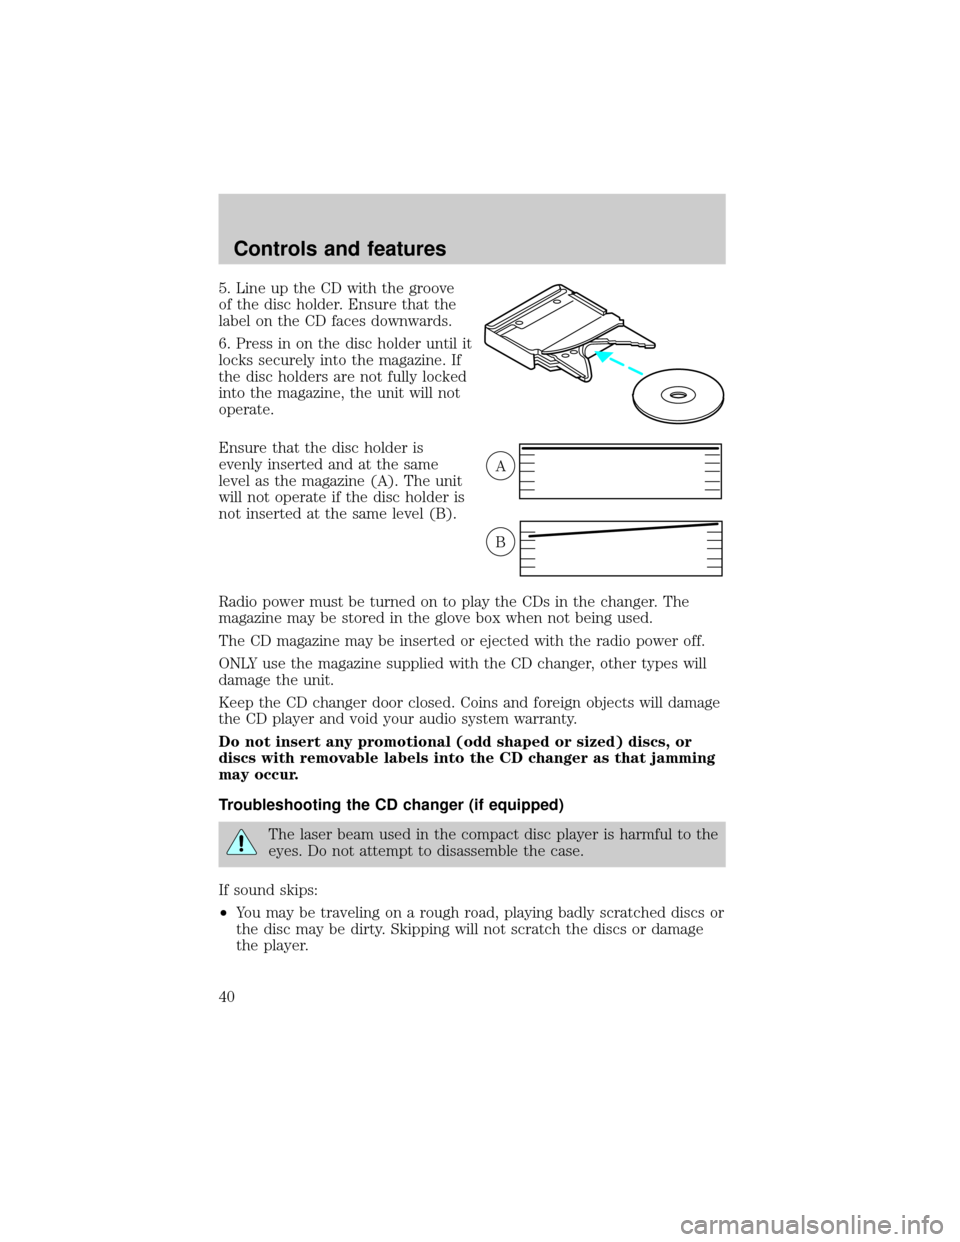
5. Line up the CD with the groove
of the disc holder. Ensure that the
label on the CD faces downwards.
6. Press in on the disc holder until it
locks securely into the magazine. If
the disc holders are not fully locked
into the magazine, the unit will not
operate.
Ensure that the disc holder is
evenly inserted and at the same
level as the magazine (A). The unit
will not operate if the disc holder is
not inserted at the same level (B).
Radio power must be turned on to play the CDs in the changer. The
magazine may be stored in the glove box when not being used.
The CD magazine may be inserted or ejected with the radio power off.
ONLY use the magazine supplied with the CD changer, other types will
damage the unit.
Keep the CD changer door closed. Coins and foreign objects will damage
the CD player and void your audio system warranty.
Do not insert any promotional (odd shaped or sized) discs, or
discs with removable labels into the CD changer as that jamming
may occur.
Troubleshooting the CD changer (if equipped)
The laser beam used in the compact disc player is harmful to the
eyes. Do not attempt to disassemble the case.
If sound skips:
²You may be traveling on a rough road, playing badly scratched discs or
the disc may be dirty. Skipping will not scratch the discs or damage
the player.
A
B
Controls and features
40
Page 43 of 232

POWER ADJUSTABLE FOOT PEDALS (IF EQUIPPED)
Press and hold the rocker control
(located on the side of the driver's
seat) to adjust accelerator and
brake pedal.
²press the rear side of the control
to adjust the pedals toward you
²press the front side of the control to adjust the pedals away from you
The adjustment allows for approximately 76mm (3 inches) of maximum
travel.
Never adjust the accelerator and brake pedal with feet on pedals
or while the vehicle is moving.
TRACTION CONTROLY(IF EQUIPPED)
This control can be used to turn the
Traction Controlyon or off. Refer
to theTraction Controlysection of
theDrivingchapter for more
information.
POSITIONS OF THE IGNITION
1. ACCESSORY, allows the electrical
accessories such as the radio to
operate while the engine is not
running.
2. LOCK, locks the steering wheel,
automatic transmission gearshift
lever and allows key removal.
3. OFF, shuts off the engine without
locking the steering wheel.
4. ON, all electrical circuits
operational. Warning lights illuminated with engine off. Key position
when driving.
5. START, cranks the engine. Release the key as soon as the engine
starts.
PEDALS
T/C O
F
F
1
23
4
5
Controls and features
43
Page 54 of 232

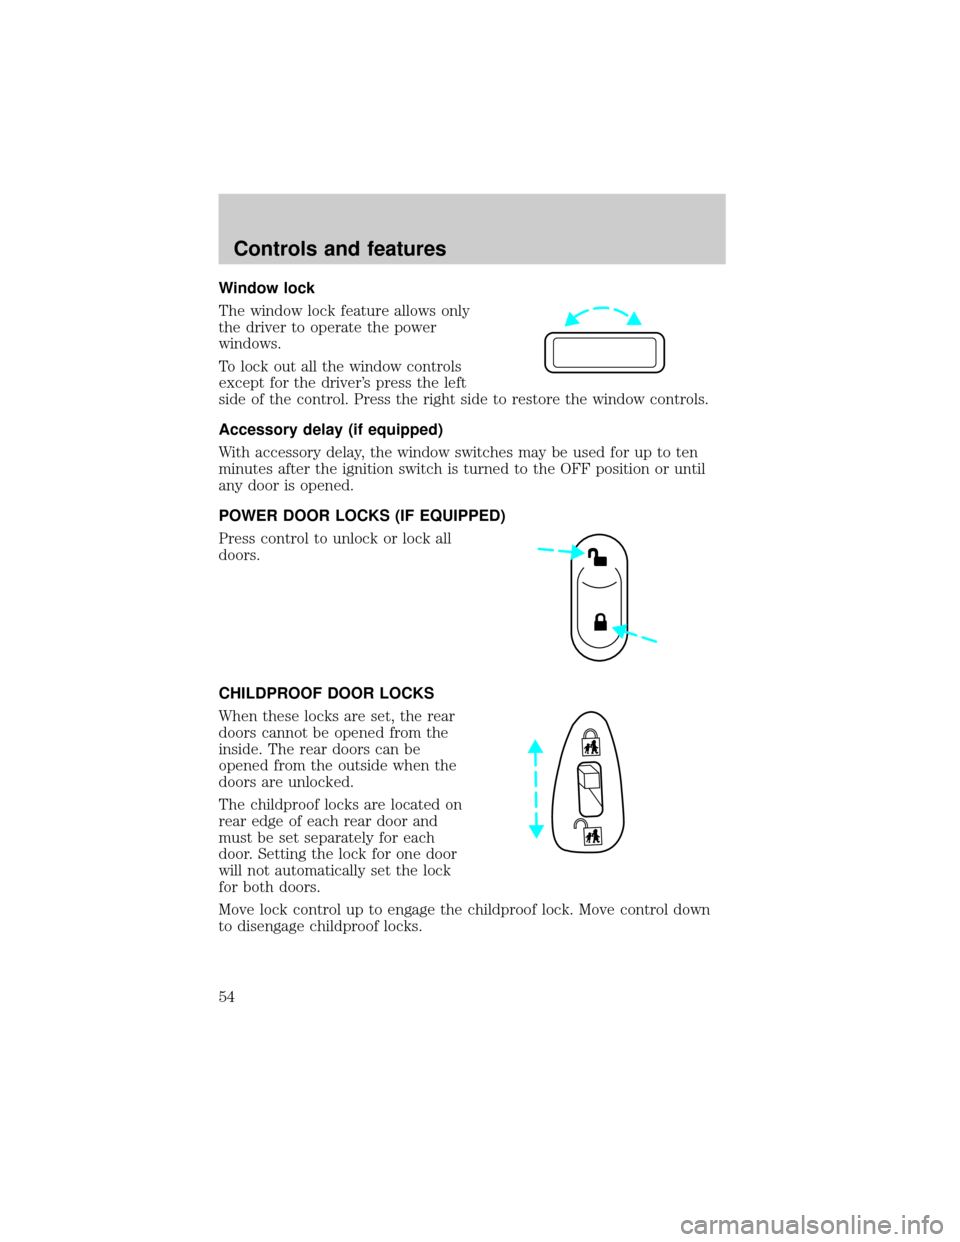
Window lock
The window lock feature allows only
the driver to operate the power
windows.
To lock out all the window controls
except for the driver's press the left
side of the control. Press the right side to restore the window controls.
Accessory delay (if equipped)
With accessory delay, the window switches may be used for up to ten
minutes after the ignition switch is turned to the OFF position or until
any door is opened.
POWER DOOR LOCKS (IF EQUIPPED)
Press control to unlock or lock all
doors.
CHILDPROOF DOOR LOCKS
When these locks are set, the rear
doors cannot be opened from the
inside. The rear doors can be
opened from the outside when the
doors are unlocked.
The childproof locks are located on
rear edge of each rear door and
must be set separately for each
door. Setting the lock for one door
will not automatically set the lock
for both doors.
Move lock control up to engage the childproof lock. Move control down
to disengage childproof locks.
Controls and features
54
Page 56 of 232

CENTER CONSOLE
Your vehicle may be equipped with a variety of console features. These
include:
²Utility compartment
²Bin mat (snap-in)
²Cupholders (front and rear)
²Coin holder slots
²Compact disc changer (if equipped)
²Tissue holder
²Rear A/C vent
²Rear ashtray (see your Ford, Lincoln Mercury dealer to obtain rear
ashtray
Use only soft cups in the cupholder. Hard objects can injure you
in a collision.
If your vehicle is equipped with the column shift and a bench seat, it has
a center console in the center front seating position.
The center console has similar features as the full console. To open the
storage compartment, raise the armrest and pull the strap on the seat up
and toward the front of the vehicle. The rear seat area is provided with
dual cupholders.
POSITIVE RETENTION FLOOR MAT
Position the floor mat so that the
eyelet is over the pointed end of the
retention post and rotate forward to
lock in. Make sure that the mat does
not interfere with the operation of
the accelerator or the brake pedal.
To remove the floor mat, reverse the
installation procedure.
Controls and features
56
Page 57 of 232
TRUNK REMOTE CONTROL
Press the remote trunk release
control on the instrument panel to
the left of the steering wheel.
LIFTGATE (WAGON ONLY)
You can open and close the liftgate and the liftgate window from outside
the vehicle. It cannot be opened from inside the cargo area.
²To open the liftgate window,
unlock the liftgate (with the key,
the power door locks or the
remote entry key fob) and push
the key lock cylinder.
²To open the liftgate, unlock the
liftgate and pull up on the handle
under the license plate lamp
shield.
To lock the liftgate and the liftgate window, press the lock button down
on the inside of the liftgate, use the key, the power door locks, or the
remote entry key fob.
The liftgate and liftgate window should be closed before driving your
vehicle. If not, possible damage may occur to the liftgate lift cylinders
and attaching hardware.
Controls and features
57
Page 60 of 232

7. Insert the shade into the side mounting brackets and check to make
sure that it operates properly.
The cover may cause injury in a sudden stop or accident if it is
not securely installed.
Cargo utility hooks (Sedan)
The utility hooks located in side the trunk can be used to hang small
items on. Do not hang more than 12 kg (20 lbs) on the hooks. The hooks
are not designed to restrain objects during a collision.
REMOTE ENTRY SYSTEM (IF EQUIPPED)
The remote entry system allows you to lock or unlock all vehicle doors,
trunk and liftgate without a key.
The remote entry features only operate with the vehicle in P (Park) or N
(Neutral) and the ignition in the, ACC, OFF or ON positions.
If there is any potential remote keyless entry problem with your vehicle,
ensureALL key fobs(remote entry transmitters) are brought to the
dealership, to aid in troubleshooting.
Unlocking the doors/liftgate
Press this control to unlock the
driver's door. The interior lamps will
illuminate with the ignition OFF.
Press the control a second time
within three seconds to unlock all
doors and liftgate (wagons).
Controls and features
60
Page 61 of 232
Locking the doors/liftgate
Press this control to lock all doors
and liftgate (wagons).
To confirm all doors are closed and
locked, press the control a second
time within three seconds. The
doors will lock again and the horn
will chirp.
If any of the doors or liftgate are
ajar, the horn will make two quick
chirps, reminding you to properly
close all doors.
Unlocking the liftgate/trunk
Press the control to unlock the
liftgate/trunk.
Sounding a panic alarm
Press this control to activate the
alarm.
To deactivate the alarm, press the
control again or turn the ignition to
ACC or ON.
This device complies with part 15 of
the FCC rules and with RS-210 of
Industry Canada. Operation is
subject to the following two
conditions: (1) This device may not
cause harmful interference, and (2) This device must accept any
interference received, including interference that may cause undesired
operation.
Controls and features
61