2000 FORD TAURUS remove seats
[x] Cancel search: remove seatsPage 20 of 232

²(Floor)-Allows for maximum heating by distributing outside air
through the floor ducts. However, the air will not be cooled below the
outside temperature because the air conditioning does not operate in
this mode.
²
(Floor and defrost)-Distributes outside air through the
windshield defroster ducts and the floor ducts. Heating and air
conditioning capabilities are provided in this mode. For added
customer comfort, when the temperature control knob is anywhere in
between the full hot and full cold positions, the air distributed through
the floor ducts will be slightly warmer than the air sent to the
windshield defrost ducts. If the temperature is about 10ÉC (50ÉF) or
higher, the air conditioner will automatically dehumidify the air to
reduce fogging.
²
(Defrost)-Distributes outside air through the windshield
defroster ducts. It can be used to clear ice or fog from the windshield.
If the temperature is about 10ÉC (50ÉF) or higher, the air conditioner
will automatically dehumidify the air to reduce fogging.
Operating tips
²In humid weather, selectbefore driving. This will reduce fogging
on your windshield. After a few minutes, select any desired position.
²To reduce humidity buildup inside the vehicle, do not drive with the
climate control system in the OFF or MAX A/C position.
²Do not put objects under the front seat that will interfere with the
airflow to the rear seats.
²Remove any snow, ice or leaves
from the air intake area (at the
bottom of the windshield under
the hood).
²If the air conditioner works well in MAX A/C, but not in A/C, this may
indicate that the cabin air filter (if equipped) needs to be replaced.
²If your vehicle has been parked with the windows closed during hot
weather, the air conditioner will do a much faster job of cooling if you
Controls and features
20
Page 77 of 232
REAR SEATS
2nd seat/Split-folding rear seat (if equipped)
One or both rear seatbacks can be folded down to provide additional
cargo space.
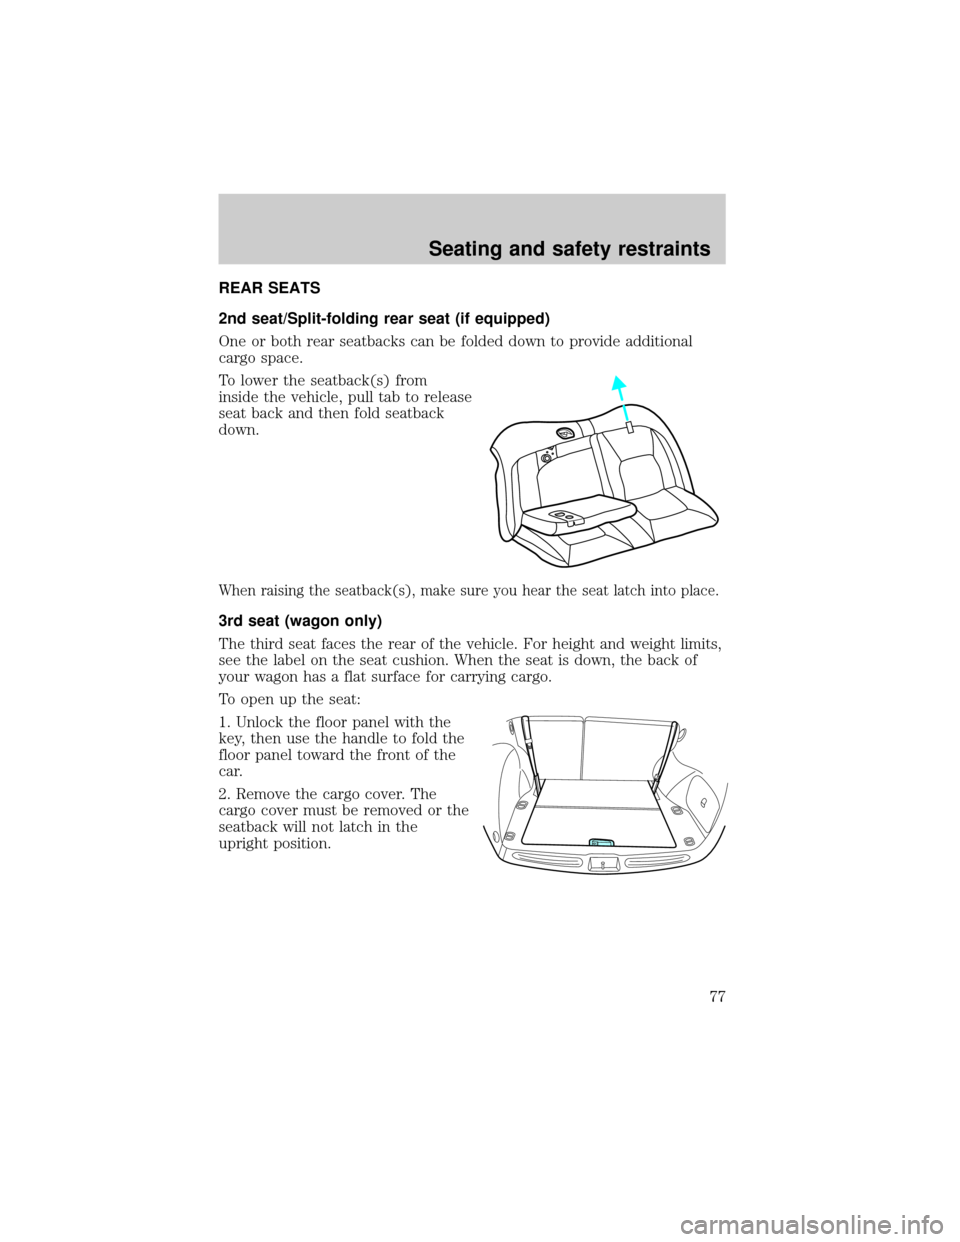
To lower the seatback(s) from
inside the vehicle, pull tab to release
seat back and then fold seatback
down.
When raising the seatback(s), make sure you hear the seat latch into place.
3rd seat (wagon only)
The third seat faces the rear of the vehicle. For height and weight limits,
see the label on the seat cushion. When the seat is down, the back of
your wagon has a flat surface for carrying cargo.
To open up the seat:
1. Unlock the floor panel with the
key, then use the handle to fold the
floor panel toward the front of the
car.
2. Remove the cargo cover. The
cargo cover must be removed or the
seatback will not latch in the
upright position.
Seating and safety restraints
77
Page 82 of 232
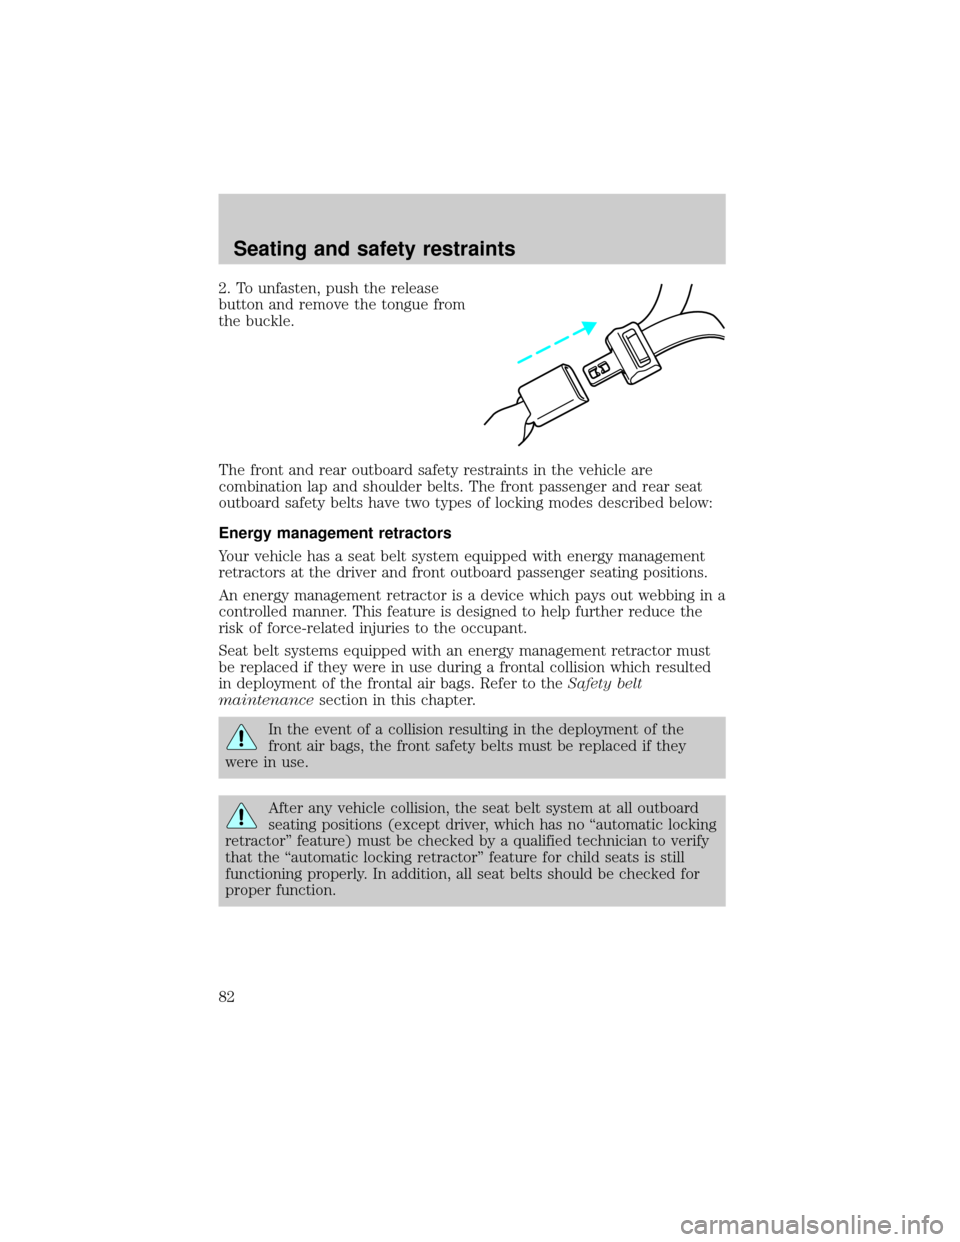
2. To unfasten, push the release
button and remove the tongue from
the buckle.
The front and rear outboard safety restraints in the vehicle are
combination lap and shoulder belts. The front passenger and rear seat
outboard safety belts have two types of locking modes described below:
Energy management retractors
Your vehicle has a seat belt system equipped with energy management
retractors at the driver and front outboard passenger seating positions.
An energy management retractor is a device which pays out webbing in a
controlled manner. This feature is designed to help further reduce the
risk of force-related injuries to the occupant.
Seat belt systems equipped with an energy management retractor must
be replaced if they were in use during a frontal collision which resulted
in deployment of the frontal air bags. Refer to theSafety belt
maintenancesection in this chapter.
In the event of a collision resulting in the deployment of the
front air bags, the front safety belts must be replaced if they
were in use.
After any vehicle collision, the seat belt system at all outboard
seating positions (except driver, which has no ªautomatic locking
retractorº feature) must be checked by a qualified technician to verify
that the ªautomatic locking retractorº feature for child seats is still
functioning properly. In addition, all seat belts should be checked for
proper function.
Seating and safety restraints
82
Page 83 of 232
BELT AND RETRACTOR ASSEMBLY MUST BE REPLACED if
the seat belt assembly ªautomatic locking retractorº feature or
any other seat belt function is not operating properly when checked
according to the procedures in Workshop Manual.
Failure to replace the Belt and Retractor assembly could
increase the risk of injury in collisions.
Vehicle sensitive mode
The vehicle sensitive mode is the normal retractor mode, allowing free
shoulder belt length adjustment to your movements and locking in
response to vehicle movement. For example, if the driver brakes
suddenly or turns a corner sharply, or the vehicle receives an impact of
approximately 8 km/h (5 mph) or more, the combination safety belts will
lock to help reduce forward movement of the driver and passengers.
Automatic locking mode
In this mode, the shoulder belt is automatically pre-locked. The belt will
still retract to remove any slack in the shoulder belt.
The automatic locking mode is not available on the driver safety belt.
When to use the automatic locking mode
²Anytimea child safety seat is installed in the vehicle. Children 12
years old and under should be properly restrained in the rear seat
whenever possible. Refer toSafety Restraints for ChildrenorSafety
Seats for Childrenlater in this chapter.
Seating and safety restraints
83
Page 88 of 232
Safety belts for rear-facing occupants (wagon only)
Never use child safety seats in the third seat of a wagon.
Your vehicle is equipped with safety belts containing an adjust tongue at
the rear-facing seating positions.
When the adjust tongue of the lap/shoulder combination seat belt is latched
into the buckle, the tongue will allow the lap portion to become shorter,
but locks the webbing in place to restrict it from becoming longer.
Before you reach and latch a combination lap and shoulder belt having an
adjust tongue into the buckle, you may have to lengthen the lap belt
portion of it. To lengthen the lap belt, pull some webbing out of the
shoulder belt retractor. While holding the webbing below the tongue, grasp
the tongue so that it is parallel to the webbing and slide the tongue
upward. Provide enough length so that the tongue can reach the buckle.
To fasten the belt, pull the combination lap and shoulder belt from the
retractor so that the shoulder belt portion of the safety belt crosses your
shoulder and chest. Be sure the belt is not twisted. If the belt is twisted,
remove the twist. Insert the tongue into the proper buckle for your
seating position until you hear a snap and feel it latch. Make sure the
tongue is securely fastened to the buckle by pulling on the tongue.
The lap belts should fit snugly and as low as possible around the
hips, not around the waist.
Front and rear seat occupants, including pregnant women,
should wear safety belts for optimum protection in an accident.
Each seating position in your vehicle has a specific safety belt
assembly which is made up of one buckle and one tongue that
are designed to be used as a pair. 1) Use the shoulder belt on the
outside shoulder only. Never wear the shoulder belt under the arm.
2) Never swing the safety belt around your neck over the inside
shoulder. 3) Never use a single belt for more than one person.
Due to folding rear seats, sometimes the buckles and tongues toward the
center of the vehicle may be hidden by the rear edge of the seat cushion.
Pull them out so they will be accessible.
Seating and safety restraints
88
Page 134 of 232

Passenger compartment fuse panel
The fuse panel is located below and to the left of the steering wheel by
the brake pedal. Remove the panel cover to access the fuses.
To remove a fuse use the fuse puller tool provided on the fuse panel
cover.
The fuses are coded as follows.
Fuse/Relay
LocationFuse Amp
RatingPassenger Compartment
Fuse Panel Description
1 Ð Accessory Delay Relay
2 Ð Driver One Touch Down Relay
3 Ð Blower Motor Relay
4 Ð Flasher Relay
5 Ð Not Used
6 Ð Not Used
7 40A Rear Defrost Grid Feed
8 40A Blower Motor
9 Ð Rear Defrost Relay
10 30A Power Seats, Delayed Accessory, Adjustable
Pedals
11 15A Integrated Control Panel (ICP), Rear
Washer Wiper Control, Front Washer, Cell
Phone, Passenger Switch Illumination,
GEM, Rear Wiper Motor
12 10A Heated Mirrors, Rear Defrost Switch
12
34
56
78
9
10
11 1213 14
15
16 1718
19 2021 22
2324
2526
27 2829
30
32 33
35
3637
38
39 40
41
42
PULL TAB
TO RELEASE SEE OWNERS MANUAL
CONSULTER LA GUIDE
Roadside emergencies
134
Page 203 of 232
Cleaning the instrument panel
Clean with a damp cloth, then dry with a dry cloth.
Avoid cleaner or polish that increases the gloss of the upper portion of
the instrument panel. The dull finish in this area helps protect the driver
from undesirable windshield reflection.
Do not use chemical solvents or strong detergents when cleaning
the steering wheel or instrument panel to avoid contamination of
the air bag system.
Cleaning the instrument cluster lens
Clean with a damp cloth, then dry with a dry cloth.
Do not use household or glass cleaners as these may damage the lens.
Cleaning seats equipped with side air bags
Remove dust and loose dirt with a whisk broom or a vacuum cleaner.
Remove fresh spots immediately. Follow the directions that come with
the cleaner. Do not saturate the seat cover with upholstery cleaner.
Do not use chemical solvents or strong detergents when cleaning
the seat mounted side air bag. Such products could contaminate
the side air bag system and affect performance of the side air bag in a
collision.
Woodtone trim
Wipe stains with a soft cloth and a multi-purpose cleaning solution.
Inside windows
Use Ultra-Clear Spray Glass Cleaner (E4AZ-19C507±AA) for the inside
windows if they become fogged.
Cleaning and maintaining the safety belts
Clean the safety belts with a mild soap solution recommended for
cleaning upholstery or carpets. Do not bleach or dye the belts, because
these actions may weaken the belt webbing.
Check the safety belt system periodically to make sure there are no
nicks, wear or cuts. If your vehicle has been involved in an accident,
Maintenance and care
203
Page 204 of 232

refer to theSafety belt maintenancesection in theSeating and safety
restraintschapter.
Cleaning leather seats (if equipped)
To clean, simply use a soft cloth dampened with water and a mild soap.
Wipe the leather again with a damp cloth to remove soap residue. Dry
with a soft cloth. For tougher soiling concerns, Ford recommends using
the Deluxe Leather Care Kit F8AZ-19G253±AA, which is available from
your Ford Dealer. This mild cleaner and special pad, cleans the leather
and maintains its natural beauty. Follow the instructions on the cleaner
label. Regular cleaning of your leather upholstery helps maintain its
resiliency and color.
Do not use household cleaning products, alcohol solutions,
solvents or cleaners intended for rubber, vinyl or plastics.
Cleaning the interior fabric
Remove dust and loose dirt with a whisk broom or a vacuum cleaner.
Remove fresh spots immediately. Do not use household or glass cleaners.
These agents can stain and discolor the fabric. Use a mild soap and
water solution if necessary.
Maintenance and care
204