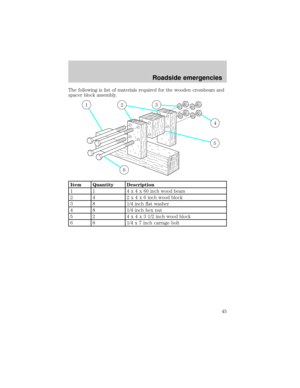
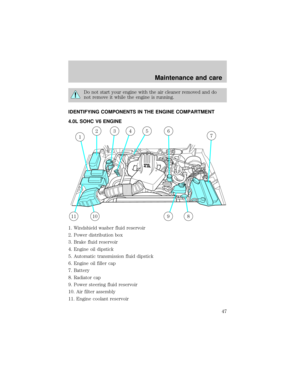
Page 25 of 80
 on any wheel(s)
²high crown in center of road
²high crosswinds
²wheels out of alignm")
If the steering wanders or pulls, the condition could be caused by any of
the following:
²underinflated tire(s) on any wheel(s)
²high crown in center of road
²high crosswinds
²wheels out of alignment
²loose or worn components in steering linkage
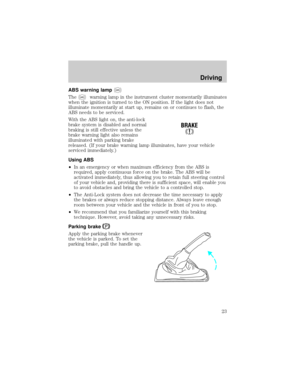
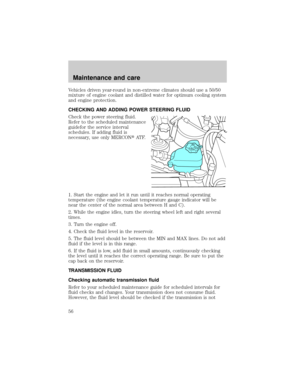
AUTOMATIC TRANSMISSION OPERATION (IF EQUIPPED)
Brake-shift interlock
This vehicle is equipped with a brake-shift interlock feature that prevents
the gearshift lever from being moved from P (Park) when the ignition is
in the ON position unless brake pedal is depressed.
If you cannot move the gearshift lever out of P (Park) with ignition in
the ON position and the brake pedal depressed:
1. Apply the parking brake, turn ignition key to LOCK, then remove the
key.
2. Insert the key and turn it to OFF. Apply the brake pedal and shift to N
(Neutral).
3. Start the vehicle.
If it is necessary to use the above procedure to move the gearshift lever,
it is possible that a fuse has blown or the vehicle's brakelamps are not
operating properly. Refer toFuses and relaysin theRoadside
emergencieschapter.
Do not drive your vehicle until you verify that the brakelamps
are working.
If your vehicle gets stuck in mud or snow it may be rocked out by
shifting between forward and reverse gears, stopping between shifts, in a
steady pattern. Press lightly on the accelerator in each gear.
Do not rock the vehicle if the engine is not at normal operating
temperature or damage to the transmission may occur.
Do not rock the vehicle for more than a few minutes or damage
to the transmission and tires may occur or the engine may
overheat.
Driving
25
Page 26 of 80
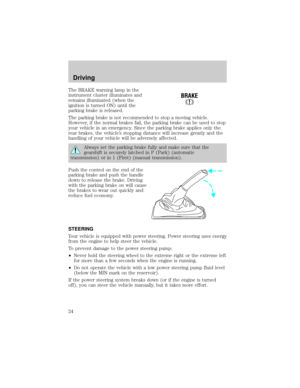
. Turn off the ignition whenever you leave
your vehicle.
If the parking brake is fully released, but the brake warn")
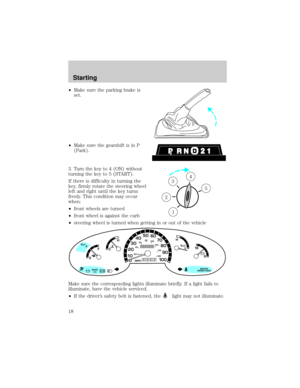
Always set the parking brake fully and make sure the gearshift is
latched in P (Park). Turn off the ignition whenever you leave
your vehicle.
If the parking brake is fully released, but the brake warning lamp
remains illuminated, the brakes may not be working properly.
See your dealer or a qualified service technician.
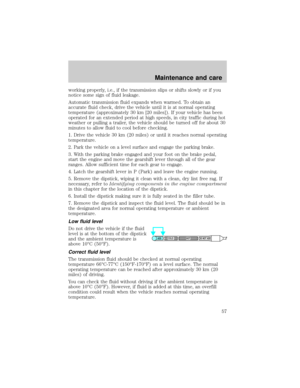
Driving with a 5±speed automatic transmission
Understanding gearshift positions
Hold the brake pedal down while you move the gearshift lever
from P (Park) to another position. If you do not hold the brake
pedal down, your vehicle may move unexpectedly and injure someone.
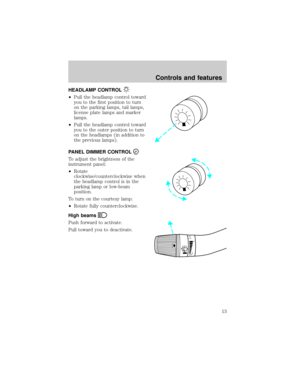
P (Park)
To put your vehicle in gear, start the engine, depress the brake pedal,
then move gearshift lever out of P (Park).
Always come to a complete stop
before shifting into P (Park). Make
sure the gearshift lever is securely
latched in P (Park). This position
locks the transmission and prevents
the rear wheels from turning.
Always set the parking brake fully and make sure the gearshift is
latched in P (Park). Turn off the ignition whenever you leave
your vehicle.
R (Reverse)
With the gearshift in R (Reverse),
the vehicle will move backward.
Always come to a complete stop
before shifting into and out of R
(Reverse).
Driving
26
Page 27 of 80

With the gearshift lever in N
(Neutral), the vehicle can be started
and is free to roll. Hold the brake
pedal down while in this position.
(Overdrive)
The normal driving position for the
b")
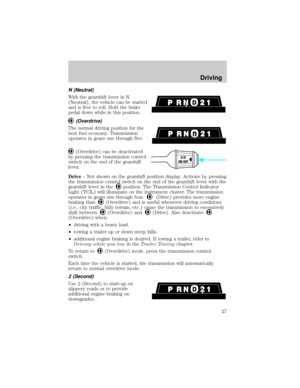
N (Neutral)
With the gearshift lever in N
(Neutral), the vehicle can be started
and is free to roll. Hold the brake
pedal down while in this position.
(Overdrive)
The normal driving position for the
best fuel economy. Transmission
operates in gears one through five.
(Overdrive) can be deactivated
by pressing the transmission control
switch on the end of the gearshift
lever.
Drive± Not shown on the gearshift position display. Activate by pressing
the transmission control switch on the end of the gearshift lever with the
gearshift lever in the
position. The Transmission Control Indicator
Light (TCIL) will illuminate on the instrument cluster. The transmission
operates in gears one through four.
(Drive) provides more engine
braking than
(Overdrive) and is useful whenever driving conditions
(i.e., city traffic, hilly terrain, etc.) cause the transmission to excessively
shift between
(Overdrive) and(Drive). Also deactivate
(Overdrive) when:
²driving with a heavy load.
²towing a trailer up or down steep hills.
²additional engine braking is desired. If towing a trailer, refer to
Driving while you towin theTrailer Towingchapter.
To return to
(Overdrive) mode, press the transmission control
switch.
Each time the vehicle is started, the transmission will automatically
return to normal overdrive mode.
2 (Second)
Use 2 (Second) to start-up on
slippery roads or to provide
additional engine braking on
downgrades.
O/D
ON/OFF
Driving
27
Page 28 of 80
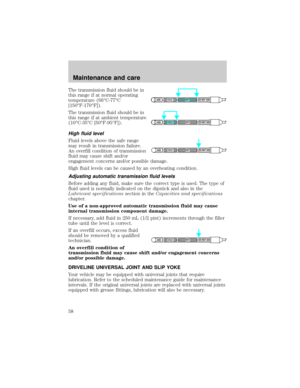
1 (First)
Use 1 (First) to provide maximum
engine braking on steep
downgrades. Upshifts can be made
by shifting to 2 (Second) or to
(Overdrive). Selecting 1 (Low) at
higher speeds causes the transmission to shift to a lower gear and will
shift to 1 (First) after the vehicle decelerates to the proper vehicle
speed.
Forced Downshifts
To gain acceleration in(Overdrive) or Drive (O/D OFF) when
passing another vehicle, push the accelerator to the floor. The
transmission will downshift to the appropriate gear: fourth, third, second
or first gear.
Driving
28
Page 29 of 80

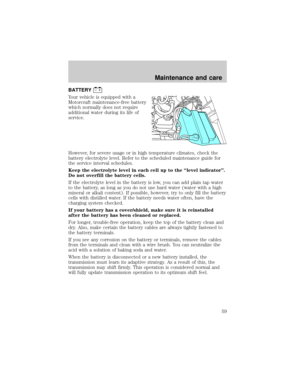
RESETTING THE FUEL PUMP SHUT-OFF SWITCH
The fuel pump shut-off switch is a device intended to stop the electric
fuel pump when your vehicle has been involved in a substantial jolt.
After a collision, if the engine cranks but does not start, the fuel pump
shut-off switch may have been activated.
The fuel pump shut-off switch is located in the center of the dash on the
dash panel.
Use the following procedure to reset
the fuel pump shut-off switch.
1. Turn the ignition to the OFF
position.
2. Check the fuel system for leaks.
3. If no fuel leak is apparent, reset
the fuel pump shut-off switch by
pushing in on the reset button.
4. Turn the ignition to the ON
position. Pause for a few seconds and return the key to the OFF
position.
5. Make a further check for leaks in the fuel system.
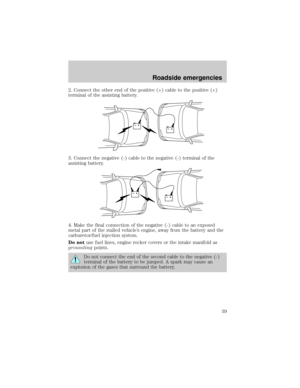
FUSES AND RELAYS
Fuses
If electrical components in the
vehicle are not working, a fuse may
have blown. Blown fuses are
identified by a broken wire within
the fuse. Check the appropriate
fuses before replacing any electrical
components.
Always replace a fuse with one that has the specified amperage
rating. Using a fuse with a higher amperage rating can cause
severe wire damage and could start a fire.
15
Roadside emergencies
29
Page 30 of 80
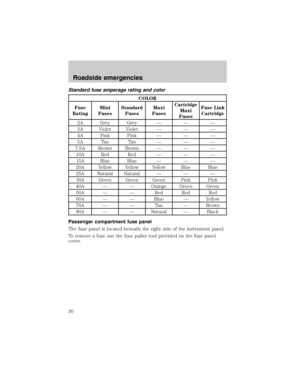
Standard fuse amperage rating and color
COLOR
Fuse
RatingMini
FusesStandard
FusesMaxi
FusesCartridge
Maxi
FusesFuse Link
Cartridge
2A Grey Grey Ð Ð Ð
3A Violet Violet Ð Ð Ð
4A Pink Pink Ð Ð Ð
5A Tan Tan Ð Ð Ð
7.5A Brown Brown Ð Ð Ð
10A Red Red Ð Ð Ð
15A Blue Blue Ð Ð Ð
20A Yellow Yellow Yellow Blue Blue
25A Natural Natural Ð Ð Ð
30A Green Green Green Pink Pink
40A Ð Ð Orange Green Green
50A Ð Ð Red Red Red
60A Ð Ð Blue Ð Yellow
70A Ð Ð Tan Ð Brown
80A Ð Ð Natural Ð Black
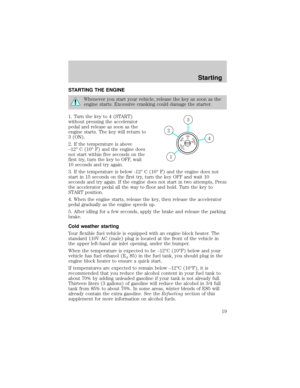
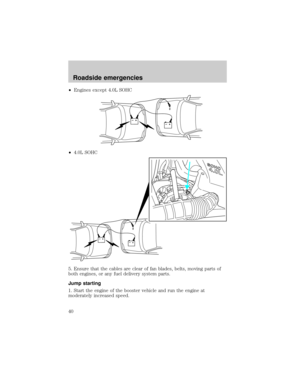
Passenger compartment fuse panel
The fuse panel is located beneath the right side of the instrument panel.
To remove a fuse use the fuse puller tool provided on the fuse panel
cover.
Roadside emergencies
30
Page 31 of 80
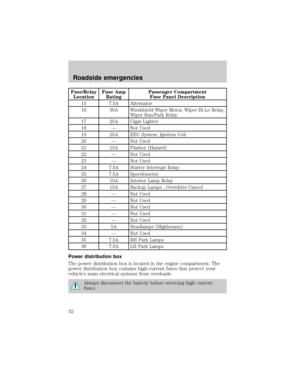
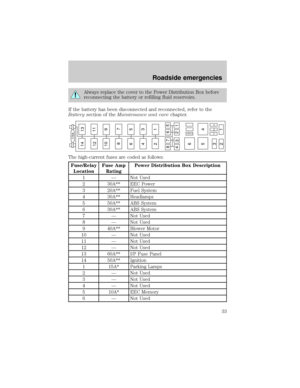
The fuses are coded as follows:
Fuse/Relay
LocationFuse Amp
RatingPassenger Compartment
Fuse Panel Description
1 Ð Not Used
2 7.5A Blower Motor Relay
3 Ð Not Used
4 15A Left Headlamp
5 10A Data Link Connector (OBD II)
6 20A Defrost/Fan
7 Ð Not Used
8 15A Right Headlamp
9 Ð Not Used
10 7.5A Shift Lock Actuator, Turn Signals
11 7.5A Instrument Cluster (Warning Lamps)
12 Ð Not Used
13 15A EEC System, Stop Lamps, Four Wheel
Anti-Lock Brake System (4WABS)
14 10A Four Wheel Anti-Lock Brake System
(4WABS) Module, 4WABS Main Relay
1 234
5 678
9 101112
13 14 15 16
17 18 19 20
21 22 23 24
25 26
29 30
35 36
313233
34
27 28
Roadside emergencies
31
Page 32 of 80
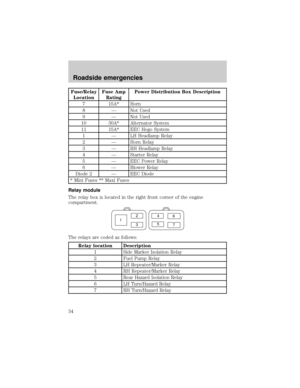
Fuse/Relay
LocationFuse Amp
RatingPassenger Compartment
Fuse Panel Description
15 7.5A Alternator
16 30A Windshield Wiper Motor, Wiper Hi-Lo Relay,
Wiper Run/Park Relay
17 25A Cigar Lighter
18 Ð Not Used
19 25A EEC System, Ignition Coil
20 Ð Not Used
21 15A Flasher (Hazard)
22 Ð Not Used
23 Ð Not Used
24 7.5A Starter Interrupt Relay
25 7.5A Speedometer
26 10A Interior Lamp Relay
27 15A Backup Lamps , Overdrive Cancel
28 Ð Not Used
29 Ð Not Used
30 Ð Not Used
31 Ð Not Used
32 Ð Not Used
33 5A Headlamps (Highbeams)
34 Ð Not Used
35 7.5A RH Park Lamps
36 7.5A LH Park Lamps
Power distribution box
The power distribution box is located in the engine compartment. The
power distribution box contains high-current fuses that protect your
vehicle's main electrical systems from overloads.
Always disconnect the battery before servicing high current
fuses.
Roadside emergencies
32


Use 1 (First) to provide maximum
engine braking on steep
downgrades. Upshifts can be made
by shifting to 2 (Second) or to
(Overdrive). Selecting 1 (Low) at
higher speeds causes the transmiss")


