2000 FORD F350 light
[x] Cancel search: lightPage 187 of 256

How fail-safe cooling works
If the engine begins to overheat:
•the engine coolant temperature
gauge will move to the red (hot)
area.
•the
andsymbol will
illuminate.
•theService Engine Soon
indicator light will illuminate.
If the engine reaches a preset over-temperature condition, the engine
will automatically switch to alternating cylinder operation. Each disabled
cylinder acts as an air pump and cools the engine.
When this occurs the vehicle will still operate. However:
•the engine power will be limited.
•the air conditioning system will be disabled.
Continued operation will increase the engine temperature and the engine
will completely shut down, causing steering and braking effort to
increase.
Once the engine temperature cools, the engine can be re-started. Take
your vehicle to a service facility as soon as possible to minimize engine
damage.
When fail-safe mode is activated
You have limited engine power when in the fail-safe mode, so drive the
vehicle with caution. The vehicle will not be able to maintain high-speed
operation and the engine will run rough. Remember that the engine is
capable of completely shutting down automatically to prevent engine
damage, therefore:
1. Pull off the road as soon as safely possible and turn off the engine.
2. Arrange for the vehicle to be taken to a service facility.
3. If this is not possible, wait a short period for the engine to cool.
4. Check the coolant level and replenish if low.
Never remove the coolant reservoir cap while the engine is
running or hot.
H
C
Maintenance and care
187
ProCarManuals.com
Page 195 of 256

However, for severe usage or in high temperature climates, check the
battery electrolyte level. Refer to the Scheduled Maintenance Guide for
the service interval schedules.
Keep the electrolyte level in each cell up to the “level indicator”.
Do not overfill the battery cells.
If the electrolyte level in the battery is low, you can add plain tap water
to the battery, as long as you do not use hard water (water with a high
mineral or alkali content). If possible, however, try to only fill the battery
cells with distilled water. If the battery needs water often, have the
charging system checked.
If your battery has a cover/shield, make sure it is reinstalled
after the battery has been cleaned or replaced.
For longer, trouble-free operation, keep the top of the battery clean and
dry. Also, make certain the battery cables are always tightly fastened to
the battery terminals.
If you see any corrosion on the battery or terminals, remove the cables
from the terminals and clean with a wire brush. You can neutralize the
acid with a solution of baking soda and water.
Batteries normally produce explosive gases which can cause
personal injury. Therefore, do not allow flames, sparks or lighted
substances to come near the battery. When working near the battery,
always shield your face and protect your eyes. Always provide proper
ventilation.
When lifting a plastic-cased battery, excessive pressure on the
end walls could cause acid to flow through the vent caps,
resulting in personal injury and/or damage to the vehicle or battery.
Lift the battery with a battery carrier or with your hands on opposite
corners.
Keep batteries out of reach of children. Batteries contain sulfuric
acid. Avoid contact with skin, eyes or clothing. Shield your eyes
when working near the battery to protect against possible splashing of
acid solution. In case of acid contact with skin or eyes, flush
immediately with water for a minimum of 15 minutes and get prompt
medical attention. If acid is swallowed, call a physician immediately.
Maintenance and care
195
ProCarManuals.com
Page 204 of 256

When refueling always shut the engine off and never allow
sparks or open flames near the filler neck. Never smoke while
refueling. Fuel vapor is extremely hazardous under certain conditions.
Care should be taken to avoid inhaling excess fumes.
The flow of fuel through a fuel pump nozzle can produce static
electricity, which can cause a fire if fuel is pumped into an
ungrounded fuel container.
Use the following guidelines to avoid static build-up when filling an
ungrounded fuel container:
•Place approved fuel container on the ground.
•DO NOT fill a fuel container while it is in the vehicle.
•Keep the fuel pump nozzle in contact with the fuel container while
filling.
•DO NOT use a device that would hold the fuel pump handle in the fill
position.
Choosing the right fuel
Use only UNLEADED FUEL. The use of leaded fuel is prohibited by law
and could damage your vehicle.
Do not use fuel containing methanol. It can damage critical fuel system
components.
Your vehicle was not designed to use fuel or fuel additives with metallic
compounds, including manganese-based compounds containing MMT.
Repairs to correct the effects of using a fuel for which your vehicle was
not designed may not be covered by your warranty.
Octane recommendations
Your vehicle is designed to use
“Regular” unleaded gasoline with an
(R+M)/2 octane rating of 87. We do
not recommend the use of gasolines
labeled as “Regular” that are sold
with octane ratings of 86 or lower in high altitude areas.
Do not be concerned if your engine sometimes knocks lightly. However, if
it knocks heavily under most driving conditions while you are using fuel
87(R+M)/2 METHOD
Maintenance and care
204
ProCarManuals.com
Page 209 of 256

•Using the air conditioner or defroster may reduce fuel economy.
•You may want to turn off the speed control in hilly terrain if
unnecessary shifting between third and fourth gear occurs.
Unnecessary shifting of this type could result in reduced fuel
economy.
•Warming up a vehicle on cold mornings is not required and may
reduce fuel economy.
•Resting your foot on the brake pedal while driving may reduce fuel
economy.
•Combine errands and minimize stop-and-go driving.
Maintenance
•Keep tires properly inflated and use only recommended size.
•Operating a vehicle with the wheels out of alignment will reduce fuel
economy.
•Use recommended engine oil. Refer toLubricant Specifications.
•Perform all regularly scheduled maintenance items. Follow the
recommended maintenance schedule and owner maintenance checks
found in your vehicle Scheduled Maintenance Guide.
Conditions
•Heavily loading a vehicle or towing a trailer may reduce fuel economy
at any speed.
•Carrying unnecessary weight may reduce fuel economy (approximately
0.4 km/L [1 mpg] is lost for every 180 kg [400 lb] of weight carried).
•Adding certain accessories to your vehicle (for example bug
deflectors, rollbars/light bars, running boards, ski/luggage racks) may
reduce fuel economy.
•Using fuel blended with alcohol may lower fuel economy.
•Fuel economy may decrease with lower temperatures during the first
12–16 km (8–10 miles) of driving.
•Driving on flat terrain offers improved fuel economy as compared to
driving on hilly terrain.
•Transmissions give their best fuel economy when operated in the top
cruise gear and with steady pressure on the gas pedal.
Maintenance and care
209
ProCarManuals.com
Page 211 of 256

Illumination of the “Service Engine Soon” light, charging system warning
light or the temperature warning light, fluid leaks, strange odors, smoke
or loss of engine power, could indicate that the emission control system
is not working properly.
Exhaust leaks may result in entry of harmful and potentially
lethal fumes into the passenger compartment.
Do not make any unauthorized changes to your vehicle or engine. By
law, vehicle owners and anyone who manufactures, repairs, services,
sells, leases, trades vehicles, or supervises a fleet of vehicles are not
permitted to intentionally remove an emission control device or prevent
it from working. Information about your vehicle’s emission system is on
the Vehicle Emission Control Information Decal located on or near the
engine. This decal identifies engine displacement and gives some tune up
specifications.
Please consult your “Warranty Guide” for complete emission warranty
information.
Readiness for Inspection/Maintenance (I/M) testing
In some localities, it may be a legal requirement to pass an I/M test of
the on-board diagnostics system. If your “Check Engine/Service Engine
Soon” light is on, refer to the description in theWarning Lights and
Chimessection of theInstrumentationchapter. Your vehicle may not
pass the I/M test with the “Check Engine/Service Engine Soon” light on.
If the vehicle’s powertrain system or its battery has just been serviced,
the on-board diagnostics system is reset to a “not ready for I/M test”
condition. To ready the on-board diagnostics system for I/M testing, a
minimum of 30 minutes of city and highway driving is necessary as
described below:
•First, at least 10 minutes of driving on an expressway or highway.
•Next, at least 20 minutes driving in stop-and-go, city-type traffic with
at least four idle periods.
Allow the vehicle to sit for at least eight hours without starting the
engine. Then, start the engine and complete the above driving cycle. The
engine must warm up to its normal operating temperature. Once started,
do not turn off the engine until the above driving cycle is complete.
Maintenance and care
211
ProCarManuals.com
Page 216 of 256

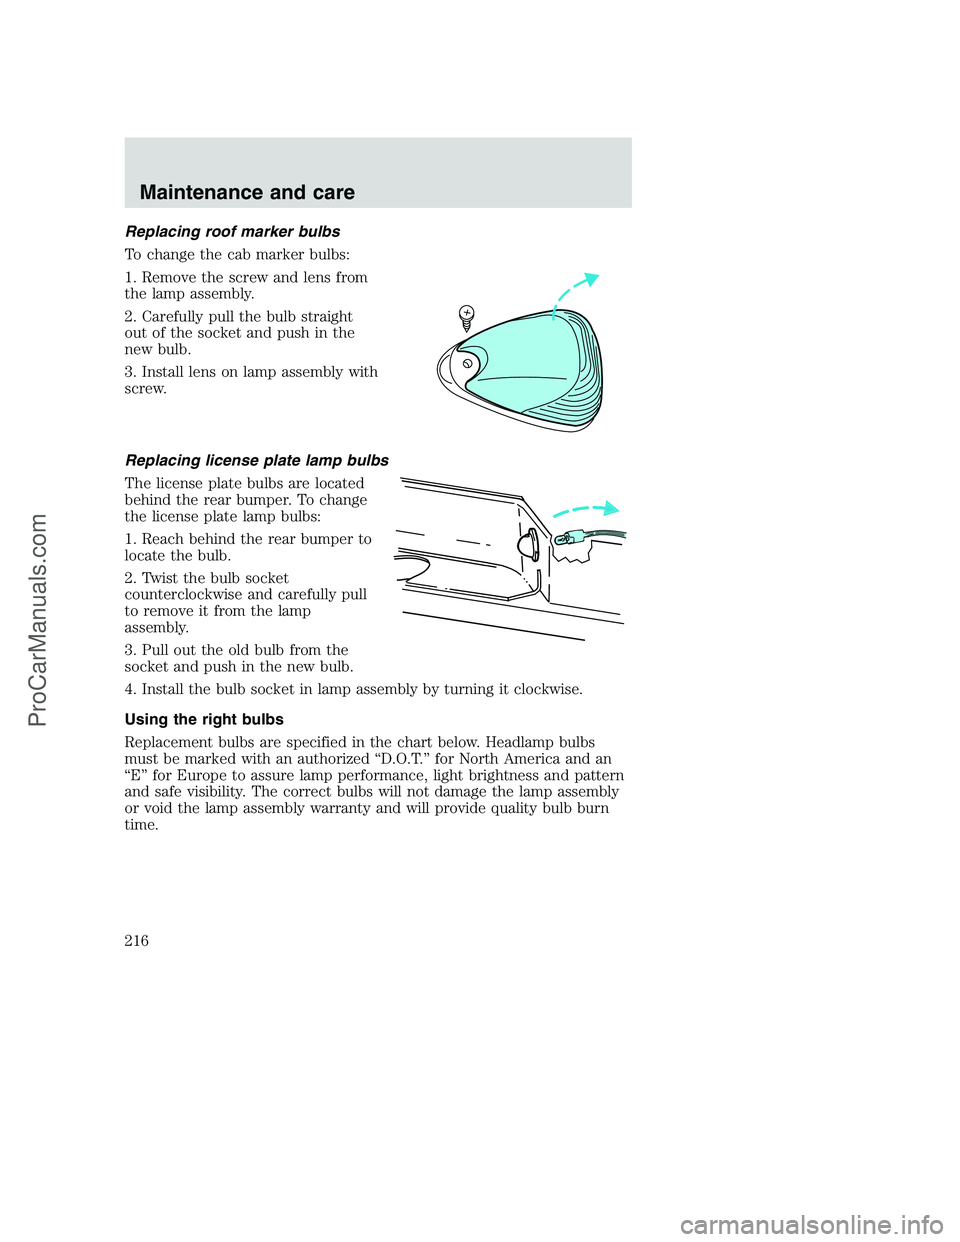
Replacing roof marker bulbs
To change the cab marker bulbs:
1. Remove the screw and lens from
the lamp assembly.
2. Carefully pull the bulb straight
out of the socket and push in the
new bulb.
3. Install lens on lamp assembly with
screw.
Replacing license plate lamp bulbs
The license plate bulbs are located
behind the rear bumper. To change
the license plate lamp bulbs:
1. Reach behind the rear bumper to
locate the bulb.
2. Twist the bulb socket
counterclockwise and carefully pull
to remove it from the lamp
assembly.
3. Pull out the old bulb from the
socket and push in the new bulb.
4. Install the bulb socket in lamp assembly by turning it clockwise.
Using the right bulbs
Replacement bulbs are specified in the chart below. Headlamp bulbs
must be marked with an authorized “D.O.T.” for North America and an
“E” for Europe to assure lamp performance, light brightness and pattern
and safe visibility. The correct bulbs will not damage the lamp assembly
or void the lamp assembly warranty and will provide quality bulb burn
time.
Maintenance and care
216
ProCarManuals.com
Page 217 of 256

Function Number of
bulbsTrade number
Headlamps (aerodynamic) 2 9007
Headlamps (sealed beam) 2 H6054
Park/turn 2 3157
Sidemarker 2 194
Tail/stop/turn/sidemarker 2 3157 K
Backup 2 3156K
High-mount stoplamp 1 921
License plate lamp 2 168
Cargo lamp 2 906
Roofmarker 5 194
Rear fender clearance 4
(a)
Exteroir visor lamp (if equipped) 4 194
Rear identification 3 194
All replacement bulbs are clear in color except where noted.
To replace all instrument panel lights - see your dealer
(a)Replace entire lamp assembly; bulb is not serviceable.
AIMING THE HEADLAMPS
The headlamps on your vehicle are properly aimed at the assembly plant.
If your vehicle has been in an accident the alignment of your headlamps
should be checked by a qualified service technician.
CLEANING AND CARING FOR YOUR VEHICLE
Refer to the Customer Assistance chapter for a list of Ford-approved
cleaners, polishes and waxes.
Maintenance and care
217
ProCarManuals.com
Page 218 of 256

Washing your vehicle
Wash your vehicle regularly with
cold or lukewarm water. Never use
strong detergents or soap. If your
vehicle is particularly dirty, use a
quality car wash detergent. Always
use a clean sponge, washing glove
or similar device and plenty of water
for best results. To avoid spots,
avoid washing when the hood is still
warm, immediately after or during
exposure to strong sunlight.
During winter months, it is especially important to wash the vehicle on a
regular basis. Large quantities of dirt and road salt are difficult to
remove and also cause damage to the vehicle.
Any gasoline spilled on the vehicle or deposits such as bird droppings
should be washed and sponged off as soon as possible. Deposits not
removed promptly can cause damage to the vehicle’s paintwork.
Remove any exterior accessories (such as antennas) and fold in the side
view mirrors before entering a car wash. If you have wax applied to the
vehicle at a commercial car wash, it is recommended that you clean the
wiper blades and windshield as described inCleaning the wiper blades
and windshield.
After washing, apply the brakes several times to dry them.
Waxing your vehicle
Waxing your vehicle on a regular basis will reduce minor scratches and
paint damage.
Wax when water stops beading on the surface. This could be every three
or four months, depending on operating conditions.
Use only carnauba or synthetic-based waxes. Use a cleaning fluid with a
clean cloth to remove any bugs before waxing your vehicle. Use tar
remover to remove any tar spots.
Avoid getting wax on the windshield, or on any surfaces which appear
coarse or bumpy. If you have wax applied at a commercial car wash, it is
recommended that you clean the wiper blades and windshield as
described inCleaning the wiper blades and windshield.
Maintenance and care
218
ProCarManuals.com