2000 FORD F150 brakes
[x] Cancel search: brakesPage 158 of 280

You should either know the terrain or examine maps of the area before
driving. Map out your route before driving in the area. For more
information on driving off-road, read the ªFour Wheelingº supplement in
your owner's portfolio.
If your vehicle gets stuck
If the vehicle is stuck it may be rocked out by shifting from forward and
reverse gears, stopping between shifts, in a steady pattern. Press lightly
on the accelerator in each gear.
Do not rock the vehicle if the engine is not at normal operating
temperature or damage to the transmission may occur.
Do not rock the vehicle for more than a few minutes or damage
to the transmission and tires may occur or the engine may
overheat.
Do not spin the wheels at over 56 km/h (35 mph). The tires may
fail and injure a passenger or bystander.
Sand
When driving over sand, try to keep all four wheels on the most solid
area of the trail. Do not reduce the tire pressures but shift to a lower
gear and drive steadily through the terrain. Apply the accelerator slowly
and avoid spinning the wheels.
Mud and water
If you must drive through high water, drive slowly. Traction or brake
capability may be limited.
When driving through water, determine the depth; avoid water higher
than the bottom of the hubs (if possible) and proceed slowly. If the
ignition system gets wet, the vehicle may stall.
Once through water, always try the brakes. Wet brakes do not stop the
vehicle as effectively as dry brakes. Drying can be improved by moving
your vehicle slowly while applying light pressure on the brake pedal.
After driving through mud, clean off residue stuck to the driveshafts and
tires. Excess mud stuck on tires and rotating driveshafts causes an
imbalance that could damage drive components.
If the transmission, transfer case or front axle are submerged in water,
their fluids should be checked and changed, if necessary.
Driving
158
Page 159 of 280

Water intrusion into the transmission may damage the
transmission.
Replace rear axle lubricant any time the axle has been submerged in
water. The rear axle does not normally require a lubricant change for the
life of the vehicle. Rear axle lubricant quantities are not to be checked or
changed unless a leak is suspected or repair is required.
Driving on hilly or sloping terrain
When driving on a hill, avoid driving crosswise or turning on steep
slopes. You could lose traction and slip sideways. Drive straight up,
straight down or avoid the hill completely. Know the conditions on the
other side of a hill before driving over the crest.
When climbing a steep hill, start in a lower gear rather than downshifting
to a lower gear from a higher gear once the ascent has started. This
reduces strain on the engine and the possibility of stalling.
When descending a steep hill, avoid sudden braking. Shift to a lower gear
when added engine braking is desired.
When speed control is on and you are driving uphill, your vehicle speed
may drop considerably, especially if you are carrying a heavy load.
If vehicle speed drops more than 16 km/h (10 mph), the speed control
will cancel automatically. Resume speed with accelerator pedal.
If speed control cancels after climbing the hill, reset speed by pressing
and holding the SET ACCEL button (to resume speeds over 50 km/h [30
mph]).
Automatic transmissions may shift frequently while driving up steep
grades. Eliminate frequent shifting by shifting out of
(Overdrive) into
a lower gear.
Driving on snow and ice
A 4WD vehicle has advantages over 2WD vehicles in snow and ice but
can skid like any other vehicle.
Avoid sudden applications of power and quick changes of direction on
snow and ice. Apply the accelerator slowly and steadily when starting
from a full stop.
When braking, apply the brakes as you normally would. In order to allow
the anti-lock brake system (ABS) to operate properly, keep steady
pressure on the brake pedal.
Driving
159
Page 162 of 280

Calculating the load your vehicle can carry/tow
1. Use the appropriate maximum gross combined weight rating (GCWR)
chart to find the maximum GCWR for your type engine and rear axle
ratio.
2. Weigh your vehicle as you customarily operate the vehicle without
cargo. To obtain correct weights, try taking your vehicle to a shipping
company or an inspection station for trucks.
3. Subtract your loaded vehicle weight from the maximum GCWR on the
following charts. This is the maximum trailer weight your vehicle can tow
and must fall below the maximum shown under maximum trailer weight
on the chart.
DRIVING THROUGH WATER
Do not drive quickly through standing water, especially if the depth is
unknown. Traction or brake capability may be limited and if the ignition
system gets wet, your engine may stall. Water may also enter your
engine's air intake and severely damage your engine.
If driving through deep or standing water is unavoidable, proceed very
slowly. Never drive through water that is higher than the bottom of the
hubs (for trucks) or the bottom of the wheel rims (for cars).
Once through the water, always try the brakes. Wet brakes do not stop
the vehicle as effectively as dry brakes. Drying can be improved by
moving your vehicle slowly while applying light pressure on the brake
pedal.
Driving through deep water where the transmission vent tube is
submerged may allow water into the transmission and cause
internal transmission damage.
Your vehicle may tow a class I, II or III trailer provided the maximum
trailer weight is less than or equal to the maximum trailer weight listed
for your engine and rear axle ratio on the following charts.
Your vehicle's load capacity is designated by weight, not by volume, so
you cannot necessarily use all available space when loading a vehicle.
Towing a trailer places an additional load on your vehicle's engine,
transmission, axle, brakes, tires and suspension. Inspect these
components carefully after any towing operation.
Exceeding the maximum GCWR could result in extensive damage
to your vehicle and personal injury.
Driving
162
Page 168 of 280

Hitches
Do not use hitches that clamp onto the vehicle's bumper or attach to the
axle. You must distribute the load in your trailer so that 10%±15% of the
total weight of the trailer is on the tongue.
Load equalizing hitch
When hooking up a trailer using a load equalizing hitch, always use the
following procedure:
1. Park the unloaded vehicle on a level surface. With the ignition on and
all doors closed, allow the vehicle to stand for several minutes so that it
can level.
2. Measure the height of a reference point on the front and rear bumpers
at the center of the vehicle.
3. Attach the trailer to the vehicle and adjust the hitch equalizers so that
the front bumper height is within 0±13 mm (0.5 in) of the reference
point. After proper adjustment, the rear bumper should be no higher
than in Step 3.
Adjusting an equalizing hitch so the rear bumper of the vehicle
is lower or higher than it was unloaded will defeat the function
of the load equalizing hitch and may cause unpredictable handling.
Safety chains
Always connect the trailer's safety chains to the frame or hook retainers
of the vehicle. To connect the trailer's safety chains, cross the chains
under the trailer tongue and allow slack for turning corners.
If you use a rental trailer, follow the instructions that the rental agency
gives to you.
Do not attach safety chains to the bumper.
Trailer brakes
Electric brakes and manual, automatic or surge-type trailer brakes are
safe if installed properly and adjusted to the manufacturer's
specifications. The trailer brakes must meet local and Federal
regulations.
Driving
168
Page 204 of 280

BRAKE FLUID
Checking and adding brake fluid
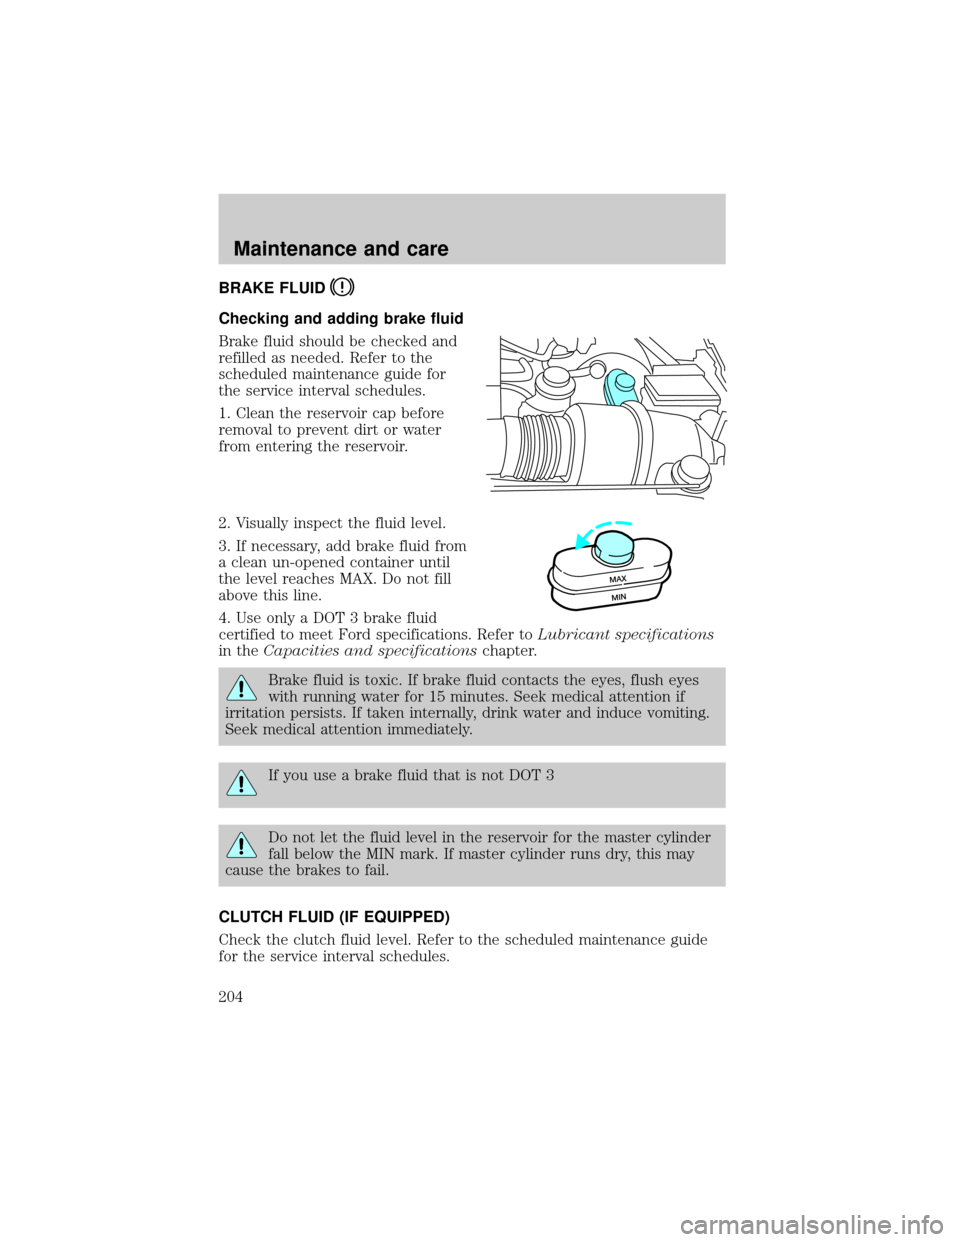
Brake fluid should be checked and
refilled as needed. Refer to the
scheduled maintenance guide for
the service interval schedules.
1. Clean the reservoir cap before
removal to prevent dirt or water
from entering the reservoir.
2. Visually inspect the fluid level.
3. If necessary, add brake fluid from
a clean un-opened container until
the level reaches MAX. Do not fill
above this line.
4. Use only a DOT 3 brake fluid
certified to meet Ford specifications. Refer toLubricant specifications
in theCapacities and specificationschapter.
Brake fluid is toxic. If brake fluid contacts the eyes, flush eyes
with running water for 15 minutes. Seek medical attention if
irritation persists. If taken internally, drink water and induce vomiting.
Seek medical attention immediately.
If you use a brake fluid that is not DOT 3
Do not let the fluid level in the reservoir for the master cylinder
fall below the MIN mark. If master cylinder runs dry, this may
cause the brakes to fail.
CLUTCH FLUID (IF EQUIPPED)
Check the clutch fluid level. Refer to the scheduled maintenance guide
for the service interval schedules.
MAX
MIN
Maintenance and care
204
Page 242 of 280

AIMING THE HEADLAMPS
The headlamps on your vehicle are properly aimed at the assembly plant.
If your vehicle has been in an accident the alignment of your headlamps
should be checked by a qualified service technician.
CLEANING AND CARING FOR YOUR VEHICLE
Refer to the Customer Assistance chapter for a list of Ford-approved
cleaners, polishes and waxes.
Washing your vehicle
Wash your vehicle regularly with
cold or lukewarm water. Never use
strong detergents or soap. If your
vehicle is particularly dirty, use a
quality car wash detergent. Always
use a clean sponge, washing glove
or similar device and plenty of water
for best results. To avoid spots,
avoid washing when the hood is still
warm, immediately after or during
exposure to strong sunlight.
During winter months, it is especially important to wash the vehicle on a
regular basis. Large quantities of dirt and road salt are difficult to
remove and also cause damage to the vehicle.
Any gasoline spilled on the vehicle or deposits such as bird droppings
should be washed and sponged off as soon as possible. Deposits not
removed promptly can cause damage to the vehicle's paintwork.
Remove any exterior accessories, such as antennas, before entering a car
wash. If you have wax applied to the vehicle at a commercial car wash, it
is recommended that you clean the wiper blades and windshield as
described inCleaning the wiper blades and windshield.
After washing, apply the brakes several times to dry them.
Waxing your vehicle
Waxing your vehicle on a regular basis will reduce minor scratches and
paint damage.
Wax when water stops beading on the surface. This could be every three
or four months, depending on operating conditions.
Maintenance and care
242
Page 273 of 280

A
Accessory delay ..........................79
Air bag supplemental
restraint system ........................113
and child safety seats ............114
description ..............................113
disposal ....................................117
driver air bag ..........................115
indicator light ...................12, 116
operation .................................115
passenger air bag ...................115
passenger
deactivation switch ...........65, 117
Air cleaner filter .......220±221, 247
Air conditioning ..........................60
Ambulance packages ....................3
Antifreeze
(see Engine coolant) ................206
Anti-lock brake system
(see Brakes) ......................139±140
Anti-theft system
warning light .............................13
Armrests ....................................102
Audio system (see Radio) .........24
Automatic transmission ............144
driving an automatic
overdrive .................................145
fluid, adding ............................213
fluid, checking ........................213
fluid, refill capacities ..............248
fluid, specification ..................253
Auxiliary power point .................23
Axle
lubricant specifications ..251, 253
refill capacities ........................248
traction lok ..............................142B
Battery .......................................218
acid, treating emergencies .....218
charging system
warning light .............................13
jumping a disabled battery ....190
maintenance-free ....................218
replacement, specifications ...247
servicing ..................................218
voltage gauge ............................18
Belt minder ...............................108
Brakes ........................................138
anti-lock ...........................138±140
anti-lock brake system (ABS)
warning light .....................13, 140
brake warning light ..................12
fluid, checking and adding ....204
fluid, refill capacities ..............248
fluid, specifications .........251, 253
lubricant specifications ..251, 253
parking ....................................141
pedals (see Power
adjustable foot pedals) ............22
shift interlock ..........................144
Break-in period .............................3
C
Capacities for refilling fluids ....248
Cassette tape player ...................36
CD changer .................................54
Certification Label ....................257
Child safety restraints ..............122
child safety belts ....................122
Child safety seats ......................123
attaching with tether straps ..128
in front seat ............................125
in rear seat ......................125, 127
Index
273
Page 277 of 280

anti-lock brakes (ABS) ....13, 140
anti-theft ...................................13
brake ..........................................12
charging system ........................13
check coolant ............................14
cruise indicator .........................15
door ajar ....................................15
engine oil pressure ...................14
high beam .................................13
low fuel ......................................10
safety belt .................................12
service engine soon ..................11
speed control ............................71
turn signal indicator .................13
Load limits .................................160
GAWR ......................................160
GVWR ......................................160
trailer towing ..........................160
Loading instructions .................161
Locks
autolock .....................................91
Lubricant specifications ...251, 253
Lumbar support, seats .....100±101
M
Manual transmission .................147
fluid capacities ........................248
lubricant specifications ..........253
reverse .....................................152
Mirrors
automatic dimming
rearview mirror .........................77
fold away ...................................81
side view mirrors (power) .......80
Motorcraft parts ................231, 247O
Octane rating ............................229
Odometer .....................................17
Oil (see Engine oil) ..................200
Overdrive .....................................72
P
Panic alarm feature,
remote entry system ..................91
Parking brake ............................141
Parts (see Motorcraft parts) ....247
Pedals (see Power
adjustable foot pedals) ...............22
Power adjustable foot pedals .....22
Power distribution box
(see Fuses) ...............................182
Power door locks ..................79, 91
Power steering ..........................142
fluid, checking and adding ....212
fluid, refill capacity ................248
fluid, specifications .........251, 253
Preparing to
drive your vehicle .....................143
R
Radio ............................................24
Relays ........................................177
Remote entry system ...........89, 91
illuminated entry ......................94
locking/unlocking doors ...........90
panic alarm ...............................91
replacement/additional
transmitters .........................93±94
replacing the batteries .............92
Index
277