Page 6 of 280
These are some of the symbols you may see on your vehicle.
Vehicle Symbol Glossary
Safety Alert
See Owner's Guide
Fasten Safety BeltAir Bag-Front
Air Bag-SideChild Seat
Child Seat Installation
WarningChild Seat Tether
Anchorage
Brake SystemAnti-Lock Brake System
Brake Fluid -
Non-Petroleum BasedTraction Control
Master Lighting SwitchHazard Warning Flasher
Fog Lamps-FrontFuse Compartment
Fuel Pump ResetWindshield Wash/Wipe
Windshield
Defrost/DemistRear Window
Defrost/Demist
Power Windows
Front/RearPower Window Lockout
Introduction
6
Page 21 of 280
Always remember to turn on your headlamps at dusk or during
inclement weather. The Daytime Running Light (DRL) System
does not activate your tail lamps and generally may not provide
adequate lighting during these conditions. Failure to activate your
headlamps under these conditions may result in a collision.
Foglamp control (if equipped)
The headlamp control also operates
the foglamps. The foglamps can be
turned on only when the headlamp
control is in the
position and
the high beams are not turned on.
Pull headlamp control towards you
to turn foglamps on. The foglamp
indicator light
will illuminate.
PANEL DIMMER CONTROL
Use to adjust the brightness of the
instrument panel during headlamp
and parklamp operation.
²Rotate up to brighten.
²Rotate down to dim.
²Rotate to full up position (past
detent) to turn on interior lamps.
A
Controls and features
21
Page 22 of 280

AUTOLAMP CONTROL (IF EQUIPPED)
The autolamp system provides light
sensitive automatic on-off control of
the exterior lights normally
controlled by the headlamp control.
The autolamp system also keeps the
lights on for approximately 20
seconds after the ignition switch is
turned to OFF.
²To turn autolamps on, rotate the
control counterclockwise.
²To turn autolamps off, rotate the control clockwise to OFF.
²Foglamps are not controlled by the autolamps. In order to turn on the
foglamps, you must turn the lamp switch to the
position and
pull toward you for fog.
POWER REAR SLIDER WINDOW (IF EQUIPPED)
²Press the open arrow side of
control to open window.
²Press the closed arrow side of
control to close window.
POWER ADJUSTABLE FOOT PEDALS (IF EQUIPPED)
The accelerator and brake pedal
should only be adjusted when the
vehicle is stopped and the gearshift
lever is in the P(Park) position.
Press and hold the rocker control to
adjust accelerator and brake pedal.
²press the left side of the control to adjust the pedals toward you
²press the right side of the control to adjust the pedals away from you
The adjustment allows for approximately 76mm (3 inches) of maximum
travel.
A
PEDALS
Controls and features
22
Page 63 of 280

Since the air conditioner removes considerable moisture from the air
during operation, it is normal if clear water drips on the ground under
the air conditioner drain while the system is working and even after you
have stopped the vehicle.
²MAX A/C-Uses recirculated air to cool the vehicle. MAX A/C is noisier
than A/C but more economical and will cool the inside of the vehicle
faster. Airflow will be from the instrument panel registers. This mode
can also be used to prevent undesirable odors from entering the
vehicle.
²A/C-Uses outside air to cool the vehicle. It is quieter than MAX A/C
but not as economical. Airflow will be from the instrument panel
registers.
²PANEL -Distributes outside air through the instrument panel registers.
However, the air will not be cooled below the outside temperature
because the air conditioning does not operate in this mode.
²OFF-Outside air is shut out and the fan will not operate. For short
periods of time only, use this mode to prevent undesirable odors from
entering the vehicle.
²PANEL &FLOOR-Distributes outside air through the instrument panel
registers and the floor ducts. Heating and air conditioning capabilities
are provided in this mode. For added customer comfort, when the
temperature control knob is anywhere in between the full hot and full
cold positions, the air distributed through the floor ducts will be
slightly warmer than the air sent to the instrument panel registers.
²FLOOR -Allows for maximum heating by distributing outside air
through the floor ducts. However, the air will not be cooled below the
outside temperature because the air conditioning does not operate in
this mode.
²FLOOR & DEFROST ±Distributes outside air through the windshield
defroster ducts and the floor ducts. Heating and air conditioning
capabilities are provided in this mode. For added customer comfort,
the air distributed through the floor ducts will be slightly warmer than
the air sent to the windshield defroster ducts. If the temperature is
about 6ÉC (43ÉF) or higher, the air conditioner will automatically
dehumidify the air to reduce fogging.
²DEF
(Defrost)-Distributes outside air through the windshield
defroster ducts. It can be used to clear ice or fog from the windshield.
If the temperature is about 6ÉC (43ÉF) or higher, the air conditioner
will automatically dehumidify the air to reduce fogging.
Controls and features
63
Page 184 of 280
Fuse/Relay
LocationFuse Amp
RatingPower Distribution Box
Description
101 30A** Trailer Tow Battery Charge
102 50/20A** Four Wheel Antilock Brake
Module/Rear Wheel Antilock Brake
Module
103 50A** Junction Block Battery Feed
104 30A** 4x4 Shift Motor & Clutch
105 40A** Climate Control Front Blower
106 20A** Inter Cooler Pump (Lightning only)
107 Ð Not Used
108 30A** Trailer Tow Electric Brake
109 Ð Not Used
110 30A** Power Windows
111 40A** Ignition Switch Battery Feed (Start
and Run Circuits)
112 30A** Drivers Power Seat, Adjustable
Pedals
113 40A** Ignition Switch Battery Feed (Run
and Accessory Circuits)
114 Ð Not Used
115 20A** Power Door Locks (SuperCrew only)
116 Ð Not Used
117 Ð Not Used
118 Ð Not Used
201 Ð Trailer Tow Park Lamp Relay
202 Ð Front Wiper Run/Park Relay
203 Ð Trailer Tow Backup Lamp Relay
204 Ð A/C Clutch Relay
205 Ð Horn Relay
206 Ð Fog Lamp Relay
207 Ð Front Washer Pump Relay
208 Ð Inter Cooler Pump Relay (Lightning
only)
Roadside emergencies
184
Page 236 of 280

Do not make any unauthorized changes to your vehicle or engine. By
law, vehicle owners and anyone who manufactures, repairs, services,
sells, leases, trades vehicles, or supervises a fleet of vehicles are not
permitted to intentionally remove an emission control device or prevent
it from working. Information about your vehicle's emission system is on
the Vehicle Emission Control Information Decal located on or near the
engine. This decal identifies engine displacement and gives some tune up
specifications.
Please consult your ªWarranty Guideº for complete emission warranty
information.
Readiness for Inspection/Maintenance (I/M) testing
In some localities, it may be a legal requirement to pass an I/M test of
the on-board diagnostics system. If your ªCheck Engine/Service Engine
Soonº light is on, refer to the description in theWarning Lights and
Chimessection of theInstrumentationchapter. Your vehicle may not
pass the I/M test with the ªCheck Engine/Service Engine Soonº light on.
If the vehicle's powertrain system or its battery has just been serviced,
the on-board diagnostics system is reset to a ªnot ready for I/M testº
condition. To ready the on-board diagnostics system for I/M testing, a
minimum of 30 minutes of city and highway driving is necessary as
described below:
²First, at least 10 minutes of driving on an expressway or highway.
²Next, at least 20 minutes driving in stop-and-go, city-type traffic with
at least four idle periods.
Allow the vehicle to sit for at least eight hours without starting the
engine. Then, start the engine and complete the above driving cycle. The
engine must warm up to its normal operating temperature. Once started,
do not turn off the engine until the above driving cycle is complete.
BULBS
Replacing exterior bulbs
Check the operation of the following lamps frequently:
²Headlamps
²Foglamps (if equipped)
²High-mount brakelamp
²Brakelamps
Maintenance and care
236
Page 241 of 280

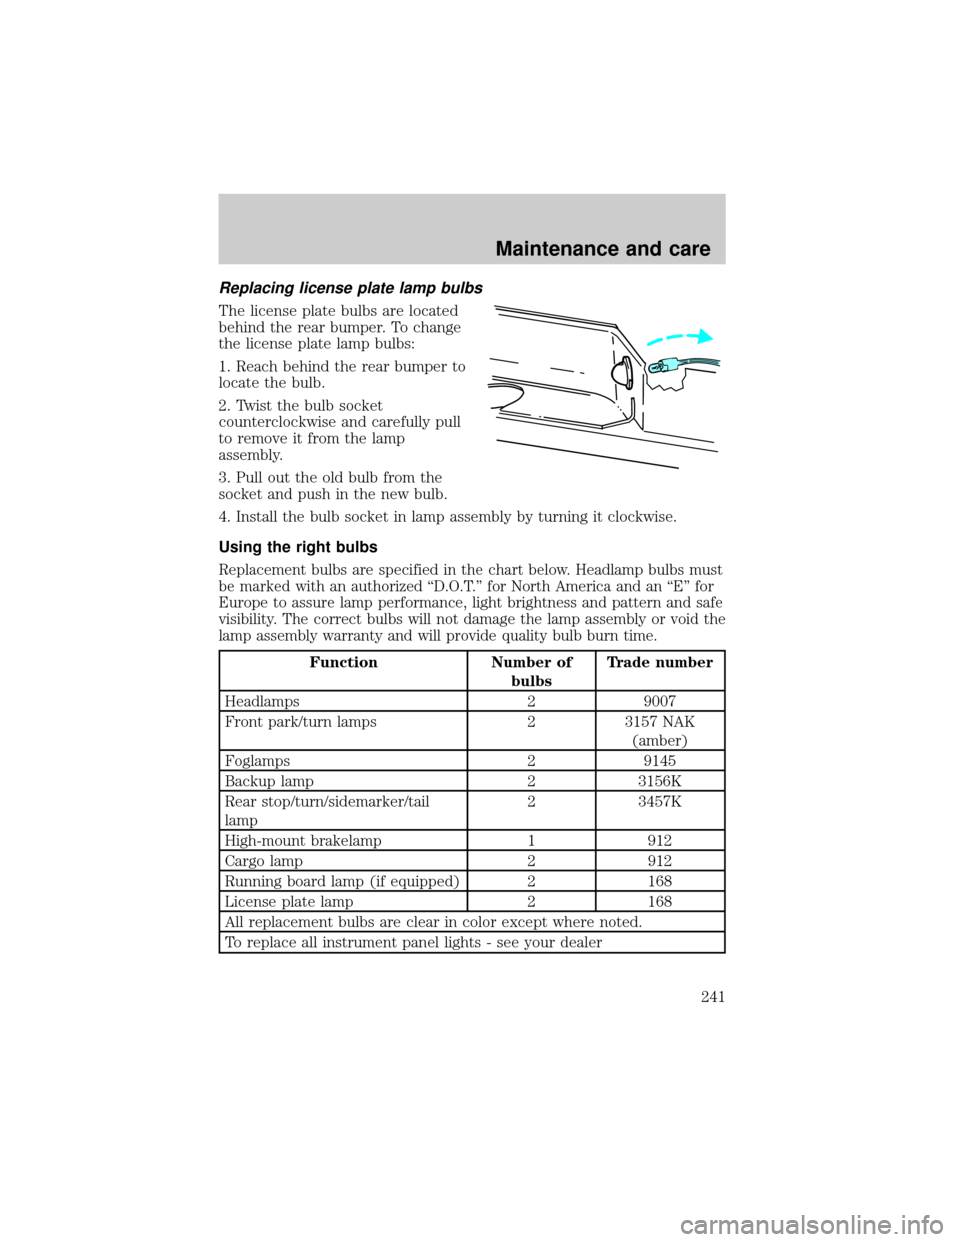
Replacing license plate lamp bulbs
The license plate bulbs are located
behind the rear bumper. To change
the license plate lamp bulbs:
1. Reach behind the rear bumper to
locate the bulb.
2. Twist the bulb socket
counterclockwise and carefully pull
to remove it from the lamp
assembly.
3. Pull out the old bulb from the
socket and push in the new bulb.
4. Install the bulb socket in lamp assembly by turning it clockwise.
Using the right bulbs
Replacement bulbs are specified in the chart below. Headlamp bulbs must
be marked with an authorized ªD.O.T.º for North America and an ªEº for
Europe to assure lamp performance, light brightness and pattern and safe
visibility. The correct bulbs will not damage the lamp assembly or void the
lamp assembly warranty and will provide quality bulb burn time.
Function Number of
bulbsTrade number
Headlamps 2 9007
Front park/turn lamps 2 3157 NAK
(amber)
Foglamps 2 9145
Backup lamp 2 3156K
Rear stop/turn/sidemarker/tail
lamp2 3457K
High-mount brakelamp 1 912
Cargo lamp 2 912
Running board lamp (if equipped) 2 168
License plate lamp 2 168
All replacement bulbs are clear in color except where noted.
To replace all instrument panel lights - see your dealer
Maintenance and care
241
Page 268 of 280
Comfort and convenience
Air conditioner
Air filtration systems
Automatic Headlamp System with Daytime Running Lights (DRL)
Cargo nets
Cargo organizers (interior)
Cargo storage bin (regular cab)
Cargo trays (interior)
Celluar phone holder
Dash trim (wood grain)
Engine block heaters
Manual sliding rear window
Moon roof deflector
Power sliding rear window
Rapid heat system
Tire step
Travel equipment
Bed mount bike carrier
Bumper mount bike carrier
Daytime running lights (DRL)
Fog lights
Heavy-duty battery
Hitch mount bike carrier
Inside mirror with compass display
Inside mirror with compass and temperature display
Outside signal mirror (available only with power mirrors)
Pickup box rails
Retractable bed hooks
Running boards (molded, diamond plate, tubular and stirrup step)
Seatback organizer
Customer assistance
268