Page 6 of 104
WARNING LIGHTS AND CHIMES
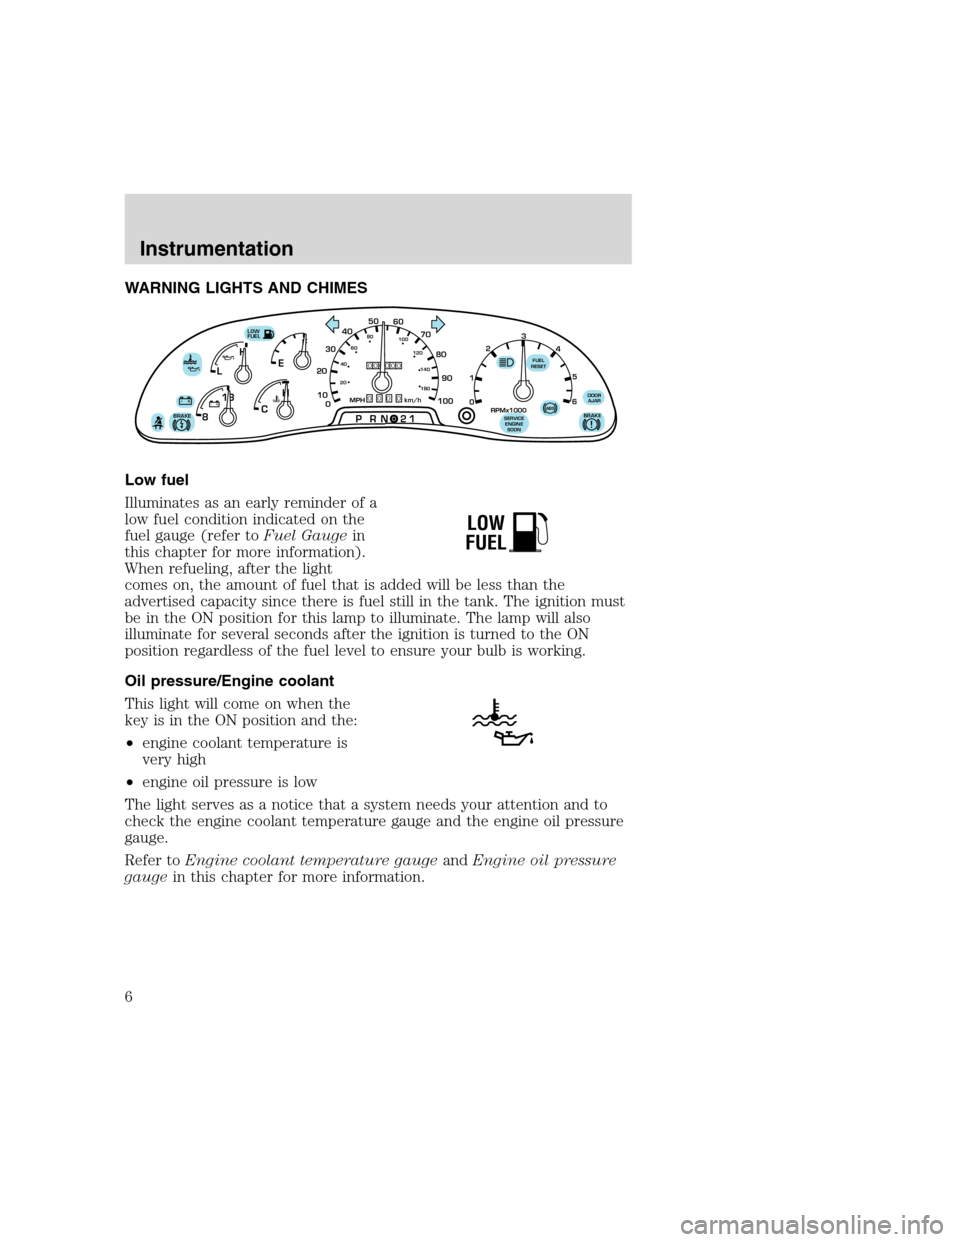
Low fuel
Illuminates as an early reminder of a
low fuel condition indicated on the
fuel gauge (refer toFuel Gaugein
this chapter for more information).
When refueling, after the light
comes on, the amount of fuel that is added will be less than the
advertised capacity since there is fuel still in the tank. The ignition must
be in the ON position for this lamp to illuminate. The lamp will also
illuminate for several seconds after the ignition is turned to the ON
position regardless of the fuel level to ensure your bulb is working.
Oil pressure/Engine coolant
This light will come on when the
key is in the ON position and the:
•engine coolant temperature is
very high
•engine oil pressure is low
The light serves as a notice that a system needs your attention and to
check the engine coolant temperature gauge and the engine oil pressure
gauge.
Refer toEngine coolant temperature gaugeandEngine oil pressure
gaugein this chapter for more information.
F
E
CH H
L
18
8
PRN 21LOW
FUEL
BRAKE!
+ -+ -000000000
0
50
60
70
20
10
0 3040
80
90
100
20406080
100
120
140
180
MPH km/h
1
02
RPMx1000
3
4
5
6
SERVICE
ENGINE
SOONABS
FUEL
RESET
DOOR
AJAR
BRAKE
LOW
FUEL
Instrumentation
6
Page 12 of 104
GAUGES
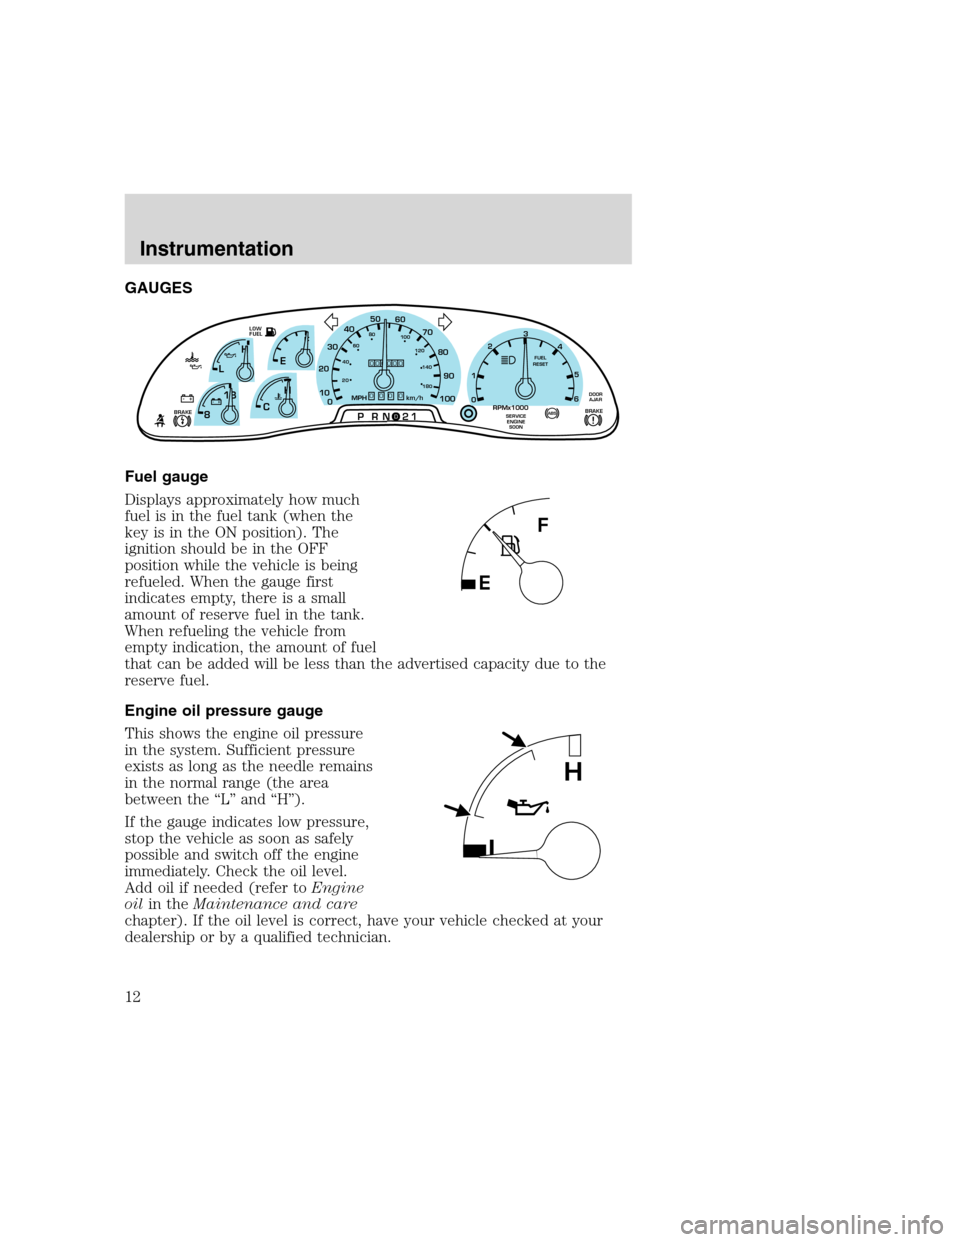
Fuel gauge
Displays approximately how much
fuel is in the fuel tank (when the
key is in the ON position). The
ignition should be in the OFF
position while the vehicle is being
refueled. When the gauge first
indicates empty, there is a small
amount of reserve fuel in the tank.
When refueling the vehicle from
empty indication, the amount of fuel
that can be added will be less than the advertised capacity due to the
reserve fuel.
Engine oil pressure gauge
This shows the engine oil pressure
in the system. Sufficient pressure
exists as long as the needle remains
in the normal range (the area
between the “L” and “H”).
If the gauge indicates low pressure,
stop the vehicle as soon as safely
possible and switch off the engine
immediately. Check the oil level.
Add oil if needed (refer toEngine
oilin theMaintenance and care
chapter). If the oil level is correct, have your vehicle checked at your
dealership or by a qualified technician.
F
E
CH H
L
18
8
PRN 21LOW
FUEL
BRAKE!
+ -+ -000000000
0
50
60
70
20
10
0 3040
80
90
100
20406080
100
120
140
180
MPH km/h
1
02
RPMx1000
3
4
5
6
SERVICE
ENGINE
SOONABS
FUEL
RESET
DOOR
AJAR
BRAKE
L
H
Instrumentation
12
Page 46 of 104
Fuse/Relay
LocationFuse Amp
RatingDescription
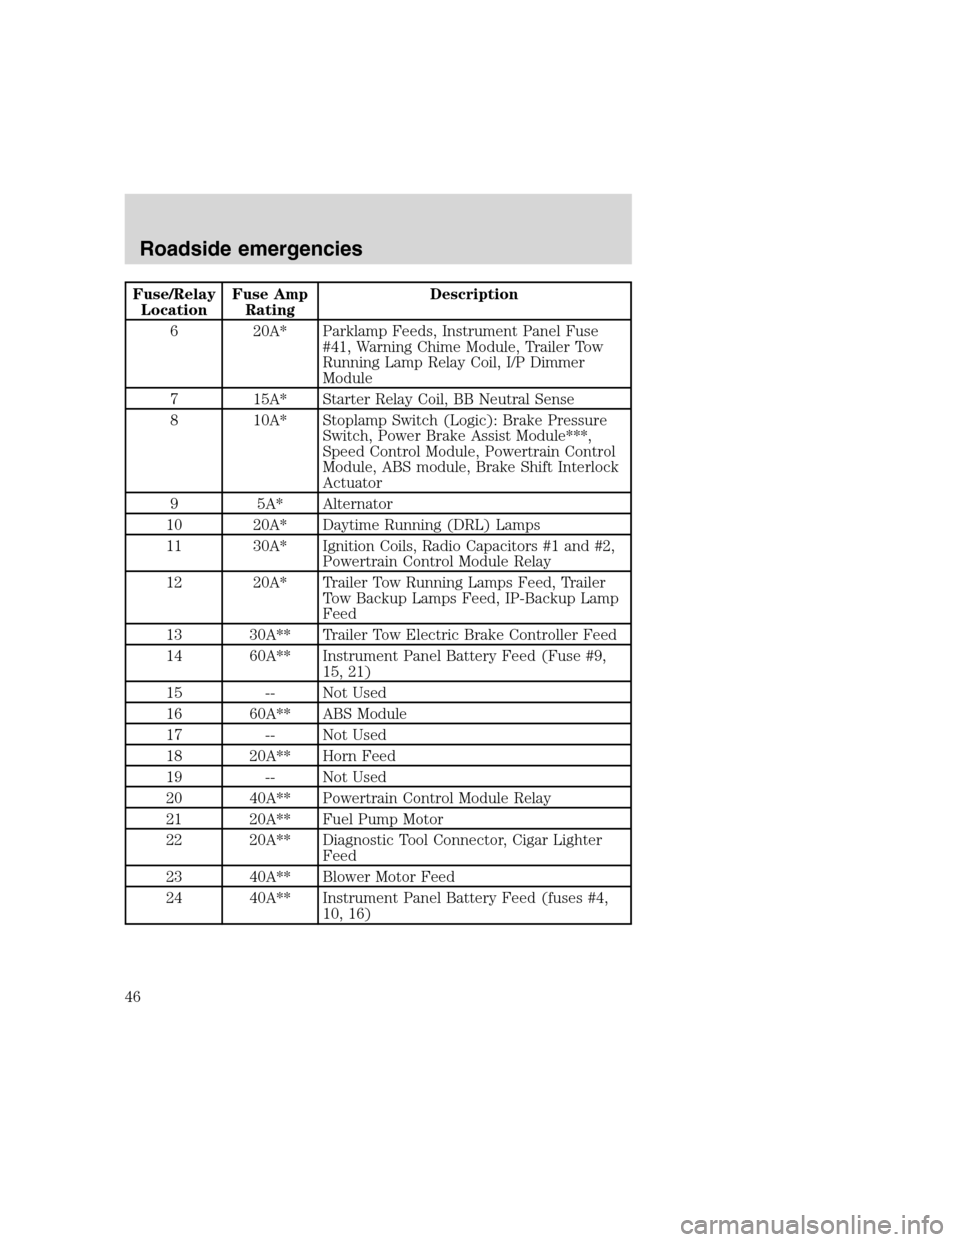
6 20A* Parklamp Feeds, Instrument Panel Fuse
#41, Warning Chime Module, Trailer Tow
Running Lamp Relay Coil, I/P Dimmer
Module
7 15A* Starter Relay Coil, BB Neutral Sense
8 10A* Stoplamp Switch (Logic): Brake Pressure
Switch, Power Brake Assist Module***,
Speed Control Module, Powertrain Control
Module, ABS module, Brake Shift Interlock
Actuator
9 5A* Alternator
10 20A* Daytime Running (DRL) Lamps
11 30A* Ignition Coils, Radio Capacitors #1 and #2,
Powertrain Control Module Relay
12 20A* Trailer Tow Running Lamps Feed, Trailer
Tow Backup Lamps Feed, IP-Backup Lamp
Feed
13 30A** Trailer Tow Electric Brake Controller Feed
14 60A** Instrument Panel Battery Feed (Fuse #9,
15, 21)
15 -- Not Used
16 60A** ABS Module
17 -- Not Used
18 20A** Horn Feed
19 -- Not Used
20 40A** Powertrain Control Module Relay
21 20A** Fuel Pump Motor
22 20A** Diagnostic Tool Connector, Cigar Lighter
Feed
23 40A** Blower Motor Feed
24 40A** Instrument Panel Battery Feed (fuses #4,
10, 16)
Roadside emergencies
46
Page 79 of 104
WHAT YOU SHOULD KNOW ABOUT AUTOMOTIVE FUELS
Important safety precautions
Do not overfill the fuel tank. The pressure in an overfilled tank
may cause leakage and lead to fuel spray and fire.
The fuel system may be under pressure. If the fuel filler cap is
venting vapor or if you hear a hissing sound, wait until it stops
before completely removing the fuel filler cap. Otherwise, fuel may
spray out and injure you or others.
If you do not use the proper fuel filler cap, excessive pressure or
vacuum in the fuel tank may damage the fuel system or cause
the fuel system to work improperly in a collision, which may result in
possible personal injury.
Automotive fuels can cause serious injury or death if misused or
mishandled.
Gasoline may contain benzene, which is a cancer-causing agent.
Observe the following guidelines when handling automotive fuel:
•Extinguish all smoking materials
and any open flames before
fueling your vehicle.
•Always turn off the vehicle before
fueling.
•Automotive fuels can be harmful
or fatal if swallowed. Fuel such as
gasoline is highly toxic and if
swallowed can cause death or
permanent injury. If fuel is
swallowed, call a physician immediately, even if no symptoms are
immediately apparent. The toxic effects of fuel may not be visible for
hours.
Maintenance and care
79
Page 85 of 104
![FORD F SERIES MOTORHOME AND COMMERCIAL CHASSIS 2000 10.G Owners Manual Conditions
•Heavily loading a vehicle or towing a trailer may reduce fuel economy
at any speed.
•Carrying unnecessary weight may reduce fuel economy (approximately
0.4 km/L [1 mpg] is lost for eve FORD F SERIES MOTORHOME AND COMMERCIAL CHASSIS 2000 10.G Owners Manual Conditions
•Heavily loading a vehicle or towing a trailer may reduce fuel economy
at any speed.
•Carrying unnecessary weight may reduce fuel economy (approximately
0.4 km/L [1 mpg] is lost for eve](/manual-img/11/4998/w960_4998-84.png)
Conditions
•Heavily loading a vehicle or towing a trailer may reduce fuel economy
at any speed.
•Carrying unnecessary weight may reduce fuel economy (approximately
0.4 km/L [1 mpg] is lost for every 180 kg [400 lb] of weight carried).
•Adding certain accessories to your vehicle (for example bug
deflectors, rollover/light bars, running boards, ski/luggage racks) may
reduce fuel economy.
•Using fuel blended with alcohol may lower fuel economy.
•Fuel economy may decrease with lower temperatures during the first
12–16 km (8–10 miles) of driving.
•Driving on flat terrain offers improved fuel economy as compared to
driving on hilly terrain.
•Transmissions give their best fuel economy when operated in the top
cruise gear and with steady pressure on the gas pedal.
•Close windows for high speed driving.
EPA window sticker
Every new vehicle should have the EPA window sticker. Contact your
dealer if the window sticker is not supplied with your vehicle. The EPA
window sticker should be your guide for the fuel economy comparisons
with other vehicles.
It is important to note the box in the lower left corner of the window
sticker. These numbers represent the Range of L/100 km (MPG)
expected on the vehicle under optimum conditions. Your fuel economy
may vary depending upon the method of operation and conditions.
FUEL FILTER REPLACEMENT
The fuel filter assembly is located inside the driver side frame rail, near
the transmission.
The fuel filter should be replaced every 24 000 km (15 000 miles).
Maintenance and care
85
Page 86 of 104
Removal
If the fuel filter is being serviced with the rear of the vehicle
higher than the front, or if the fuel tank is pressurized, fuel
leakage or siphoning from the tank fuel tubes could occur. To prevent
this condition, maintain the vehicle front end at or above the level of
the rear of the vehicle.
Do not smoke or carry lighted tobacco or open flame of any type
when working on or near any fuel related component. Highly
flammable mixtures are always present and may be ignited, resulting in
possible personal injury.
Fuel in the fuel system remains under high pressure even when
the engine is not running. Before servicing or disconnecting any
of the fuel lines or fuel system components, the fuel system pressure
must be relieved in order to prevent accidental spraying of fuel,
causing personal injury or a fire hazard.
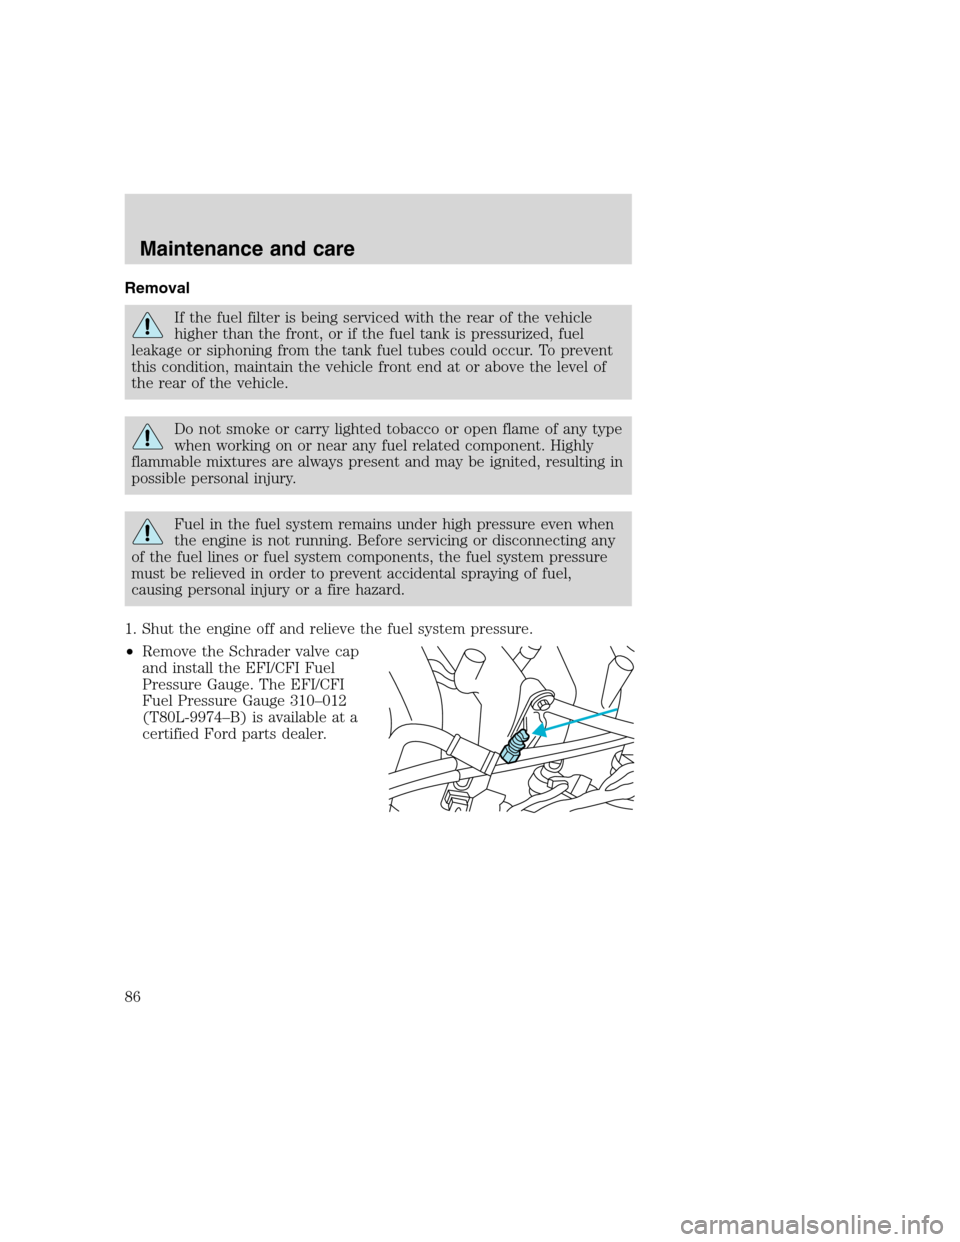
1. Shut the engine off and relieve the fuel system pressure.
•Remove the Schrader valve cap
and install the EFI/CFI Fuel
Pressure Gauge. The EFI/CFI
Fuel Pressure Gauge 310–012
(T80L-9974–B) is available at a
certified Ford parts dealer.
Maintenance and care
86
Page 87 of 104
•Open the manual valve slowly on
the EFI/CFI Fuel Pressure Gauge
and relieve the fuel pressure. This
will drain some fuel out of the
system; place the fuel in a
suitable container.
2. Use the fuel line disconnect tool
to disconnect the fuel lines from the
fuel filter. The Fuel Line Disconnect
Tool 310–S039 (T90T-9550–S) is
available at a certified Ford parts
dealer.
•Disconnect the safety clip from
the male hose.
•Install the fuel line disconnect
tool and push into the fitting.
•Separate the fittings. Clean the
fittings and inspect the fittings for
damage.
Maintenance and care
87
Page 88 of 104
Installation
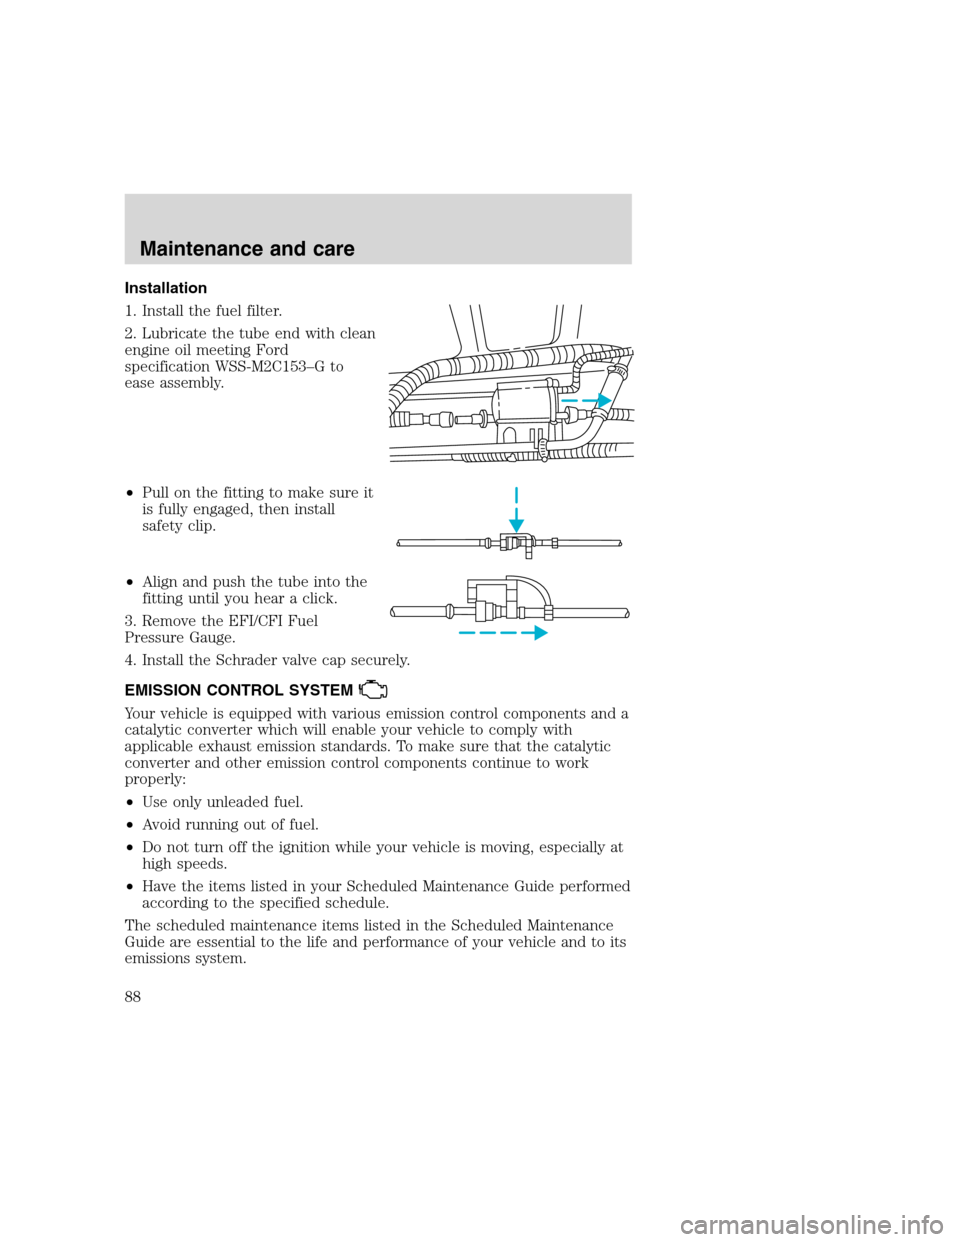
1. Install the fuel filter.
2. Lubricate the tube end with clean
engine oil meeting Ford
specification WSS-M2C153–G to
ease assembly.
•Pull on the fitting to make sure it
is fully engaged, then install
safety clip.
•Align and push the tube into the
fitting until you hear a click.
3. Remove the EFI/CFI Fuel
Pressure Gauge.
4. Install the Schrader valve cap securely.
EMISSION CONTROL SYSTEM
Your vehicle is equipped with various emission control components and a
catalytic converter which will enable your vehicle to comply with
applicable exhaust emission standards. To make sure that the catalytic
converter and other emission control components continue to work
properly:
•Use only unleaded fuel.
•Avoid running out of fuel.
•Do not turn off the ignition while your vehicle is moving, especially at
high speeds.
•Have the items listed in your Scheduled Maintenance Guide performed
according to the specified schedule.
The scheduled maintenance items listed in the Scheduled Maintenance
Guide are essential to the life and performance of your vehicle and to its
emissions system.
Maintenance and care
88