Page 35 of 256
Use the SEL control to select the
desired signal mode (the selected
mode will appear in the display).
The following signal modes can be
selected:
²JAZZ CLUBÐjazz club with
clearly reflected sounds.
²HALLÐrectangular concert hall capacity of about 2 000
²CHURCHÐchurch with a high vault.
²STADIUMÐoutdoor stadium with a capacity of about 30 000.
²NEWSЪvoice-onlyº type of sound with a limited audio band.
Press the DSP control until one of
the following appears:
²ALL SEATS
²DRIVER SEAT
²REAR SEATS
Use the SELECT control to change
the equalization to the desired
mode.
Setting the clock with radio data system (RDS) feature
Press the RDS control until SELECT
HOUR or SELECT MINS is
displayed.
Use the SEL control to manually set
the time.
²Press
to increase
hours/minutes.
²Press
to decrease
hours/minutes.
SEL
RDSDSP
SEL
RDSDSP
SEL
Controls and features
35
Page 44 of 256
Setting the clock
Press the RDS control until SELECT
HOUR or SELECT MINS is
displayed.
Use the SEL control to manually set
the time.
²Press
to increase
hours/minutes.
²Press
to decrease
hours/minutes.
Rear seat controls (if equipped)
The rear seat controls allow the
middle seat passengers to operate
the radio, tape, CD or CD changer
(if equipped).
To turn on the rear seat controls,
press the memory preset controls 3
and 5 at the same time. The
will appear in the display.
Pressing 3 and 5 at the same time
again will turn the rear seat controls
off.
If there is a discrepancy between the rear seat and the front audio
controls, (such as both trying to listen to the same playing media), the
front audio system will receive the desired selection.
RDS
SEL
- VOLUME +
MODE
SEEK MEMORY
REW1FF2SIDE 1-23
4COMP5SHUFFLE6
Controls and features
44
Page 171 of 256

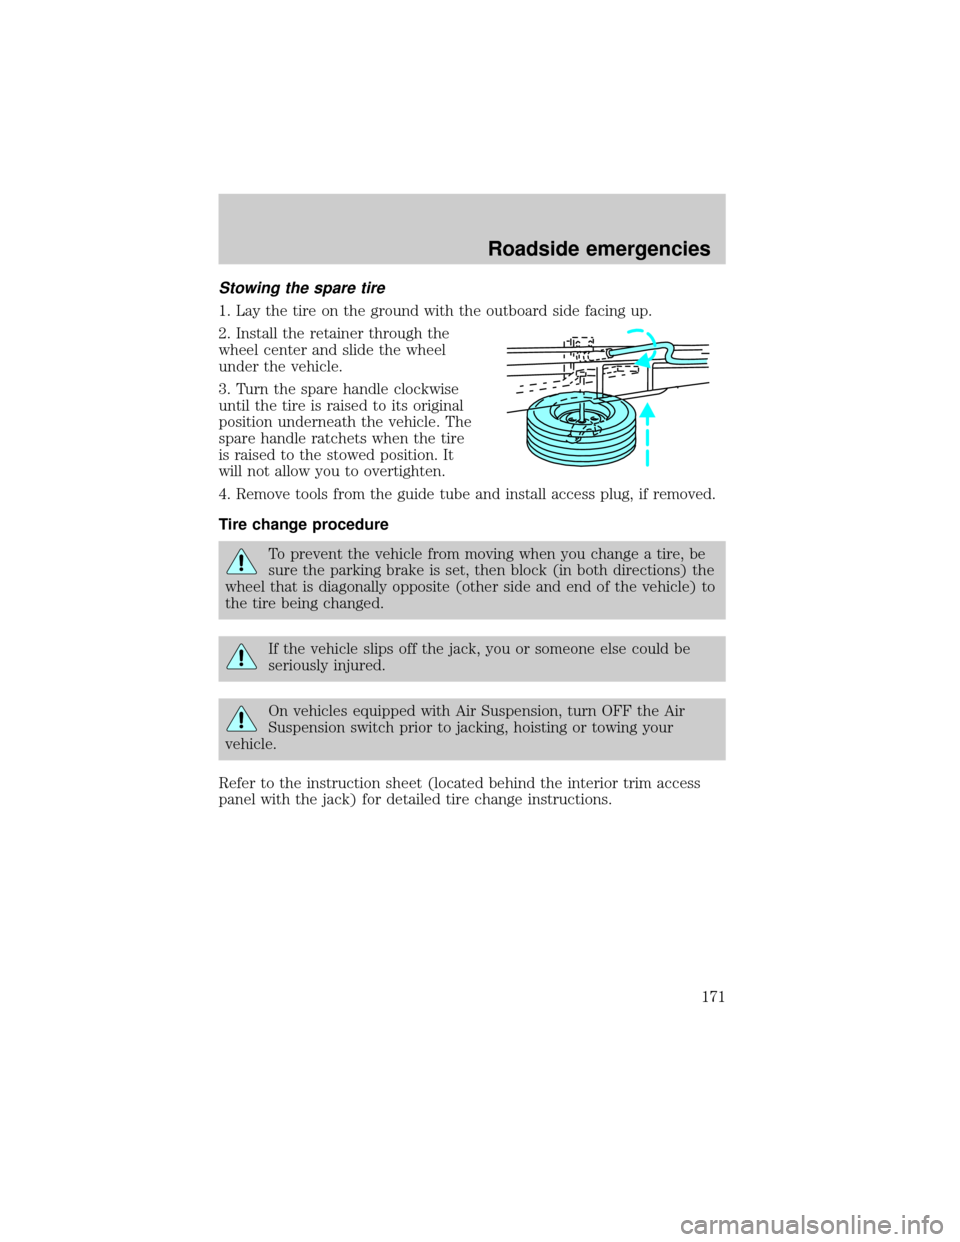
Stowing the spare tire
1. Lay the tire on the ground with the outboard side facing up.
2. Install the retainer through the
wheel center and slide the wheel
under the vehicle.
3. Turn the spare handle clockwise
until the tire is raised to its original
position underneath the vehicle. The
spare handle ratchets when the tire
is raised to the stowed position. It
will not allow you to overtighten.
4. Remove tools from the guide tube and install access plug, if removed.
Tire change procedure
To prevent the vehicle from moving when you change a tire, be
sure the parking brake is set, then block (in both directions) the
wheel that is diagonally opposite (other side and end of the vehicle) to
the tire being changed.
If the vehicle slips off the jack, you or someone else could be
seriously injured.
On vehicles equipped with Air Suspension, turn OFF the Air
Suspension switch prior to jacking, hoisting or towing your
vehicle.
Refer to the instruction sheet (located behind the interior trim access
panel with the jack) for detailed tire change instructions.
Roadside emergencies
171
Page 172 of 256
1. Park on a level surface, activate
hazard flashers and set the parking
brake.
2. Place gearshift lever in P (Park)
and turn engine OFF.
3. Block the diagonally opposite
wheel.
4. Obtain the spare tire and jack
from their storage locations.
5. Use the tip of the lug wrench to
remove any wheel trim.
6. Loosen each wheel lug nut
one-half turn counterclockwise but
do not remove them until the wheel
is raised off the ground.
BRAKE
HOOD
Roadside emergencies
172
Page 173 of 256
7. Turn OFF the air suspension
switch (if equipped).
8. Position the jack according to the
following guides and turn the jack
handle clockwise until the wheel is
completely off the ground.
When one of the rear
wheels is off the ground,
the transmission alone will not
prevent the vehicle from moving
or slipping off the jack, even if the
transmission is in P (Park). To
prevent the vehicle from moving
when you change the tire, be sure
that the parking brake is set and
the diagonally opposite wheel is
blocked. If the vehicle slips off the
jack, someone could be seriously
injured.
²Front (4x2)
AIR SUSPENSION
SWITCH
INTERRUPTEUR DE
LA SUSPENSION
PNEUMATIQUE
OFF
Roadside emergencies
173
Page 199 of 256

7. Drive the vehicle to complete the relearning process.
²The vehicle may need to be driven 16 km (10 miles) or more to
relearn the idle and fuel trim strategy.
²If you do not allow the engine to relearn its idle trim, the idle
quality of your vehicle may be adversely affected until the idle
trim is eventually relearned.
If the battery has been disconnected or a new battery has been installed,
the clock and the preset radio stations must be reset once the battery is
reconnected.
²Always dispose of automotive
batteries in a responsible manner.
Follow your local authorized
standards for disposal. Call your
local authorized recycling center
to find out more about recycling
automotive batteries.
AIR FILTER MAINTENANCE
Refer to the Scheduled Maintenance Guide for the appropriate intervals
for changing the air filter element.
When changing the air filter element, use only the Motorcraft air filter
element listed. Refer toMotorcraft Part Numbersin theCapacities and
specificationschapter.
Do not start your engine with the air cleaner removed and do
not remove it while the engine is running.
LEAD
RETURN
RECYCLE
Maintenance and care
199
Page 249 of 256

washing ....................................221
waxing .....................................221
wheels ......................................222
wiper blades ............................223
Climate control (see Air
conditioning or Heating) ............51
Clock .......................................35,44
Compass, electronic ....................71
calibration .................................73
set zone adjustment .................72
Console ........................................80
overhead ...............................69,74
rear ............................................81
Controls
power seat .................................94
Coolant
checking and adding ..............187
refill capacities .................191,226
specifications ...................229,232
Cruise control
(see Speed control) ....................63
Customer Assistance ................159
Ford accessories for your
vehicle .....................................242
Ford Extended
Service Plan ............................235
Getting assistance outside
the U.S. and Canada ..............241
Getting roadside assistance ...159
Getting the
service you need ....................235
Ordering additional
owner's literature ...................246
The Dispute
Settlement Board ...................238
Utilizing the Mediation/
Arbitration Program ...............241
Daytime running lamps
(see Lamps) ................................19
Defrost
rear window ..............................21Dipstick
automatic
transmission fluid ...................194
engine oil .................................183
Doors
door ajar warning .....................12
lubricant specifications ..........229
Driveline universal
joint and slip yoke ....................196
Driving under special
conditions ..................................148
mud ..........................................147
sand .........................................147
snow and ice ...........................149
through water ..................147,149
Emergencies, roadside
jump-starting ..........................175
Emission control system ..........213
Engine ........................................232
check engine/
service engine soon light ...........8
cleaning ...................................222
coolant .....................................187
fail-safe coolant ......................192
idle speed control ...................197
lubrication
specifications ...................229,232
refill capacities ........................226
service points ..........................183
starting after a collision .........160
Engine block heater .................131
Engine oil ..................................183
change oil soon warning,
message center .......................183
checking and adding ..............183
dipstick ....................................183
filter, specifications .........185,226
recommendations ...................185
refill capacities ........................226
specifications ...................229,232
Exhaust fumes ..........................132
Fail safe cooling ........................192
Index
249