2000 FORD E-450 automatic transmission
[x] Cancel search: automatic transmissionPage 126 of 232

Disconnect the wiring to the trailer before backing the trailer into the
water. Reconnect the wiring to the trailer after the trailer is removed
from the water.
Recreational towing (all wheels on the ground)
An example of recreational towing would be towing your vehicle on a
trip behind a Motorhome. Follow these guidelines if you have the need
for recreational towing your vehicle with all four wheels on the ground.
These guidelines are designed to ensure that your transmission is not
damaged.
2WD vehicles (with automatic transmissions)
²Place the transmission in N (Neutral)
²Maximum speed is 56 km (35 mph)
²Maximum distance is 80 km (50 miles)
If a distance of 80 km (50 miles) or a speed of 56 km (35 mph) must be
exceeded, the drive shaft will have to be removed.
Ford recommends the driveshaft be removed/installed only by a qualified
technician. See your local dealer for driveshaft removal/installation.
Improper removal/installation of the driveshaft can cause
transmission fluid loss, damage to the driveshaft and internal
transmission components.
DRIVING THROUGH WATER
Do not drive quickly through standing water, especially if the depth is
unknown. Traction or brake capability may be limited and if the ignition
system gets wet, your engine may stall. Water may also enter your
engine's air intake and severely damage your engine.
If driving through deep or standing water is unavoidable, proceed very
slowly. Never drive through water that is higher than the bottom of the
hubs (for trucks) or the bottom of the wheel rims (for cars).
Once through the water, always try the brakes. Wet brakes do not stop
the vehicle as effectively as dry brakes. Drying can be improved by
moving your vehicle slowly while applying light pressure on the brake
pedal.
Driving through deep water where the transmission/transmission
vent tube is submerged may allow water into the transmission
and cause internal transmission damage.
Driving
126
ProCarManuals.com
Page 138 of 232

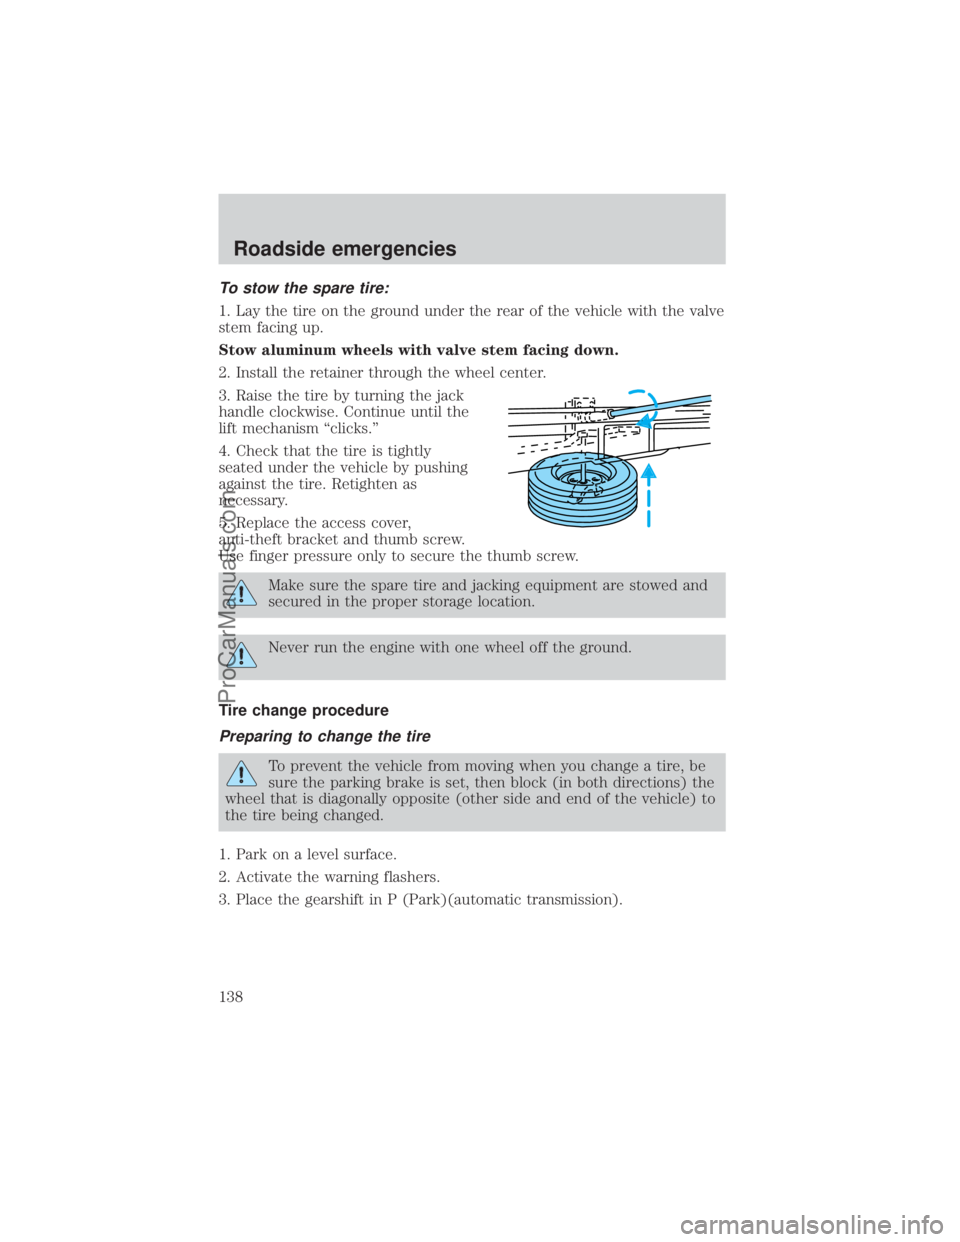
To stow the spare tire:
1. Lay the tire on the ground under the rear of the vehicle with the valve
stem facing up.
Stow aluminum wheels with valve stem facing down.
2. Install the retainer through the wheel center.
3. Raise the tire by turning the jack
handle clockwise. Continue until the
lift mechanism ªclicks.º
4. Check that the tire is tightly
seated under the vehicle by pushing
against the tire. Retighten as
necessary.
5. Replace the access cover,
anti-theft bracket and thumb screw.
Use finger pressure only to secure the thumb screw.
Make sure the spare tire and jacking equipment are stowed and
secured in the proper storage location.
Never run the engine with one wheel off the ground.
Tire change procedure
Preparing to change the tire
To prevent the vehicle from moving when you change a tire, be
sure the parking brake is set, then block (in both directions) the
wheel that is diagonally opposite (other side and end of the vehicle) to
the tire being changed.
1. Park on a level surface.
2. Activate the warning flashers.
3. Place the gearshift in P (Park)(automatic transmission).
Roadside emergencies
138
ProCarManuals.com
Page 144 of 232

Model Bolt Size Wheel Lug nut Torque*
Nm Lb-ft
E-150 1/2-20 135 100
E-250, E-350 and
E-Super Duty9/16-18 190 140
* Torque specifications are for nut and bolt threads free of dirt and
rust. Do not use oil or grease on threads. Use only Ford recommended
replacement fasteners.
JUMP STARTING YOUR VEHICLE
The gases around the battery can explode if exposed to flames,
sparks, or lit cigarettes. An explosion could result in injury or
vehicle damage.
Do not push start your vehicle. You could damage the catalytic
converter.
Batteries contain sulfuric acid which can burn skin, eyes, and
clothing, if contacted.
Do not attempt to push start your vehicle. Automatic
transmissions do not have push-start capability.
Preparing your vehicle
1.Use only a 12±volt supply to start your vehicle.
2. Do not disconnect the battery of the disabled vehicle as this could
damage the vehicle's electrical system.
3. Park the booster vehicle close to the hood of the disabled vehicle
making sure the two vehiclesdo nottouch. Set the parking brake on
both vehicles and stay clear of the engine cooling fan and other moving
parts.
4. Check all battery terminals and remove any excessive corrosion before
you attach the battery cables. Ensure that vent caps are tight and level.
Roadside emergencies
144
ProCarManuals.com
Page 152 of 232

IDENTIFYING COMPONENTS IN THE ENGINE COMPARTMENT
Engine compartment component locations
Refer to the7.3 Liter Power Stroke Direct Injection Turbo Diesel
Owner's Guide Supplementfor diesel engine component locations.
1. Windshield washer fluid reservoir
2. Engine oil filler cap (except 4.2L V6 engine)
3. Automatic transmission fluid dipstick
4. Air filter assembly
5. Engine oil dipstick
6. Engine oil filler cap (4.2L V6 engine only)
7. Power steering fluid reservoir
8. Brake fluid reservoir
9. Engine coolant reservoir
10. Battery
ENGINE OIL
Checking the engine oil
Refer to the Scheduled Maintenance Guide for the appropriate intervals
for checking the engine oil.
12345678
910
Maintenance and care
152
ProCarManuals.com
Page 165 of 232

For E-SuperDuty vehicles with the Hydro-Boost Brake System,
do not press the brake pedal after the engine has been turned
off.
5. Recheck the fluid level on the dipstick. Do not add fluid if the level is
between the arrows in the FULL COLD range.
6. If the fluid is low, add fluid in small amounts, continuously checking
the level until it reaches the FULL COLD range. Be sure to put the
dipstick back in the reservoir.
TRANSMISSION FLUID
Checking automatic transmission fluid
Refer to your Scheduled Maintenance Guide for scheduled intervals for
fluid checks and changes. Your transmission does not consume fluid.
However, the fluid level should be checked if the transmission is not
working properly, i.e., if the transmission slips or shifts slowly or if you
notice some sign of fluid leakage.
Automatic transmission fluid expands when warmed. To obtain an
accurate fluid check, drive the vehicle until it is at normal operating
temperature (approximately 30 km [20 miles]). If your vehicle has been
operated for an extended period at high speeds, in city traffic during hot
weather or pulling a trailer, the vehicle should be turned off for about 30
minutes to allow fluid to cool before checking.
1. Drive the vehicle 30 km (20 miles) or until it reaches normal operating
temperature.
2. Park the vehicle on a level surface and engage the parking brake.
3. With the parking brake engaged and your foot on the brake pedal,
start the engine and move the gearshift lever through all of the gear
ranges. Allow sufficient time for each gear to engage.
4. Latch the gearshift lever in P (Park) and leave the engine running.
5. Remove the dipstick, wiping it clean with a clean, dry lint free rag. If
necessary, refer toIdentifying components in the engine compartment
in this chapter for the location of the dipstick.
6. Install the dipstick making sure it is fully seated in the filler tube.
Maintenance and care
165
ProCarManuals.com
Page 166 of 232

7. Remove the dipstick and inspect the fluid level. The fluid should be in
the designated area for normal operating temperature or ambient
temperature.
Low fluid level
Do not drive the vehicle if the fluid
level is at the bottom of the dipstick
and the ambient temperature is
above 10ÉC (50ÉF).
Correct fluid level
The transmission fluid should be checked at normal operating
temperature 66ÉC-77ÉC (150ÉF-170ÉF) on a level surface. The normal
operating temperature can be reached after approximately 30 km (20
miles) of driving.
You can check the fluid without driving if the ambient temperature is
above 10ÉC (50ÉF). However, if fluid is added at this time, an overfill
condition could result when the vehicle reaches normal operating
temperature.
The transmission fluid should be in
this range if at normal operating
temperature (66ÉC-77ÉC
[150ÉF-170ÉF]).
The transmission fluid should be in
this range if at ambient temperature
(10ÉC-35ÉC [50ÉF-95ÉF]).
High fluid level
Fluid levels above the safe range
may result in transmission failure.
An overfill condition of transmission
fluid may cause shift and/or
engagement concerns and/or possible damage.
High fluid levels can be caused by an overheating condition.
Adjusting automatic transmission fluid levels
Before adding any fluid, make sure the correct type is used. The type of
fluid used is normally indicated on the dipstick and also in the
Lubricant specificationssection in theCapacities and specifications
chapter.
Maintenance and care
166
ProCarManuals.com
Page 167 of 232

Use of a non-approved automatic transmission fluid may cause
internal transmission component damage.
If necessary, add fluid in 250 mL (1/2 pint) increments through the filler
tube until the level is correct.
If an overfill occurs, excess fluid
should be removed by a qualified
technician.
An overfill condition of transmission fluid may cause shift and/or
engagement concerns and/or possible damage.
DRIVELINE UNIVERSAL JOINT AND SLIP YOKE
Your vehicle may be equipped with universal joints that require
lubrication. Refer to the Scheduled Maintenance Guide for maintenance
intervals. If the original universal joints are replaced with universal joints
equipped with grease fittings, lubrication will also be necessary.
BATTERY
Your vehicle is equipped with a
Motorcraft maintenance-free battery
which normally does not require
additional water during its life of
service.
However, for severe usage or in high temperature climates, check the
battery electrolyte level. Refer to the Scheduled Maintenance Guide for
the service interval schedules.
Keep the electrolyte level in each cell up to the ªlevel indicatorº.
Do not overfill the battery cells.
If the electrolyte level in the battery is low, you can add plain tap water
to the battery, as long as you do not use hard water (water with a high
mineral or alkali content). If possible, however, try to only fill the battery
Maintenance and care
167
ProCarManuals.com
Page 202 of 232

Fluid Ford Part
NameApplication Capacity
Transmission
fluid
6Motorcraft
MERCONtV
AT FAutomatic
(4R70W)13.1L
(13.9 quarts)7
Motorcraft
MERCONtAT FAutomatic
(4R100 except
E-Super Duty)15.0L
(15.9 quarts)7
Automatic
(4R100 E-Super
Duty)15.5L
(16.4 quarts)7
Windshield
washer fluidUltra-Clear
Windshield
Washer
ConcentrateAll 4.0L
(4.2 quarts)
1Use Ford Premium Engine Coolant (green in color). DO NOT USE Ford
Extended Life Engine Coolant (orange in color). Refer toAdding engine
coolant, in the Maintenance and Care chapter.
2If your vehicle's rear axle is filled with a synthetic rear axle lubricant it
is considered lubricated for life. These lubricants do not need to be
checked or changed unless a leak is suspected, service is required or the
axle assembly has been submerged in water. The axle lubricant should
be changed any time the rear axle has been submerged in water.
Fill 6 mm to 14 mm (1/4 inch to 9/16 inch) below bottom of fill hole.
Add 118 ml (4 oz.) of Additive Friction Modifier C8AZ-19B546-A or
equivalent meeting Ford specification EST-M2C118±A, for complete refill
of 8.8 inch and 9.75 inch Traction-Lok axles.
3Fill Dana rear axles to 6 mm to 19 mm (1/4 inch to 3/4 inch) below
bottom of fill hole.
4Ford conventional and Traction-Lok axles require Motorcraft SAE
75W-140 Synthetic Rear Axle Lubricant F1TZ-19580-B or equivalent
meeting Ford specification WSL-M2C192-A. Add 118 ml (4 oz.) of
Additive Friction Modifier C8AZ-19B546-A or equivalent meeting Ford
specification EST-M2C118±A. Dana conventional and limited-slip axles
(E250/350/450)require Motorcraft SAE 80W-90 Premium Rear Axle
Lubricant XY-80W90-QL or equivalent meeting Ford specification
WSP-M2C197-A. Add 177ml (6 oz.) of Additive Friction Modifier
C8AZ-19B546-A or equivalent meeting Ford specification EST-M2C118-A.
Capacities and specifications
202
ProCarManuals.com