2000 FIAT MAREA Fuel tank
[x] Cancel search: Fuel tankPage 33 of 330

Technical Data Marea-Marea Weekend
Engine: cooling system • fuel system 2000 range (§)
OO.io
COOLING
Cooling circuit coolant circulation via centrifugal pump, radiator
and two speed fan operated by engine control unit
Water pump operated via belt
fl (^+\ STA9E 1 90°H-94°C 96°+97T
^ Engagement vj^/ ?
of fan stage Z 95°+99°C (•) 101+102°C
\f Operated by v .
control unit (s\oo\ 9 85V89X 93°-H94T
• v y
v—' stage 2 90°+94°C (•) 98+99T
opening starts 81° - 85°C
Engine coolant
thermostat rnax opening 99+103°C 101DC+105'C
valve travel 9.5 mm
Fitting clearance between impeller p
vanes and pump casing j |< 0.3:1.1 mm 0.4 : 0.95 mm
Pressure for checking system water tightness 0.98 bar
Pressure for checking exhaust valve on expansion
tank cap 0.98 bar
(•) Versions with climate control
FUEL FEED SYSTEM
Make
Electronic integrated
injection-ignition
MPI - I.A.W.
Weber-Marelli
Electronic integrated
injection-ignition
MPI - BOSCH Motronic
Pump electric immersed in the tank
Output > 120 l/h
Fuel pressure regulator setting 3 bar
26 Print n° 506.763/23
Page 70 of 330

Engine
Fuel feed system
Marea- Marea Weekend
2000 range @
10.
FUEL ANTI-EVAPORATION SYSTEM
The fuel anti-evaporation system has several improvements, compared with previous versions, aimed at
sealing the fuel vapours on the outside.
In particular, the following measures have been adopted:
- multi-purpose valve on the tank to prevent leaks.
- New anti-evaporation solenoid valve and the adoption of rapid attachment connectors for the anti-
evaporation system pipes.
- Plug on the fuel filler with attachment cable.
For further information on the fuel system, refer to publication: 507137.
Key
1. Filler
2. Multi-purpose valve
3. Active charcoal filter
4. Anti-evaporation solenoid
valve
5. Fuel vapour intake on inlet
manifold
6. Fuel tank
7. Engine management elec
tronic control unit
LOCATION OF DIAGNOSTIC SOCKET
The diagnostic socket for the analysis of the en
gine management system is located under the
junction unit in the dashboard. This socket also
makes the connection with the diagnostic equip
ment (Examiner or other instruments) for the
other electronic control units on the vehicle.
In effect, it is a "standardized" 16-way diagnostic
socket which can be connected to the diagnostic
equipment using the "MPX97" adaptor.
2 Print n° 506.763/23
Page 75 of 330

Marea- Marea Weekend •
2000 range ©
16v Engine
Fuel feed system
10.
1. Loosen the belt tension using the lock nut
(2) and the adjustment screw (1); then re
lease the belt from the pulley.
2. Undo the bolts fixing the bracket for the
power assisted steering pump mounting
and detach the pump.
3. Undo the nuts fixing the exhaust manifold
to the cylinder head and detach the mani
fold.
- To refit, reverse the order of the operations
carried out for the removal; tension the
power assisted steering pump drive belt,
using the adjustment screw; use tool
189576200 to check that the tension is
between 32 and 45 daN.
ELECTRIC FUEL PUMP WITH LEVEL
SENDER UNIT
Removing-refitting
- Disconnect the negative battery terminal.
- Lift up the lining in the luggage compart
ment and remove the fuel pup protective
cover.
- Disconnect the electrical connection for the
electric pump assembly and the fuel supply
and breather pipes.
4. Undo the ring nut fixing the electric fuel
pump to the tank using tool 1870736000.
The gasket on the tank housing should be
replaced each time the pump drip tray is
removed-refitted.
NOTE The position of the fuel pump is fixed
and is established by a reference in
the housing in the tank which sou Id
correspond to the projection on the
pump drip tray.
Copyright by Fiat Auto 7
Page 78 of 330

Marea- Marea Weekend & Engine
2000 range (§) Fuel feed system
ENGINE MANAGEMENT SYSTEM
Foreword
The Marea-Marea Weekend 1998 20v is equipped with a 5 cylinder in line engine with 20 valves, 1998
cc, twin overhead camshaft and a Bosch ME3.1 integrated electronic injection/ignition system.
The fuel system differs from the one described for the 1998 20v "99 range" version through the addition
of several variants to make it compatible with the EEC Stage 3 EOBD regulations.
The main modifications to the system can be summarized as follows:
- Catalytic converter near the exhaust manifold to take maximum advantage of the heat of the gases.
- Two Lambda sensors, one upstream (front) and one downstream (rear) which check the quality of the
exhaust gases and the operation of the catalyzer.
- Adoption of an accelerometre sensor on the right shock absorber turret, used to distinguish between
engine torque variations doe to the uneveness of the road surface and those due to failed ignition in
the combustion chamber (misfire).
- Adoption of a timing sensor on the inlet side timing pulley.
- Multi-purpose valve on the tank to prevent leaks.
- Adoption of raipd attachment connectors for the anti-evaporation system pipes.
- Cap on the fuel filler with an attachment cable.
For further information on the fuel system, refer to publication 507137.
DIAGRAM SHOWING ENGINE EXHAUST ASSEMBLY
4F001WJ01
Key
1. Exhaust manifold
2. Catalytic converter
3. Front Lambda sensor
4. Rear Lambda sensor
5. Silencers
Copyright by Fiat Auto 1
Page 88 of 330

Engine
Fuel feed system
Marea- Marea Weekend © ™
2000 range ©
10.
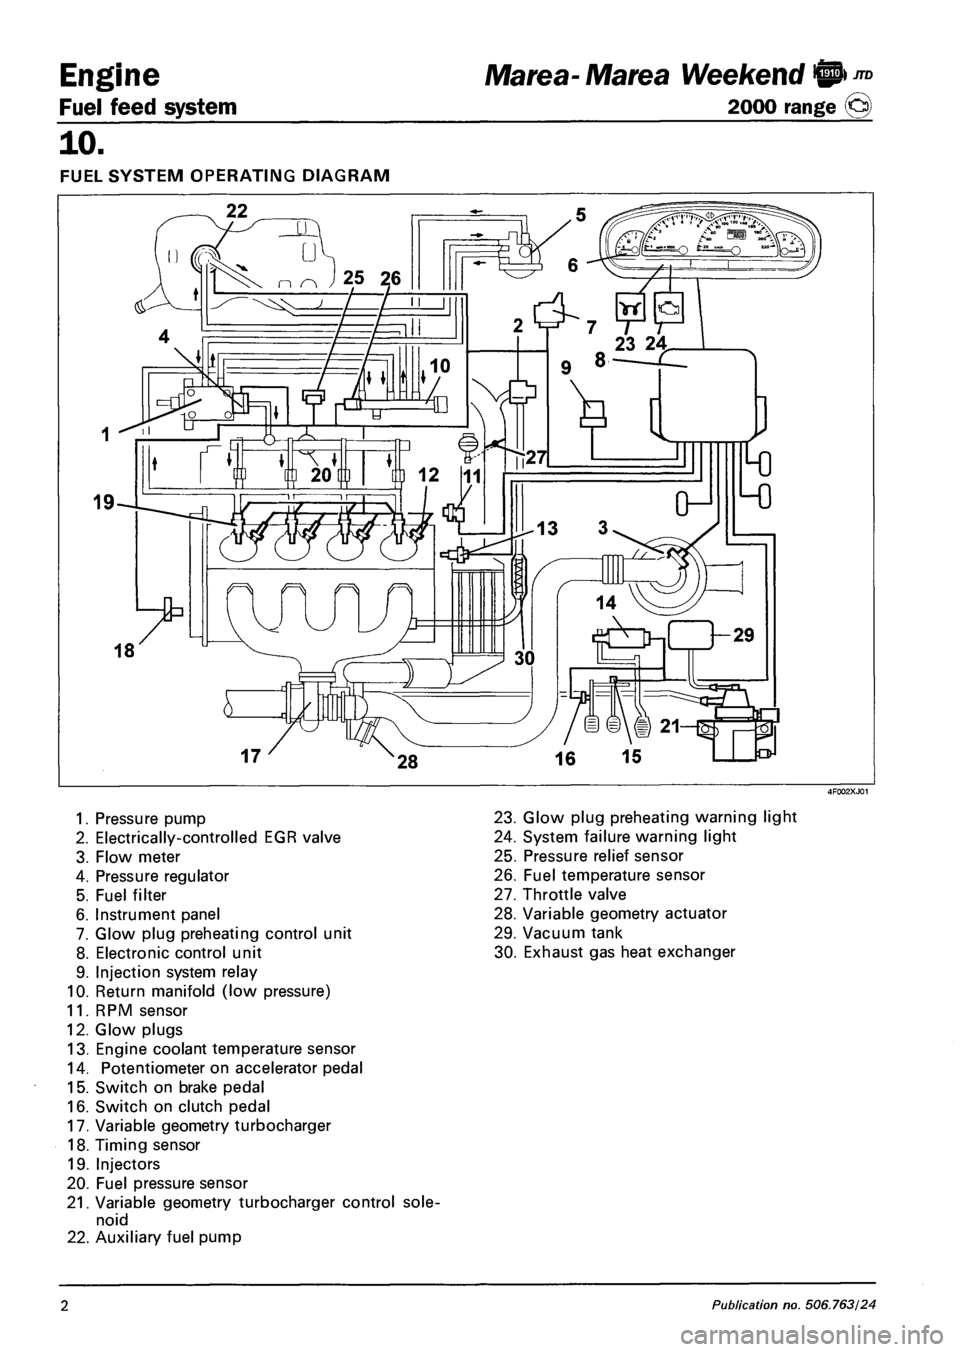
FUEL SYSTEM OPERATING DIAGRAM
1. Pressure pump
2. Electrically-controlled EGR valve
3. Flow meter
4. Pressure regulator
5. Fuel filter
6. Instrument panel
7. Glow plug preheating control unit
8. Electronic control unit
9. Injection system relay
10. Return manifold (low pressure)
11. RPM sensor
12. Glow plugs
13. Engine coolant temperature sensor
14. Potentiometer on accelerator pedal
15. Switch on brake pedal
16. Switch on clutch pedal
17. Variable geometry turbocharger
18. Timing sensor
19. Injectors
20. Fuel pressure sensor
21. Variable geometry turbocharger control sole
noid
22. Auxiliary fuel pump
23. Glow plug preheating warning light
24. System failure warning light
25. Pressure relief sensor
26. Fuel temperature sensor
27. Throttle valve
28. Variable geometry actuator
29. Vacuum tank
30. Exhaust gas heat exchanger
2 Publication no. 506.763/24
Page 89 of 330

Ma tea- Marea Weekend 9 ™
2000 range (Q) Fuel feed system
Engine
10.
Control of injected fuel quantity
The control unit controls the fuel pressure regulator and injectors on the basis of output signals from the
accelerator pedal potentiometer, flow meter and rpm sensor.
The timing and thus the injection sequence are determined when the engine is started up using signals
from the rpm and timing sensor (synchronisation stage); injection timing is then implemented using the
rpm sensor signal alone and considering a injection sequence of 1 -3-4-2.
The control unit inhibits injection in the following cases:
- fuel pressure level greater than 1500 bars;
- fuel pressure level lower than 120 bars;
- engine speed higher than 6000 rpm.
When the engine has warmed up, maximum injection duration (injector opening time) is 1500 ns, but it
can reach 3000 ns during the start-up stage.
Control of injection advance
The electronic control unit determines injection advance mainly on the basis of the quantity of fuel to be
injected.
The injection advance is then corrected on the basis of coolant temperature and speed in order to com
pensate for ignition delays due to low temperatures in the combustion chamber during warm-up.
The optimum injection point is also processed to ensure driving comfort and emission limits laid down by
Euro 3 legislation.
Control of injection pressure
This control is of particular importance because injection pressure influences the following parameters:
- amount of fuel taken into the cylinders for the same injection time duration;
- injected fuel nebulation;
- spray penetration;
- lag between electrical control to injection and actual injection start and end times.
The above parameters engine behaviour significantly, particularly in terms of power output, exhaust emis
sions, noise levels and handling.
The injection control unit controls the pressure governor on the basis of engine load to obtain an optimal
line pressure at all times.
When the engine is cold, injection pressure is corrected on the basis of engine speed and engine coolant
temperature to meet engine needs at different operating temperatures.
Control of auxiliary fuel pump
The auxiliary fuel pump submerged in the tank is supplied by the injection control unit by means of a relay
when the ignition key is turned on.
Fuel supply to the pump is inhibited when one of the following condition occurs:
- when the ignition has been turned on for a certain length of time without the engine running;
- if the inertia switch cuts in.
Control of injection during over-run (cut-off)
The fuel cut-off strategy is implemented when the injection control unit receives information that the ac
celerator pedal has been released from the potentiometer.
Under these conditions, the control unit cuts off the fuel supply to the injectors and restores it before idle
speed is reached.
Copyright by Fiat Auto 3
Page 95 of 330

Marea- Marea Weekend 9 ™
2000 range ©) Fuel feed system
Engine
10.
Compents of injection system wiring diagram
1. Vehicle speepd
2. Rev counter
3. Engine radiator fan low speed relay
4. Radiator fan high speed activation relay
5. Potentiometer on accelerator pedal
6. Timing sensor
7. Fuel pressure sensor
8. EGR system modulator solenoid
9. Fuel pressure regulator
10. Glow plug preheating warning light on control panel
11. Injection system failure warning light
12. Air conditioning system relay
13. Coolant temperature sensor
14. Rpm sensor
15. Fuel temperature sensor
16. Diagnostic socket
17. Fiat CODE control unit
18. Four stage pressure switch
19. Injection electronic control unit
20. Pressure relief sensor
21. 7.5A fuse protecting electronic injection system ( + 15 power supply from ignition switch)
22. 7.5A fuse protecting electronic injection system ( + 30 power supply from ignition switch)
23. Main injection system relay
24. 30A fuse protecting injection system
25. Auxiliary fuel pump relay
26. Glow plug preheating control unit
27. Intake air flow and temperature sensor (debimeter)
28. Brake pedal switch
29. Clutch pedal switch
30. Ignition switch
31. Battery
32. Inertia switch
33. Auxiliary fuel pump (submerged in tank)
34. 60A fuse protecting glow plug control unit
35. Cylinder no. 1 glow plug
36. Cylinder no. 2 glow plug
37. Cylinder no. 3 glow plug
38. Cylinder no. 4 glow plug
39. Cylinder no. 1 injector
40. Cylinder no. 2 injector
41. Cylinder no. 3 injector
42. Cylinder no. 4 injector
43. Throttle valve control solenoid
44. Variable geometry turbocharger control solenoid
45. Diesel filter heater relay
Copyright by Fiat Auto 9
Page 104 of 330

Engine
Fuel feed system
JTD Marea- Marea Weekend 0
2000 range ©
10.
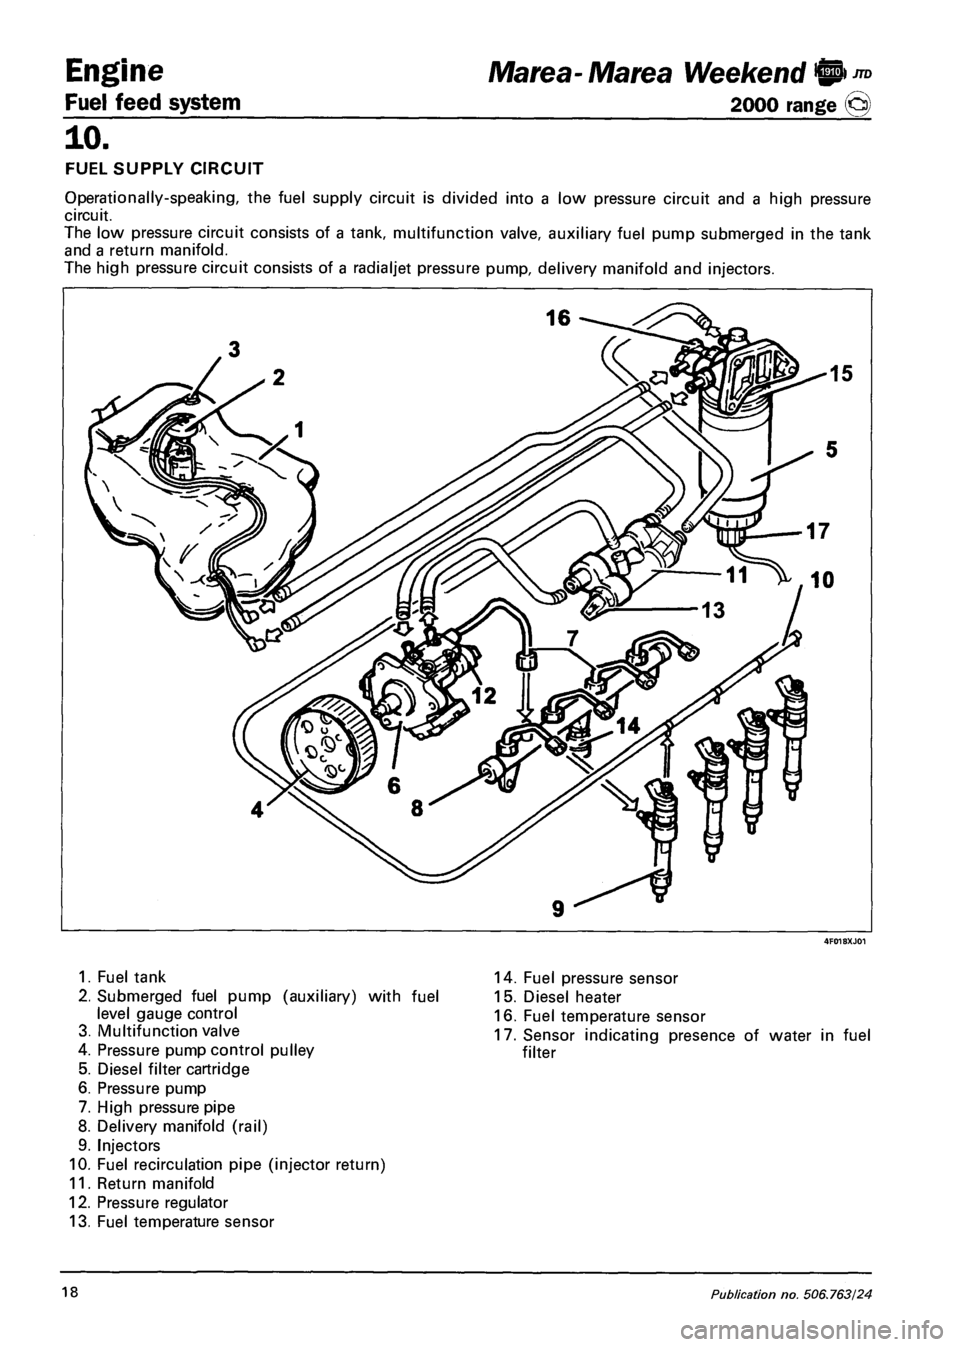
FUEL SUPPLY CIRCUIT
Operationally-speaking, the fuel supply circuit is divided into a low pressure circuit and a high pressure
circuit.
The low pressure circuit consists of a tank, multifunction valve, auxiliary fuel pump submerged in the tank
and a return manifold.
The high pressure circuit consists of a radialjet pressure pump, delivery manifold and injectors.
1. Fuel tank
2. Submerged fuel pump (auxiliary) with fuel
level gauge control
3. Multifunction valve
4. Pressure pump control pulley
5. Diesel filter cartridge
6. Pressure pump
7. High pressure pipe
8. Delivery manifold (rail)
9. Injectors
10. Fuel recirculation pipe (injector return)
11. Return manifold
12. Pressure regulator
13. Fuel temperature sensor
14. Fuel pressure sensor
15. Diesel heater
16. Fuel temperature sensor
17. Sensor indicating presence of water in fuel
filter
18 Publication no. 506.763/24