Page 214 of 365
yellowblue
4-31
The other label is the Certification label, found on the rear
edge of the driver's door. It tells you the gross weight
capacity of your vehicle, called the Gross Vehicle Weight
Rating (GVWR). The GVWR includes the weight of the
vehicle, all occupants, fuel and cargo. Never exceed the
GVWR for your vehicle or the Gross Axle Weight Rating
(GAWR) for either the front or rear axle.
If you do have a heavy load, spread it out. Don't carry
more than 167 pounds (75 kg) in your trunk.
CAUTION:
Do not load your vehicle any heavier than the
GVWR, or either the maximum front or rear
GAWR. If you do, parts on your vehicle can
break, and it can change the way your vehicle
handles. These could cause you to lose control
and crash. Also, overloading can shorten the life
of your vehicle.
NOTICE:
Your warranty does not cover parts or
components that fail because of overloading.
Page 215 of 365

yellowblue
4-32
If you put things inside your vehicle -- like suitcases,
tools, packages or anything else
-- they will go as fast as
the vehicle goes. If you have to stop or turn quickly, or
if there is a crash, they'll keep going.
CAUTION:
Things you put inside your vehicle can strike
and injure people in a sudden stop or turn, or
in a crash.
�Put things in the trunk of your vehicle. In a
trunk, put them as far forward as you can.
Try to spread the weight evenly.
�Never stack heavier things, like suitcases,
inside the vehicle so that some of them are
above the tops of the seats.
�Don't leave an unsecured child restraint in
your vehicle.
�When you carry something inside the
vehicle, secure it whenever you can.
�Don't leave a seat folded down unless you
need to.
Towing a Trailer
CAUTION:
If you don't use the correct equipment and drive
properly, you can lose control when you pull a trailer.
For example, if the trailer is too heavy, the brakes
may not work well
-- or even at all. You and your
passengers could be seriously injured. You may also
damage your vehicle; the resulting repairs would not
be covered by your warranty. Pull a trailer only if you
have followed all the steps in this section. Ask your
dealer for advice and information about towing a
trailer with your vehicle.
Your vehicle can tow a trailer if it is equipped with the
proper trailer towing equipment. To identify what the
vehicle trailering capacity is for your vehicle, you
should read the information in ªWeight of the Trailerº
that appears later in this section. But trailering is
different than just driving your vehicle by itself.
Trailering means changes in handling, durability and
fuel economy. Successful, safe trailering takes correct
equipment, and it has to be used properly.
Page 246 of 365
yellowblue
5-25 Removing the Spare Tire and Tools
The equipment you'll need
is in the trunk.
Turn the center nut on the compact spare cover
counterclockwise to remove it.
Remove the compact spare tire. See ªCompact Spare
Tireº later in this section for more information about the
compact spare.
Page 252 of 365

yellowblue
5-31
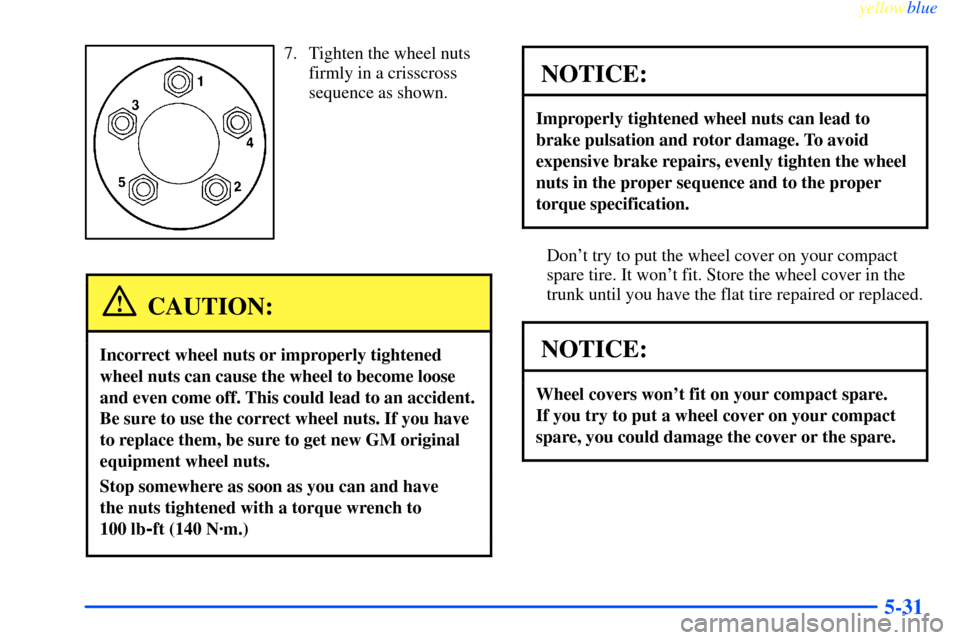
7. Tighten the wheel nuts
firmly in a crisscross
sequence as shown.
CAUTION:
Incorrect wheel nuts or improperly tightened
wheel nuts can cause the wheel to become loose
and even come off. This could lead to an accident.
Be sure to use the correct wheel nuts. If you have
to replace them, be sure to get new GM original
equipment wheel nuts.
Stop somewhere as soon as you can and have
the nuts tightened with a torque wrench to
100 lb
-ft (140 N´m.)
NOTICE:
Improperly tightened wheel nuts can lead to
brake pulsation and rotor damage. To avoid
expensive brake repairs, evenly tighten the wheel
nuts in the proper sequence and to the proper
torque specification.
Don't try to put the wheel cover on your compact
spare tire. It won't fit. Store the wheel cover in the
trunk until you have the flat tire repaired or replaced.
NOTICE:
Wheel covers won't fit on your compact spare.
If you try to put a wheel cover on your compact
spare, you could damage the cover or the spare.
Page 253 of 365
yellowblue
5-32 Storing the Flat Tire and Tools
CAUTION:
Storing a jack, a tire or other equipment in the
passenger compartment of the vehicle could
cause injury. In a sudden stop or collision, loose
equipment could strike someone. Store all these
in the proper place.
After you've put the compact spare tire on your vehicle,
you'll need to store the flat tire in your trunk. Use the
following procedure to secure the flat tire in the trunk.
When storing a full-size tire, you must use the extension
to help avoid wheel surface damage. Use the extension
and protector/guide located in foam holder. To store a
full
-size tire, place the tire in the trunk valve stem facing
down with the protector/guide through a wheel bolt
hole, remove the protector and attach the retainer
securely. When reinstalling the compact spare, put the
protector/guide back in the foam holder. Store the cover
as far forward as possible.
Page 254 of 365
yellowblue
5-33 Storing the Spare Tire and Tools
CAUTION:
Storing a jack, a tire or other equipment in the
passenger compartment of the vehicle could
cause injury. In a sudden stop or collision, loose
equipment could strike someone. Store all these
in the proper place.
The compact spare is for temporary use only. Replace
the compact spare tire with a full
-size tire as soon as you
can. See ªCompact Spare Tireº in the Index. See the
storage instructions label to replace your compact spare
in your trunk properly.
A. Retainer
B. Cover
C. Compact Spare Tire
D. Nut
E. Jack
F. Wrench
G. Lock Nut Tool
H. Foam Holder
I. Extension and
Protective Guide
J. Bolt Screw
Page 265 of 365

yellowblue
6-8
Filling a Portable Fuel Container
CAUTION:
Never fill a portable fuel container while it is in
your vehicle. Static electricity discharge from the
container can ignite the gasoline vapor. You can
be badly burned and your vehicle damaged if this
occurs. To help avoid injury to you and others:
�Dispense gasoline only into
approved containers.
�Do not fill a container while it is inside a
vehicle, in a vehicle's trunk, pickup bed or
on any surface other than the ground.
�Bring the fill nozzle in contact with the
inside of the fill opening before operating
the nozzle. Contact should be maintained
until the filling is complete.
�Don't smoke while pumping gasoline.
Checking Things Under the Hood
CAUTION:
An electric fan under the hood can start up and
injure you even when the engine is not running.
Keep hands, clothing and tools away from any
underhood electric fan.
CAUTION:
Things that burn can get on hot engine parts and
start a fire. These include liquids like gasoline,
oil, coolant, brake fluid, windshield washer and
other fluids, and plastic or rubber. You or others
could be burned. Be careful not to drop or spill
things that will burn onto a hot engine.
Page 295 of 365
yellowblue
6-38
9. Install the new bulb by inserting the smallest tab on
the bulb base into the matching notch in the
retaining ring. Turn the bulb a quarter
-turn
clockwise until it stops.
10. Reinstall the dust caps and reconnect the
electrical connector.
11. Install the headlamp assembly back to the vehicle.
12. Attach the air baffle.
13. Close the hood.
Fog Lamps (If Equipped)
1. Remove the T15 TORX� screw.
2. Pull out the lamp assembly.
3. Remove the old bulb. Do not discard! The
replacement number is printed on the bulb.
See ªReplacement Bulbsº in the Index for
more information.
4. Insert new bulb into the assembly.
5. Reinstall the lamps and screw.
Tail/Stop/Turn Signal Lamp
A. Rear Sidemarker Lamp
B. Tail/Stop/Turn Signal Lamp
To remove the rear lamp assembly:
1. Open the trunk. Remove the convenience net, if you
have one. Unhook the net from the upper wing nut.