Page 292 of 365
yellowblue
6-35
3. Remove the two headlamp fasteners by pulling
up on them.4. Gently pull the headlamp assembly away from the
vehicle and remove the electrical connector.
5. Remove the round dust caps to gain access
to the bulbs.
6. Turn the bulb counterclockwise and remove it from
the retaining ring by gently pulling it away from
the headlamp.
7. Remove the electrical connector from the bulb by
raising the lock tab and pulling the connector away
from the bulb's base.
8. Install the electrical connector to the new bulb.
Page 293 of 365

yellowblue
6-36
9. Install the new bulb by inserting the smallest tab on
the bulb base into the matching notch in the
retaining ring. Turn the bulb a quarter
-turn
clockwise until it stops.
10. Reverse all steps to reinstall the headlamp
assembly. Then, check the lamps.
Headlamp Aiming
If your vehicle is damaged in an accident, the headlamp
aim may be affected. Aim adjustment to the low beam
may be necessary if it is difficult to see lane markers
(for horizontal aim), or if oncoming drivers flash their
high beams at you (for vertical aim). If you believe your
headlamps need to be re
-aimed, we recommend that you
take your vehicle to the dealer for service. However, it is
possible for you to re
-aim your headlamps by following
the procedure in the service manual for your vehicle.
NOTICE:
To make sure your headlamps are aimed
properly, read all the instructions before
beginning. Failure to follow these instructions
could cause damage to headlamp parts.
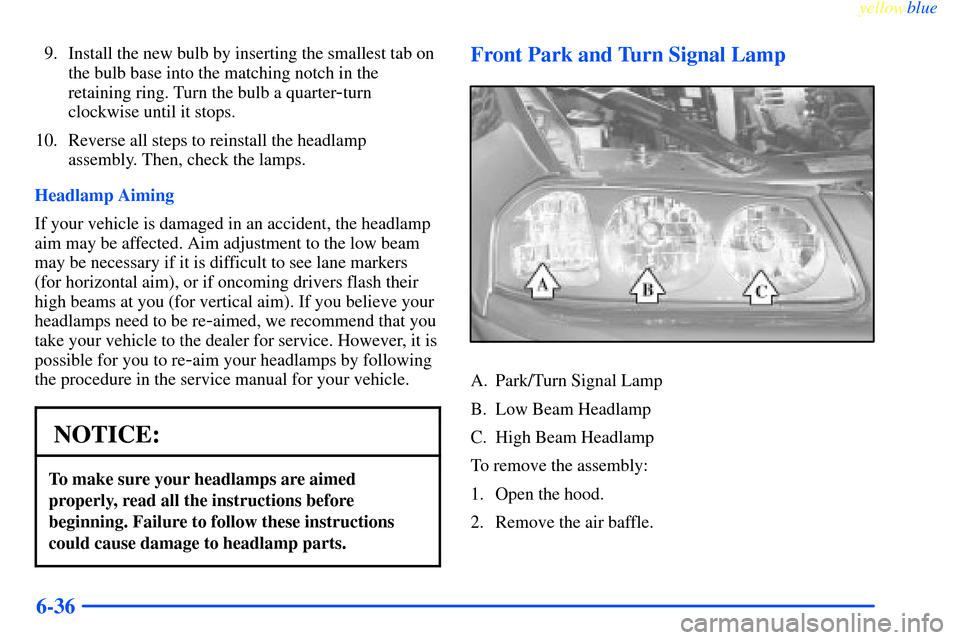
Front Park and Turn Signal Lamp
A. Park/Turn Signal Lamp
B. Low Beam Headlamp
C. High Beam Headlamp
To remove the assembly:
1. Open the hood.
2. Remove the air baffle.
Page 294 of 365
yellowblue
6-37
3. Remove the two headlamp fasteners by pulling
up on them.4. Gently pull the headlamp assembly away from the
vehicle and remove the electrical connector.
5. Remove the round dust caps to gain access
to the bulbs.
6. Turn the bulb counterclockwise and remove it from
the retaining ring by gently pulling it away from the
headlamp.
7. Remove the electrical connector from the bulb by
raising the lock tab and pulling the connector away
from the bulb's base.
8. Install the electrical connector to the bulb.
Page 295 of 365
yellowblue
6-38
9. Install the new bulb by inserting the smallest tab on
the bulb base into the matching notch in the
retaining ring. Turn the bulb a quarter
-turn
clockwise until it stops.
10. Reinstall the dust caps and reconnect the
electrical connector.
11. Install the headlamp assembly back to the vehicle.
12. Attach the air baffle.
13. Close the hood.
Fog Lamps (If Equipped)
1. Remove the T15 TORX� screw.
2. Pull out the lamp assembly.
3. Remove the old bulb. Do not discard! The
replacement number is printed on the bulb.
See ªReplacement Bulbsº in the Index for
more information.
4. Insert new bulb into the assembly.
5. Reinstall the lamps and screw.
Tail/Stop/Turn Signal Lamp
A. Rear Sidemarker Lamp
B. Tail/Stop/Turn Signal Lamp
To remove the rear lamp assembly:
1. Open the trunk. Remove the convenience net, if you
have one. Unhook the net from the upper wing nut.
Page 308 of 365

yellowblue
6-51
Each new wheel should have the same load-carrying
capacity, diameter, width, offset and be mounted the
same way as the one it replaces.
If you need to replace any of your wheels, wheel bolts
or wheel nuts, replace them only with new GM original
equipment parts. This way, you will be sure to have the
right wheel, wheel bolts and wheel nuts for your vehicle.
CAUTION:
Using the wrong replacement wheels, wheel bolts
or wheel nuts on your vehicle can be dangerous.
It could affect the braking and handling of your
vehicle, make your tires lose air and make you lose
control. You could have a collision in which you or
others could be injured. Always use the correct
wheel, wheel bolts and wheel nuts for replacement.
NOTICE:
The wrong wheel can also cause problems with
bearing life, brake cooling, speedometer or
odometer calibration, headlamp aim, bumper
height, vehicle ground clearance and tire or tire
chain clearance to the body and chassis.
See ªChanging a Flat Tireº in the Index for
more information.
Used Replacement Wheels
CAUTION:
Putting a used wheel on your vehicle is
dangerous. You can't know how it's been used or
how far it's been driven. It could fail suddenly
and cause an accident. If you have to replace a
wheel, use a new GM original equipment wheel.
Page 318 of 365

yellowblue
6-61 Headlamp Wiring
The headlamp circuit is protected by individual fuses in
the underhood electrical center. An electrical overload
will cause the fuse to blow. If this happens, have your
headlamp system checked right away.
Windshield Wipers
The windshield wiper motor is protected by a circuit
breaker and a fuse. If the motor overheats due to heavy
snow, etc., the wiper will stop until the motor cools. If
the overload is caused by some electrical problem, have
it fixed.
Power Windows and Other Power Options
A circuit breaker in the driver's side fuse panel protect the
power windows and other power accessories. When the
current load is too heavy, the circuit breaker opens and
closes, protecting the circuit until the problem is fixed.
Fuses and Circuit Breakers
The wiring circuits in your vehicle are protected from
short circuits by a combination of fuses, circuit
breakers and fusible thermal links in the wiring itself.
This greatly reduces the chance of fires caused by
electrical problems.
Look at the silver
-colored band inside the fuse. If the
band is broken or melted, replace the fuse. Be sure you
replace a bad fuse with a new one of the identical size
and rating.
Page 319 of 365
yellowblue
6-62
Driver's Side Instrument Panel Fuse Block
Some fuses are in a fuse
block on the driver's side
of the instrument panel.
Pull off the cover labeled
FUSES to expose the fuses.
Circuit Relay Description
RETAINED
ACCESSORY
PWR RELAYRetained Accessory Power Relay
HEADLAMP
RELAYHeadlamp Relay
Page 323 of 365
yellowblue
6-66
Circuit Relay Description
FUEL PUMP Fuel Pump
DRL RELAY Daytime Running Lamps
A.I.R. RELAY Air Induction Reaction Relay
CRANK RLY Starter (Crank) Relay
HORNS Horn
FOG LTS Fog LampsMaxi Fuses Description
LEFT I/P Left Bussed Electrical
Center (Battery)
RT I/P #1 Right Bussed Electrical
Center (Battery)
RT I/P #2 Right Bussed Electrical
Center (Battery)
U/HOOD #1 Underhood (Top) Electrical Center
Mini Fuses Description
HORN RLY Horn Relay
FOG RLY Fog Lamp Relay
F/PMP RLY Fuel Pump Relay
DRL/EXIT LTS Low (Left Front) & High
(Left Front) Headlamps
EXT LTS Low (Right Front) & High
(Right Front) Headlamps
PCM PCM Battery
A/C RLY
(CMPR)HVAC Compressor
Relay & Generator
Underhood Fuse Block #2
Some fuses are in a fuse block on the passenger's side of
the engine compartment.