Page 113 of 361

Your vehicle may have a convenience net. You will see
it on the back wall of the rear area of the vehicle.
Put small loads, like grocery bags, in the net. It can help
kee")
2-55 Convenience Net (Option)
Your vehicle may have a convenience net. You will see
it on the back wall of the rear area of the vehicle.
Put small loads, like grocery bags, in the net. It can help
keep them from falling over during sharp turns or quick
starts and stops. The convenience net is not for larger,
heavier loads.
You can unhook the net and place it in one of the rear
storage compartments when you are not using it.
On coupe models only, a vinyl storage bag has also
been provided.
Ashtray and Cigarette Lighter
The ashtray and cigarette lighter are located on the
instrument panel, in front of the shift lever. To use the
ashtray, lift up on the bottom of the door.
NOTICE:
Don't put papers and other things that burn
into the ashtray. If you do, cigarettes or other
smoking materials could set them on fire,
causing damage.
Loose objects (such as paper clips) can lodge behind and
beneath the ashtray lid and prevent movement of the lid.
You should avoid putting small, loose objects near
the ashtray.
To use the cigarette lighter, push it in all the way and let
go. When it's ready, it will pop back out by itself.
NOTICE:
Don't hold a cigarette lighter in with your hand
while it is heating. If you do, it won't be able to
back away from the heating element when it's
ready. That can make it overheat, damaging the
lighter and the heating element.
Sun Visors
To block out glare, you can swing down the visors.
You can also swing them to the side.
Visor Vanity Mirrors
Pull down the sun visor and lift the cover to expose the
vanity mirror.
Page 114 of 361

Pull down the sun visor and lift the cover to expose the
lighted vanity mirror. When the cover is lifted, the lamps
will come on automatically, even if the i")
2-56
Lighted Visor Vanity Mirrors (Option)
Pull down the sun visor and lift the cover to expose the
lighted vanity mirror. When the cover is lifted, the lamps
will come on automatically, even if the ignition is off.
Accessory Power Outlet
The accessory power outlet is located inside the center
console storage compartment, on the forward left side.
Remove the tethered cap to use the outlet. The outlet can
be used to connect electrical equipment such as a cellular
telephone or CB radio. Be sure to follow the installation
instructions included with the equipment. Leave the cap
on when the accessory power outlet is not in use.
NOTICE:
When using the accessory power outlet:
�The maximum load of any electrical
equipment should not exceed 15 amps.
�Be sure to turn off any electrical equipment
when not in use. Leaving electrical equipment
on for extended periods can drain the battery.
We recommend that you see a qualified technician or
your dealer for the proper installation of your equipment.
Floor Mats (Option)
Your vehicle's floor mats are specially designed to
remain in position under your feet and out of reach of
the accelerator pedal. The driver's side floor mat is held
in place by two locator hooks and the passenger's side is
held in place by one.
Be sure that the driver's side floor mat is properly
placed on the floor so that it does not block the
movement of the accelerator pedal.
How to Remove and Replace the Floor Mats
To remove the floor mats,
pull up on the rear of the
mat to disconnect from the
locator hooks.
To reinstall the floor mats, line up the openings in the floor
mat over the locator hooks and push down into place.
Page 115 of 361

Removing the Roof Panel
CAUTION:
Dont try to remove the roof panel while the
vehicle is moving. Trying to remove the roof
panel while the vehicle is moving could cause an
acc")
2-57
Roof Panel (Option)
Removing the Roof Panel
CAUTION:
Don't try to remove the roof panel while the
vehicle is moving. Trying to remove the roof
panel while the vehicle is moving could cause an
accident. The panel could fall into the vehicle and
cause you to lose control, or it could fly off and
strike another vehicle. You or others could be
injured. Remove the roof panel only when the
vehicle is parked.
Until you are sure you can remove the panel alone, have
someone help you.
NOTICE:
To avoid damage to the roof panel, paint and
weatherstripping, do not drop or rest it on its
edges. Place the roof panel in the egg
-shaped
stowage receivers after removing it from
the vehicle.
1. Park on a level surface, set the parking brake firmly
and shift an automatic transmission into PARK (P).
Shift a manual transmission into REVERSE (R).
2. Turn the ignition key to OFF. Lower both sunshades
and turn them toward the door glass.
3. Open the rear liftgate and remove any items that may
interfere with proper storage of the roof panel. Make
sure to install the two egg
-shaped stowage receivers
into the floor of the rear storage compartment.
Secure both receivers into their proper positions by
turning them counterclockwise.
Page 117 of 361
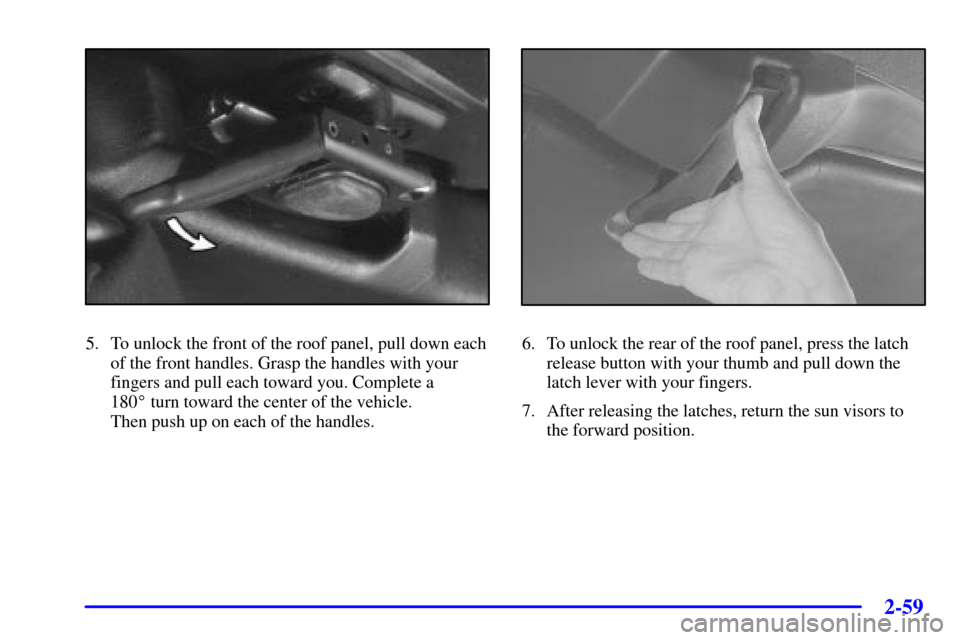
2-59
5. To unlock the front of the roof panel, pull down each
of the front handles. Grasp the handles with your
fingers and pull each toward you. Complete a
180� turn toward the center of the vehicle.
Then push up on each of the handles.6. To unlock the rear of the roof panel, press the latch
release button with your thumb and pull down the
latch lever with your fingers.
7. After releasing the latches, return the sun visors to
the forward position.
Page 119 of 361
2-61
1. Turn the roof panel so that the rear edge of the panel is
facing the storage area. The locating pins (at the rear of
the panel) should point toward the egg
-shaped stowage
receivers on the floor of the center compartment.
2. Push the panel forward until the pins bottom out in
the receivers.
3. There are two spring-loaded storage pins on the rear
wall of the storage compartment (A). These storage pins
go into the slots on each side of the roof panel (B).
4. Gently lower the roof panel onto the carpeted ledge.
Then, pull each release rearward and upward to place
the storage pins into the holes of the roof panel.
5. Gently lift and lower the roof panel to be sure it is
locked into place.
Page 121 of 361
2-63
5. Position the rear edge of the roof panel to the
weatherstrip on the back of the roof opening (A).
Then align the pins at the rear of the roof panel
weatherstrip with the receiving cup in the body
weatherstrip (B). Gently lower the front edge of the
roof panel to the front of the body opening (C).
6. Turn the front handles toward the side doors to the
closed position.7. Hook the rear latch by pushing the lever up to the
locked position.
8. Grasp and tug the roof panel up and down and
side
-to-side to make sure the roof panel is
securely installed.
Convertible Top (Option)
The following procedures explain the proper operation
of the convertible top.
NOTICE:
Certain automatic car washes may cause damage
to the vehicle. The top fabric can be damaged by
top cleaning brushes.
For care and cleaning of the convertible top, see
ªCleaning Your Convertible Topº in the Index.
Page 123 of 361
2-65
3. Unlock the front of the convertible top by lowering
the latch handles and turning them inward. Push the
latch handles back to the up position.4. Lift upward on the front edge (A) of the convertible
top off of the windshield frame. Then lift upward on
the rear edge (B) of the convertible top to be vertical
off the storage compartment lid (C). The front
edge (A) and rear edge (B) should be straight up
and down.
Page 129 of 361

C. Turn Signal/Multifunction Lever
D. Driver Information Center (DIC")
2-71
The main components of your instrument panel are:
A. Instrument Panel Brightness Control
B. Head
-Up Display Controls (Option)
C. Turn Signal/Multifunction Lever
D. Driver Information Center (DIC)
(Located in the Instrument Cluster)
E. Instrument Panel Cluster
F. Windshield Wiper/Washer Lever
G. Driver Information Center (DIC) Buttons
H. Hazard Warning Flasher Button
I. Center Air Vents
J. Audio System
K. Comfort Controls
L. Fog Lamp Button (Option)
M. Remote Hatch Release Button (Coupe) or Remote
Trunk Release Button (Convertible/Hardtop)N. Horn
O. Ignition Switch
P. Shift Lever (Automatic Shown)
Q. Traction Control System (TCS) Switch/Active
Handling Switch (Option)
R. Accessory Power Outlet
(Located in the Center Console)
S. Selective Real Time Damping (SRTD) (Option)
T. Instrument Panel Cupholder
U. Remote Fuel Door Release Button
(Located in the Center Console)
V. Ashtray and Cigarette Lighter
W. Parking Brake
X. Glove Box
Y. Instrument Panel Fuse Block
(Located behind the Toe
-Board)
 should point toward the egg
-shaped stowage
receivers on the")
.
Then align the pins at the rear of the roof panel
weatherstrip with the receiving cup in the b")
 of the conver")