Page 90 of 361
2-32
Shifting Into PARK (P)
(Automatic Transmission Only)
CAUTION:
It can be dangerous to get out of your vehicle if
the shift lever is not fully in PARK (P) with the
parking brake firmly set. Your vehicle can roll.
If you have left the engine running, the vehicle
can move suddenly. You or others could be
injured. To be sure your vehicle won't move,
even when you're on fairly level ground, use the
steps that follow.
1. Hold the brake pedal down with your right foot and
set the parking brake.
2. Move the shift lever into PARK (P) by holding in the
button on the lever and pushing the lever all the way
toward the front of the vehicle.
3. Turn the ignition key to OFF.
4. Remove the key and take it with you. If you can
remove the key from the ignition, the vehicle is
in PARK (P).
Page 91 of 361

CAUTION:
It can be dangerous to leave your vehicle with
the engine running. Your vehicle could move
suddenly if the shi")
2-33 Leaving Your Vehicle With the Engine
Running (Automatic Transmission Only)
CAUTION:
It can be dangerous to leave your vehicle with
the engine running. Your vehicle could move
suddenly if the shift lever is not fully in PARK (P)
with the parking brake firmly set. And, if you
leave the vehicle with the engine running, it could
overheat and even catch fire. You or others could
be injured. Don't leave your vehicle with the
engine running unless you have to.
If you have to leave your vehicle with the engine
running, be sure your vehicle is in PARK (P) and your
parking brake is firmly set before you leave it. After
you've moved the shift lever into PARK (P), hold down
the regular brake pedal. See if you can move the shift
lever away from PARK (P) without first pulling it
toward you. If you can, it means that the shift lever
wasn't fully locked into PARK (P).
Torque Lock (Automatic Transmission)
If you are parking on a hill and you don't shift your
transmission into PARK (P) properly, the weight of the
vehicle may put too much force on the parking pawl in
the transmission. You may find it difficult to pull the
shift lever out of PARK (P). This is called ªtorque lock.º
To prevent torque lock, set the parking brake and then
shift into PARK (P) properly before you leave the
driver's seat. To find out how, see ªShifting Into
PARK (P)º in the Index.
When you are ready to drive, move the shift lever out
of PARK (P) before you release the parking brake.
If torque lock does occur, you may need to have another
vehicle push yours a little uphill to take some of the
pressure from the parking pawl in the transmission,
so you can pull the shift lever out of PARK (P).
Page 97 of 361
2-39
Tilt Wheel
A tilt wheel allows you to adjust the steering wheel.
You can also raise it to the highest level to give your
legs more room when you exit and enter the vehicle.
The lever is located on the left side of the steering
column. To tilt the wheel, hold the steering wheel and
pull the lever toward you. Move the steering wheel to a
comfortable level, then release the lever to lock the
steering wheel into place.
Telescopic Steering Wheel (Option)
The telescopic steering wheel switch is located on the
right side of the steering column.
To operate the telescopic
steering wheel, push the
switch forward and the
wheel will move away
from you. Pull the switch
rearward and the wheel
will move toward you.
The telescopic steering wheel position can be stored
with your memory settings. See ªMemoryº in the Index
for more information.
Page 100 of 361

2-42
You can open the doors manually using the knob next to
the headlamp assembly. Turn the knob counterclockwise
until the doors are open. Turn the knob clockwise to
close the doors manually.
The headlamp doors should be open when driving in icy
or snowy conditions to prevent the doors from freezing
closed and when washing the vehicle to help clean
the headlamps.
NOTICE:
In order to avoid possible contact of the hood to
the headlamp doors, care should be taken in
raising the hood with the headlamps up, or shut
off the headlamps prior to opening the hood.
Headlamp High/Low-Beam Changer
To change the headlamps from low beam to high or high
to low, push the turn signal lever all the way forward.
When the high beams are
on, this light on the
instrument panel cluster
also will be on. To change
the headlamps from high to
low, pull the lever rearward.
Lamps on Reminder
If you turn the ignition off and leave the headlamps or
parking lamps on and open a door, you will hear a chime
reminding you to turn off the lamps.
Flash-to-Pass Feature
To use the flash-to-pass feature, momentarily pull the
turn signal lever toward you. The high
-beam indicator
will flash to indicate to the other driver that you intend
to pass. If the low
-beam headlamps are off and you have
the optional fog lamps on, the fog lamps will flash.
Page 115 of 361

Removing the Roof Panel
CAUTION:
Dont try to remove the roof panel while the
vehicle is moving. Trying to remove the roof
panel while the vehicle is moving could cause an
acc")
2-57
Roof Panel (Option)
Removing the Roof Panel
CAUTION:
Don't try to remove the roof panel while the
vehicle is moving. Trying to remove the roof
panel while the vehicle is moving could cause an
accident. The panel could fall into the vehicle and
cause you to lose control, or it could fly off and
strike another vehicle. You or others could be
injured. Remove the roof panel only when the
vehicle is parked.
Until you are sure you can remove the panel alone, have
someone help you.
NOTICE:
To avoid damage to the roof panel, paint and
weatherstripping, do not drop or rest it on its
edges. Place the roof panel in the egg
-shaped
stowage receivers after removing it from
the vehicle.
1. Park on a level surface, set the parking brake firmly
and shift an automatic transmission into PARK (P).
Shift a manual transmission into REVERSE (R).
2. Turn the ignition key to OFF. Lower both sunshades
and turn them toward the door glass.
3. Open the rear liftgate and remove any items that may
interfere with proper storage of the roof panel. Make
sure to install the two egg
-shaped stowage receivers
into the floor of the rear storage compartment.
Secure both receivers into their proper positions by
turning them counterclockwise.
Page 117 of 361
2-59
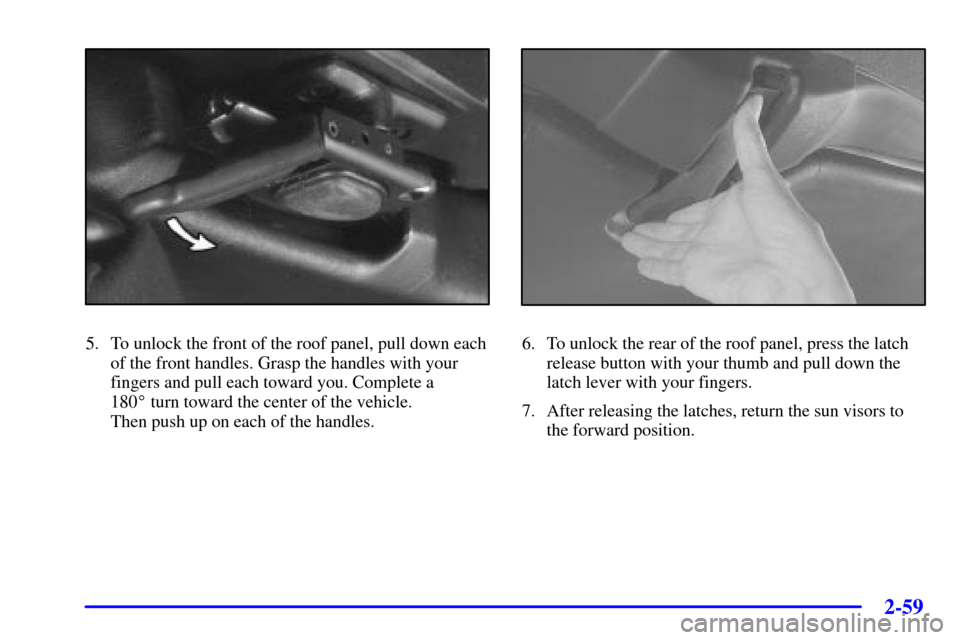
5. To unlock the front of the roof panel, pull down each
of the front handles. Grasp the handles with your
fingers and pull each toward you. Complete a
180� turn toward the center of the vehicle.
Then push up on each of the handles.6. To unlock the rear of the roof panel, press the latch
release button with your thumb and pull down the
latch lever with your fingers.
7. After releasing the latches, return the sun visors to
the forward position.
Page 118 of 361
2-60
8. Stand on one side of the vehicle and, if necessary,
have your helper stand on the other side. Together,
carefully lift the front edge of the panel up and
forward, and out of the vehicle opening.
9. When the panel is loosened from the vehicle, one
person should grasp the roof panel as close to the
center of the vehicle as possible and lift away
the panel.
Storing the Roof Panel
CAUTION:
If the roof panel is not stored properly, it could
be thrown about the vehicle in a crash or sudden
maneuver. People in the vehicle could be injured.
Whenever you store the roof panel in the vehicle,
always be sure that it is stored securely in the
rear area using the storage pins.
NOTICE:
To avoid damage to the roof panel, paint and
weatherstripping, do not drop or rest it on its
edges. Place the roof panel in the egg
-shaped
stowage receivers after removing it from
the vehicle.
Page 119 of 361
2-61
1. Turn the roof panel so that the rear edge of the panel is
facing the storage area. The locating pins (at the rear of
the panel) should point toward the egg
-shaped stowage
receivers on the floor of the center compartment.
2. Push the panel forward until the pins bottom out in
the receivers.
3. There are two spring-loaded storage pins on the rear
wall of the storage compartment (A). These storage pins
go into the slots on each side of the roof panel (B).
4. Gently lower the roof panel onto the carpeted ledge.
Then, pull each release rearward and upward to place
the storage pins into the holes of the roof panel.
5. Gently lift and lower the roof panel to be sure it is
locked into place.

(Automatic Transmission Only)
CAUTION:
It can be dangerous to get out of your vehicle if
the shift lever is not fully in PARK (P) with the
parking brake firmly set. Your v")


 should point toward the egg
-shaped stowage
receivers on the")