Page 117 of 361
2-59
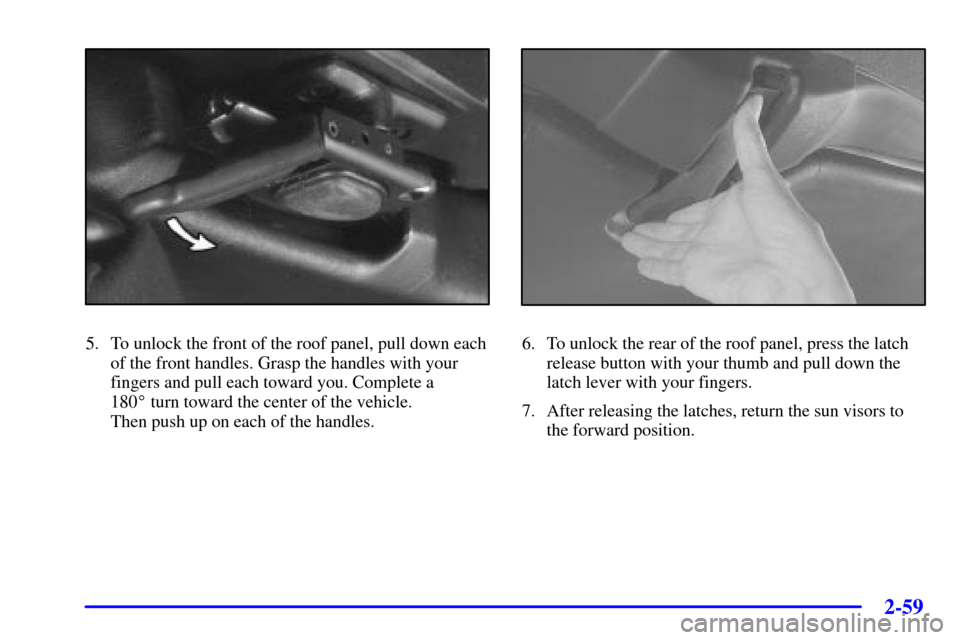
5. To unlock the front of the roof panel, pull down each
of the front handles. Grasp the handles with your
fingers and pull each toward you. Complete a
180� turn toward the center of the vehicle.
Then push up on each of the handles.6. To unlock the rear of the roof panel, press the latch
release button with your thumb and pull down the
latch lever with your fingers.
7. After releasing the latches, return the sun visors to
the forward position.
Page 118 of 361
2-60
8. Stand on one side of the vehicle and, if necessary,
have your helper stand on the other side. Together,
carefully lift the front edge of the panel up and
forward, and out of the vehicle opening.
9. When the panel is loosened from the vehicle, one
person should grasp the roof panel as close to the
center of the vehicle as possible and lift away
the panel.
Storing the Roof Panel
CAUTION:
If the roof panel is not stored properly, it could
be thrown about the vehicle in a crash or sudden
maneuver. People in the vehicle could be injured.
Whenever you store the roof panel in the vehicle,
always be sure that it is stored securely in the
rear area using the storage pins.
NOTICE:
To avoid damage to the roof panel, paint and
weatherstripping, do not drop or rest it on its
edges. Place the roof panel in the egg
-shaped
stowage receivers after removing it from
the vehicle.
Page 119 of 361
2-61
1. Turn the roof panel so that the rear edge of the panel is
facing the storage area. The locating pins (at the rear of
the panel) should point toward the egg
-shaped stowage
receivers on the floor of the center compartment.
2. Push the panel forward until the pins bottom out in
the receivers.
3. There are two spring-loaded storage pins on the rear
wall of the storage compartment (A). These storage pins
go into the slots on each side of the roof panel (B).
4. Gently lower the roof panel onto the carpeted ledge.
Then, pull each release rearward and upward to place
the storage pins into the holes of the roof panel.
5. Gently lift and lower the roof panel to be sure it is
locked into place.
Page 120 of 361

2-62
Installing the Roof Panel
CAUTION:
An improperly attached roof panel may fall into
or fly off the vehicle. You or others could be
injured. After installing the roof panel, always
check that it is firmly attached by pushing up on
the underside of the panel. Check now and then
to be sure the roof panel is firmly in place.
NOTICE:
To avoid damage to the roof panel, paint and
weatherstripping, do not drop or rest it on
its edges.
1. Check to be sure that the front handles and rear latch
on the ceiling are in their opened positions before
attempting to install the roof panel.
2. If the roof panel is stored in the rear area, grasp it
with your right hand at the middle edge near the
seatbacks, and with your left hand at the middle of
the edge closest to you. Reverse the steps described
previously under ªStoring the Roof Panel.º
3. Remove the roof panel from the
storage compartment.
4. In most cases, it is easier to install the removable
roof with two people rather than one. Place the roof
panel over the vehicle.
Page 121 of 361
2-63
5. Position the rear edge of the roof panel to the
weatherstrip on the back of the roof opening (A).
Then align the pins at the rear of the roof panel
weatherstrip with the receiving cup in the body
weatherstrip (B). Gently lower the front edge of the
roof panel to the front of the body opening (C).
6. Turn the front handles toward the side doors to the
closed position.7. Hook the rear latch by pushing the lever up to the
locked position.
8. Grasp and tug the roof panel up and down and
side
-to-side to make sure the roof panel is
securely installed.
Convertible Top (Option)
The following procedures explain the proper operation
of the convertible top.
NOTICE:
Certain automatic car washes may cause damage
to the vehicle. The top fabric can be damaged by
top cleaning brushes.
For care and cleaning of the convertible top, see
ªCleaning Your Convertible Topº in the Index.
Page 171 of 361
 until you determine your
comfort zone. If you choose 60�F (16�C), the
system will remain at maximum cooling and")
3-5
When adjusting the temperature, start with a driver-set
temperature of 73�F (23�C) until you determine your
comfort zone. If you choose 60�F (16�C), the
system will remain at maximum cooling and will not
automatically adjust fan speed or air delivery. If you
choose 90�F (32�C), the system will remain at
maximum heating and will not automatically adjust fan
speed or air delivery. Choosing either maximum setting
will not cause the system to heat or cool any faster.
Turning the knob past either maximum setting has no
effect on the operation of the system.
Passenger Temperature Offset
The PASSENGER knob changes the temperature on the
passenger's side of the vehicle. When the knob is in
the 12 o'clock position, the passenger's temperature is
the same as the driver's. Turn the knob clockwise for
warmer air on the passenger's side, counterclockwise
for cooler air. If the driver
-set temperature is set at 60�F
(16�C) or 90�F (32�C), turning the passenger knob
has no effect because the system is locked at a
maximum setting.Automatic Operation
Press the AUTO button to place the entire system in the
automatic mode. After a five
-second display of the
current settings, only the word AUTO and the outside
temperature will be shown on the digital display. The
system will operate to achieve your comfort set
temperature as quickly as possible. If you have set the
driver temperature at 60�F (16�C) or 90�F (32�C),
the system will not operate automatically until a
different temperature is selected. The AUTO control
system works best with the windows up and the
removable roof installed or the convertible top up.
A Typical Cold Weather Example:
Your vehicle has been parked outside overnight in cold
weather (below 32�F/ 0�C) and you have set the driver
temperature at 73�F (23�C) and have selected the
AUTO mode. The system will automatically adjust the
temperature output to maximum heating. The fan will
start at a low speed. This is to avoid blowing cold air
into the vehicle. The length of the delay depends on the
amount of time since the engine was last started, the
outside temperature and the engine coolant temperature.
As the coolant warms up, the fan speed will gradually
increase. Air will flow to the floor with some air to
the windshield to prevent fogging under most
normal conditions.
Page 250 of 361

6-
6-1
Section 6 Service and Appearance Care
Here you will find information about the care of your vehicle. This section begins with service and fuel information,
and then it shows how to check important fluid and lubricant levels. There is also technical information about your
vehicle, and a part devoted to its appearance care.
6
-2 Service
6
-3 Fuel
6
-5 Filling Your Tank
6
-9 Checking Things Under the Hood
6
-12 Engine Oil
6
-17 Engine Air Cleaner/Filter
6
-19 Automatic Transmission Fluid
6
-19 Manual Transmission Fluid
6
-21 Hydraulic Clutch
6
-22 Rear Axle
6
-23 Engine Coolant
6
-26 Surge Tank Pressure Cap
6
-26 Power Steering Fluid
6
-27 Windshield Washer Fluid
6
-29 Brakes
6
-32 Battery
6
-33 Bulb Replacement
6
-37 Windshield Wiper Blade Replacement6
-40 Tires
6
-52 Lifting Your Corvette
6
-56 Appearance Care
6
-56 Cleaning the Inside of Your Vehicle
6
-59 Cleaning a Removable Roof Panel
6
-60 Cleaning the Outside of Your Vehicle
6
-61 Cleaning Your Convertible Top
6
-62 Cleaning Aluminum Wheels
6
-62 Cleaning Tires
6
-62 Finish Damage
6
-63 Underbody Maintenance
6
-64 GM Vehicle Care/Appearance Materials
6
-65 Vehicle Identification Number (VIN)
6
-65 Service Parts Identification Label
6
-66 Electrical System
6
-73 Replacement Bulbs
6
-74 Capacities and Specifications
6
-75 Normal Maintenance Replacement Parts
Page 308 of 361

6-59
If you use a glass treatment or conditioner containing
ethyl alcohol or ethyl sulfate on your glass, be sure to
remove the acrylic roof panel, if so equipped. These
products may damage the panel.
Grime from the windshield will stick to the wiper blades
and affect their performance. Clean the blade by wiping
vigorously with a cloth soaked in full
-strength
windshield washer solvent. Then rinse the blade
with water.
Check the wiper blades and clean them as necessary;
replace blades that look worn.
Weatherstrips
Silicone grease on weatherstrips will make them last
longer, seal better, and not stick or squeak.
Apply silicone grease with a clean cloth at least every
six months. During very cold, damp weather more
frequent application may be required. (See
ªRecommended Fluids and Lubricantsº
in the Index.)
Cleaning a Removable Roof Panel
Special care is necessary when cleaning, removing
and/or storing the roof panel.
�Flush with water to remove dust and dirt, then dry
the panel.
�Clean the panel with GM Glass Cleaner. Leave the
cleaner on the panel for one minute, then wipe the
panel with a soft, lint
-free cloth.
�Don't use abrasive cleaning materials.
If water drops are frequently allowed to dry on the roof
panel, impurities in the water will adhere to the top.
These impurities may etch or mar the finish. When the
panel gets wet, you should dry it off.
NOTICE:
Do not use a glass treatment or conditioner
containing ethyl alcohol or ethyl sulfate on the
roof panel. These products may damage
the panel.

 should point toward the egg
-shaped stowage
receivers on the")
.
Then align the pins at the rear of the roof panel
weatherstrip with the receiving cup in the b")