Page 59 of 364

1-48
To remove the child restraint, just unbuckle the vehicle's
safety belt. It will be ready to work for an adult or larger
child passenger.
Securing a Child Restraint in the Right
Front Seat Position
Your vehicle has a right front passenger air bag. Never
put a rear
-facing child restraint in this seat. Here's why:
CAUTION:
A child in a rear-facing child restraint can be
seriously injured or killed if the right front
passenger's air bag inflates. This is because the
back of the rear
-facing child restraint would be
very close to the inflating air bag. Always secure
a rear
-facing child restraint in the rear seat.
Although a rear seat is a safer place, you can secure a
forward
-facing child restraint in the right front seat.
You'll be using the lap
-shoulder belt. See the earlier
part about the top strap if the child restraint has one.
Be sure to follow the instructions that came with the
child restraint. Secure the child in the child restraint
when and as the instructions say.
1. Because your vehicle has a right front passenger
air bag, always move the seat as far back as it will
go before securing a forward
-facing child restraint.
(See ªSeatsº in the Index.)
2. Put the restraint on the seat.
3. Pick up the latch plate, and run the lap and shoulder
portions of the vehicle's safety belt through or around
the restraint. The child restraint instructions will show
you how.
Page 118 of 364
2-54
6. Lift the side cover eyelet (C) at the rear of the side
boot cover from the snap ball stud (D). Raise the
back of the boot side cover to unhook the tab (A)
from the slot (B) in the quarter trim panel. Do the
same on the other side.7. Store both boot side covers in the trunk.
8. Close the trunk.
9. Raise the rear seatback to the up position. Push the
seat back to make sure it is latched. Ensure that the
rear safety belts do not become trapped behind the
rear seats.
Installing the One Piece Boot
1. From inside the vehicle, pull the tab on the rear seat
to fold down the seat. See ªFold
-Down Rear Seatº
in the Index.
2. Open the trunk and remove the boot. Leave the
trunk open.
The attachments for the one piece boot are the same
as the attachments for the three piece boot at the
quarter trim panel and the trunk lid opening.
The one piece boot attachment is unique at the rear
seat back.
Page 146 of 364

3-5 Heating
On cold days, use FLOOR with the temperature knob all
the way in the red area. The system will bring in outside
air, heat it and send it to the floor ducts.
Your vehicle has heat ducts that are directed toward the
rear seat. Keep the area under the front seats clear of
obstructions so the heated air can reach the rear
seat passengers.
If your vehicle has an engine coolant heater, you can
use it to help your system provide warm air faster when
it's cold outside (0�F (
-18�C) or lower). An engine
coolant heater warms the coolant your engine and
heating system use to provide heat. See ªEngine
Coolant Heaterº in the Index.
Defogging and Defrosting
Your system has two settings for clearing the front and
side windows. To defrost the windows quickly, use
DEFROST with the temperature knob all the way in
the red area. To warm passengers while keeping the
windows clean, use DEFOG.
To defog the side windows, set the right control to
BI
-LEVEL and the fan control to the highest setting.To defog the side windows while using the air
conditioner, set the right control to BI
-LEVEL, the fan
control to the highest setting, and press the A/C button.
For both systems, aim the side vents toward the side
windows. For increased airflow to the side vents, close
the center vents.
Rear Window Defogger (If Equipped)
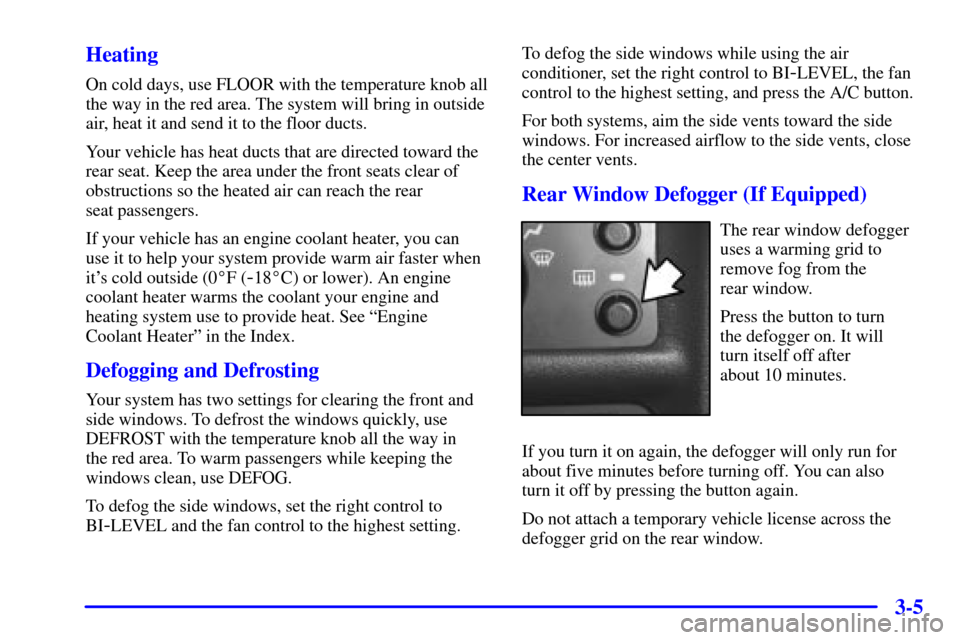
The rear window defogger
uses a warming grid to
remove fog from the
rear window.
Press the button to turn
the defogger on. It will
turn itself off after
about 10 minutes.
If you turn it on again, the defogger will only run for
about five minutes before turning off. You can also
turn it off by pressing the button again.
Do not attach a temporary vehicle license across the
defogger grid on the rear window.
Page 303 of 364

6-57
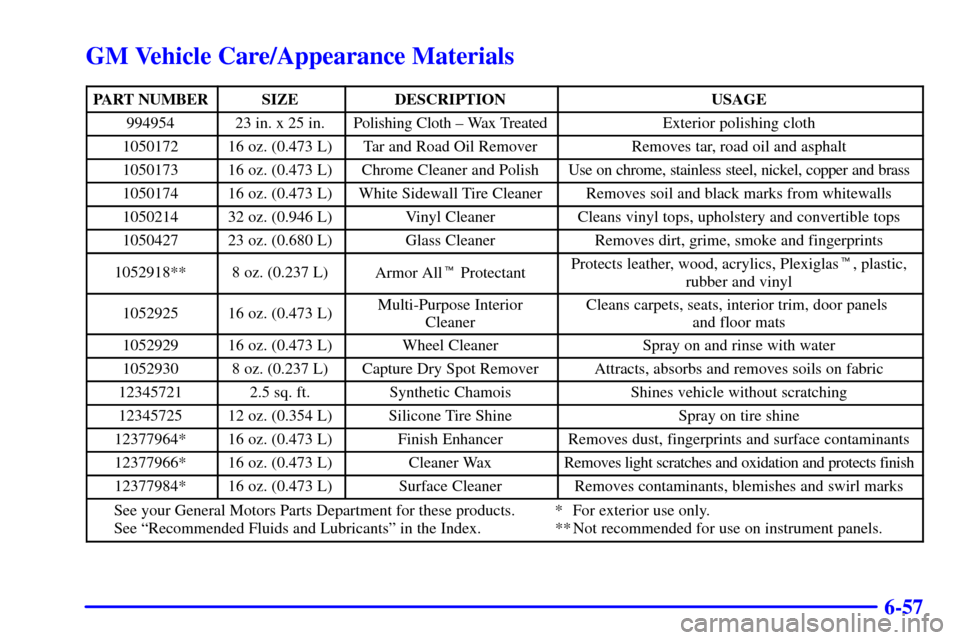
GM Vehicle Care/Appearance Materials
PART NUMBERSIZEDESCRIPTIONUSAGE
99495423 in. x 25 in.Polishing Cloth ± Wax TreatedExterior polishing cloth
105017216 oz. (0.473 L)Tar and Road Oil RemoverRemoves tar, road oil and asphalt
105017316 oz. (0.473 L)Chrome Cleaner and PolishUse on chrome, stainless steel, nickel, copper and brass
105017416 oz. (0.473 L)White Sidewall Tire CleanerRemoves soil and black marks from whitewalls
105021432 oz. (0.946 L)Vinyl CleanerCleans vinyl tops, upholstery and convertible tops
105042723 oz. (0.680 L)Glass CleanerRemoves dirt, grime, smoke and fingerprints
1052918**8 oz. (0.237 L)Armor All� ProtectantProtects leather, wood, acrylics, Plexiglas�, plastic,
rubber and vinyl
105292516 oz. (0.473 L)Multi-Purpose Interior
CleanerCleans carpets, seats, interior trim, door panels
and floor mats
105292916 oz. (0.473 L)Wheel CleanerSpray on and rinse with water
10529308 oz. (0.237 L)Capture Dry Spot RemoverAttracts, absorbs and removes soils on fabric
123457212.5 sq. ft.Synthetic ChamoisShines vehicle without scratching
1234572512 oz. (0.354 L)Silicone Tire ShineSpray on tire shine
12377964*16 oz. (0.473 L)Finish EnhancerRemoves dust, fingerprints and surface contaminants
12377966*16 oz. (0.473 L)Cleaner WaxRemoves light scratches and oxidation and protects finish
12377984*16 oz. (0.473 L)Surface CleanerRemoves contaminants, blemishes and swirl marks
See your General Motors Parts Department for these products. * For exterior use only.
See ªRecommended Fluids and Lubricantsº in the Index. ** Not recommended for use on instrument panels.