Page 329 of 392

6-67 Fuses and Circuit Breakers
The wiring circuits in your vehicle are protected from
short circuits by a combination of fuses and circuit
breakers. This greatly reduces the chance of damage
caused by electrical problems.
Look at the silver
-colored band inside the fuse. If the
band is broken or melted, replace the fuse. Be sure you
replace a bad fuse with a new one of the identical size
and rating.
There are three fuse blocks in your vehicle: the
instrument panel fuse block located under the instrument
panel, the underhood fuse block located on the
passenger's side engine compartment and the rear fuse
block, located under the rear seat.Instrument Panel Fuse Block
The instrument panel fuse block is located to the far
right side under the instrument panel.
Remove the hush panel on the passenger's side to reveal
the fuses. To remove the panel, do the following:
1. Remove the two 7 mm screws located along the front
edge of the panel.
2. Lower the hush panel. The fuse block is a
rectangular covered box located on the far right side
under the instrument panel.
3. Remove the cover. Now you can see the fuses and
replace them.
4. Place the wide end of the fuse puller over the plastic
end of the fuse.
5. Squeeze the ends over the fuse and pull it out.
Spare fuses are located in the empty slots shown on the
following chart.
When finished, reinstall the hush panel. Reinstall lamps,
connectors, and HVAC duct temperature sensors if they
were removed.
Page 330 of 392
6-68
Fuse Usage
SBM Interior Lamps
PDM PDM Module
A/C HVAC Motor, HVAC Mix Motors
IGN SEN EC Mirror, Driver HTS Seat, Rear
Defog Relay, MEM Module, Cool
LVL Sensor, Pass Heated Seat
ELC HVAC Flat Pk Mtrs, ELC Sensor,
ELC Sensor (R Bec)
ABS
Anti
-Lock Brake System Module
HVAC HVAC Main Con Head, HVAC
Programmer, IPC
CR CONT Stepper Motor CR, Cruise Switch
HUD HUD Switch, HUD Display
CSTR/SBM HVAC Programmer, IPC (Cluster),
SBM (275 to LCM)
(1135 to BTSI SL)
Page 331 of 392
6-69
Fuse Usage
LP PK L Underhood Lamp, L PK/
Sidemarker, L Park/Turn Lamp,
SBM, L Tail Signal Lamp,
L Tail/Stop Lamp,
L Rear Sidemarker
LP PK R Rt Pk/Sidemarker Lamp,
Rt PK/Turn Lamp, Rt Tail/Sign
Lamp, Rt Tail/Stoplamp, Rt Rear
Sidemarker, Stop/Tail Lamp,
Tail/Signal Lamp, License
Lamp, RFA
RUN Run/Accessory
WSW Wiper Motor
EMPTY Not Used
WSW/RFA Wiper Switch, RFA, Rain Sense
B/U LP
EC Mirror, Back
-Up LampsUnderhood Fuse Block
There are additional fuses located on the passenger's
side of the engine compartment.
Minifuses Usage
1 Air Sol
2 SBM, LCM
3 Turn Signal
Page 334 of 392

6-72
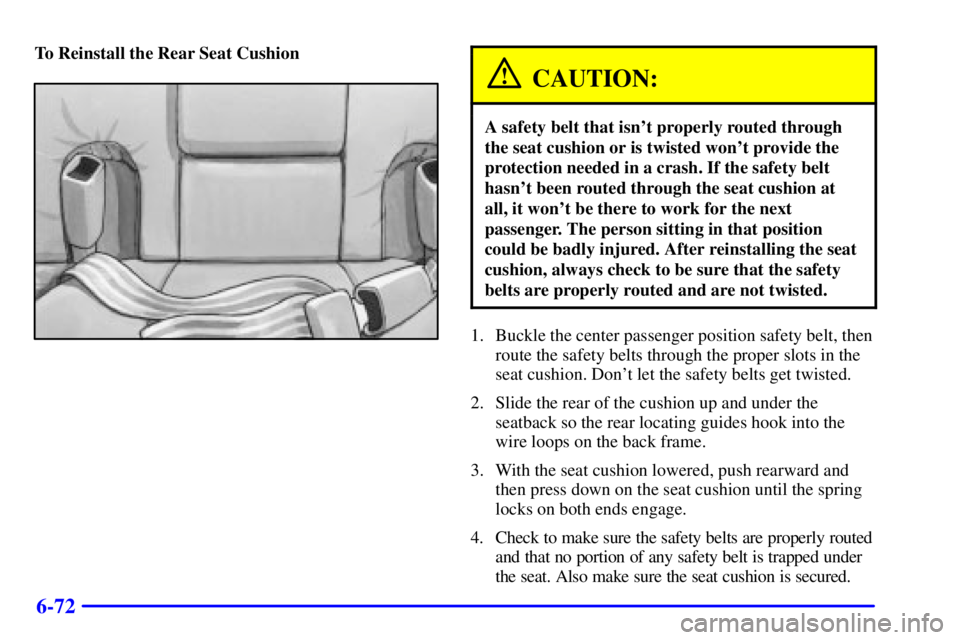
To Reinstall the Rear Seat Cushion
CAUTION:
A safety belt that isn't properly routed through
the seat cushion or is twisted won't provide the
protection needed in a crash. If the safety belt
hasn't been routed through the seat cushion at
all, it won't be there to work for the next
passenger. The person sitting in that position
could be badly injured. After reinstalling the seat
cushion, always check to be sure that the safety
belts are properly routed and are not twisted.
1. Buckle the center passenger position safety belt, then
route the safety belts through the proper slots in the
seat cushion. Don't let the safety belts get twisted.
2. Slide the rear of the cushion up and under the
seatback so the rear locating guides hook into the
wire loops on the back frame.
3. With the seat cushion lowered, push rearward and
then press down on the seat cushion until the spring
locks on both ends engage.
4. Check to make sure the safety belts are properly routed
and that no portion of any safety belt is trapped under
the seat. Also make sure the seat cushion is secured.
Page 335 of 392
6-73
Rear Compartment Fuse Block
Additional fuses are located in the fuse center under the
rear seat.
Mini Relay Usage
1 Heated BackliteMicro Relays Usage
2 Rap
3 Trunk Release
4 ELC
Circuit
BreakersUsage
5 Power Seat
6 ELC Sensor, ELC
Compressor Solenoid
Minifuses Usage
7 Crank
8 Auxiliary Outlet
9 PCM/CRU
10 SBM Module
11 Radio/Phone
12 Sunroof
13 Spare
Page 370 of 392

7-30 At Least Twice a Year
Restraint System Check
Make sure the safety belt reminder light and all your
belts, buckles, latch plates, retractors and anchorages are
working properly. Look for any other loose or damaged
safety belt system parts. If you see anything that might
keep a safety belt system from doing its job, have it
repaired. Have any torn or frayed safety belts replaced.
Also look for any opened or broken air bag coverings,
and have them repaired or replaced. (The air bag system
does not need regular maintenance.)
Wiper Blade Check
Inspect wiper blades for wear or cracking. Replace blade
inserts that appear worn or damaged or that streak or
miss areas of the windshield. Also see ªWiper Blades,
Cleaningº in the Index.
Weatherstrip Lubrication
Silicone grease on weatherstrips will make them last
longer, seal better, and not stick or squeak. Apply
silicone grease with a clean cloth. During very cold,
damp weather more frequent application may be
required. (See ªRecommended Fluids and Lubricantsº
in the Index.)Automatic Transaxle Check
Check the transaxle fluid level; add if needed. See
ªAutomatic Transaxle Fluidº in the Index. A fluid loss
may indicate a problem. Check the system and repair
if needed.
At Least Once a Year
Key Lock Cylinders Service
Lubricate the key lock cylinders with the lubricant
specified in Part D.
Body Lubrication Service
Lubricate all body door hinges. Also lubricate all hinges
and latches, including those for the hood, glove box
door and console door. Part D tells you what to use.
More frequent lubrication may be required when
exposed to a corrosive environment.
Page 371 of 392

7-31
Starter Switch Check
CAUTION:
When you are doing this check, the vehicle could
move suddenly. If it does, you or others could be
injured. Follow the steps below.
1. Before you start, be sure you have enough room
around the vehicle.
2. Firmly apply both the parking brake (see ªParking
Brakeº in the Index if necessary) and the
regular brake.
NOTE: Do not use the accelerator pedal, and be
ready to turn off the engine immediately if it starts.
3. Try to start the engine in each gear. The starter
should work only in PARK (P) or NEUTRAL (N).
If the starter works in any other position,
your vehicle needs service.Automatic Transaxle Shift Lock Control
System Check
CAUTION:
When you are doing this check, the vehicle could
move suddenly. If it does, you or others could be
injured. Follow the steps below.
1. Before you start, be sure you have enough room
around the vehicle. It should be parked on a
level surface.
2. Firmly apply the parking brake (see ªParking Brakeº
in the Index if necessary).
NOTE: Be ready to apply the regular brake
immediately if the vehicle begins to move.
3. With the engine off, turn the key to the RUN
position, but don't start the engine. Without applying
the regular brake, try to move the shift lever out of
PARK (P) with normal effort. If the shift lever
moves out of PARK (P), your vehicle needs service.
Page 372 of 392

7-32
Ignition Transaxle Lock Check
While parked, and with the parking brake set, try to turn
the ignition key to LOCK in each shift lever position.
�The key should turn to LOCK only when the shift
lever is in PARK (P).
�The key should come out only in LOCK.
Parking Brake and Automatic Transaxle PARK (P)
Mechanism Check
CAUTION:
When you are doing this check, your vehicle
could begin to move. You or others could be
injured and property could be damaged. Make
sure there is room in front of your vehicle in case
it begins to roll. Be ready to apply the regular
brake at once should the vehicle begin to move.
Park on a fairly steep hill, with the vehicle facing
downhill. Keeping your foot on the regular brake, set the
parking brake.
�To check the parking brake's holding ability: With
the engine running and transaxle in NEUTRAL (N),
slowly remove foot pressure from the regular brake
pedal. Do this until the vehicle is held by the parking
brake only.
�To check the PARK (P) mechanism's holding ability:
With the engine running, shift to PARK (P).
Then release the parking brake followed by the
regular brake.
Underbody Flushing Service
At least every spring, use plain water to flush any
corrosive materials from the underbody. Take care to
clean thoroughly any areas where mud and other debris
can collect.