2000 BMW 328Ci COUPE height
[x] Cancel search: heightPage 49 of 189
47n
RepairsIndexOverview Controls Car care Technology Data
For maximum safety when adjusting the
seat position, please observe the fol-
lowing:
Never try to adjust your seat while
operating the vehicle. The seat
could respond with an unexpected
movement, and the ensuing loss of ve-
hicle control could lead to an accident.
Be sure that the safety belt remains
firmly against your body at all times. In
the event of a frontal impact, a loose lap
belt could slide over the hips, leading to
abdominal injury. In addition, the safety
belt's restraint effectiveness is reduced
if the belt is worn loosely.
Never ride with the backrest reclined to
an extreme horizontal angle (especially
important for front passengers to re-
member). Keep the backrest relatively
upright to minimize the risk of "sliding
under" the safety belt and sustaining in-
jury in a crash.<
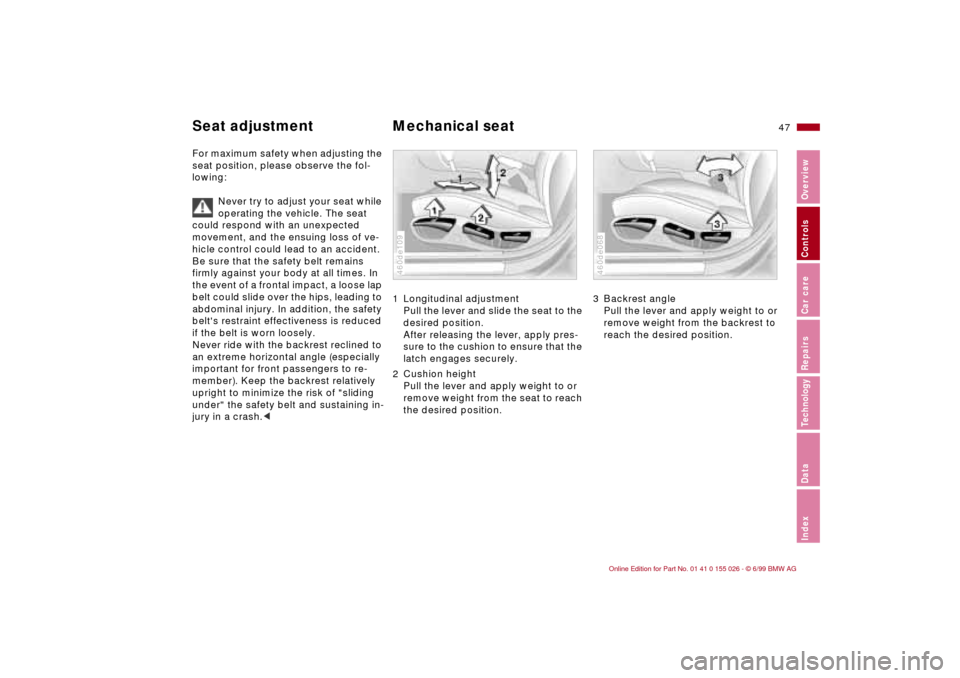
1 Longitudinal adjustment
Pull the lever and slide the seat to the
desired position.
After releasing the lever, apply pres-
sure to the cushion to ensure that the
latch engages securely.
2 Cushion height
Pull the lever and apply weight to or
remove weight from the seat to reach
the desired position.460de109
3 Backrest angle
Pull the lever and apply weight to or
remove weight from the backrest to
reach the desired position.460de068
Seat adjustment Mechanical seat
Page 50 of 189
48n
Mechanical seat Head restraints Correct sitting postureTo reduce strain on the spinal column,
sit all the way back in the seat and rest
your back fully against the backrest.
Ideal sitting posture is achieved with
your head extending from your spine in
a straight line.
For long-distance driving, you may wish
to to increase the backrest angle slightly
to reduce muscular tension. You should
be able to grab the steering wheel at its
highest point with your arms slightly
bent.
After a seat adjustment, adjust the
height of the safety belt also. Refer to
page 55.
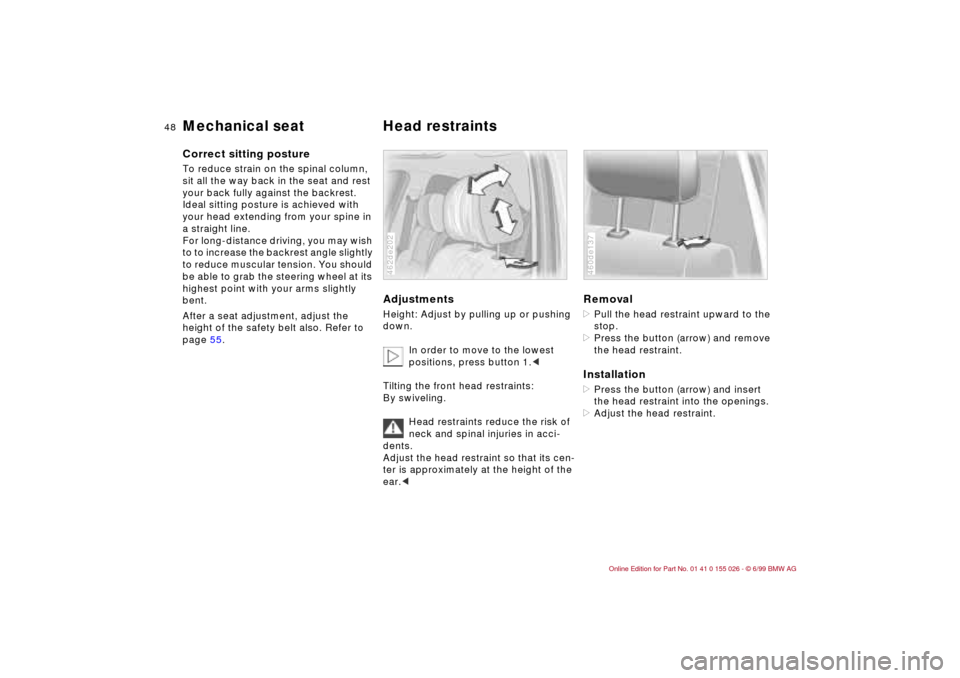
Adjustments Height: Adjust by pulling up or pushing
down.
In order to move to the lowest
positions, press button 1.<
Tilting the front head restraints:
By swiveling.
Head restraints reduce the risk of
neck and spinal injuries in acci-
dents.
Adjust the head restraint so that its cen-
ter is approximately at the height of the
ear.<462de202
Removal>Pull the head restraint upward to the
stop.
>Press the button (arrow) and remove
the head restraint.Installation>Press the button (arrow) and insert
the head restraint into the openings.
>Adjust the head restraint.460de137
Page 52 of 189
50n
Electric power seat
*
Seat and mirror memory
*
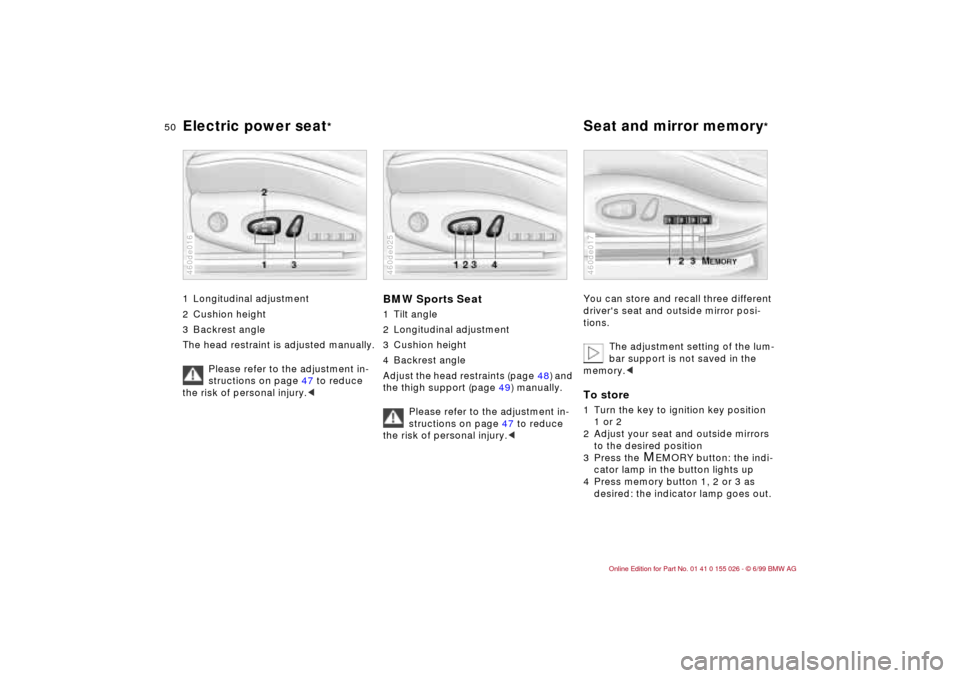
1 Longitudinal adjustment
2 Cushion height
3 Backrest angle
The head restraint is adjusted manually.
Please refer to the adjustment in-
structions on page 47 to reduce
the risk of personal injury.<460de016
BMW Sports Seat1 Tilt angle
2 Longitudinal adjustment
3 Cushion height
4 Backrest angle
Adjust the head restraints (page 48) and
the thigh support (page 49) manually.
Please refer to the adjustment in-
structions on page 47 to reduce
the risk of personal injury.<460de025
You can store and recall three different
driver's seat and outside mirror posi-
tions.
The adjustment setting of the lum-
bar support is not saved in the
memory.
2 Adjust your seat and outside mirrors
to the desired position
3 Press the
M
EMORY button: the indi-
cator lamp in the button lights up
4 Press memory button 1, 2 or 3 as
desired: the indicator lamp goes out.
460de017
Page 57 of 189
55n
RepairsIndexOverview Controls Car care Technology Data
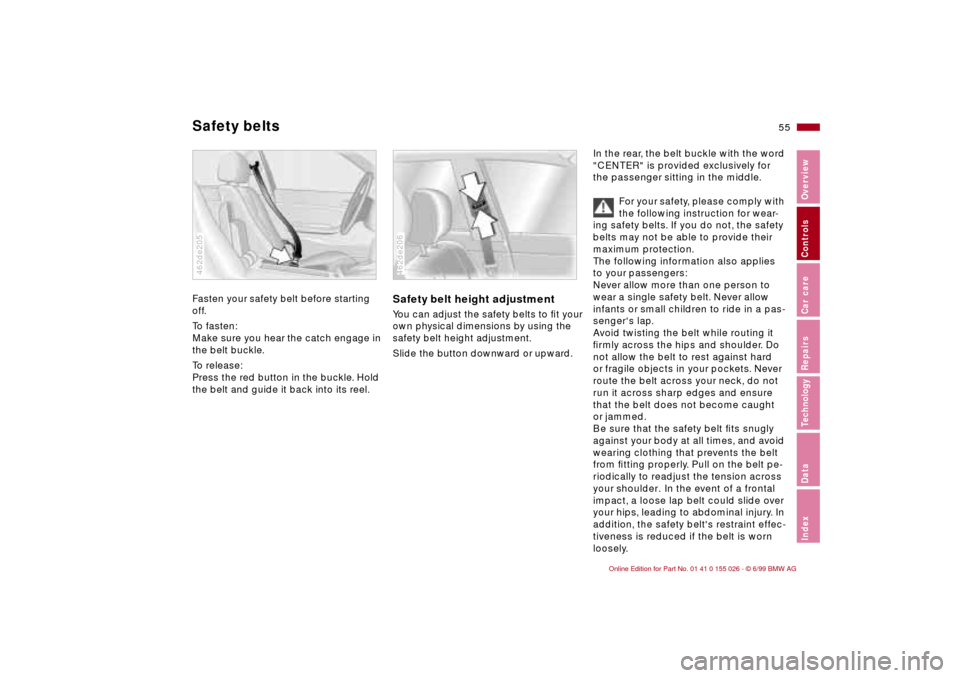
Fasten your safety belt before starting
off.
To fasten:
Make sure you hear the catch engage in
the belt buckle.
To release:
Press the red button in the buckle. Hold
the belt and guide it back into its reel.462de205
Safety belt height adjustmentYou can adjust the safety belts to fit your
own physical dimensions by using the
safety belt height adjustment.
Slide the button downward or upward.462de206
In the rear, the belt buckle with the word
"CENTER" is provided exclusively for
the passenger sitting in the middle.
For your safety, please comply with
the following instruction for wear-
ing safety belts. If you do not, the safety
belts may not be able to provide their
maximum protection.
The following information also applies
to your passengers:
Never allow more than one person to
wear a single safety belt. Never allow
infants or small children to ride in a pas-
senger's lap.
Avoid twisting the belt while routing it
firmly across the hips and shoulder. Do
not allow the belt to rest against hard
or fragile objects in your pockets. Never
route the belt across your neck, do not
run it across sharp edges and ensure
that the belt does not become caught
or jammed.
Be sure that the safety belt fits snugly
against your body at all times, and avoid
wearing clothing that prevents the belt
from fitting properly. Pull on the belt pe-
riodically to readjust the tension across
your shoulder. In the event of a frontal
impact, a loose lap belt could slide over
your hips, leading to abdominal injury. In
addition, the safety belt's restraint effec-
tiveness is reduced if the belt is worn
loosely.
Safety belts
Page 150 of 189
148n
Changing tires
Take these precautionary mea-
sures if you have either a flat tire
or are changing the tire:
Park the vehicle as far from the flow of
traffic as possible and on firm ground.
Switch on the hazard flashers. Turn the
steering wheel to the straight-ahead
position, remove the key and engage
the steering lock. Shift into 1st or re-
verse (selector lever in "Park" with auto-
matic) and engage the parking brake.
All passengers should be outside the
car and well away from your immediate
working area (behind the guardrail, for
instance).
If a warning triangle or portable hazard
warning lamp is available, set it up on
the roadside at an appropriate distance
from the rear of the vehicle. Comply
with all safety guidelines and regula-
tions.
Change the wheel only on a level, firm
surface that is not slippery. Avoid jack-
ing the car on a soft or slippery support
surface (snow, ice, loose gravel, etc.),
as it could slide sideways.
Ensure that the jack is positioned on a
solid support surface.
Do not place wooden blocks or similar
objects under the jack. If this done, the
jack might not be able to reach its full
support capacity because of the limited
height.
Do not lie under the vehicle or start the
engine when the vehicle is supported
by the jack – risk of fatal injury.<
Your BMW has either a spare
* or
space-saver tire
* for temporary use and
to ensure your mobility.
Take the luggage compartment
floor panel completely out to
remove the spare tire
* (refer to
page 41).<
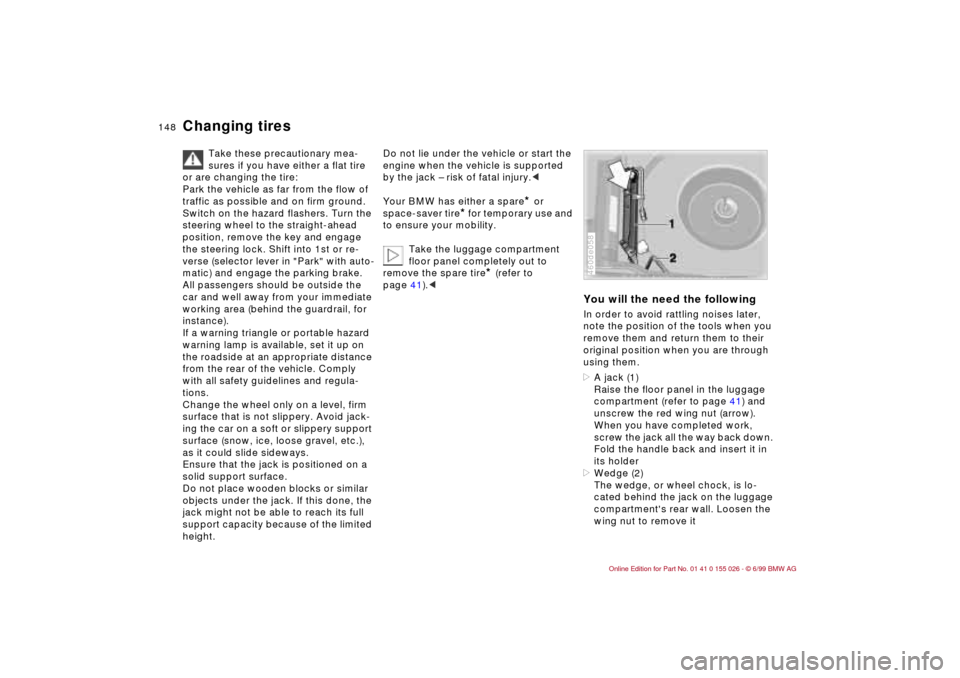
You will the need the followingIn order to avoid rattling noises later,
note the position of the tools when you
remove them and return them to their
original position when you are through
using them.
>A jack (1)
Raise the floor panel in the luggage
compartment (refer to page 41) and
unscrew the red wing nut (arrow).
When you have completed work,
screw the jack all the way back down.
Fold the handle back and insert it in
its holder
>Wedge (2)
The wedge, or wheel chock, is lo-
cated behind the jack on the luggage
compartment's rear wall. Loosen the
wing nut to remove it460de058
Page 182 of 189

Everything from A to ZGGasoline 26
Gasoline gauge 75
Glove compartment 94
Glove compartment lamp
bulb replacement 146
Grills 88
Gross weight 172HHandbrake 64
Hands-free system 95
Hazard warning system 25
Hazard warning triangle 25
Head restraint 48
Headlamp covers,
care 130, 141
Headlamp flasher 85
Headlamp washer
system 122, 173
Headlamp washers 71
Heated mirrors 52
Heated seats 93
Heater and ventilation 88
Heavy loads 100
Height 171
HiFi System – harman
kardon 94
High beams 23, 69, 85
bulb replacement 141
Hood release 119
Horn 17
Hubcap 149
IIce warning 78
Icy roads 78
Identification, tires 115
Ignition key 32
Ignition lock 62
Indicator lamps 20
Inflation pressure 27, 113
Inflation pressure
monitoring 82, 164
Inside rearview mirror,
automatically set for low-
beam lights 53
INSPECTION 76
Installing child restraint
system 61
Instrument cluster 18
Instrument lighting 84
Instrument panel lighting 84
Interaxle tire rotation 114
Interface socket 96
Interface socket for On-
Board-Diagnostics 137
Interference
cellular phones 112
Interior lamp 36, 85
bulb replacement 145
remote control 36
Interior mirror 52
automatic dim 163
Interior motion sensor 42
Interlock 62
Intermittent wipe 69
JJack 148
Jump-starting 156KKey 32
Key Memory 54LLamp switch 84
Lamps on warning 84
Lashing eyes 100
Leather care 134
Length 171
License plate lamp
bulb replacement 145
Light-alloy wheels 117
Lighter 96
Load-securing devices 100
Low beam headlamps 84
Low beams
bulb replacement 141
Low-beam light inside
rearview mirror 53
Lug bolts 149
Luggage compartment 39
capacity 172
emergency release 39
floor mat 41
floor panel 41
remote control 37Luggage compartment
lamps
bulb replacement 146
Luggage compartment
lid 39
emergency release 39
Luggage compartment
lighting 39
Luggage rack 101
Lumbar support 49
MM+S tires 116
Maintenance 76, 129
Malfunction displays 77
Manual transmission 65
Manually controlled
recirculated-air 91
Memory 51
MFL (Multi-function steering
wheel) 24
Microfilter 93, 154
Microphone 95
Mirror memory 51
Mirrors 52
Mobile phones 112
Modifications,
technical 6, 136
Multi-function steering wheel
(MFL) 24
Page 183 of 189

Everything from A to Z
181n
RepairsIndexOverview Controls Car care Technology Data
NNavigation system, refer to
the radio operating
instructions
Neckrest 48
New transmitter, radio
remote control 147
Non-smokers package 96
Nozzles 122OOBD connector 137
Obstruction protection 44
Odometer 74
Oil
filling capacity 173
quality 124
viscosity 124
Oil additives 123
Oil change intervals, see the
Service and Warranty
Information Booklet
Oil consumption 123
Oil dipstick 123
Oil filter change 173
Oil level
check 123
indicator lamp 21
Oil pressure, indicator
lamp 20
Oil specifications 124
OILSERVICE 76Onboard computer 77
Onboard computer, refer to
the radio operating
instructions
Onboard tool kit 140
Opening and closing
from inside 38
from outside 34
Outlets, ventilation 88
Outside temperature
display 78
PPaint blemishes 131
Paint, care 131
Paintwork
minor repairs 132
waxing 132
Park Distance Control
(PDC) 80
Parking brake 64
Parking help 80
Parking lamps 84, 85
bulb replacement 142
Parking, winter 111
PDC (Park Distance
Control) 80
Performance 170
Pocket lamp 94
Pollen 93
Power steering 112
Power windows 44Preheat 62
Pressure monitoring,
tires 82, 164
Pressure, tires 27, 113
RRadiator 173
Radio Data System
(RDS) 162
Radio reception 112, 162
Radio remote control, new
transmitter 147
Radio, refer also to the radio
operating instructions
Rain sensor 70, 165
RDC (Tire Pressure
Control) 82, 164
RDS (Radio Data
System) 162
Reading lamps 86
Rear backrest, folding 98
Rear lamps 143
Rear window
defroster 71, 92
Rear-view mirror 52
Reclining seat 47
Refueling 26
Remote control 35
Removal of the vehicle from
service 136
Remove condensation,
windows 91Replenish washer fluid 122
Reporting safety defects 7
Reserve control lamp 75
Restraint system 56, 60
Reverse 17, 65
Roller blind, sun
protection 93
Roof load 172
Roof luggage rack 101
Rubber parts 110
SSafety belt height
adjustment 55
Safety belt tensioner 162
Safety belts 55
safety belt height
adjustment 55
Safety buttons 38
Safety feature 44
Seat
electric power 50
mechanical 47
Seat adjustment 47
Seat heating 93
Seat memory 51
Securing cargo 100
Securing loads 100
Selector lever, automatic
transmission 66
Self-diagnostics 166