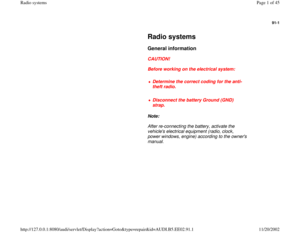
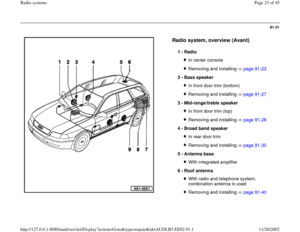
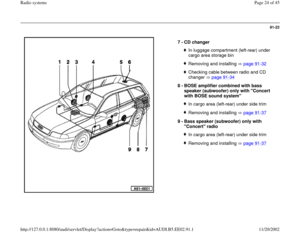
Page 25 of 45
91-23
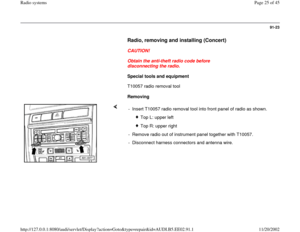
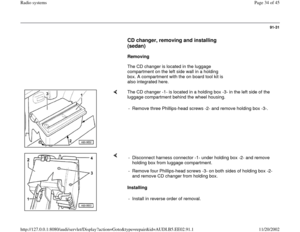
Radio, removing and installing (Concert)
CAUTION!
Obtain the anti-theft radio code before
disconnecting the radio.
Special tools and equipment
T10057 radio removal tool
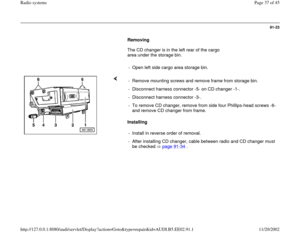
Removing
- Insert T10057 radio removal tool into front panel of radio as shown.
Top L: upper left
Top R: upper right
- Remove radio out of instrument panel together with T10057.
- Disconnect harness connectors and antenna wire.
Pa
ge 25 of 45 Radio s
ystems
11/20/2002 htt
p://127.0.0.1:8080/audi/servlet/Dis
play?action=Goto&t
yp
e=re
pair&id=AUDI.B5.EE02.91.1
Page 26 of 45
91-24
Installing
- Remove T10057 radio removal tool before
installing radio.
- Connect harness connectors and antenna
wire.
- Carefully slide radio into instrument panel until
radio is fully engaged in frame.
- Enter anti-theft radio code and check operation
radio owners manual.
Pa
ge 26 of 45 Radio s
ystems
11/20/2002 htt
p://127.0.0.1:8080/audi/servlet/Dis
play?action=Goto&t
yp
e=re
pair&id=AUDI.B5.EE02.91.1
Page 27 of 45
91-25
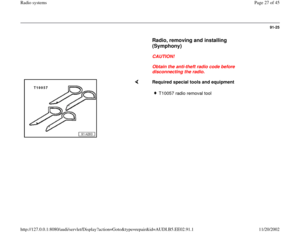
Radio, removing and installing
(Symphony)
CAUTION!
Obtain the anti-theft radio code before
disconnecting the radio.
Required special tools and equipment
T10057 radio removal tool
Pa
ge 27 of 45 Radio s
ystems
11/20/2002 htt
p://127.0.0.1:8080/audi/servlet/Dis
play?action=Goto&t
yp
e=re
pair&id=AUDI.B5.EE02.91.1
Page 28 of 45
91-26
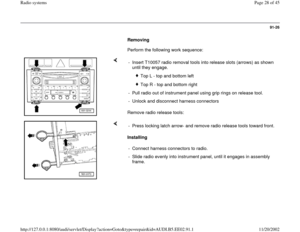
Removing
Perform the following work sequence:
Remove radio release tools: - Insert T10057 radio removal tools into release slots (arrows) as shown
until they engage.
Top L - top and bottom left
Top R - top and bottom right
- Pull radio out of instrument panel using grip rings on release tool.
- Unlock and disconnect harness connectors
Installing - Press locking latch arrow- and remove radio release tools toward front.
- Connect harness connectors to radio.
- Slide radio evenly into instrument panel, until it engages in assembly
frame.
Pa
ge 28 of 45 Radio s
ystems
11/20/2002 htt
p://127.0.0.1:8080/audi/servlet/Dis
play?action=Goto&t
yp
e=re
pair&id=AUDI.B5.EE02.91.1
Page 29 of 45
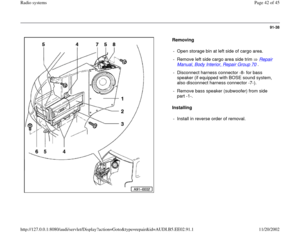
91-27
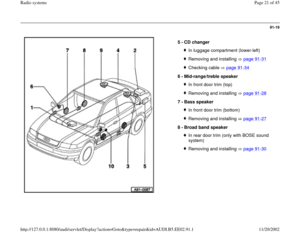
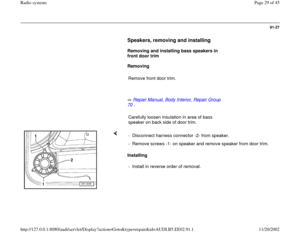
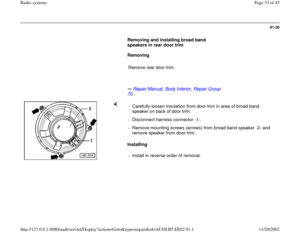
Speakers, removing and installing
Removing and installing bass speakers in
front door trim
Removing
Remove front door trim.
Repair Manual, Body Interior, Repair Group
70
.
Carefully loosen insulation in area of bass
speaker on back side of door trim.
Installing - Disconnect harness connector -2- from speaker.
- Remove screws -1- on speaker and remove speaker from door trim.
- Install in reverse order of removal.
Pa
ge 29 of 45 Radio s
ystems
11/20/2002 htt
p://127.0.0.1:8080/audi/servlet/Dis
play?action=Goto&t
yp
e=re
pair&id=AUDI.B5.EE02.91.1
Page 30 of 45
91-28
Removing and installing mid-range/treble
speakers in front door trim
Removing
Remove front door trim.
Repair Manual, Body Interior, Repair Group
70
.
- Carefully loosen insulation in area of treble
speaker on back side of door trim.
Installing - Using screwdriver, disconnect clip -1-.
- Remove speaker -2- from door trim.
- Install in reverse order of removal.
Pa
ge 30 of 45 Radio s
ystems
11/20/2002 htt
p://127.0.0.1:8080/audi/servlet/Dis
play?action=Goto&t
yp
e=re
pair&id=AUDI.B5.EE02.91.1
Page 31 of 45
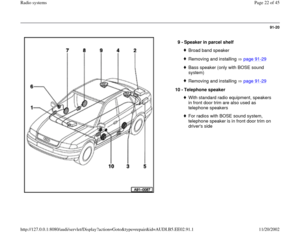
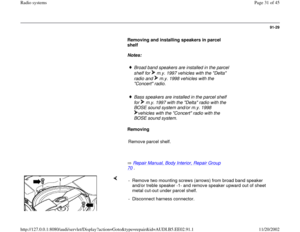
91-29
Removing and installing speakers in parcel
shelf
Notes:
Broad band speakers are installed in the parcel
shelf for m.y. 1997 vehicles with the "Delta"
radio and m.y. 1998 vehicles with the
"Concert" radio.
Bass speakers are installed in the parcel shelf
for m.y. 1997 with the "Delta" radio with the
BOSE sound system and/or m.y. 1998
vehicles with the "Concert" radio with the
BOSE sound system.
Removing
Remove parcel shelf.
Repair Manual, Body Interior, Repair Group
70
.
- Remove two mounting screws (arrows) from broad band speaker
and/or treble speaker -1- and remove speaker upward out of sheet
metal cut-out under parcel shelf.
- Disconnect harness connector.
Pa
ge 31 of 45 Radio s
ystems
11/20/2002 htt
p://127.0.0.1:8080/audi/servlet/Dis
play?action=Goto&t
yp
e=re
pair&id=AUDI.B5.EE02.91.1
Page 32 of 45
Installing
- Install in reverse order of removal.
Pa
ge 32 of 45 Radio s
ystems
11/20/2002 htt
p://127.0.0.1:8080/audi/servlet/Dis
play?action=Goto&t
yp
e=re
pair&id=AUDI.B5.EE02.91.1


CAUTION!
Obtain the anti-theft radio code before
disconnecting the radio.
Special tools and equipment
T10057 radio")


CAUTION!
Obtain the anti-theft radio code before
disconnecting the radio.
Required special tools and equipment
T10057 ra")
 as shown
until they engage.")


