Page 9 of 34
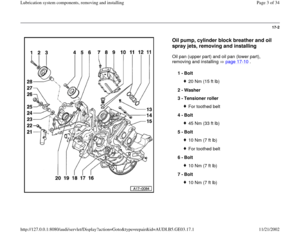
17-6
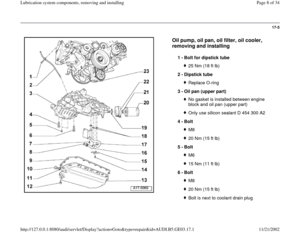
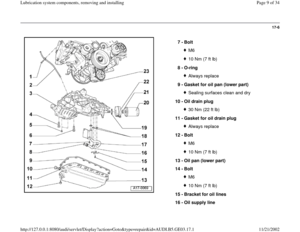
7 -
Bolt
M610 Nm (7 ft lb)
8 -
O-ring Always replace
9 -
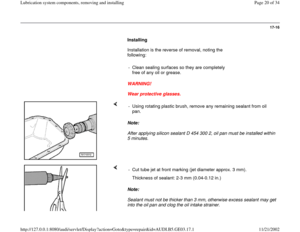
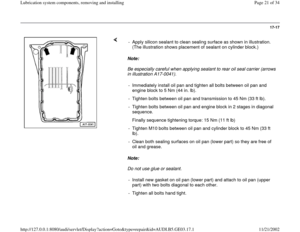
Gasket for oil pan (lower part) Sealing surfaces clean and dry
10 -
Oil drain plug 30 Nm (22 ft lb)
11 -
Gasket for oil drain plug Always replace
12 -
Bolt M610 Nm (7 ft lb)
13 -
Oil pan (lower part)
14 -
Bolt M610 Nm (7 ft lb)
15 -
Bracket for oil lines
16 -
Oil supply line
Pa
ge 9 of 34 Lubrication s
ystem com
ponents, removin
g and installin
g
11/21/2002 htt
p://127.0.0.1:8080/audi/servlet/Dis
play?action=Goto&t
yp
e=re
pair&id=AUDI.B5.GE03.17.1
Page 10 of 34
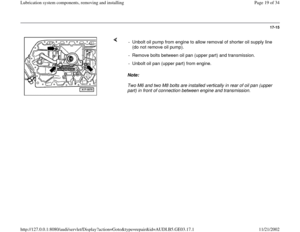
From pump to oil filter
17 -
Oil supply line From oil filter to engine oil circulation
Pa
ge 10 of 34 Lubrication s
ystem com
ponents, removin
g and installin
g
11/21/2002 htt
p://127.0.0.1:8080/audi/servlet/Dis
play?action=Goto&t
yp
e=re
pair&id=AUDI.B5.GE03.17.1
Page 11 of 34
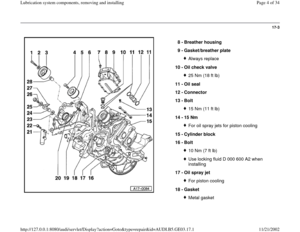
17-7
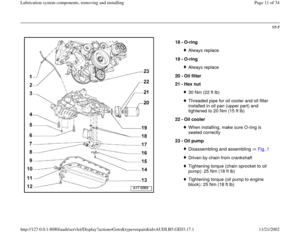
18 -
O-ring
Always replace
19 -
O-ring Always replace
20 -
Oil filter
21 -
Hex nut 30 Nm (22 ft lb)Threaded pipe for oil cooler and oil filter
installed in oil pan (upper part) and
tightened to 20 Nm (15 ft lb)
22 -
Oil cooler When installing, make sure O-ring is
seated correctly
23 -
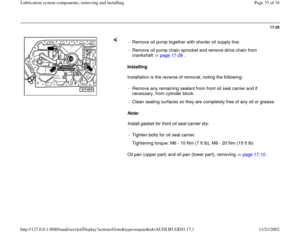
Oil pump Disassembling and assembling Fig. 1Driven by chain from crankshaftTightening torque (chain sprocket to oil
pump): 25 Nm (18 ft lb) Tightening torque (oil pump to engine
block): 25 Nm (18 ft lb)
Pa
ge 11 of 34 Lubrication s
ystem com
ponents, removin
g and installin
g
11/21/2002 htt
p://127.0.0.1:8080/audi/servlet/Dis
play?action=Goto&t
yp
e=re
pair&id=AUDI.B5.GE03.17.1
Page 12 of 34
17-8
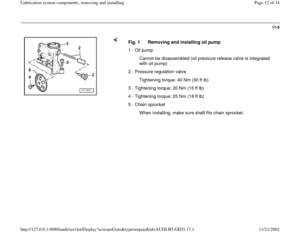
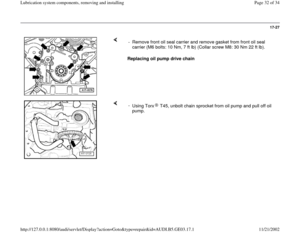
Fig. 1 Removing and installing oil pump
1 - Oil pump
Cannot be disassembled (oil pressure release valve is integrated
with oil pump)
2 - Pressure regulation valve
Tightening torque: 40 Nm (30 ft lb)
3 - Tightening torque: 20 Nm (15 ft lb)
4 - Tightening torque: 25 Nm (18 ft lb)
5 - Chain sprocket
When installing, make sure shaft fits chain sprocket
Pa
ge 12 of 34 Lubrication s
ystem com
ponents, removin
g and installin
g
11/21/2002 htt
p://127.0.0.1:8080/audi/servlet/Dis
play?action=Goto&t
yp
e=re
pair&id=AUDI.B5.GE03.17.1
Page 13 of 34
17-9
Oil check valve, replacing
Note:
If irregular valve noise occurs repeatedly during
short periods of driving and disappears after
extended periods of driving, the oil check valves
must be replaced.
- Remove intake manifold.
Tightening torque: 10 Nm (7 ft lb)
- Remover cover under intake manifold.
Tightening torque: 10 Nm (7 ft lb)
Note:
The opening also contains distribution line -2- for supplying jets for piston
cooling. - Replace oil check valves -1-.
Tightening torque: 25 Nm (18 ft lb)
Pa
ge 13 of 34 Lubrication s
ystem com
ponents, removin
g and installin
g
11/21/2002 htt
p://127.0.0.1:8080/audi/servlet/Dis
play?action=Goto&t
yp
e=re
pair&id=AUDI.B5.GE03.17.1
Page 14 of 34
17-10
Oil pan (upper part) and oil pan (lower
part), removing and installing
Special tools and equipment
Drill with plastic brush attachment
Sealant D 454 300 A2
Torque wrench 10 Nm - 45 Nm
- Switch ignition off and disconnect battery
Ground (GND) strap.
CAUTION!
Before disconnecting the battery, determine
the correct coding for the anti-theft radio.
- Withdraw dipstick.
- Unbolt dipstick tube at right-front of cylinder
head, pull up and remove.
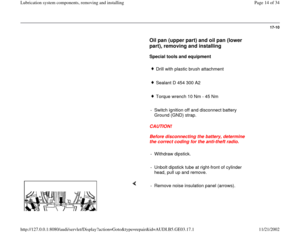
- Remove noise insulation panel (arrows).
Pa
ge 14 of 34 Lubrication s
ystem com
ponents, removin
g and installin
g
11/21/2002 htt
p://127.0.0.1:8080/audi/servlet/Dis
play?action=Goto&t
yp
e=re
pair&id=AUDI.B5.GE03.17.1
Page 15 of 34
17-11
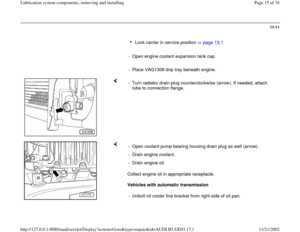
Lock carrier in service position page 13
-1
- Open engine coolant expansion tank cap.
- Place VAG1306 drip tray beneath engine.
- Turn radiator drain plug counterclockwise (arrow). If needed, attach
tube to connection flange.
Collect engine oil in appropriate receptacle.
Vehicles with automatic transmission - Open coolant pump bearing housing drain plug as well (arrow).
- Drain engine coolant.
- Drain engine oil.
- Unbolt oil cooler line bracket from right-side of oil pan.
Pa
ge 15 of 34 Lubrication s
ystem com
ponents, removin
g and installin
g
11/21/2002 htt
p://127.0.0.1:8080/audi/servlet/Dis
play?action=Goto&t
yp
e=re
pair&id=AUDI.B5.GE03.17.1
Page 16 of 34
17-12
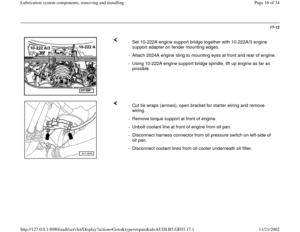
- Set 10-222A engine support bridge together with 10-222A/3 engine
support adapter on fender mounting edges.
- Attach 2024A engine sling to mounting eyes at front and rear of engine.
- Using 10-222A engine support bridge spindle, lift up engine as far as
possible.
- Cut tie wraps (arrows), open bracket for starter wiring and remove
wiring.
- Remove torque support at front of engine.
- Unbolt coolant line at front of engine from oil pan.
- Disconnect harness connector from oil pressure switch on left-side of
oil pan.
- Disconnect coolant lines from oil cooler underneath oil filter.
Pa
ge 16 of 34 Lubrication s
ystem com
ponents, removin
g and installin
g
11/21/2002 htt
p://127.0.0.1:8080/audi/servlet/Dis
play?action=Goto&t
yp
e=re
pair&id=AUDI.B5.GE03.17.1


8 -
O-ring Always replace
9 -
Gasket for oil pan (lower part) Sealing surfaces clean and dry
10 -
Oil drain plug 30 Nm (22 ft lb)
11 -
Gasket for oil drain p")

Threaded pipe for oil cooler and oil filter
installed in oil pan (upper part) and
t")

2 - Pressure regulation valve
Tightening torque")

 and oil pan (lower
part), removing and installing
Special tools and equipment
Drill with plastic brush attachment
Sealant D 454 300 A2
Torq")

