1999 TOYOTA LAND CRUISER headlights
[x] Cancel search: headlightsPage 8 of 202

New L/C100(U)
16
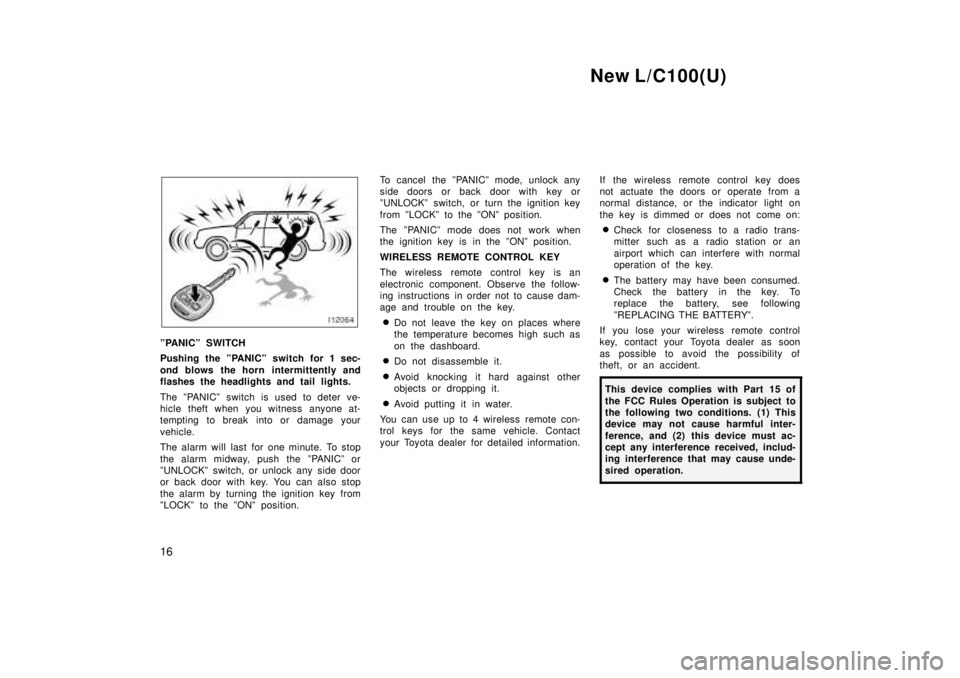
ºPANICº SWITCH
Pushing the ºPANICº switch for 1 sec-
ond blows the horn intermittently and
flashes the headlights and tail lights.
The ºPANICº switch is used to deter ve-
hicle theft when you witness anyone at-
tempting to break into or damage your
vehicle.
The alarm will last for one minute. To stop
the alarm midway, push the ºPANICº or
ºUNLOCKº switch, or unlock any side door
or back door with key. You can also stop
the alarm by turning the ignition key from
ºLOCKº to the ºONº position. To cancel the ºPANICº mode, unlock any
side doors or back door with key or
ºUNLOCKº switch, or turn the ignition key
from ºLOCKº to the ºONº position.
The ºPANICº mode does not work when
the ignition key is in the ºONº position.
WIRELESS REMOTE CONTROL KEY
The wireless remote control key is an
electronic component. Observe the follow-
ing instructions in order not to cause dam-
age and trouble on the key.
� Do not leave the key on places where
the temperature becomes high such as
on the dashboard.
� Do not disassemble it.
� Avoid knocking it hard against other
objects or dropping it.
� Avoid putting it in water.
You can use up to 4 wireless remote con-
trol keys for the same vehicle. Contact
your Toyota dealer for detailed information. If the wireless remote control key does
not actuate the doors or operate from a
normal distance, or the indicator light on
the key is dimmed or does not come on:
� Check for closeness to a radio trans-
mitter such as a radio station or an
airport which can interfere with normal
operation of the key.
� The battery may have been consumed.
Check the battery in the key. To
replace the battery, see following
ºREPLACING THE BATTERYº.
If you lose your wireless remote control
key, contact your Toyota dealer as soon
as possible to avoid the possibility of
theft, or an accident.
This device complies with Part 15 of
the FCC Rules Operation is subject to
the following two conditions. (1) This
device may not cause harmful inter-
ference, and (2) this device must ac-
cept any interference received, includ-
ing interference that may cause unde-
sired operation.
Page 17 of 202

New L/C100(U)25
2. In front of the vehicle, pull up theauxiliary catch l ever and lift the
hood.
Before closing the hood, check to see that
you have not forgotten any tools, rags,
etc. Then lower the hood and make sure
it locks into place. If necessary, press
down gently on the front edge to lock it. Theft deterrent systemÐTo deter the vehicle theft, the system
is designed to give an alarm if any of
the side doors, back door or hood is
forcibly unlocked or opened or the bat-
tery terminal is disconnected and then
reconnected when the vehicle is locked.
The alarm blows the horn intermittently
and flashes the headlights and tail lights.SETTING THE SYSTEM
1. Turn the ignition key to the ºLOCKº position and remove it.
The indicator light will start flashing every
2 second when the key is removed from
the ignition switch. (See ºEngine
immobiliser systemº for details.)
2. Have all passengers get out of the vehicle.
3. Close and lock all the side doors, back door and hood.
The indicator light will come on when all
the side doors, back door and hood are
closed and locked.
Page 71 of 202

New L/C100(U)79
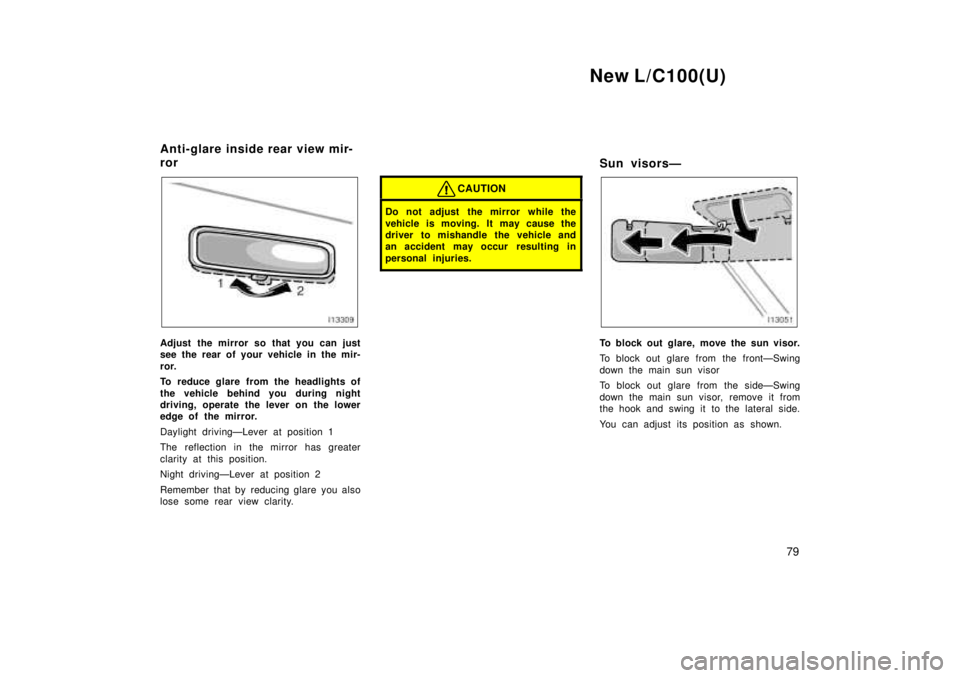
Adjust the mirror so that you can just
see the rear of your vehicle in the mir-
ror.
To reduce glare from the headlights of
the vehicle behind you during night
driving, operate the lever on the lower
edge of the mirror.
Daylight drivingÐLever at position 1
The reflection in the mirror has greater
clarity at this position.
Night drivingÐLever at position 2
Remember that by reducing glare you also
lose some rear view clarity.
CAUTION
Do not adjust the mirror while the
vehicle is moving. It may cause the
driver to mishandle the vehicle and
an accident may occur resulting in
personal injuries.
Sun visorsÐ
To block out glare, move the sun visor.
To block out glare from the frontÐSwing
down the main sun visor
To block out glare from the sideÐSwing
down the main sun visor, remove it from
the hook and swing it to the lateral side.
You can adjust its position as shown.
Anti-glare inside rear view mir-
ror
Page 73 of 202

New L/C100(U)81
Part 1
OPERATION OF
INSTRUMENTS AND
CONTROLSÐ
Chapter 1- 4
Lights, Wipers and Defogger �
Headlight and turn signals
�Emergency flashers
�Instrument panel light control
�Front fog lights
�Interior lights
�Personal lights
�Center interior and personal lights
�Ignition switch light
�Windshield wipers and washer
�Rear window wiper and washer
�Rear window defogger
�Outside rear view mirror heaters
Headlight and turn signals
HEADLIGHTS
To turn on the following lights: Twist
the headlight/turn signal lever knob.
Position 1ÐParking, tail, license plate,
side marker and instrument panel lights
Position 2ÐHeadlights and all of the
above
Position 3 (ºAUTOº)ÐHeadlights and/or all
of the above
They automatically turn on or off depend-
ing on the darkness of the surroundings.
Manually twist the knob to the position 2
to turn on the headlights if they are need-
ed immediately when entering a dark tun-
nel, parking structure, etc.The automatic light control sensor is on
the top of the passenger 's side instrument
panel.
Do not place anything on the instrument
panel, and/or do not affix anything on the
windshield to block this sensor.
If you feel that the automatic light control
comes into operation too early or too late,
have the sensor adjusted by your Toyota
dealer.
Page 74 of 202

New L/C100(U)
82
The tail lights automatically turn off when
the driver 's door is opened with the igni-
tion key in the ºACCº or ºLOCKº position.
To turn them on again, turn the key to the
ºONº position or actuate the headlight
switch. If you are going to park for over
one week, make sure the headlight switch
is off.
The headlights automatically turn off after
some time since the ignition switch is
turned off, then any side door is opened.
To turn them on again, turn the key to the
ºONº position or actuate the headlight
switch. If you are going to park for over
one week, make sure the headlight switch
is off.
NOTICE
To prevent the battery from being dis-
charged, do not leave the lights onfor a long period when the engine isnot running.
Daytime running light system
The headlights turn on at reduced intensi-
ty when the parking brake is released with
the engine started, even with the light
switch in the ºOFFº position. They will not
go off until the ignition switch is turned
off. To turn on the other exterior lights and
instrument panel lights, twist the knob to
the position 1.
Twist the knob to the position 2 to turn
the headlights to full intensity for driving
at night.
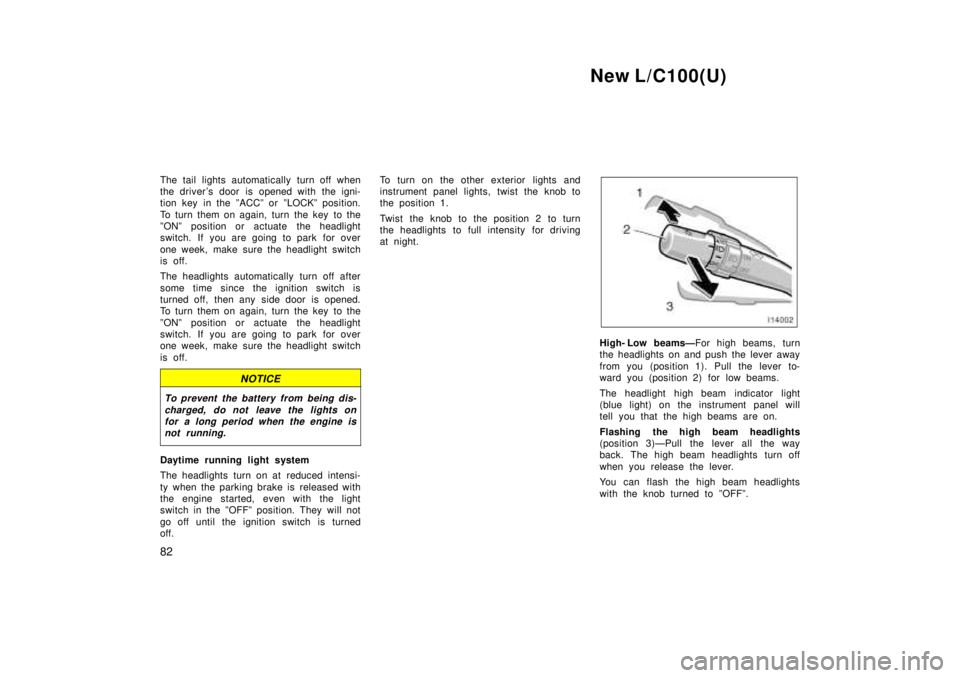
High- Low beamsÐ
For high beams, turn
the headlights on and push the lever away
from you (position 1). Pull the lever to-
ward you (position 2) for low beams.
The headlight high beam indicator light
(blue light) on the instrument panel will
tell you that the high beams are on.
Flashing the high beam headlights
(position 3)ÐPull the lever all the way
back. The high beam headlights turn off
when you release the lever.
You can flash the high beam headlights
with the knob turned to ºOFFº.
Page 181 of 202

New L/C100(U)209
Tire surface and wheel nuts
Check the tires carefully for cuts, damage
or excessive wear. See Chapter 7- 2 for
additional information. When checking the
tires, make sure no nuts are missing, and
check the nuts for looseness. Tighten
them if necessary.
Tire rotation
Rotate the tires every 12000 km (7500
miles). See Chapter 7- 2 for additional in-
formation.
Fluid leaks
Check underneath for leaking fuel, oil, wa-
ter or other fluid after the vehicle has
been parked for a while. If you smell fuel
fumes or notice any leak, have the cause
found and corrected immediately.
Doors and engine hood
Check that all doors and back door oper-
ate smoothly and all latches lock securely.
Make sure the engine hood secondary
latch secures the hood from opening when
the primary latch is released.
INSIDE THE VEHICLE
Items listed below should be checked
regularly, e.g. while performing periodic
services, cleaning the vehicle, etc.
Lights
Make sure the headlights, stop lights, tail
lights, turn signal lights, and other lights
are all working. Check headlight aim.
Service reminder indicators and warning
buzzers
Check that all service reminder indicators
and warning buzzers function properly.
Steering wheel
Be alert for changes in steering condition,
such as hard steering or strange noise.
Seats
Check that all front seat controls such as
seat adjusters, seatback recliner, etc. op-
erate smoothly and that all latches lock
securely in any position. Check that the
head restraint move up and down smooth-
ly and that the locks hold securely in any
latched position. For folding- down rear
seatbacks, swing- up rear seat cushions
and detachable third seats, check that the
latches lock securely.Seat belts
Check that the seat belt system such as
buckles, retractors and anchors operate
properly and smoothly. Make sure that the
belt webbing is not cut, frayed, worn or
damaged.
Accelerator pedal
Check the pedal for smooth operation and
uneven pedal effort or catching.
Brake pedal
Check the pedal for smooth operation and
that the pedal has the proper clearance.
Check the brake booster function.
Brakes
At a safe place, check that the brakes do
not pull to one side when applied.
Parking brake
Check that the lever has the proper travel
and that, on a safe incline, your vehicle
is held securely with only the parking
brake applied.