1999 SUBARU LEGACY high
[x] Cancel search: highPage 40 of 1456

Diagnosis of engine condition by measurement of manifold vacuum
Vacuum gauge indication Possible engine condition
1. Needle is steady but lower than normal position. This ten-
dency becomes more evident as engine temperature rises.Leakage around intake manifold gasket or disconnection or
damaged vacuum hose
2. When engine speed is reduced slowly from higher speed,
needle stops temporarily when it is lowering or becomes
steady above normal position.Back pressure too high, or exhaust system clogged
3. Needle intermittently drops to position lower than normal
position.Leakage around cylinder
4. Needle drops suddenly and intermittently from normal posi-
tion.Sticky valves
5. When engine speed is gradually increased, needle begins
to vibrate rapidly at certain speed, and then vibration
increases as engine speed increases.Weak or broken valve springs
6. Needle vibrates above and below normal position in narrow
range.Defective ignition system or throttle chamber idle adjustment
6. Engine Oil Pressure
A: MEASUREMENT
1) Disconnect battery ground cable.
2) Remove generator from bracket.
(1) Disconnect connector and terminal from
generator.
G2M0088
(2) Remove V-belt cover
G2M0089
(3) Loosen lock bolt and slider bolt, and remove
V-belt for generator.
(4) Remove generator lock bolt.
(5) Remove bolt which install generator on
bracket.
G2M0090
3) Disconnect connector from oil pressure switch.
4) Remove oil pressure switch from engine cylin-
der block.
G2M0091
5) Connect oil pressure gauge hose to cylinder
block.
6) Connect battery ground cable.
7) Start the engine, and measure oil pressure.
6
2-2[W6A0]SERVICE PROCEDURE
6. Engine Oil Pressure
Page 41 of 1456

Diagnosis of engine condition by measurement of manifold vacuum
Vacuum gauge indication Possible engine condition
1. Needle is steady but lower than normal position. This ten-
dency becomes more evident as engine temperature rises.Leakage around intake manifold gasket or disconnection or
damaged vacuum hose
2. When engine speed is reduced slowly from higher speed,
needle stops temporarily when it is lowering or becomes
steady above normal position.Back pressure too high, or exhaust system clogged
3. Needle intermittently drops to position lower than normal
position.Leakage around cylinder
4. Needle drops suddenly and intermittently from normal posi-
tion.Sticky valves
5. When engine speed is gradually increased, needle begins
to vibrate rapidly at certain speed, and then vibration
increases as engine speed increases.Weak or broken valve springs
6. Needle vibrates above and below normal position in narrow
range.Defective ignition system or throttle chamber idle adjustment
6. Engine Oil Pressure
A: MEASUREMENT
1) Disconnect battery ground cable.
2) Remove generator from bracket.
(1) Disconnect connector and terminal from
generator.
G2M0088
(2) Remove V-belt cover
G2M0089
(3) Loosen lock bolt and slider bolt, and remove
V-belt for generator.
(4) Remove generator lock bolt.
(5) Remove bolt which install generator on
bracket.
G2M0090
3) Disconnect connector from oil pressure switch.
4) Remove oil pressure switch from engine cylin-
der block.
G2M0091
5) Connect oil pressure gauge hose to cylinder
block.
6) Connect battery ground cable.
7) Start the engine, and measure oil pressure.
6
2-2[W6A0]SERVICE PROCEDURE
6. Engine Oil Pressure
Page 132 of 1456

2. Engine Noise
Type of sound Condition Possible cause
Regular clicking soundSound increases as engine
speed increases.IValve mechanism is defective.
IIncorrect valve clearance
IWorn valve rocker
IWorn camshaft
IBroken valve spring
Heavy and dull clankOil pressure is low.IWorn crankshaft main bearing
IWorn connecting rod bearing (big end)
Oil pressure is normal.ILoose flywheel mounting bolts
IDamaged engine mounting
High-pitched clank
(Spark knock)Sound is noticeable when
accelerating with an overload.IIgnition timing advanced
IAccumulation of carbon inside combustion chamber
IWrong spark plug
IImproper gasoline
Clank when engine speed is
medium (1,000 to 2,000 rpm)Sound is reduced when fuel
injector connector of noisy cyl-
inder is disconnected.
(NOTE*)IWorn crankshaft main bearing
IWorn bearing at crankshaft end of connecting rod
Knocking sound when engine
is operating under idling speed
and engine is warmSound is reduced when fuel
injector connector of noisy cyl-
inder is disconnected.
(NOTE*)IWorn cylinder liner and piston ring
IBroken or stuck piston ring
IWorn piston pin and hole at piston end of connecting rod
Sound is not reduced if each
fuel injector connector is dis-
connected in turn. (NOTE*)IUnusually worn valve lifter
IWorn cam gear
IWorn camshaft journal bore in crankcase
Squeaky sound ÐIInsufficient generator lubrication
Rubbing sound ÐIDefective generator brush and rotor contact
Gear scream when starting
engineÐIDefective ignition starter switch
IWorn gear and starter pinion
Sound like polishing glass with
a dry clothÐILoose drive belt
IDefective engine coolant pump shaft
Hissing sound ÐILoss of compression
IAir leakage in air intake system, hoses, connections or
manifolds
Timing belt noise ÐILoose timing belt
IBelt contacting case/adjacent part
Valve tappet noise ÐIIncorrect valve clearance
NOTE*:
When disconnecting fuel injector connector, Malfunction Indicator Light (CHECK ENGINE light) illuminates and trouble code is
stored in ECM memory.
Therefore, carry out the CLEAR MEMORY MODE
necting fuel injector connector.
78
2-3a[K200]DIAGNOSTICS
2. Engine Noise
Page 207 of 1456
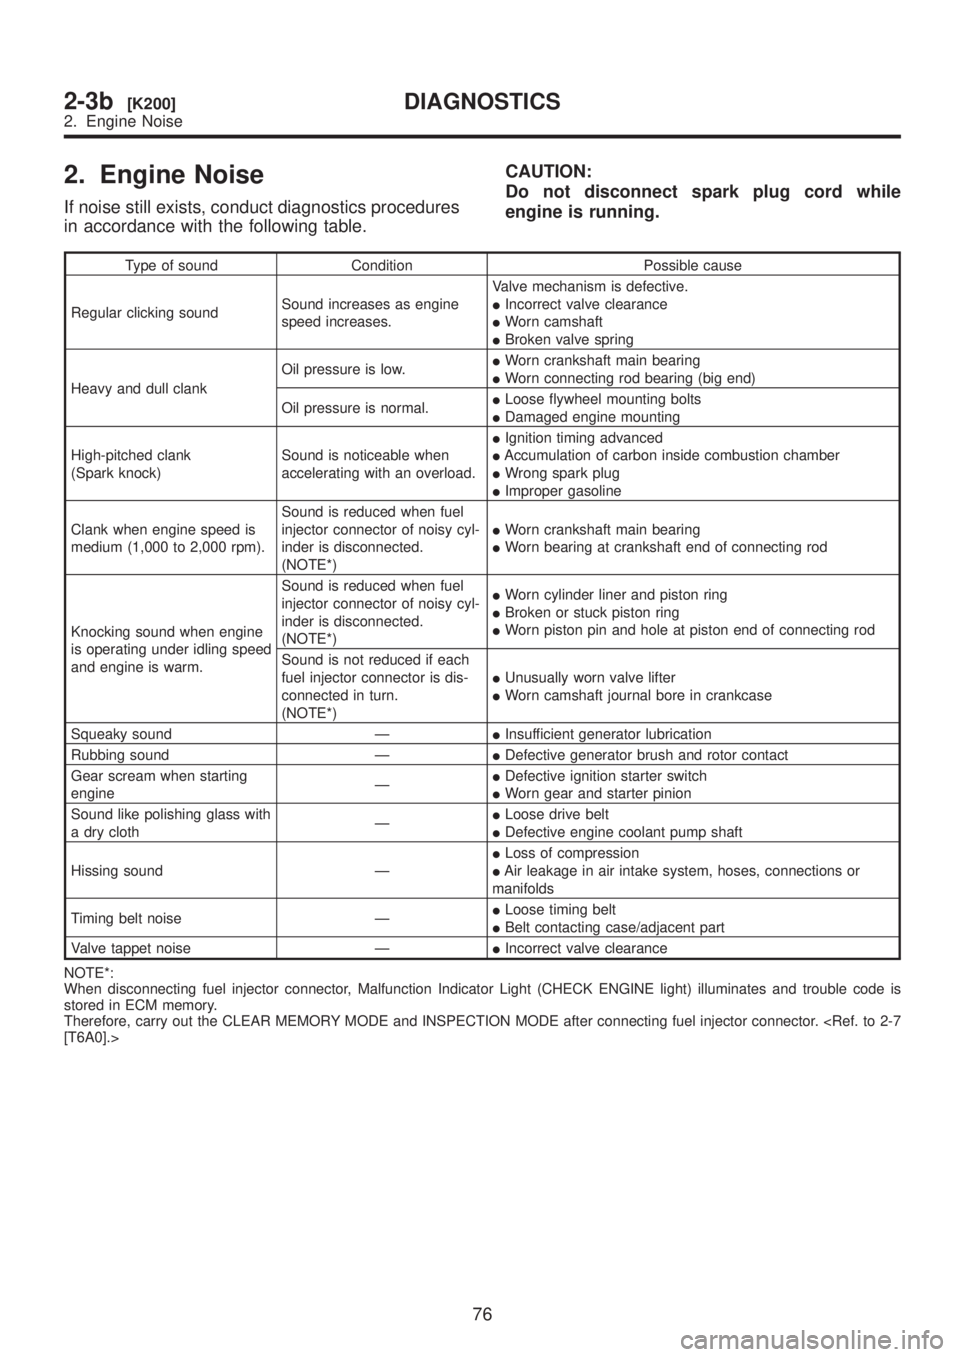
2. Engine Noise
If noise still exists, conduct diagnostics procedures
in accordance with the following table.CAUTION:
Do not disconnect spark plug cord while
engine is running.
Type of sound Condition Possible cause
Regular clicking soundSound increases as engine
speed increases.Valve mechanism is defective.
IIncorrect valve clearance
IWorn camshaft
IBroken valve spring
Heavy and dull clankOil pressure is low.IWorn crankshaft main bearing
IWorn connecting rod bearing (big end)
Oil pressure is normal.ILoose flywheel mounting bolts
IDamaged engine mounting
High-pitched clank
(Spark knock)Sound is noticeable when
accelerating with an overload.IIgnition timing advanced
IAccumulation of carbon inside combustion chamber
IWrong spark plug
IImproper gasoline
Clank when engine speed is
medium (1,000 to 2,000 rpm).Sound is reduced when fuel
injector connector of noisy cyl-
inder is disconnected.
(NOTE*)IWorn crankshaft main bearing
IWorn bearing at crankshaft end of connecting rod
Knocking sound when engine
is operating under idling speed
and engine is warm.Sound is reduced when fuel
injector connector of noisy cyl-
inder is disconnected.
(NOTE*)IWorn cylinder liner and piston ring
IBroken or stuck piston ring
IWorn piston pin and hole at piston end of connecting rod
Sound is not reduced if each
fuel injector connector is dis-
connected in turn.
(NOTE*)IUnusually worn valve lifter
IWorn camshaft journal bore in crankcase
Squeaky sound ÐIInsufficient generator lubrication
Rubbing sound ÐIDefective generator brush and rotor contact
Gear scream when starting
engineÐIDefective ignition starter switch
IWorn gear and starter pinion
Sound like polishing glass with
a dry clothÐILoose drive belt
IDefective engine coolant pump shaft
Hissing sound ÐILoss of compression
IAir leakage in air intake system, hoses, connections or
manifolds
Timing belt noise ÐILoose timing belt
IBelt contacting case/adjacent part
Valve tappet noise ÐIIncorrect valve clearance
NOTE*:
When disconnecting fuel injector connector, Malfunction Indicator Light (CHECK ENGINE light) illuminates and trouble code is
stored in ECM memory.
Therefore, carry out the CLEAR MEMORY MODE and INSPECTION MODE after connecting fuel injector connector.
76
2-3b[K200]DIAGNOSTICS
2. Engine Noise
Page 430 of 1456

1. Clutch System
Symptom Possible cause Corrective
1. Clutch slippage.
It is hard to perceive clutch slippage in the early stage,
but pay attention to the following symptoms
IEngine revs up when shifting.
IHigh speed driving is impossible; especially rapid
acceleration impossible and vehicle speed does not
increase in proportion to an increase in engine speed.
IPower falls, particularly when ascending a slope,
and there is a smell of burning of the clutch facing.
IMethod of testing: Put the vehicle in stationary con-
dition with parking brake fully applied. Disengage the
clutch and shift the transmission gear into the first.
Gradually allow the clutch to engage while gradually
increasing the engine speed. The clutch function is
satisfactory if the engine stalls. However, the clutch is
slipping if the vehicle does not start off and the engine
does not stall.(a) No clutch pedal play Readjust.
(b) No release lever end play Readjust.
(c) Clutch facing smeared by oil Replace.
(d) Worn clutch facing Replace.
(e) Deteriorated diaphragm spring Replace.
(f) Distorted pressure plate or flywheel Correct or replace.
(g) Defective release bearing holder Correct or replace.
(h) Defective pedal and cable system Correct or replace.
2. Clutch drags.
As a symptom of this trouble, a harsh scratching noise
develops and control becomes quite difficult when
shifting gears. The symptom becomes more apparent
when shifting into the first gear. However, because
much trouble of the this sort is due to defective syn-
chronization mechanism, carry out the test as
described after.
It may be judged as insufficient disengagement of
clutch if any noise occurs during this test.(a) Excessive clutch pedal play Readjust.
(b) Excessive clutch release lever play Readjust.
(c) Worn or rusty clutch disc hub spline Replace clutch disc.
(d) Excessive deflection of clutch disc
facingCorrect or replace.
(e) Seized crankshaft pilot needle bearing Replace.
(f) Malfunction of pedal and cable system Correct or replace.
(g) Cracked clutch disc facing Replace.
(h) Sticked clutch disc (smeared by oil or
water)Replace.
3. Clutch chatters.
Clutch chattering is an unpleasant vibration to the
whole body when the vehicle is just started with clutch
partially engaged.(a) Improper clutch cable routing Correct.
(b) Adhesion of oil on the facing Replace clutch disc.
(c) Weak or broken torsion spring Replace clutch disc.
(d) Defective facing contact or excessive
discReplace clutch disc defec-
tion.
(e) Warped pressure plate or flywheel Correct or replace.
(f) Loose disc rivets Replace clutch disc.
(g) Loose engine mounting Retighten or replace
mounting.
(h) Improper adjustment of pitching stop-
perAdjustment.
4. Noisy clutch
Examine whether the noise is generated when the
clutch is disengaged, engaged, or partially engaged.(a) Broken, worn or unlubricated release
bearingReplace release bearing.
(b) Insufficient lubrication of pilot bearing Apply grease.
(c) Loose clutch disc hub Replace clutch disc.
(d) Loose torsion spring retainer Replace clutch disc.
(e) Deteriorated or broken torsion spring Replace clutch disc.
5. Clutch grabs.
When starting the vehicle with the clutch partially
engaged, the clutch engages suddenly and the vehicle
jumps instead of making a smooth start.(a) Grease or oil on facing Replace clutch disc.
(b) Deteriorated cushioning spring Replace clutch disc.
(c) Worn or rusted spline of clutch disc or
mainTake off rust, apply
grease or replace clutch
shaft disc or mainshaft.
(d) Deteriorated or broken torsion spring Replace clutch disc.
(e) Loose engine mounting Retighten or replace
mounting.
(f) Deteriorated diaphragm spring Replace.
19
[K100]2-10DIAGNOSTICS
1. Clutch System
Page 503 of 1456

5) If specified starting torque range cannot be
obtained when a No. 1 adjusting washer is used,
then select a suitable No. 2 adjusting washer from
those listed in the following table. Repeat steps 1)
through 4) to adjust starting torque.
B3M0536I
(A) Adjusting washer No. 1
(B) Adjusting washer No. 2
Starting torque Dimension H Washer No. 2
Low Small Select thicker one.
High Large Select thinner one.
Adjusting washer No. 2
Part No. Thickness mm (in)
803025059 3.850 (0.1516)
803025054 4.000 (0.1575)
803025058 4.150 (0.1634)
6) Recheck that starting torque is within specified
range, then clinch lock nut at four positions.
4. Main Shaft Assembly
A: DISASSEMBLY
1. 2200 cc MODEL
1) Put vinyl tape around main shaft splines to pro-
tect oil seal from damage. Then pull out oil seal
and needle bearing by hand.
2) Remove lock nut from transmission main shaft
assembly.
NOTE:
Remove caulking before taking off lock nut.
ST1 498937000 TRANSMISSION HOLDER
ST2 499987003 SOCKET WRENCH (35)
B3M0087A
3) Remove insert stopper plate, sleeve and hub
assembly No. 2, baulk ring, 5th drive gear, and
needle bearing.
B3M1364A
(A) Insert stopper plate
(B) Sleeve and hub assembly No. 2
(C) Baulk ring
(D) 5th drive gear
(E) Needle bearing (32´36´25.7)
35
[W4A1]3-1SERVICE PROCEDURE
4. Main Shaft Assembly
Page 506 of 1456

5) If specified starting torque range cannot be
obtained when a No. 1 adjusting washer is used,
then select a suitable No. 2 adjusting washer from
those listed in the following table. Repeat steps 1)
through 4) to adjust starting torque.
B3M0536I
(A) Adjusting washer No. 1
(B) Adjusting washer No. 2
Starting torque Dimension H Washer No. 2
Low Small Select thicker one.
High Large Select thinner one.
Adjusting washer No. 2
Part No. Thickness mm (in)
803025059 3.850 (0.1516)
803025054 4.000 (0.1575)
803025058 4.150 (0.1634)
6) Recheck that starting torque is within specified
range, then clinch lock nut at four positions.
4. Main Shaft Assembly
A: DISASSEMBLY
1. 2200 cc MODEL
1) Put vinyl tape around main shaft splines to pro-
tect oil seal from damage. Then pull out oil seal
and needle bearing by hand.
2) Remove lock nut from transmission main shaft
assembly.
NOTE:
Remove caulking before taking off lock nut.
ST1 498937000 TRANSMISSION HOLDER
ST2 499987003 SOCKET WRENCH (35)
B3M0087A
3) Remove insert stopper plate, sleeve and hub
assembly No. 2, baulk ring, 5th drive gear, and
needle bearing.
B3M1364A
(A) Insert stopper plate
(B) Sleeve and hub assembly No. 2
(C) Baulk ring
(D) 5th drive gear
(E) Needle bearing (32´36´25.7)
35
[W4A1]3-1SERVICE PROCEDURE
4. Main Shaft Assembly
Page 524 of 1456
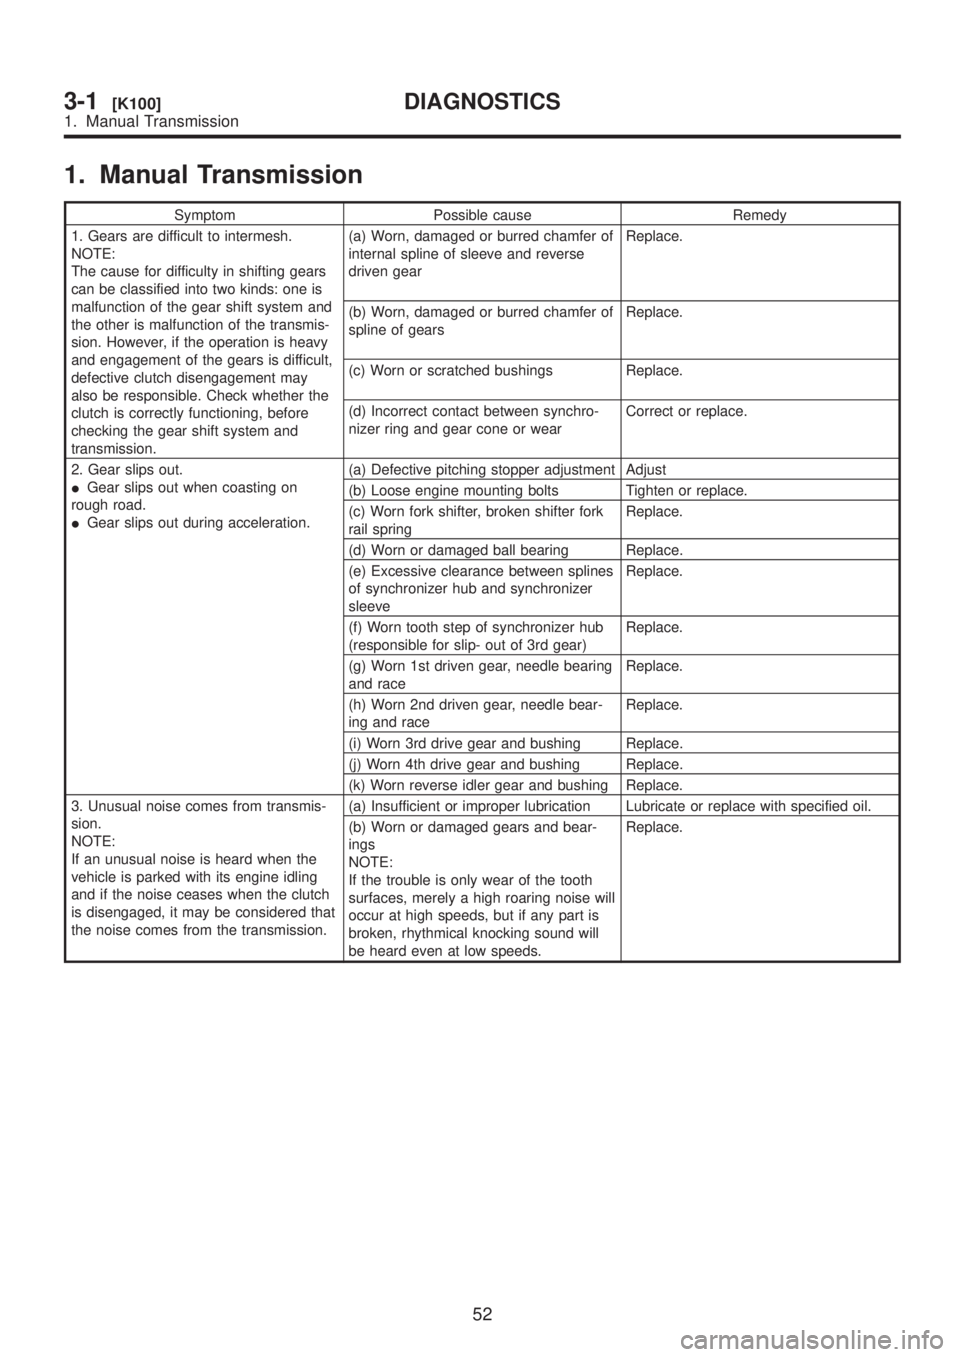
1. Manual Transmission
Symptom Possible cause Remedy
1. Gears are difficult to intermesh.
NOTE:
The cause for difficulty in shifting gears
can be classified into two kinds: one is
malfunction of the gear shift system and
the other is malfunction of the transmis-
sion. However, if the operation is heavy
and engagement of the gears is difficult,
defective clutch disengagement may
also be responsible. Check whether the
clutch is correctly functioning, before
checking the gear shift system and
transmission.(a) Worn, damaged or burred chamfer of
internal spline of sleeve and reverse
driven gearReplace.
(b) Worn, damaged or burred chamfer of
spline of gearsReplace.
(c) Worn or scratched bushings Replace.
(d) Incorrect contact between synchro-
nizer ring and gear cone or wearCorrect or replace.
2. Gear slips out.
IGear slips out when coasting on
rough road.
IGear slips out during acceleration.(a) Defective pitching stopper adjustment Adjust
(b) Loose engine mounting bolts Tighten or replace.
(c) Worn fork shifter, broken shifter fork
rail springReplace.
(d) Worn or damaged ball bearing Replace.
(e) Excessive clearance between splines
of synchronizer hub and synchronizer
sleeveReplace.
(f) Worn tooth step of synchronizer hub
(responsible for slip- out of 3rd gear)Replace.
(g) Worn 1st driven gear, needle bearing
and raceReplace.
(h) Worn 2nd driven gear, needle bear-
ing and raceReplace.
(i) Worn 3rd drive gear and bushing Replace.
(j) Worn 4th drive gear and bushing Replace.
(k) Worn reverse idler gear and bushing Replace.
3. Unusual noise comes from transmis-
sion.
NOTE:
If an unusual noise is heard when the
vehicle is parked with its engine idling
and if the noise ceases when the clutch
is disengaged, it may be considered that
the noise comes from the transmission.(a) Insufficient or improper lubrication Lubricate or replace with specified oil.
(b) Worn or damaged gears and bear-
ings
NOTE:
If the trouble is only wear of the tooth
surfaces, merely a high roaring noise will
occur at high speeds, but if any part is
broken, rhythmical knocking sound will
be heard even at low speeds.Replace.
52
3-1[K100]DIAGNOSTICS
1. Manual Transmission