Page 139 of 376

yellowblue
2-79 Low Oil Level Light
The engine is equipped with
an oil level monitoring
system. When the ignition
key is turned to ON, the
LOW OIL LEVEL light
will briefly flash.
If the light does not flash, have it fixed so it will be
ready to warn you if there's a problem.
If the light stays on, stop the vehicle on a level surface
and turn the engine off. Check the oil level using the
engine oil dipstick. (See ªEngine Oilº in the Index.)
The oil level monitoring system only checks oil level
during the brief period when the ignition key is between
RUN and START. It does not monitor engine oil level
when the engine is running. Additionally, an oil level
check is only performed if the engine has been turned
off for a considerable period of time, allowing the oil
normally in circulation to drain back into the oil pan.
Engine Coolant Temperature Light
This light tells you that the
engine coolant has
overheated or the radiator
cooling fan is not working.
If you have been operating the vehicle under normal
driving conditions, you should pull off the road, stop the
vehicle and turn off the engine as soon as possible.
In ªProblems on the Road,º this manual shows what to
do. See ªEngine Overheatingº in the Index.
Page 235 of 376
yellowblue
5-13
CAUTION:
An electric engine cooling fan under the hood can
start up even when the engine is not running and
can injure you. Keep hands, clothing and tools
away from any underhood electric fan.
If the coolant inside the coolant recovery tank is boiling,
don't do anything else until it cools down.
The coolant level should be at or above the COLD mark
on the coolant recovery tank. If it isn't, you may have a
leak in the radiator hoses, heater hoses, radiator, water
pump or somewhere else in the cooling system.
CAUTION:
Heater and radiator hoses, and other engine
parts, can be very hot. Don't touch them. If you
do, you can be burned.
Don't run the engine if there is a leak. If you run
the engine, it could lose all coolant. That could
cause an engine fire, and you could be burned.
Get any leak fixed before you drive the vehicle.
Page 236 of 376

yellowblue
5-14
NOTICE:
Engine damage from running your engine
without coolant isn't covered by your warranty.
See ªOverheated Engine Protection Operating
Modeº in the Index.
NOTICE:
When adding coolant, it is important that you use
only DEX
-COOL� (silicate-free) coolant.
If coolant other than DEX-COOL is added to the
system, premature engine, heater core or
radiator corrosion may result. In addition, the
engine coolant will require change sooner
-- at
30,000 miles (50 000 km) or 24 months,
whichever occurs first. Damage caused by the use
of coolant other than DEX
-COOL� is not
covered by your new vehicle warranty.
If there seems to be no leak, with the engine on, check to
see if the electric engine cooling fans are running. If the
engine is overheating, both fans should be running. If
they aren't, your vehicle needs service.
How to Add Coolant to the Coolant
Recovery Tank
If you haven't found a problem yet, but the coolant level
isn't at the COLD mark, add a 50/50 mixture of clean,
drinkable water and DEX
-COOL� engine coolant at the
coolant recovery tank. (See ªEngine Coolantº in the
Index for more information.)
CAUTION:
Adding only plain water to your cooling system
can be dangerous. Plain water, or some other
liquid like alcohol, can boil before the proper
coolant mixture will. Your vehicle's coolant
warning system is set for the proper coolant
mixture. With plain water or the wrong mixture,
your engine could get too hot but you wouldn't
get the overheat warning. Your engine could
catch fire and you or others could be burned. Use
a 50/50 mixture of clean, drinkable water and
DEX
-COOL� coolant.
Page 242 of 376
yellowblue
5-20
7. If you have the 3800 V6 engine, replace the
3800 Series II V6 engine cover shield.
A. Remove the oil fill tube, with cap attached, from
the valve cover.
B. Insert the catch tab on the cover shield under the
bracket on the engine.
C. Place the hole in the cover shield over the hole in
the valve cover. Install oil fill tube and cap by
twisting clockwise.
D. If you have the supercharged engine, install the
nut in the center of the cover shield.8. Then fill the coolant recovery tank to the FULL mark.
9. Put the cap back on the coolant recovery tank, but
leave the radiator pressure cap off.
10. Start the engine and let it run until you can feel the
upper radiator hose getting hot. Watch out for the
engine cooling fans.
11. By this time, the coolant level inside the radiator
filler neck may be lower. If the level is lower, add
more of the proper DEX
-COOL� coolant mixture
through the filler neck until the level reaches the
base of the filler neck.
Page 243 of 376

yellowblue
5-21
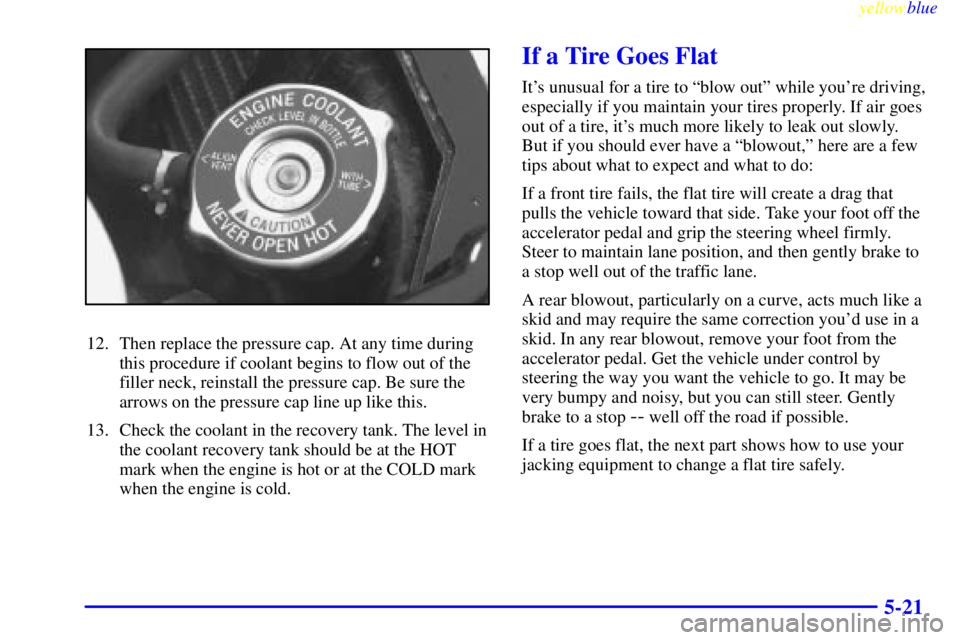
12. Then replace the pressure cap. At any time during
this procedure if coolant begins to flow out of the
filler neck, reinstall the pressure cap. Be sure the
arrows on the pressure cap line up like this.
13. Check the coolant in the recovery tank. The level in
the coolant recovery tank should be at the HOT
mark when the engine is hot or at the COLD mark
when the engine is cold.
If a Tire Goes Flat
It's unusual for a tire to ªblow outº while you're driving,
especially if you maintain your tires properly. If air goes
out of a tire, it's much more likely to leak out slowly.
But if you should ever have a ªblowout,º here are a few
tips about what to expect and what to do:
If a front tire fails, the flat tire will create a drag that
pulls the vehicle toward that side. Take your foot off the
accelerator pedal and grip the steering wheel firmly.
Steer to maintain lane position, and then gently brake to
a stop well out of the traffic lane.
A rear blowout, particularly on a curve, acts much like a
skid and may require the same correction you'd use in a
skid. In any rear blowout, remove your foot from the
accelerator pedal. Get the vehicle under control by
steering the way you want the vehicle to go. It may be
very bumpy and noisy, but you can still steer. Gently
brake to a stop
-- well off the road if possible.
If a tire goes flat, the next part shows how to use your
jacking equipment to change a flat tire safely.
Page 257 of 376

6-
yellowblue
6-1
Section 6 Service and Appearance Care
Here you will find information about the care of your vehicle. This section begins with service and fuel information,
and then it shows how to check important fluid and lubricant levels. There is also technical information about your
vehicle, and a part devoted to its appearance care.
6
-2 Service
6
-3 Fuel
6
-5 Fuels in Foreign Countries
6
-6 Filling Your Tank
6
-8 Filling a Portable Fuel Container
6
-8 Checking Things Under the Hood
6
-13 Engine Oil
6
-20 Engine Air Cleaner/Filter
6
-21 Supercharger Oil
6
-22 Automatic Transaxle Fluid
6
-26 Engine Coolant
6
-29 Power Steering Fluid
6
-31 Windshield Washer Fluid
6
-32 Brakes
6-35 Battery
6
-36 Bulb Replacement
6
-42 Windshield Wiper Blade Replacement
6
-43 Tires6
-51 Appearance Care
6
-51 Cleaning the Inside of Your Vehicle
6
-54 Care of Safety Belts
6
-55 Cleaning the Outside of Your Vehicle
6
-56 Cleaning Aluminum Wheels (If Equipped)
6
-56 Cleaning Tires
6
-57 Sheet Metal Damage
6
-57 Finish Damage
6
-57 Underbody Maintenance
6
-57 Chemical Paint Spotting
6
-58 GM Vehicle Care/Appearance Materials
6
-59 Vehicle Identification Number (VIN)
6
-59 Service Parts Identification Label
6
-60 Electrical System
6
-66 Replacement Bulbs
6
-66 Capacities and Specifications
6
-68 Air Conditioning Refrigerants
6
-68 Normal Maintenance Replacement Parts
Page 281 of 376

yellowblue
6-25
If the fluid level is low, add only enough of the proper
fluid to bring the level into the cross
-hatched area on
the dipstick.
1. Pull out the dipstick.
2. Using a long
-neck funnel, add enough fluid at the
dipstick hole to bring it to the proper level.
It doesn't take much fluid, generally less than one
pint (0.5 L). Don't overfill.
NOTICE:
We recommend you use only fluid labeled
DEXRON�-III, because fluid with that label is
made especially for your automatic transaxle.
Damage caused by fluid other than
DEXRON
�-III is not covered by your new
vehicle warranty.
3. After adding fluid, recheck the fluid level as
described under ªHow to Check.º
4. When the correct fluid level is obtained, push the
dipstick back in all the way.
Radiator Pressure Cap
NOTICE:
Your radiator cap is a 15 psi (105 kPa)
pressure
-type cap and must be tightly installed to
prevent coolant loss and possible engine damage
from overheating. Be sure the arrows on the cap
line up with the overflow tube on the radiator
filler neck.
When you replace your radiator pressure cap, an
ACDelco� cap is recommended.
Thermostat
Engine coolant temperature is controlled by a thermostat
in the engine coolant system. The thermostat stops the
flow of coolant through the radiator until the coolant
reaches a preset temperature.
When you replace your thermostat, an ACDelco
�
thermostat is recommended.
Page 284 of 376
yellowblue
6-28 Checking Coolant
The vehicle must be on a level surface. When your
engine is cold, the coolant level should be at the COLD
mark or a little higher. When your engine is warm, the
level should be up to the HOT mark or a little higher.
If this LOW COOLANT
light comes on and stays on,
it means you're low on
engine coolant.
Adding Coolant
If you need more coolant, add the proper DEX
-COOL�
coolant mixture at the coolant recovery tank, but be
careful not to spill it.
If the coolant recovery tank is completely empty, add
coolant to the radiator. (See ªEngine Overheatingº in
the Index.)