Page 94 of 328

yellowblue
2-34
As you signal a turn or a lane change, if the arrows flash
rapidly, a signal bulb may be burned out and other
drivers won't see your turn signal.
If a bulb is burned out, replace it to help avoid an
accident. If the arrows don't go on at all when you
signal a turn, check for burned
-out bulbs and then check
the fuse (see ªFuses and Circuit Breakersº in the Index).
Headlamp High/Low Beam Changer
To change the headlamps
from low beam to high
beam, pull on the turn
signal/multifunction lever
all of the way toward you.
Then release it.
When the high beams are on, a light on the instrument
panel also will be on.
Flash-to-Pass
This feature lets you use your high-beam headlamps to
signal a driver in front of you that you want to pass.To use it, pull the turn signal/multifunction lever toward
you until the high
-beam headlamps come on, then
release the lever to turn them off.
Windshield Wipers
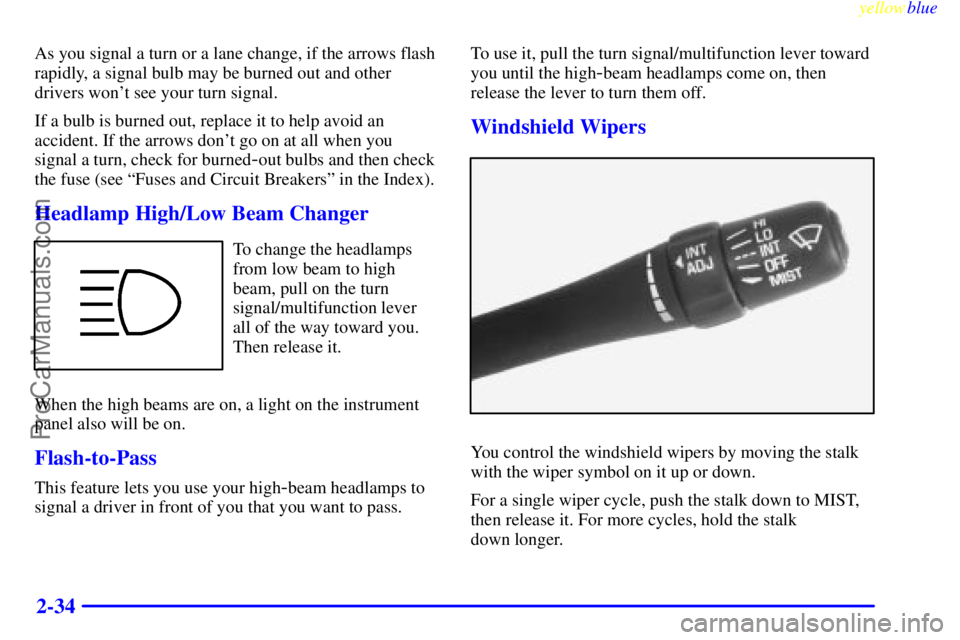
You control the windshield wipers by moving the stalk
with the wiper symbol on it up or down.
For a single wiper cycle, push the stalk down to MIST,
then release it. For more cycles, hold the stalk
down longer.
ProCarManuals.com
Page 124 of 328

yellowblue
2-64
Have you recently changed brands of fuel?
If so, be sure to fuel your vehicle with quality fuel (see
ªFuelº in the Index). Poor fuel quality will cause your
engine not to run as efficiently as designed. You may
notice this as stalling after start
-up, stalling when you
put the vehicle into gear, misfiring, hesitation on
acceleration or stumbling on acceleration. (These
conditions may go away once the engine is warmed up.)
This will be detected by the system and cause the light
to turn on.
If you experience one or more of these conditions,
change the fuel brand you use. It will require at least one
full tank of the proper fuel to turn the light off.
If none of the above steps have made the light turn off,
have your dealer or qualified service center check the
vehicle. Your dealer has the proper test equipment and
diagnostic tools to fix any mechanical or electrical
problems that may have developed.
Oil Pressure Light
If you have a low engine oil
pressure problem, this light
will stay on after you start
your engine, or come on
and you will hear a chime
when you are driving.
This indicates that your engine is not receiving enough
oil. The engine could be low on oil, or could have some
other oil problem. Have it fixed immediately.
When the ignition is on but the engine is not running,
the light will come on as a test to show you it is
working, but the light will go out when the engine is
running. If it doesn't come on with the ignition on, you
may have a problem with the fuse or bulb. Have it fixed
right away.
ProCarManuals.com
Page 126 of 328
yellowblue
2-66 Change Oil Light
The CHANGE OIL light
should come on briefly as a
bulb check when you start
the engine. If the light
doesn't come on, have
it serviced.
If the CHANGE OIL light comes on and stays on after
you start the engine, have the oil changed.
For additional information, see ªEngine Oil, When to
Changeº in the Index. To reset the Oil Life Monitor, see
ªEngine Oil Life Monitorº in the Index.
Security Light
This light will come on
when you turn the key to
ON and will stay on until
the vehicle starts.
If you're driving and the security light comes on and
remains on, your Passlock
� system is not working
properly. Your vehicle is not protected by Passlock and
you should see your dealer.
ProCarManuals.com
Page 192 of 328

yellowblue
4-40 Turn Signals When Towing a Trailer
When you tow a trailer, your vehicle may need a
different turn signal flasher and/or extra wiring. Check
with your dealer. The arrows on your instrument panel
will flash whenever you signal a turn or lane change.
Properly hooked up, the trailer lamps will also flash,
telling other drivers you're about to turn, change lanes
or stop.
When towing a trailer, the arrows on your instrument
panel will flash for turns even if the bulbs on the trailer
are burned out. Thus, you may think drivers behind you
are seeing your signal when they are not. It's important
to check occasionally to be sure the trailer bulbs are
still working.
Driving On Grades
Reduce speed and shift to a lower gear before you start
down a long or steep downgrade. If you don't shift
down, you might have to use your brakes so much that
they would get hot and no longer work well.
On a long uphill grade, shift down and reduce your
speed to around 45 mph (70 km/h) to reduce the
possibility of engine and transaxle overheating.
Parking on Hills
CAUTION:
You really should not park your vehicle, with a
trailer attached, on a hill. If something goes
wrong, your rig could start to move. People can
be injured, and both your vehicle and the trailer
can be damaged.
But if you ever have to park your rig on a hill, here's
how to do it:
1. Apply your regular brakes, but don't shift into
PARK (P) yet.
2. Have someone place chocks under the trailer wheels.
3. When the chocks are in place, release the regular
brakes until the chocks absorb the load.
4. Reapply the regular brakes. Then apply your parking
brake and shift into PARK (P).
5. Release the regular brakes.
ProCarManuals.com
Page 225 of 328

6-
yellowblue
6-1
Section 6 Service and Appearance Care
Here you will find information about the care of your vehicle. This section begins with service and fuel information,
and then it shows how to check important fluid and lubricant levels. There is also technical information about your
vehicle, and a part devoted to its appearance care.
6
-2 Service
6
-3 Fuel
6
-5 Fuels in Foreign Countries
6
-5 Filling Your Tank
6
-7 Filling a Portable Fuel Container
6
-7 Checking Things Under the Hood
6
-11 Engine Oil
6
-16 Engine Air Cleaner/Filter
6
-17 Automatic Transaxle Fluid
6
-18 Thermostat
6
-18 Engine Coolant
6
-22 Power Steering Fluid
6
-23 Windshield Washer Fluid
6
-24 Brakes
6
-27 Battery6
-28 Bulb Replacement
6
-34 Windshield Wiper Blade Replacement
6
-34 Tires
6
-44 Appearance Care
6
-44 Cleaning the Inside of Your Vehicle
6
-46 Care of Safety Belts
6
-48 Cleaning the Outside of Your Vehicle
6
-50 Finish Damage
6
-51 GM Vehicle Care/Appearance Materials
6
-52 Vehicle Identification Number (VIN)
6
-53 Electrical System
6
-58 Replacement Bulbs
6
-59 Capacities and Specifications
6
-59 Air Conditioning Refrigerants
6
-60 Normal Maintenance Replacement Parts
ProCarManuals.com
Page 252 of 328
yellowblue
6-28
Bulb Replacement
Halogen Bulbs
CAUTION:
Halogen bulbs have pressurized gas inside and
can burst if you drop or scratch the bulb. You or
others could be injured. Be sure to read and
follow the instructions on the bulb package.
Headlamps
For the type of bulb, see ªReplacement Bulbsº in
the Index.
ProCarManuals.com
Page 254 of 328

yellowblue
6-30
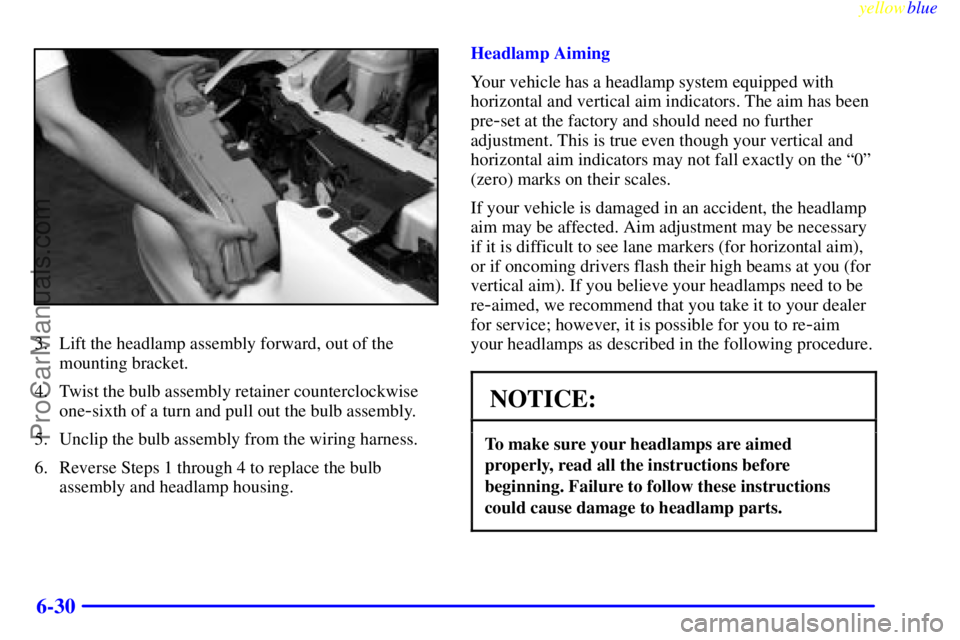
3. Lift the headlamp assembly forward, out of the
mounting bracket.
4. Twist the bulb assembly retainer counterclockwise
one
-sixth of a turn and pull out the bulb assembly.
5. Unclip the bulb assembly from the wiring harness.
6. Reverse Steps 1 through 4 to replace the bulb
assembly and headlamp housing.Headlamp Aiming
Your vehicle has a headlamp system equipped with
horizontal and vertical aim indicators. The aim has been
pre
-set at the factory and should need no further
adjustment. This is true even though your vertical and
horizontal aim indicators may not fall exactly on the ª0º
(zero) marks on their scales.
If your vehicle is damaged in an accident, the headlamp
aim may be affected. Aim adjustment may be necessary
if it is difficult to see lane markers (for horizontal aim),
or if oncoming drivers flash their high beams at you (for
vertical aim). If you believe your headlamps need to be
re
-aimed, we recommend that you take it to your dealer
for service; however, it is possible for you to re
-aim
your headlamps as described in the following procedure.
NOTICE:
To make sure your headlamps are aimed
properly, read all the instructions before
beginning. Failure to follow these instructions
could cause damage to headlamp parts.
ProCarManuals.com
Page 256 of 328
yellowblue
6-32
Horizontal Aiming Vertical Aiming
1. Turn the horizontal aiming screw until the indicator
is lined up with zero.
2. Turn the vertical aiming screw until the level bubble
is lined up with zero.
Front Turn Signal and Parking Lamp
Bulb Replacement
1. Remove the headlamp assembly. Refer to the
removal procedure earlier in this section.
2. Twist the bulb assembly retainer and pull out
the bulb.
3. Unclip the bulb assembly from the wiring harness.
4. Reverse Steps 1 through 2 to replace the bulb
assembly. Be sure to properly align the bulb with the
locating feature in the assembly.
Center High-Mounted Stop Lamp
1. Open the trunk lid and locate the center
high
-mounted stop lamp on the inside of the lid.
2. Use a Phillips screwdriver to remove the
three screws.
3. Gently remove and replace the bulbs.
4. Reverse this procedure to reassemble the lamp.
For the type of bulb, seeªReplacement Bulbsºin
the Index.
ProCarManuals.com