1999 NISSAN SENTRA engine
[x] Cancel search: enginePage 169 of 223

If you wax the surface of the hood, be
careful not to let wax get into the washer
nozzle. This may cause clogging or im-
proper windshield washer operation. If wax
gets into the nozzle, remove it with a needle
or small pin.From the released position, pull the parking
brake lever up slowly and firmly. If the
number of clicks is out of the range listed
above, see your NISSAN dealer.With the engine running, check the distance
between the upper surface of the pedal and
the metal floor. If it is out of the range shown
above, see an authorized NISSAN dealer.
Self-adjusting brakes
Your vehicle is equipped with self-adjusting
brakes.
The front (and rear, if equipped) disc-type
brakes self-adjust every time the brake
pedal is applied. The rear drum-type brakes
also self-adjust every time the brake pedal
is applied.
If the brake pedal goes down farther thanADI0613
ADI0629DI1020M
PARKING BRAKE CHECK BRAKE PEDAL
8-22Do-it-yourself
ZX
Page 170 of 223

normal, it may be due to a lack of adjust-
ment of the rear drum brakes. To adjust
apply the parking brake several times.
WARNING
See an authorized NISSAN dealer and
have it checked if the brake pedal
height does not return to normal.
Brake pad wear indicators
The disc brake pads on your vehicle have
audible wear indicators. When a brake pad
requires replacement, it makes a high
pitched scraping or screeching sound when
the vehicle is in motion whether or not the
brake pedal is depressed. Have the brakes
checked as soon as possible if the wear
indicator sound is heard.
Under some driving or climate conditions,
occasional brake squeak, squeal or other
noise may be heard. Occasional brake
noise during light to moderate stops is nor-
mal and does not affect the function or
performance of the brake system.
The rear drum brakes (if so equipped) do
not have audible wear indicators. Should
you ever hear an unusually loud noise fromthe rear drum brakes, have them inspected
as soon as possible by an authorized NIS-
SAN dealer.
Proper brake inspection intervals should
be followed.For more information regard-
ing brake inspections, see the appropriate
maintenance schedule information in the
``Maintenance'' section of this manual.Check the brake booster function as fol-
lows:
1. With the engine off, press and release
the brake pedal several times. When
brake pedal movement (distance of
travel) remains the same from one pedal
application to the next, continue on to the
next step.
2. While depressing the brake pedal, start
the engine. The pedal height should drop
a little.
3. With the brake pedal depressed, stop the
engine. Keeping the pedal depressed for
about 30 seconds, the pedal height
should not change.
4. Run the engine for one minute without
depressing the brake pedal, then turn it
off. Depress the brake pedal several
times. The pedal travel distance will de-
crease gradually with each depression
as the vacuum is released from the
booster.
If the brakes do not operate properly, see an
authorized NISSAN dealer.
BRAKE BOOSTER
Do-it-yourself8-23
ZX
Page 171 of 223

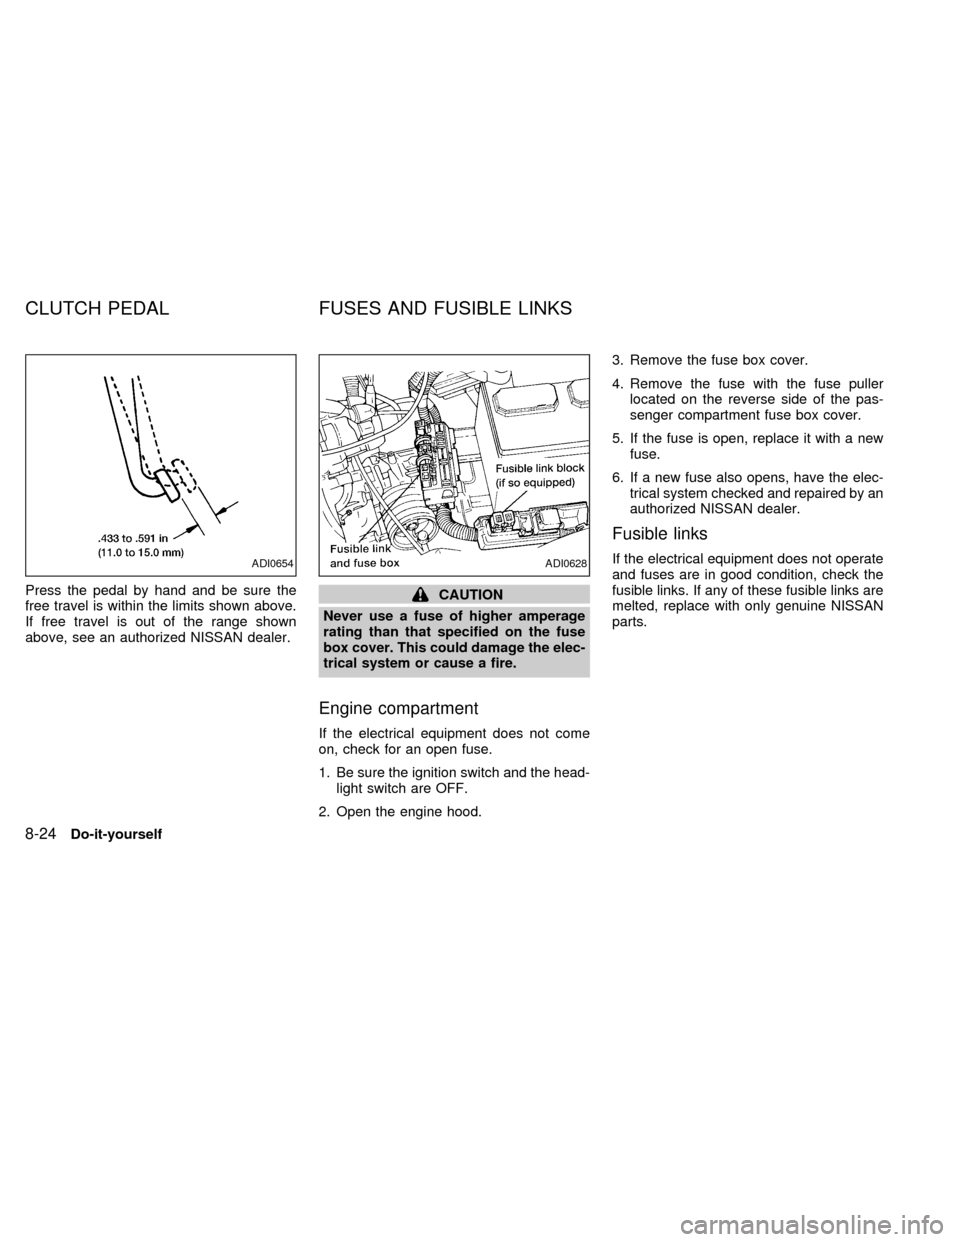
Press the pedal by hand and be sure the
free travel is within the limits shown above.
If free travel is out of the range shown
above, see an authorized NISSAN dealer.CAUTION
Never use a fuse of higher amperage
rating than that specified on the fuse
box cover. This could damage the elec-
trical system or cause a fire.
Engine compartment
If the electrical equipment does not come
on, check for an open fuse.
1. Be sure the ignition switch and the head-
light switch are OFF.
2. Open the engine hood.3. Remove the fuse box cover.
4. Remove the fuse with the fuse puller
located on the reverse side of the pas-
senger compartment fuse box cover.
5. If the fuse is open, replace it with a new
fuse.
6. If a new fuse also opens, have the elec-
trical system checked and repaired by an
authorized NISSAN dealer.
Fusible links
If the electrical equipment does not operate
and fuses are in good condition, check the
fusible links. If any of these fusible links are
melted, replace with only genuine NISSAN
parts.ADI0654ADI0628
CLUTCH PEDAL FUSES AND FUSIBLE LINKS
8-24Do-it-yourself
ZX
Page 173 of 223

HEADLIGHTS
The headlight is a semi-sealed beam type
which uses a replaceable headlight (halo-
gen) bulb. A bulb can be replaced from
inside the engine compartment without re-
moving the headlight assembly.
CAUTION
cHigh pressure halogen gas is sealed
inside the halogen bulb. The bulb
may break if the glass envelope is
scratched or the bulb is dropped.
cWhen handling the bulb, do not
touch the glass envelope.
Removing the headlight bulb
1. Open the engine hood.
2. Disconnect the negative (-) battery cable.
3.
If removing the right-hand (passenger
side) headlight bulb, it is necessary to first
reposition the engine coolant reservoir.
4. Disconnect the electrical connector from
the rear end of the bulb.
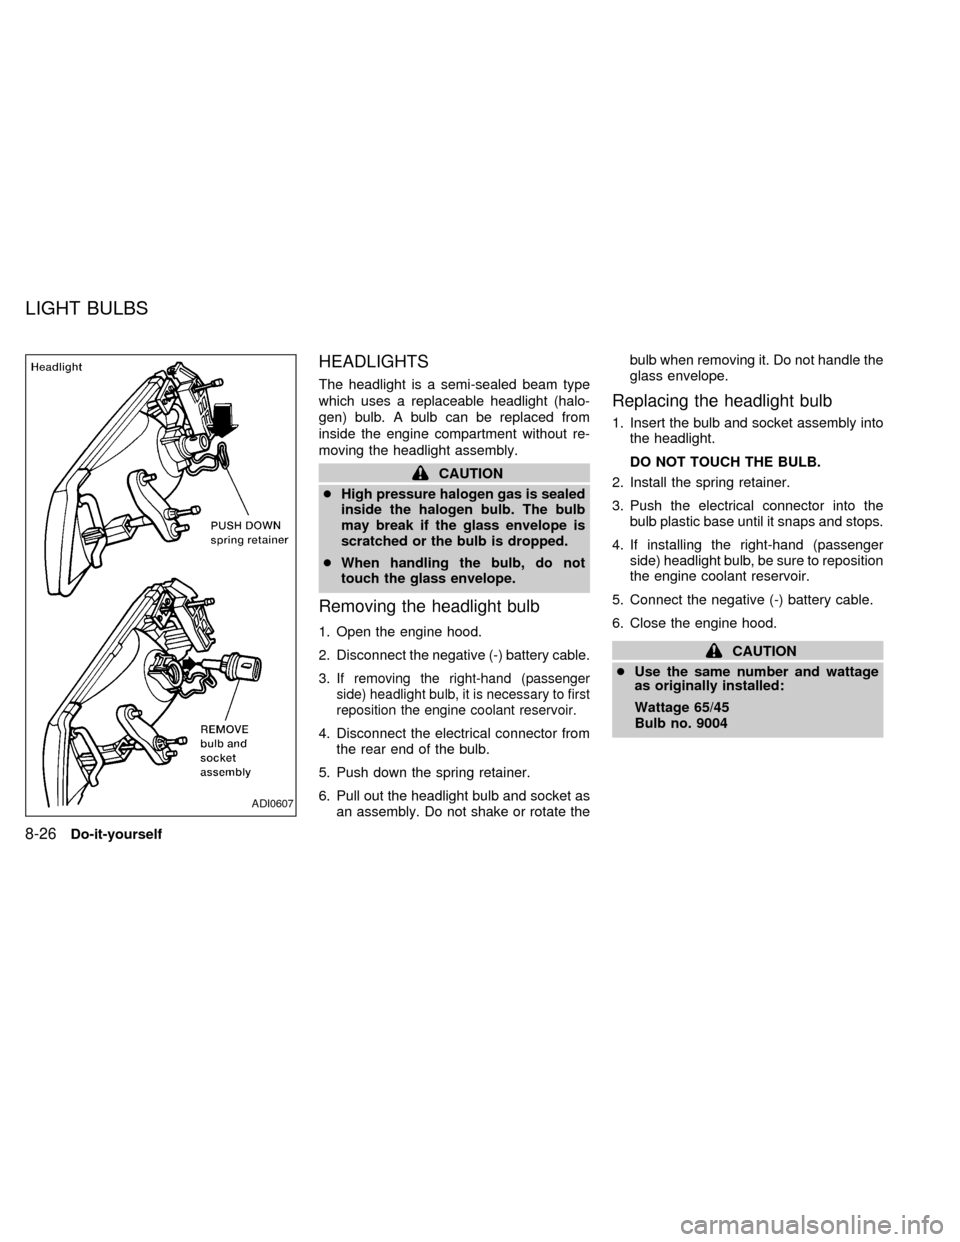
5. Push down the spring retainer.
6. Pull out the headlight bulb and socket as
an assembly. Do not shake or rotate thebulb when removing it. Do not handle the
glass envelope.
Replacing the headlight bulb
1. Insert the bulb and socket assembly into
the headlight.
DO NOT TOUCH THE BULB.
2. Install the spring retainer.
3. Push the electrical connector into the
bulb plastic base until it snaps and stops.
4. If installing the right-hand (passenger
side) headlight bulb, be sure to reposition
the engine coolant reservoir.
5. Connect the negative (-) battery cable.
6. Close the engine hood.
CAUTION
cUse the same number and wattage
as originally installed:
Wattage 65/45
Bulb no. 9004
ADI0607
LIGHT BULBS
8-26Do-it-yourself
ZX
Page 187 of 223

Your new NISSAN has been designed to
have minimum maintenance requirements
with longer service intervals to save you
both time and money. However, some day-
to-day and regular maintenance is essential
to maintain your NISSAN's good mechani-
cal condition, as well as its emission and
engine performance.
It is the owner's responsibility to make sure
the specified periodic maintenance, as well
as general maintenance, is performed.
As the vehicle owner, you are the only one
who can ensure that your vehicle receives
proper maintenance. You are a vital link in
the maintenance chain.
General maintenance
General maintenance includes those items
which should be checked during normal
day-to-day operation of the vehicle. They
are essential if your vehicle is to continue to
operate properly. It is your responsibility to
perform these maintenance procedures
regularly as prescribed.
These checks or inspections can be done
by yourself, a qualified technician or, if you
prefer, an authorized NISSAN dealer.
Periodic maintenance
The maintenance items listed under peri-
odic maintenance are required to be ser-
viced at regular intervals.
However, under severe driving conditions,
additional or more frequent maintenance is
required.
Where to go for service
If maintenance service is required or your
vehicle appears to malfunction, have the
systems checked and tuned by an autho-
rized NISSAN dealer.
NISSAN technicians are well-trained spe-
cialists who are kept up to date with the
latest service information through technical
bulletins, service tips, and in-dealership
training programs. They are completely
qualified to work on NISSAN vehiclesbe-
forethey work on your vehicle, rather than
after they have worked on it.
You can be confident that an authorized
NISSAN dealer's service department per-
forms the best job to meet the maintenance
requirements on your vehicle Ð in a reliable
and economical way.During the normal day-to-day operation of
the vehicle, general maintenance should be
performed regularly as prescribed in this
section. If you detect any unusual sounds,
vibrations or smells, be sure to check for the
cause or have an authorized NISSAN
dealer do it promptly. In addition, you should
notify an authorized NISSAN dealer if you
think repairs are required.When performing any checks or maintenance
work, closely observe the precautions in the
``Do-it-yourself'' section of this manual.
OUTSIDE THE VEHICLE
The maintenance items listed here should
be performed from time to time, unless
otherwise specified.
Additional information on the following
items with an ``*'' is found in the ``Do-it-
yourself'' section of this manual.
Tires* ÐCheck the pressure with a gauge
periodically when at a service station, in-
cluding the spare, and adjust to the speci-
fied pressure if necessary. Check carefully
for damage, cuts or excessive wear.
Wheel nuts* ÐWhen checking the tires,
make sure no wheel nuts are missing, and
GENERAL MAINTENANCE
9-2Maintenance
ZX
Page 189 of 223

Parking brake* ÐCheck that the lever has
the proper travel and confirm that your
vehicle is held securely on a fairly steep hill
with only the parking brake applied.
Automatic transmission ``Park'' mecha-
nism ÐOn a fairly steep hill check that your
vehicle is held securely with the selector
lever in the P (Park) position without apply-
ing any brakes.
UNDER THE HOOD AND VEHICLE
The maintenance items listed here should
be checked periodically, such as each time
you check the engine oil or refuel.
Additional information on the following
items with an ``*'' is found in the ``Do-it-
yourself'' section of this manual.
Windshield washer fluid* ÐCheck for
adequate fluid in the tank.
Engine coolant level* ÐCheck the cool-
ant level when the engine is cold.
Radiator and hoses ÐCheck the front of
the radiator and clean off any dirt, insects,
leaves, etc., that may have accumulated.
Make sure the hoses have no cracks, de-
formation, rot or loose connections.Brake fluid level* ÐMake sure the brake
fluid level is between the MIN and MAX
lines on the reservoir.
Battery* ÐCheck the fluid level in each
cell.
Engine drive belts* ÐMake sure the drive
belts are not frayed, worn, cracked or oily.
Engine oil level* ÐCheck the level after
parking the vehicle on a level surface, with
the engine off. Wait a few minutes for the oil
to drain back into the oil pan.
Power steering fluid level* and lines Ð
Check the level when the fluid is cold, with
the engine off. Check the lines for proper
attachment, leaks, cracks, etc.
Automatic transmission fluid level* Ð
Check the level after putting the selector
lever in P (Park) with the engine idling at
operating temperature.Exhaust system ÐMake sure there are no
cracks, holes, loose joints or supports. If the
sound of the exhaust seems unusual or
there is a smell of exhaust fumes, immedi-
ately have the exhaust system inspected by
an authorized NISSAN dealer. (See the
carbon monoxide warning in the ``Starting
and driving'' section of this manual.)
Underbody ÐThe underbody is frequently
exposed to corrosive substances such as
those used on icy roads or to control dust. It
is very important to remove these sub-
stances, from the underbody, otherwise rust
may form on the floor pan, frame, fuel lines
and exhaust system. At the end of winter,
the underbody should be thoroughly flushed
with plain water, especially those areas
where mud and dirt may have accumulate.
See the ``Appearance and care'' section of
this manual.
Fluid leaks ÐCheck under the vehicle for
fuel, oil, water or other fluid leaks after the
vehicle has been parked for awhile. Water
dripping from the air conditioner after use is
normal. If you should notice any leaks or if
gasoline fumes are evident, check for the
cause and have it corrected immediately by
an authorized NISSAN dealer.
9-4Maintenance
ZX
Page 191 of 223
![NISSAN SENTRA 1999 B14 / 4.G Owners Manual Schedule One
Abbreviations: R = Replace I = Inspect. Correct or replace if necessary. [ ]: At the mileage intervals only
MAINTENANCE OPERATIONMAINTENANCE INTERVAL
Perform at number of miles,
kilometer NISSAN SENTRA 1999 B14 / 4.G Owners Manual Schedule One
Abbreviations: R = Replace I = Inspect. Correct or replace if necessary. [ ]: At the mileage intervals only
MAINTENANCE OPERATIONMAINTENANCE INTERVAL
Perform at number of miles,
kilometer](/manual-img/5/636/w960_636-190.png)
Schedule One
Abbreviations: R = Replace I = Inspect. Correct or replace if necessary. [ ]: At the mileage intervals only
MAINTENANCE OPERATIONMAINTENANCE INTERVAL
Perform at number of miles,
kilometers or months,
whichever comes first.Miles ý 1,000 3.75 7.5 11.25 15 18.75 22.5 26.25 30 33.75 37.5 41.25 45 48.75 52.5 56.25 60
(km ý 1,000) (6) (12) (18) (24) (30) (36) (42) (48) (54) (60) (66) (72) (78) (84) (90) (96)
Months 3 6 9 12 15 18 21 24 27 30 33 36 39 42 45 48
Emission control system maintenance
Drive belts See NOTE (1)I*
Air cleaner filter See NOTE (2) [R] [R]
Idle rpm (GA16DE engine)I* I*
EVAP vapor linesI* I*
Fuel linesI* I*
Fuel filter See NOTE (3)*
Engine coolant See NOTE (4)R*
Engine oilRRRRRRRRRRRRRRRR
Engine oil filter (Use Nissan PREMIUM type or equivalent)RRRRRRRRRRRRRRRR
Spark plugs (GA16DE engine)[R] [R]
(SR20DE engine) (PLATINUM-TIPPED type) See NOTE (5)[R]
Intake & exhaust valve clearance (GA16DE engine) See NOTE (6)*
NOTE: (1) After 60,000 miles (96,000 km) or 48 months, inspect every 15,000 miles (24,000 km) or 12 months.
(2) If operating mainly in dusty conditions, more frequent maintenance may be required.
(3) If vehicle is operated under extremely adverse weather conditions or in areas where ambient temperatures are either extremely low or extremely
high, the filters might become clogged. In such an event, replace them immediately.
(4) After 60,000 miles (96,000 km) or 48 months, replace every 30,000 miles (48,000 km) or 24 months.
(5) Original equipment platinum-tipped plugs should be replaced at 60,000 miles (96,000 km). Conventional spark plugs can be used but should be
replaced at 30,000 miles (48,000 km) intervals. (See ``Technical and consumer Information'' section for details.)
(6) If valve noise increases, inspect valve clearance.
* Maintenance items and intervals with an ``*'' are recommended by NISSAN for reliable vehicle operation. The owner need not perform such
maintenance in order to maintain the emission warranty or manufacturer recall liability. Other maintenance items and intervals are required.
9-6Maintenance
ZX
Page 193 of 223
![NISSAN SENTRA 1999 B14 / 4.G Owners Manual Schedule Two
Abbreviations: R = Replace I = Inspect. Correct or replace if necessary. [ ]: At the mileage intervals only
MAINTENANCE OPERATIONMAINTENANCE INTERVAL
Perform at number of miles,
kilometer NISSAN SENTRA 1999 B14 / 4.G Owners Manual Schedule Two
Abbreviations: R = Replace I = Inspect. Correct or replace if necessary. [ ]: At the mileage intervals only
MAINTENANCE OPERATIONMAINTENANCE INTERVAL
Perform at number of miles,
kilometer](/manual-img/5/636/w960_636-192.png)
Schedule Two
Abbreviations: R = Replace I = Inspect. Correct or replace if necessary. [ ]: At the mileage intervals only
MAINTENANCE OPERATIONMAINTENANCE INTERVAL
Perform at number of miles,
kilometers or months, whichever comes first.Miles ý 1,000 7.5 15 22.5 30 37.5 45 52.5 60
(km ý 1,000) (12) (24) (36) (48) (60) (72) (84) (96)
Months 6 12 18 24 30 36 42 48
Emission control system maintenance
Drive belts See NOTE (1)I*
Air cleaner filter[R] [R]
Idle rpm (GA16DE engine)I* I*
EVAP vapor linesI* I*
Fuel linesI* I*
Fuel filter See NOTE (2)*
Engine coolant See NOTE (3)*R*
Engine oilRRRRRRRR
Engine oil filter (Use Nissan PREMIUM type or equivalent)RRRRRRRR
Spark plugs (GA16DE engine)[R] [R]
(SR20DE engine) (PLATINUM-TIPPED type) See NOTE (4)*[R]
Intake & exhaust valve clearance (GA16DE engine) See NOTE (5)
NOTE: (1) After 60,000 miles (96,000 km) or 48 months, inspect every 15,000 miles (24,000 km) or 12 months.
(2) If vehicle is operated under extremely adverse weather conditions or in areas where outside temperatures are either extremely low or extremely high, the
filters might become clogged. In such an event, replace them immediately.
(3) After 60,000 miles (96,000 km) or 48 months, replace every 30,000 miles (48,000 km) or 24 months.
(4) Original equipment platinum-tipped plugs should be replaced at 60,000 miles (96,000 km). Conventional spark plugs can be used but should be replaced
at 30,000 miles (48,000 km) intervals. (See ``Technical and consumer information'' section for details.)
(5) If valve noise increases, inspect valve clearance.
* Maintenance items and intervals with an ``*'' are recommended by NISSAN for reliable vehicle operation. The owner need not perform such maintenance
in order to maintain the emission warranty or manufacturer recall liability. Other maintenance items and intervals are required.
9-8Maintenance
ZX