1999 NISSAN SENTRA battery
[x] Cancel search: batteryPage 124 of 223
WARNING
c
The anti-lock brake system is a so-
phisticated device, but it cannot pre-
vent accidents resulting from care-
less or dangerous driving tech-
niques. It can help maintain vehicle
control during braking on slippery
surfaces, but the stopping distance
on slippery surfaces will be longer
than on normal surfaces, even with
the anti-lock system. Stopping dis-
tances may also be longer on rough,
gravel or snow covered roads, or if
you are using tire chains. Always
maintain a safe distance from the ve-
hicle in front of you. Ultimately, the
responsibility for safety of self and
others rests in the hands of the driver.
cTire type and condition may also
affect braking effectiveness.
cWhen replacing tires, install the
specified size of tires on all four
wheels.c
When installing a spare tire, make
sure it is the proper size and type as
specified on the tire placard. For tire
placard location information, refer to
``Tire placard'' in the Owner's Manual
index.
cRefer to ``Wheels and tires'' in the
``Do-it-yourself'' section of this
manual.
Freeing a frozen door lock
To prevent a door lock from freezing, apply
de-icer or glycerin through the key hole. If
the lock becomes frozen, heat the key be-
fore inserting it in the key hole.
Anti-freeze
In the winter when it is anticipated that the
temperature will drop below 32ÉF (0ÉC),
check the anti-freeze (ethylene glycol base)
to assure proper winter protection. For de-
tails, see ``Engine cooling system'' in the
``Do-it-yourself'' section of this manual.
Battery
If the battery is not fully charged during
extremely cold weather conditions, the bat-
tery fluid may freeze and damage the bat-
tery. To maintain maximum efficiency, the
battery should be checked regularly. For
details, see ``Battery'' in the ``Do-it-yourself''
section of this manual.
Draining of coolant
If the vehicle is to be left outside without
anti-freeze, drain the cooling system by
opening the drain valves located under the
radiator and on the engine block. Refill
COLD WEATHER DRIVING
Starting and driving5-19
ZX
Page 135 of 223
To start your engine with a booster battery,
the instructions and precautions below must
be followed.
WARNING
cIf done incorrectly, jump starting can
lead to a battery explosion, resulting
in severe injury or death. It could
also damage your vehicle.
cExplosive hydrogen gas is always
present in the vicinity of the battery.
Keep all sparks and flames away
from the battery.
cDo not allow battery fluid to come
into contact with eyes, skin, cloth or
painted surfaces. Battery fluid is a
corrosive sulfuric acid solution
which can cause severe burns. If the
fluid should come into contact with
anything, immediately flush the con-
tacted area with water.
cKeep battery out of the reach of
children.
cThe booster battery must be rated at
12 volts. Use of an improperly rated
battery can damage your vehicle.cWhenever working on or near a bat-
tery, always wear suitable eye pro-
tectors (e.g., goggles or industrial
safety spectacles) and remove rings,
metal bands, or any other jewelry.
Do not lean over the battery when
jump starting.
cDo not attempt to jump start a frozen
battery. It could explode and cause
serious injury.
cYour vehicle has an automatic en-
gine cooling fan. It could come on at
any time. Keep hands and other ob-
jects away from it.
JUMP STARTING
6-8In case of emergency
ZX
Page 136 of 223
Always follow the instructions below.
Failure to do so could result in damage
to the charging system and cause per-
sonal injury.
1.
If the booster battery is in another vehicle,
position the two vehicles to bring their
batteries into close proximity to each other.
Do not allow the two vehicles to touch.
2. Apply the parking brake. Move the shift
lever to N (Neutral) (on automatic trans-
mission models, move the lever to P
(Park)). Switch off all unnecessary elec-trical systems (lights, heater, air condi-
tioner, etc.).
3. Remove vent caps on the battery (if so
equipped). Cover the battery with an old
cloth to reduce explosion hazard.
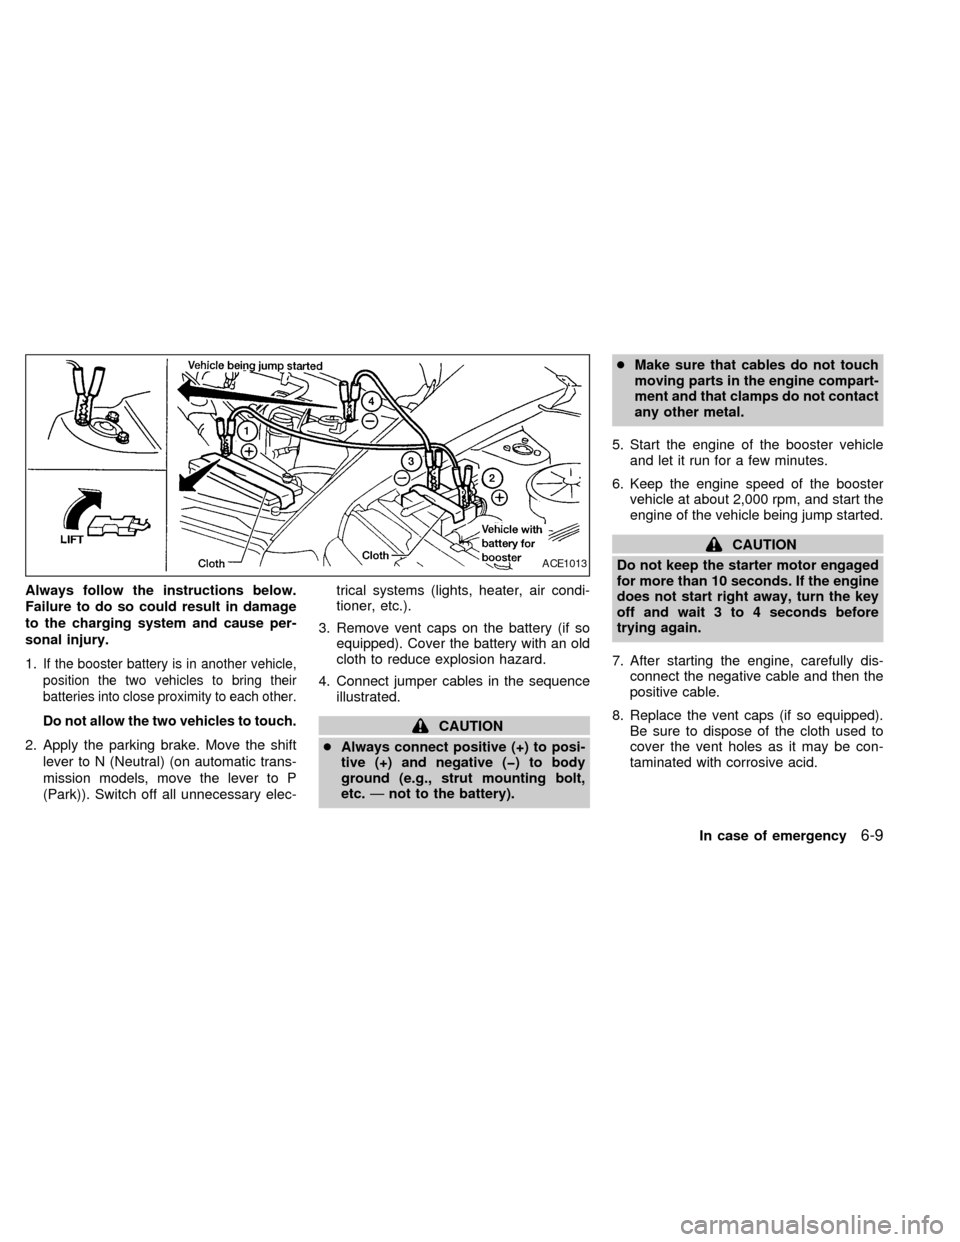
4. Connect jumper cables in the sequence
illustrated.
CAUTION
cAlways connect positive (+) to posi-
tive (+) and negative (þ) to body
ground (e.g., strut mounting bolt,
etc.Ðnot to the battery).cMake sure that cables do not touch
moving parts in the engine compart-
ment and that clamps do not contact
any other metal.
5. Start the engine of the booster vehicle
and let it run for a few minutes.
6. Keep the engine speed of the booster
vehicle at about 2,000 rpm, and start the
engine of the vehicle being jump started.
CAUTION
Do not keep the starter motor engaged
for more than 10 seconds. If the engine
does not start right away, turn the key
off and wait 3 to 4 seconds before
trying again.
7. After starting the engine, carefully dis-
connect the negative cable and then the
positive cable.
8. Replace the vent caps (if so equipped).
Be sure to dispose of the cloth used to
cover the vent holes as it may be con-
taminated with corrosive acid.
ACE1013
In case of emergency6-9
ZX
Page 148 of 223
8 Do-it-yourself
Maintenance precautions .......................................8-2
Engine compartment check locations -
GA engine .............................................................8-3
Engine compartment check locations -
SR engine ..............................................................8-4
Engine cooling system ...........................................8-5
Checking engine coolant level ...............................8-5
Changing engine coolant .......................................8-6
Engine oil ...............................................................8-8
Checking engine oil level .......................................8-8
Changing engine oil ...............................................8-9
Changing engine oil filter .....................................8-10
Automatic transmission fluid (ATF) ......................8-11
Temperature conditions for checking ATF ...........8-12
Power steering fluid..............................................8-13
Brake fluid ............................................................8-14
Window washer fluid ............................................8-14
Battery ..................................................................8-15Jump starting ........................................................8-16
Drive belts ............................................................8-17
Spark plug replacement .......................................8-18
Air cleaner housing filter ......................................8-19
Wiper blades ........................................................8-21
Parking brake check.............................................8-22
Brake pedal ..........................................................8-22
Brake booster .......................................................8-23
Clutch pedal .........................................................8-24
Fuses and fusible links.........................................8-24
Light bulbs ............................................................8-26
Headlights ............................................................8-26
Headlight aiming adjustment ................................8-27
Bulb replacement .................................................8-27
Front fog light bulb replacement (if so
equipped) .............................................................8-32
Wheels and tires ..................................................8-33
ZX
Page 149 of 223
When performing any inspection or mainte-
nance work on your vehicle, always take
care to prevent serious accidental injury to
yourself or damage to the vehicle. The
following are general precautions which
should be closely observed.
WARNING
cPark the vehicle on a level surface,
apply the parking brake securely and
block the wheels to prevent the ve-
hicle from moving. For a manual
transmission, move the gearshift
control lever to N (Neutral). For an
automatic transmission, move the
shift lever to P (Park).
cBe sure the ignition key is OFF when
performing any parts replacement or
repairs.
cBe sure to turn the ignition key to the
OFF or LOCK position. When the
ignition key is in the ON or ACC
position, the cooling fan may start to
operate suddenly even when the en-
gine is not running.cIf you must work with the engine
running, keep your hands, clothing,
hair and tools away from moving
fans, belts and any other moving
parts.
cIt is advisable to remove ties and any
jewelry, such as rings, watches, etc.,
before working on your vehicle.
cIf you must run the engine in an
enclosed space such as a garage, be
sure there is proper ventilation for
exhaust gases.
cNever get under the vehicle while it
is supported by only a jack. If it is
necessary to work under the vehicle,
support it with safety stands.
cKeep smoking materials, flame and
sparks away from fuel and battery.
cOn gasoline engine models with the
Multiport Fuel Injection (MFI) sys-
tem, the fuel filter or fuel lines
should be serviced by an authorized
NISSAN dealer because the fuel
lines are under high pressure even
when the engine is off.
CAUTION
cDo not work under the hood while
the engine is hot. Turn the engine off
and wait until it cools down.
cNever connect or disconnect either
the battery or any transistorized
component connector while the igni-
tion is ON.
c
Avoid contact with used motor oil.
Improperly disposed motor oil and/or
other vehicle fluids can hurt the en-
vironment. Always conform to local
regulations for disposal of vehicle
fluid.
This ``Do-it-yourself'' section gives instruc-
tions regarding only those items which are
relatively easy for an owner to perform.
You should be aware that incomplete or
improper servicing may result in operating
difficulties or excessive emissions, and
could affect your warranty coverage.If in
doubt about any servicing, have it done
by an authorized NISSAN dealer.
MAINTENANCE
PRECAUTIONS
8-2Do-it-yourself
ZX
Page 162 of 223
Canada Only
Add fluid when the low washer fluid warning
light comes on. Add a washer solvent to the
water for better cleaning. In the winter sea-
son, add a windshield washer antifreeze.
Follow the manufacturer's instructions for
the mixture ratio.
CAUTION
Do not substitute engine antifreeze
coolant for windshield washer solution.
This may result in damage to the paint.cKeep the battery surface clean and dry.
Any corrosion should be washed off with
a solution of baking soda and water.
cMake certain the terminal connections
are clean and securely tightened.
cIf the vehicle is not to be used for 30 days
or longer, disconnect the negative (þ) bat-
tery terminal cable to prevent discharge.
WARNING
cDo not expose the battery to flames
or electrical sparks. Hydrogen gas
generated by battery action is explo-
sive. Do not allow battery fluid to
contact your skin, eyes, fabrics, or
painted surfaces. After touching a
battery or battery cap, do not touch
or rub your eyes. Thoroughly wash
your hands. If the acid contacts your
eyes, skin or clothing, immediately
flush with water for at least 15 min-
utes and seek medical attention.
cWhen working on or near a battery,
always wear suitable eye protection
and remove all jewelry.
cKeep the battery out of the reach of
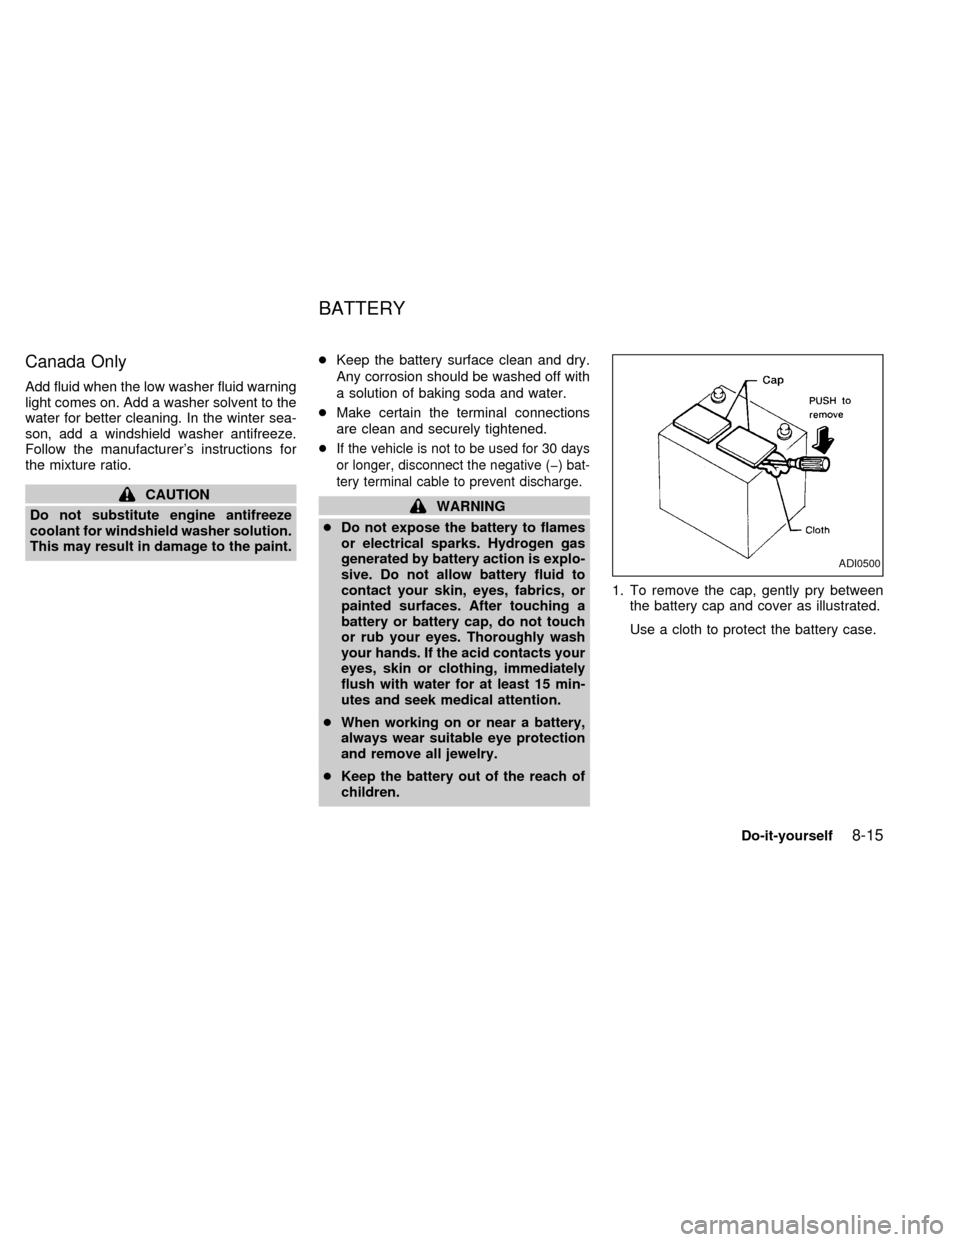
children.1. To remove the cap, gently pry between
the battery cap and cover as illustrated.
Use a cloth to protect the battery case.
ADI0500
BATTERY
Do-it-yourself8-15
ZX
Page 163 of 223

2. Check the fluid level in each cell.
If it is necessary to add fluid, add only
distilled water to bring the level up to the
OK level indicator in each filler opening.
Do not overfill.
JUMP STARTING
If jump starting is necessary, see the ``In
case of emergency'' section of this owner's
manual. If the engine does not start by jump
starting, the battery may have to be re-
placed. Contact an authorized NISSAN
dealer.
ADI0617
8-16Do-it-yourself
ZX
Page 173 of 223
HEADLIGHTS
The headlight is a semi-sealed beam type
which uses a replaceable headlight (halo-
gen) bulb. A bulb can be replaced from
inside the engine compartment without re-
moving the headlight assembly.
CAUTION
cHigh pressure halogen gas is sealed
inside the halogen bulb. The bulb
may break if the glass envelope is
scratched or the bulb is dropped.
cWhen handling the bulb, do not
touch the glass envelope.
Removing the headlight bulb
1. Open the engine hood.
2. Disconnect the negative (-) battery cable.
3.
If removing the right-hand (passenger
side) headlight bulb, it is necessary to first
reposition the engine coolant reservoir.
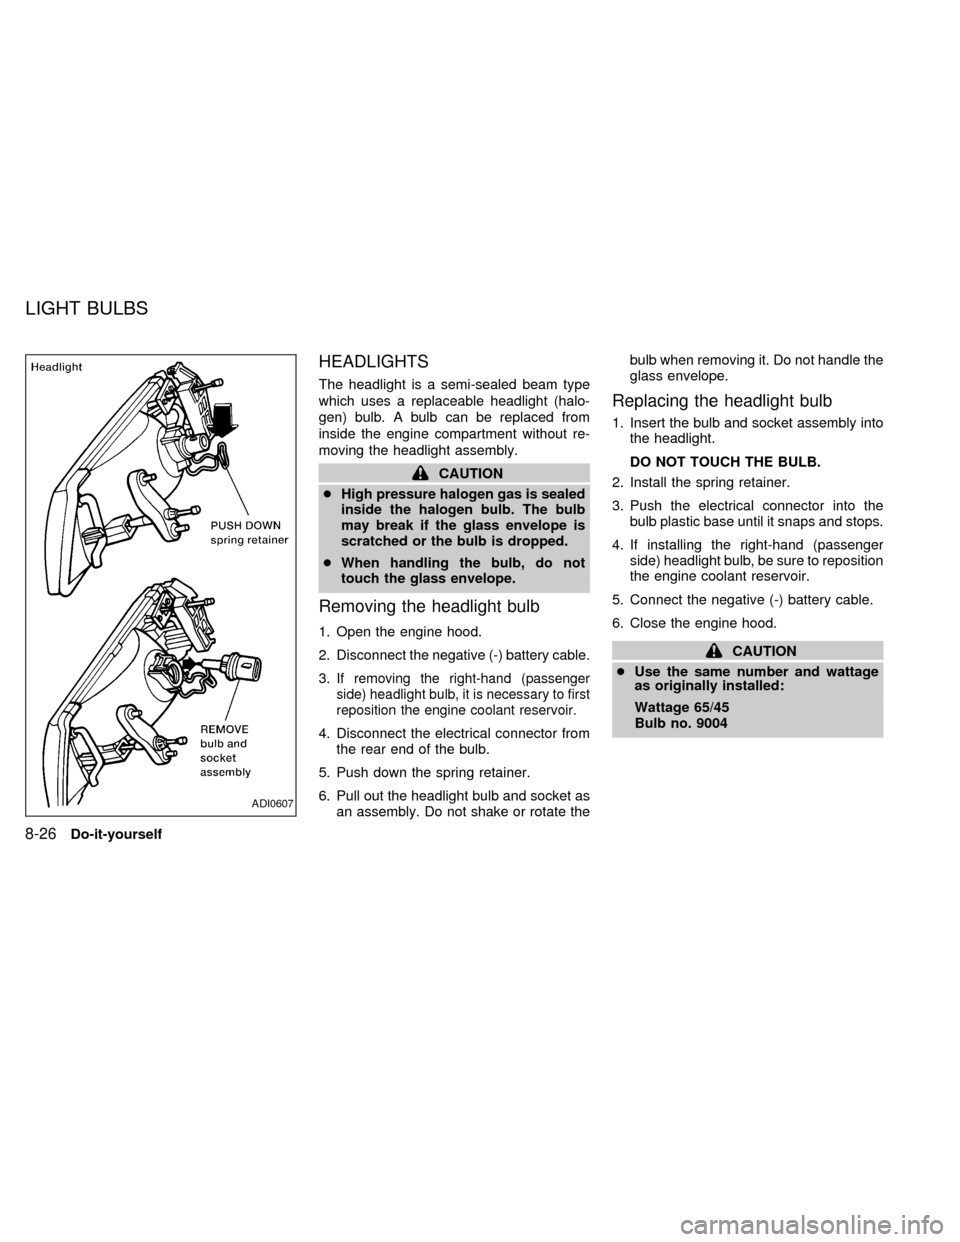
4. Disconnect the electrical connector from
the rear end of the bulb.
5. Push down the spring retainer.
6. Pull out the headlight bulb and socket as
an assembly. Do not shake or rotate thebulb when removing it. Do not handle the
glass envelope.
Replacing the headlight bulb
1. Insert the bulb and socket assembly into
the headlight.
DO NOT TOUCH THE BULB.
2. Install the spring retainer.
3. Push the electrical connector into the
bulb plastic base until it snaps and stops.
4. If installing the right-hand (passenger
side) headlight bulb, be sure to reposition
the engine coolant reservoir.
5. Connect the negative (-) battery cable.
6. Close the engine hood.
CAUTION
cUse the same number and wattage
as originally installed:
Wattage 65/45
Bulb no. 9004
ADI0607
LIGHT BULBS
8-26Do-it-yourself
ZX