1999 NISSAN QUEST transmission
[x] Cancel search: transmissionPage 93 of 286

1.Check the brake fluid level. Add brake fluid
as necessary. See ``Brake fluid'' in the
``Do-it-yourself'' section of this manual.
2. If the brake fluid level is correct, have the
warning system checked by an autho-
rized NISSAN dealer.
WARNING
cYour brake system may not be work-
ing properly if the warning light is
on. Driving could be dangerous. If
you judge it to be safe, drive care-
fully to the nearest service station
for repairs. Otherwise, have your ve-
hicle towed.
cPressing the brake pedal with the
engine stopped and/or low brake
fluid level may increase your stop-
ping distance and braking will re-
quire greater pedal effort as well as
pedal travel.
cIf the brake fluid level is below the
minimum mark on the brake fluid
reservoir, do not drive until the brake
system has been checked at an au-
thorized NISSAN dealer.
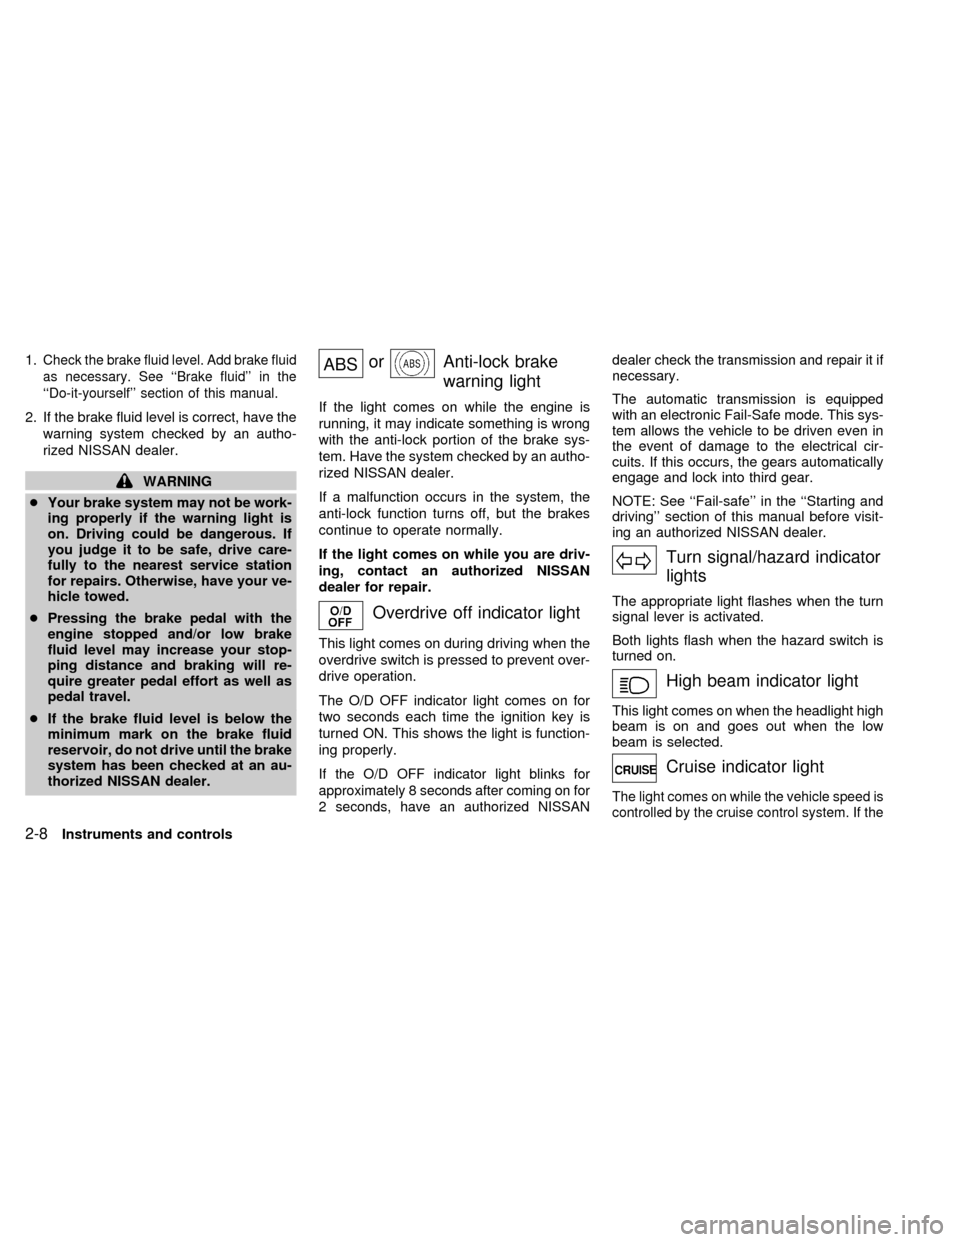
ABSorAnti-lock brake
warning light
If the light comes on while the engine is
running, it may indicate something is wrong
with the anti-lock portion of the brake sys-
tem. Have the system checked by an autho-
rized NISSAN dealer.
If a malfunction occurs in the system, the
anti-lock function turns off, but the brakes
continue to operate normally.
If the light comes on while you are driv-
ing, contact an authorized NISSAN
dealer for repair.
Overdrive off indicator light
This light comes on during driving when the
overdrive switch is pressed to prevent over-
drive operation.
The O/D OFF indicator light comes on for
two seconds each time the ignition key is
turned ON. This shows the light is function-
ing properly.
If the O/D OFF indicator light blinks for
approximately 8 seconds after coming on for
2 seconds, have an authorized NISSANdealer check the transmission and repair it if
necessary.
The automatic transmission is equipped
with an electronic Fail-Safe mode. This sys-
tem allows the vehicle to be driven even in
the event of damage to the electrical cir-
cuits. If this occurs, the gears automatically
engage and lock into third gear.
NOTE: See ``Fail-safe'' in the ``Starting and
driving'' section of this manual before visit-
ing an authorized NISSAN dealer.
Turn signal/hazard indicator
lights
The appropriate light flashes when the turn
signal lever is activated.
Both lights flash when the hazard switch is
turned on.
High beam indicator light
This light comes on when the headlight high
beam is on and goes out when the low
beam is selected.
Cruise indicator light
The light comes on while the vehicle speed is
controlled by the cruise control system. If the
2-8Instruments and controls
ZX
Page 113 of 286

Your vehicle's engine should be turned
off while programming your transmit-
ter. The Integrated HomeLinkTUniver-
sal Transceiver may not work with
older garage door openers that do not
meet current Federal Consumer Safety
Standards.
1. Test the Integrated HomeLinkTUniversal
Transceiver by pressing any button. The
red indicator light should come on. If you
have previously programmed a button
proceed to step 3.
2. Clear all channels on the Integrated
HomeLinkTUniversal Transceiver by
holding down both outside buttons (#1 &
#3) until the red light begins to flash
rapidly (approximately 20 seconds).
Then release both buttons.
3. Select which of the three Integrated
HomeLinkTUniversal Transceiver but-
tons you want to program.
4. Hold your hand-held transmitter against
the bottom surface of the Integrated
HomeLinkTUniversal Transceiver so
that you can still see the red indicator
light.5. Press the desired button until the red
indicator light flashes slowly. Do not re-
lease the button. Continue holding and
press the hand-held transmitter button
through step 6.
6. Hold down both buttons until the red
indicator light on the Integrated
HomeLinkTUniversal Transceiver
flashes rapidly (This may take 1 to 90
seconds). Then release both buttons.
The rapid flashing means that the trans-
ceiver has been successfully pro-
grammed to match your hand-held trans-
mitter. You can now use the Integrated
HomeLinkTUniversal Transceiver in-
stead of your hand-held transmitter.
Note to Canadian users:
Prior to 1992, D.O.C. regulations required
many hand-held transmitters to stop trans-
mitting after one or two seconds, even
though you continue to hold down the but-
ton. If you think you have one of these
hand-held transmitters, you should press
and re-press the transmitter button every 2
seconds without ever releasing the Inte-
grated HomeLinkTUniversal Transceiver
button. The indicator light on the Integrated
HomeLinkTUniversal Transceiver shouldblink rapidly indicating a successful pro-
gramming procedure. If it returns to the slow
blink of program mode, continue to periodi-
cally reactivate your hand-held transmitter
until a successful programming procedure
is indicated by the rapidly flashing indicator
light.
OPERATING THE TRANSCEIVER
To operate, simply press the appropriate
button on the Integrated HomeLinkTUniver-
sal Transceiver. The red indicator light illu-
minates while the signal is being transmit-
ted. The effective transmission range of the
Integrated HomeLinkTUniversal Trans-
ceiver may differ from your hand-held trans-
mitter.
PROGRAMMING PROBLEM
DIAGNOSIS
Be sure to keep your original hand-held
transmitter for possible reprogramming if
necessary.
cMake sure batteries in the hand-held
transmitter are fully charged.
cHold your hand-held transmitter against
the bottom surface of the Integrated
HomeLinkTUniversal Transceiver so
2-28Instruments and controls
ZX
Page 176 of 286

5 Starting and driving
Precautions when starting and driving ...................5-2
Exhaust gas (carbon monoxide) ............................5-2
Three way catalyst .................................................5-2
Avoiding collision and rollover................................5-3
Drinking alcohol/drugs and driving .........................5-3
Ignition switch .........................................................5-4
Before starting the engine ......................................5-5
Driving with an automatic transmission .................5-5
Overdrive switch .....................................................5-7
Starting the engine .................................................5-8Parking brake operation .........................................5-9
Cruise control (if so equipped) ...............................5-9
Break-in schedule ................................................5-11
Increasing fuel economy ......................................5-12
Parking/parking on hills ........................................5-13
Power steering system .........................................5-14
Brake system........................................................5-14
Anti-lock brake system (ABS) (if so equipped) ....5-15
Cold weather driving ............................................5-16
ZX
Page 180 of 286

cMake sure the area around the vehicle is
clear.
cMaintenance items listed here should be
checked periodically (for example, each
time you check engine oil).
cCheck that all windows and lights are
clean.
cVisually inspect tires for their appearance
and condition. Also check tires for proper
inflation.
cLock all doors.
cPosition seat and adjust head restraints.
cAdjust inside and outside mirrors.
cFasten seat belts and ask all passengers
to do likewise.
cCheck the operation of warning lights
when key is turned to the ON position.
See ``Warning/Indicator lights and chimes''
in the ``Instrument and controls'' section.
WARNING
cDo not depress the accelerator pedal
while shifting from P (Park) or N
(Neutral) to: R (Reverse), D (Drive),
2 or 1. Always depress the brake
pedal until shifting is completed.
Failure to do so could cause you to
lose control and have an accident.
cCold engine idle speed is high, so
use caution when shifting into a for-
ward or reverse gear before the en-
gine has warmed up.
cNever shift to P (Park) or R (Reverse)
while the vehicle is moving. This
could cause an accident.
CAUTION
cWhen stopping the vehicle on an
uphill grade, do not hold the vehicle
by depressing the accelerator pedal.
The foot brakes should be used for
this purpose.
cOn slippery roads, do not downshift.
This may cause a loss of control.The automatic transmission in your vehicle
is electronically controlled by a transmission
control module to produce maximum power
and smooth operation.
Shown on the following pages are the rec-
ommended operating procedures for this
transmission. Follow these procedures for
maximum vehicle performance and driving
enjoyment.
Starting the vehicle
cAfter starting the engine, fully depress the
foot brake pedal before shifting the selec-
tor lever to the R (Reverse), N (Neutral),
D (Drive), 2 or 1 position. Be sure the
vehicle is at a complete stop before at-
tempting to shift the selector lever.
This automatic transmission is designed
so the foot brake pedal MUST be de-
pressed before shifting from P (Park) to
any other position while the ignition
switch is ON.
The selector lever cannot be moved out
of P (Park) and into any of the other gear
positions if the ignition key is turned to
ACC, LOCK, or if the key is removed
from the switch.
BEFORE STARTING THE
ENGINEDRIVING WITH AN
AUTOMATIC TRANSMISSION
Starting and driving5-5
ZX
Page 181 of 286

The shift lever can be moved if the igni-
tion switch is in the ACC position. This
allows the vehicle to be moved if the
battery is discharged.
1. Keep the foot brake pedal depressed and
shift into a driving gear.
2. Release the parking brake and foot
brake, then gradually start the vehicle in
motion.
Shifting with automatic transmission
P (Park):
Use this selector position when the vehicle
is parked or when starting the engine. Al-
ways be sure the vehicle is at a complete
stop. For maximum safety, depress the
brake pedal, pull the lever toward you, and
move the lever to the P (Park) position.
Apply the parking brake. When parking on a
hill, apply the parking brake first, then shift
the lever into the P (Park) position.
Shifting from P (Park)
If the ignition switch is in the ON position
and the foot brake pedal is depressed, but
the shift lever still cannot be moved out of P
(Park), follow these instructions:
1. Shut the engine off and remove the key.
2. Apply the parking brake.
3. Reinsert the ignition key and turn it clock-
wise to the first position (ACC).
4. Depress the brake pedal, move the gear-
shift lever to N (Neutral).
5. Start the engine.
R (Reverse):
Use this position to back up. Always be sure
the vehicle is completely stopped. Depress
the brake pedal, then pull the shift lever
toward you and move it to the R (Reverse)
position.
ASD0552
5-6Starting and driving
ZX
Page 182 of 286

N (Neutral):
Neither forward nor reverse gear is en-
gaged. The engine can be started in this
position. You may shift to N (Neutral) and
restart a stalled engine while the vehicle is
moving.
D (Drive):
Use this position for all normal forward
driving.
2 (Second gear):
Use for hill climbing or engine braking on
downhill grades.
Do not downshift into 2 at speeds above 63
MPH (100 km/h). Do not exceed 63 MPH
(100 km/h) in 2.
1 (Low gear):
Use 1 when climbing steep hills slowly or
driving slowly through deep snow, sand or
mud, or for maximum engine braking on
steep downhill grades.
Do not exceed 38 MPH (60 km/h) in 1.
Do not shift into 1 at speeds above 38 MPH
(60 km/h).Accelerator downshift
In D position
For rapid passing or hill climbing, fully depress
the accelerator pedal to the floor. This shifts the
transmission down into third gear, second gear
or first gear, depending on the vehicle speed.
Fail-safe
When the Fail-safe operation occurs, the
next time the key is turned to the ON
position, the O/D OFF light blinks for ap-
proximately 8 seconds after coming on for 2
seconds. While the vehicle can be driven
under these circumstances, please note
that the gears in the automatic transmission
will be locked in 3rd gear.
NOTE: If the vehicle is driven under extreme
conditions, such as excessive wheel spinning
and subsequent hard braking, the Fail-safe
system may be activated. This will occur even
if all electrical circuits are functioning properly.
In this case, turn the ignition key OFF and wait
for 3 seconds. Then turn the key back to the
ON position. The vehicle should return to its
normal operating condition. If it does not re-
turn to its normal operating condition, have an
authorized NISSAN dealer check the trans-
mission and repair, if necessary.
OVERDRIVE SWITCH
Each time your vehicle is started, the trans-
mission is automatically ``reset'' to overdrive
ON.
ON: For normal driving the overdrive
switch is engaged. The transmission
is upshifted into overdrive as the
vehicle speed increases.
The overdrive does not engage until the
engine has reached operating tempera-
ture.
OFF: For driving up and down long slopes
where engine ``braking'' is neces-
sary, push the overdrive switch
ASD0561
Starting and driving5-7
ZX
Page 188 of 286

WARNING
Do not park the vehicle over flammable
materials such as dry grass, waste pa-
per or rags. They may ignite and cause
a fire.
1. Firmly apply the parking brake.
2. Move the selector lever to the P (Park)
position.WARNING
cSafe parking procedures require that
both the parking brake be set and
the transmission placed into P (Park)
position. Failure to do so could
cause the vehicle to move unexpect-
edly or roll away and result in an
accident. Make sure the shift lever
has been pushed up as far as it can
go and cannot be moved without
pulling it towards you.
cNever leave the engine running while
the vehicle is unattended.c
Do not leave children unattended in-
side the vehicle. They could unknow-
ingly activate switches or controls.
Unattended children could become
involved in serious accidents.
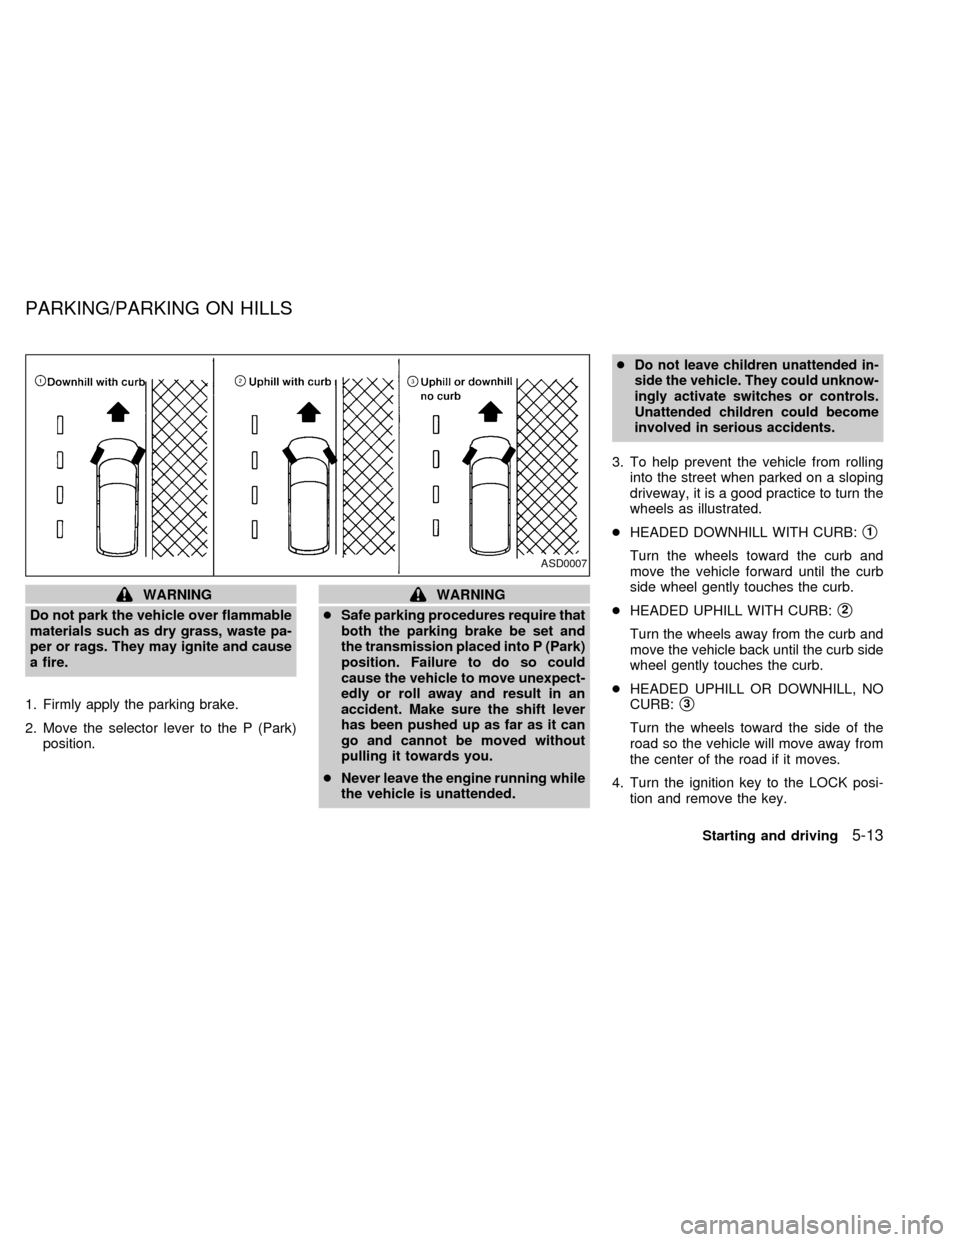
3. To help prevent the vehicle from rolling
into the street when parked on a sloping
driveway, it is a good practice to turn the
wheels as illustrated.
cHEADED DOWNHILL WITH CURB:
s1
Turn the wheels toward the curb and
move the vehicle forward until the curb
side wheel gently touches the curb.
cHEADED UPHILL WITH CURB:
s2
Turn the wheels away from the curb and
move the vehicle back until the curb side
wheel gently touches the curb.
cHEADED UPHILL OR DOWNHILL, NO
CURB:
s3
Turn the wheels toward the side of the
road so the vehicle will move away from
the center of the road if it moves.
4. Turn the ignition key to the LOCK posi-
tion and remove the key.
ASD0007
PARKING/PARKING ON HILLS
Starting and driving5-13
ZX
Page 195 of 286

If you have a flat tire, follow the instructions
below:
Stopping the vehicle
1. Safely move the vehicle off the road and
away from traffic.
2. Turn on the hazard warning flashers.
3. Park on a level surface and apply the
parking brake. Move the gearshift lever
to the P (Park) position.
4. Turn off the engine.
5. Raise the hood to warn other traffic, and
to signal professional road assistance
personnel that you need assistance.
6. Have all passengers get out of the ve-
hicle and stand in a safe place, away
from traffic and clear of the vehicle.
WARNING
cMake sure the parking brake is se-
curely applied and the automatic
transmission is shifted into P (Park).
cNever change tires when the vehicle
is on a slope, ice or slippery areas.
This is hazardous.
cNever change tires if oncoming traf-
fic is close to your vehicle. Wait for
professional road assistance.
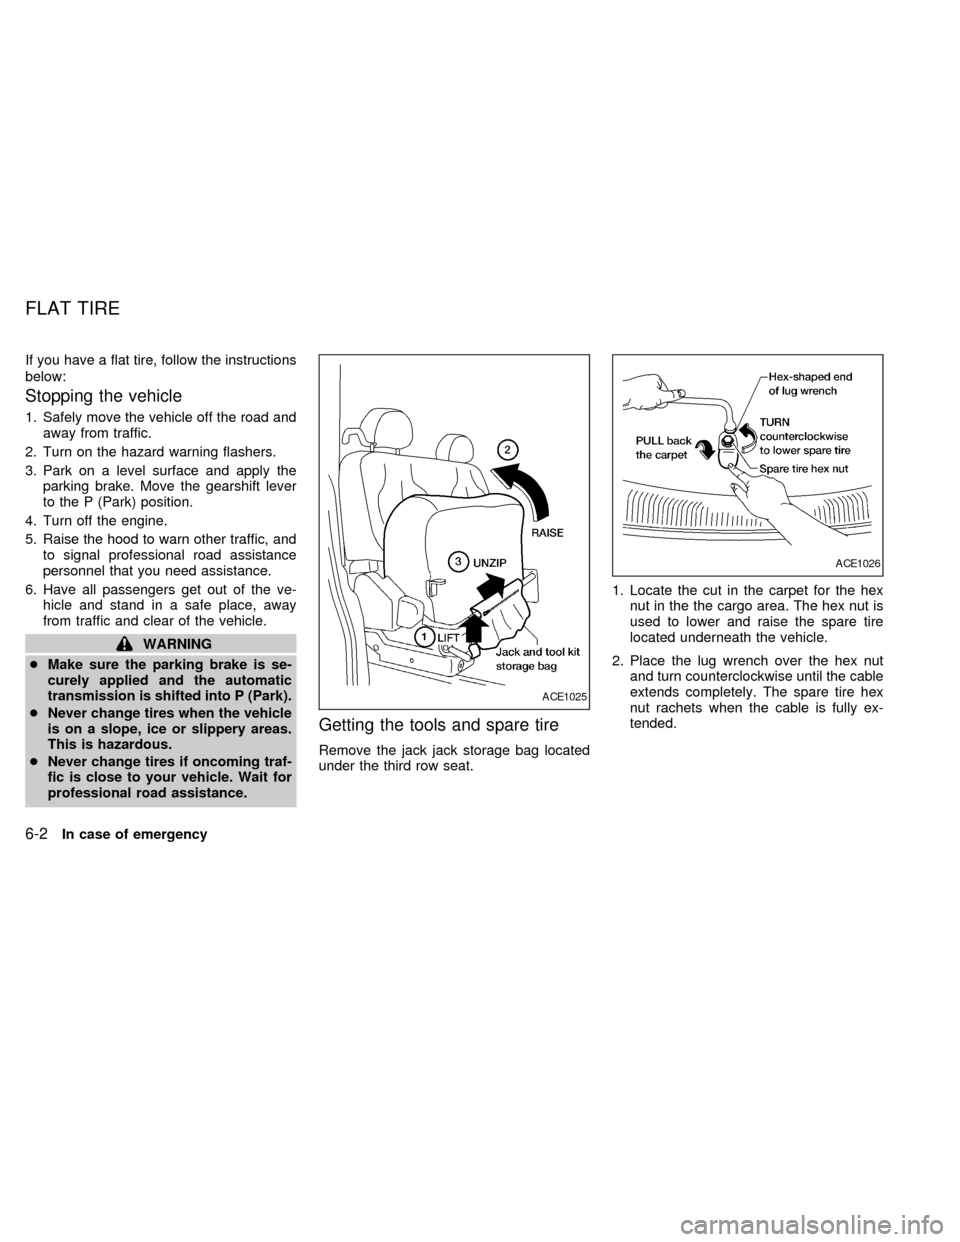
Getting the tools and spare tire
Remove the jack jack storage bag located
under the third row seat.1. Locate the cut in the carpet for the hex
nut in the the cargo area. The hex nut is
used to lower and raise the spare tire
located underneath the vehicle.
2. Place the lug wrench over the hex nut
and turn counterclockwise until the cable
extends completely. The spare tire hex
nut rachets when the cable is fully ex-
tended.
ACE1025
ACE1026
FLAT TIRE
6-2In case of emergency
ZX