1999 NISSAN QUEST ECU
[x] Cancel search: ECUPage 10 of 286
MANUAL FRONT SEAT
ADJUSTMENT
WARNING
cDo not adjust the driver's seat while
driving. The seat may move sud-
denly and could cause loss of con-
trol of the vehicle.
cAfter adjustment, gently rock in the
seat to make sure it is securely
locked.
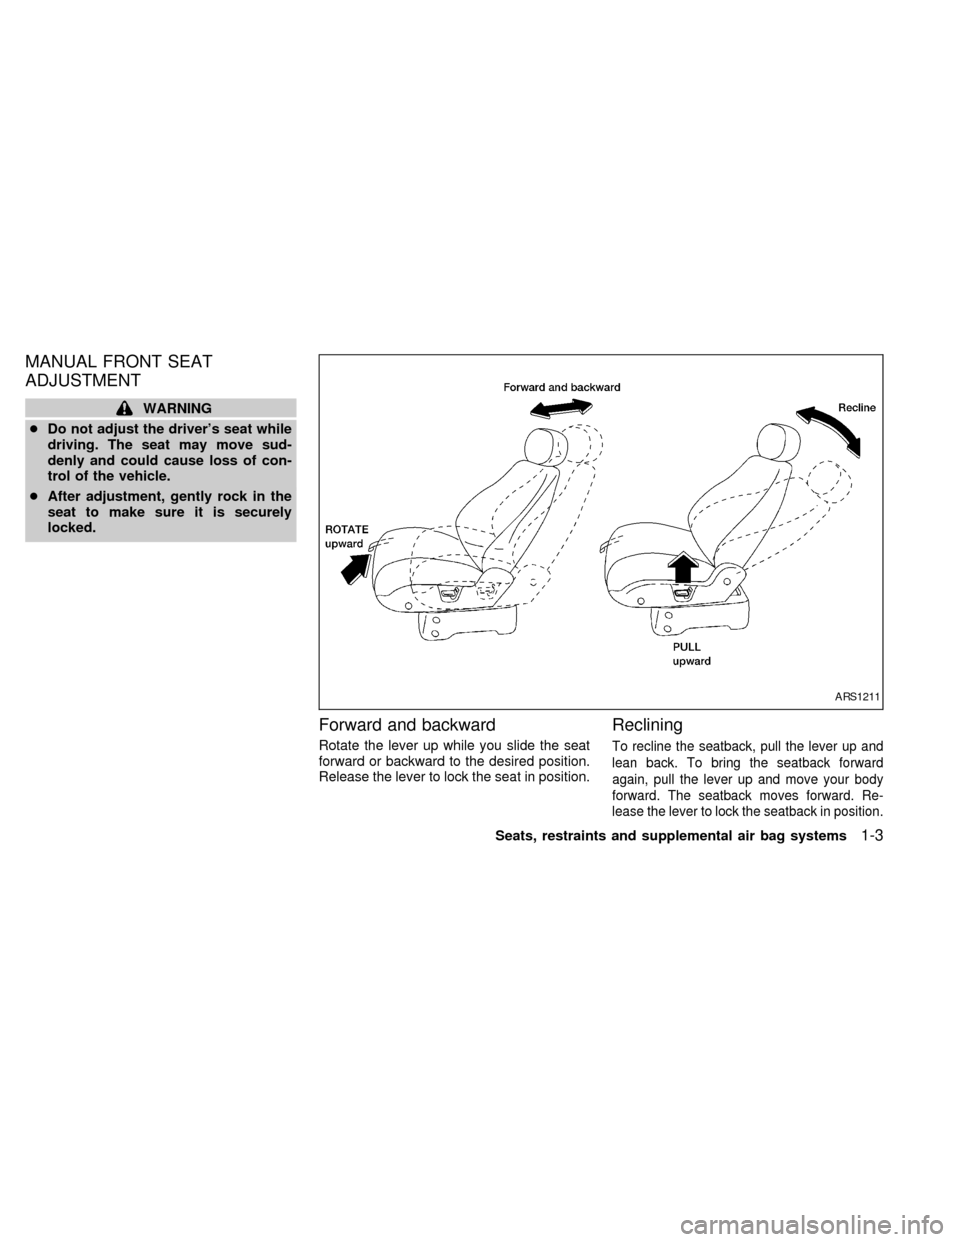
Forward and backward
Rotate the lever up while you slide the seat
forward or backward to the desired position.
Release the lever to lock the seat in position.
Reclining
To recline the seatback, pull the lever up and
lean back. To bring the seatback forward
again, pull the lever up and move your body
forward. The seatback moves forward. Re-
lease the lever to lock the seatback in position.
ARS1211
Seats, restraints and supplemental air bag systems1-3
ZX
Page 15 of 286
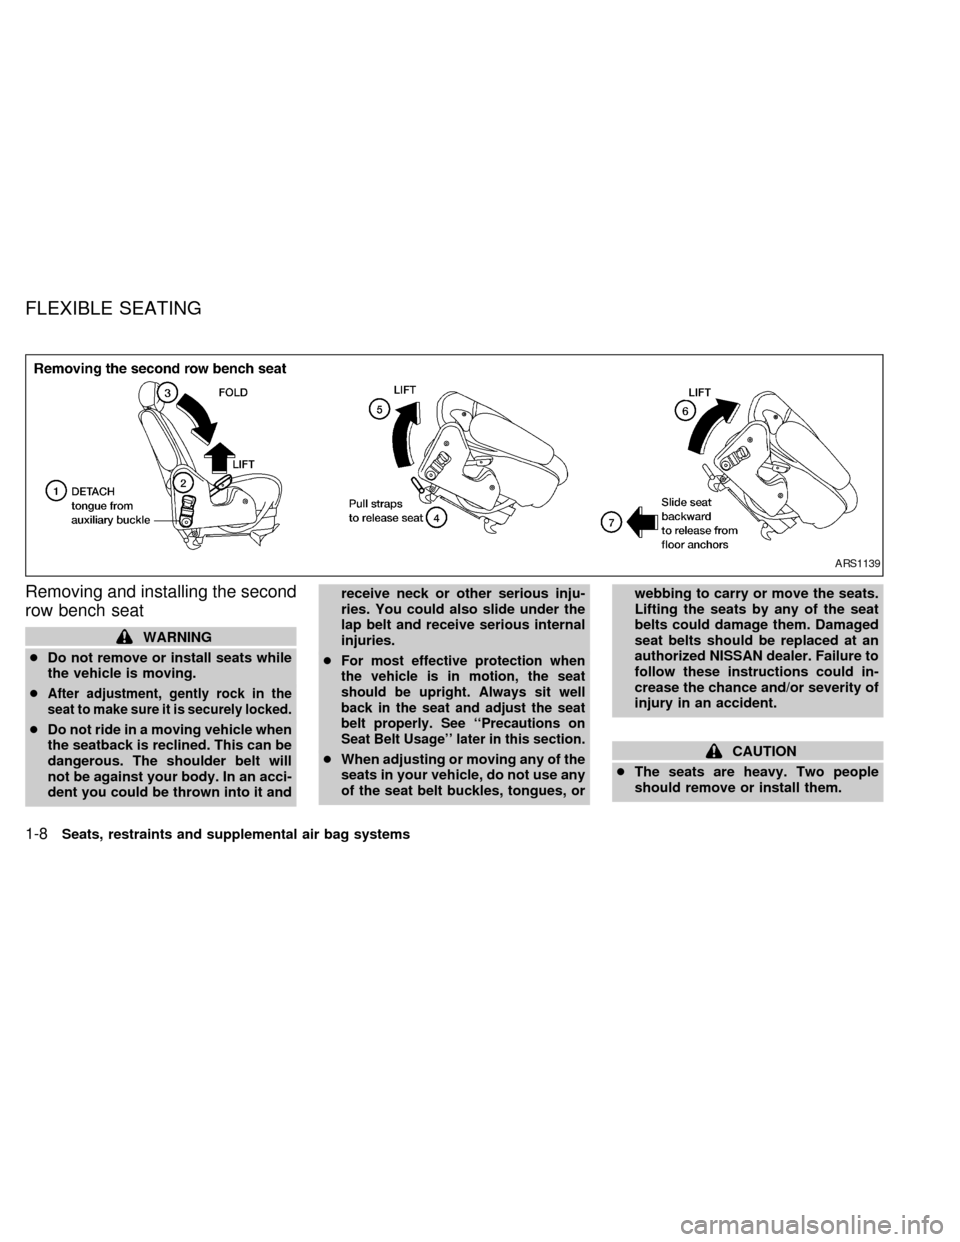
Removing and installing the second
row bench seat
WARNING
cDo not remove or install seats while
the vehicle is moving.
c
After adjustment, gently rock in the
seat to make sure it is securely locked.
cDo not ride in a moving vehicle when
the seatback is reclined. This can be
dangerous. The shoulder belt will
not be against your body. In an acci-
dent you could be thrown into it andreceive neck or other serious inju-
ries. You could also slide under the
lap belt and receive serious internal
injuries.
c
For most effective protection when
the vehicle is in motion, the seat
should be upright. Always sit well
back in the seat and adjust the seat
belt properly. See ``Precautions on
Seat Belt Usage'' later in this section.
cWhen adjusting or moving any of the
seats in your vehicle, do not use any
of the seat belt buckles, tongues, orwebbing to carry or move the seats.
Lifting the seats by any of the seat
belts could damage them. Damaged
seat belts should be replaced at an
authorized NISSAN dealer. Failure to
follow these instructions could in-
crease the chance and/or severity of
injury in an accident.CAUTION
cThe seats are heavy. Two people
should remove or install them.
ARS1139
FLEXIBLE SEATING
1-8Seats, restraints and supplemental air bag systems
ZX
Page 16 of 286
cDo not sit in seats that have been
removed from the vehicle. They may
tip over and you could be injured.
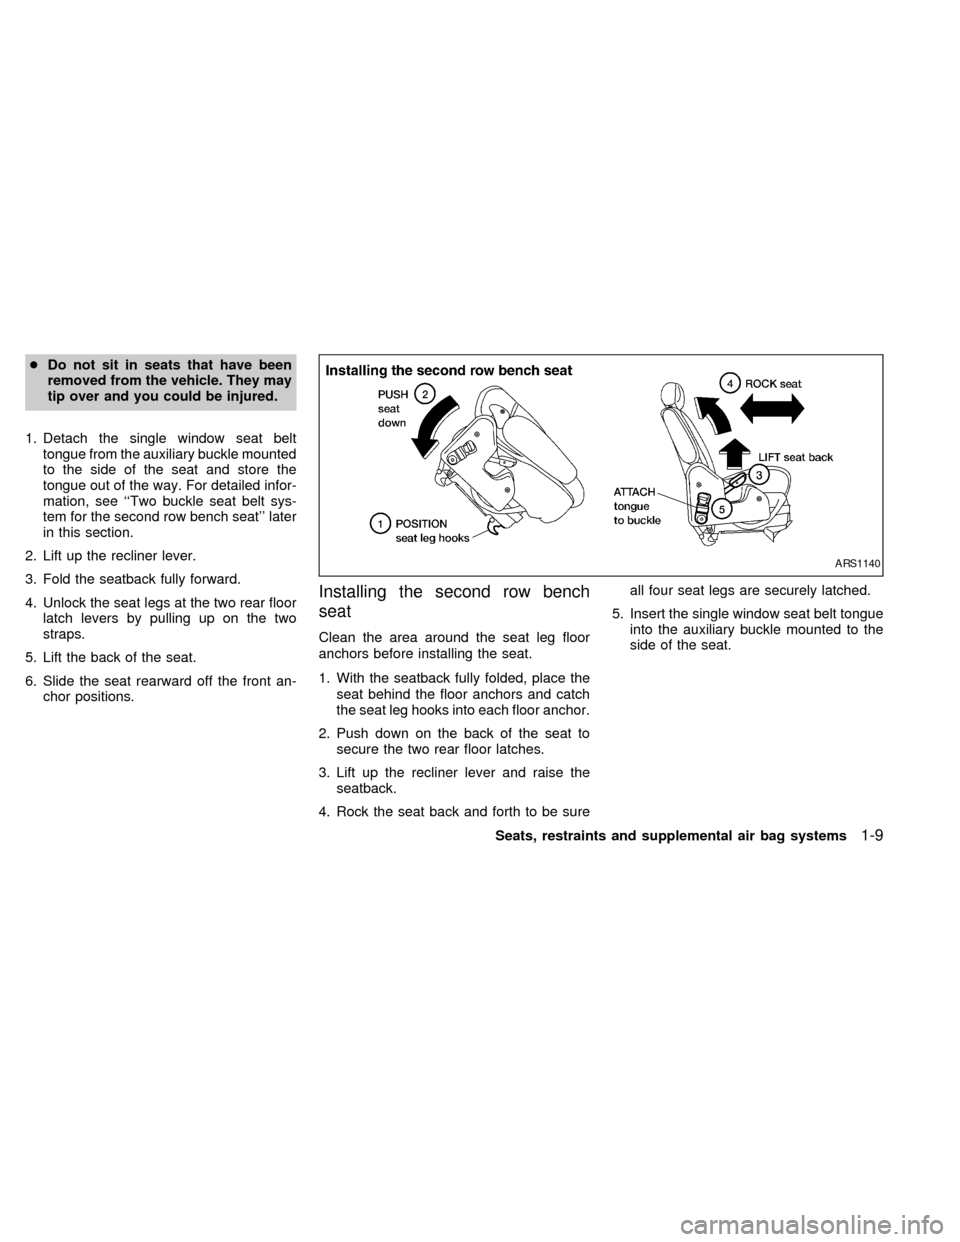
1. Detach the single window seat belt
tongue from the auxiliary buckle mounted
to the side of the seat and store the
tongue out of the way. For detailed infor-
mation, see ``Two buckle seat belt sys-
tem for the second row bench seat'' later
in this section.
2. Lift up the recliner lever.
3. Fold the seatback fully forward.
4. Unlock the seat legs at the two rear floor
latch levers by pulling up on the two
straps.
5. Lift the back of the seat.
6. Slide the seat rearward off the front an-
chor positions.
Installing the second row bench
seat
Clean the area around the seat leg floor
anchors before installing the seat.
1. With the seatback fully folded, place the
seat behind the floor anchors and catch
the seat leg hooks into each floor anchor.
2. Push down on the back of the seat to
secure the two rear floor latches.
3. Lift up the recliner lever and raise the
seatback.
4. Rock the seat back and forth to be sureall four seat legs are securely latched.
5. Insert the single window seat belt tongue
into the auxiliary buckle mounted to the
side of the seat.
ARS1140
Seats, restraints and supplemental air bag systems1-9
ZX
Page 17 of 286
Removing second row bucket seats
WARNING
cDo not remove or install seats while
the vehicle is moving.
cAfter adjustment, gently rock in the
seat to make sure it is securely
locked.
cDo not ride in a moving vehicle when
the seatback is reclined. This can be
dangerous. The shoulder belt will
not be against your body. In an acci-
dent you could be thrown into it and
receive neck or other serious inju-
ries. You could also slide under the
lap belt and receive serious internal
injuries.
c
For most effective protection when
the vehicle is in motion, the seat
should be upright. Always sit well
back in the seat and adjust the seat
belt properly. See ``Precautions on
Seat Belt Usage'' later in this section.cWhen adjusting or moving any of the
seats in your vehicle, do not use any
of the seat belt buckles, tongues, or
webbing to carry or move the seats.
Lifting the seats by any of the seat
belts could damage them. Damaged
seat belts should be replaced at your
NISSAN dealer. Failure to follow
these instructions could increase the
chance and/or severity of injury in an
accident.
CAUTION
cThe seats are heavy. Two people
should remove or install them.
cDo not sit in seats that have been
removed from the vehicle. They may
tip over and you could be injured.
1-10Seats, restraints and supplemental air bag systems
ZX
Page 20 of 286

Installing the bucket seats
Clean the area around the seat leg floor
anchors before installing the seat.
1. With the seatback fully folded, place the
seat behind the floor anchors and slide
seat leg hooks so they catch into each
floor anchor.
2. Push down on the rear of the seat to
secure the two rear floor latches.
3. Lift the recliner lever and raise the seat-
back.4. Rock the seat back and forth to be sure it
is securely latched.
The second row bucket seats are not
interchangeable. If you are having diffi-
culty installing the seats, you may have
them in the wrong location.
ARS1142
Seats, restraints and supplemental air bag systems1-13
ZX
Page 24 of 286
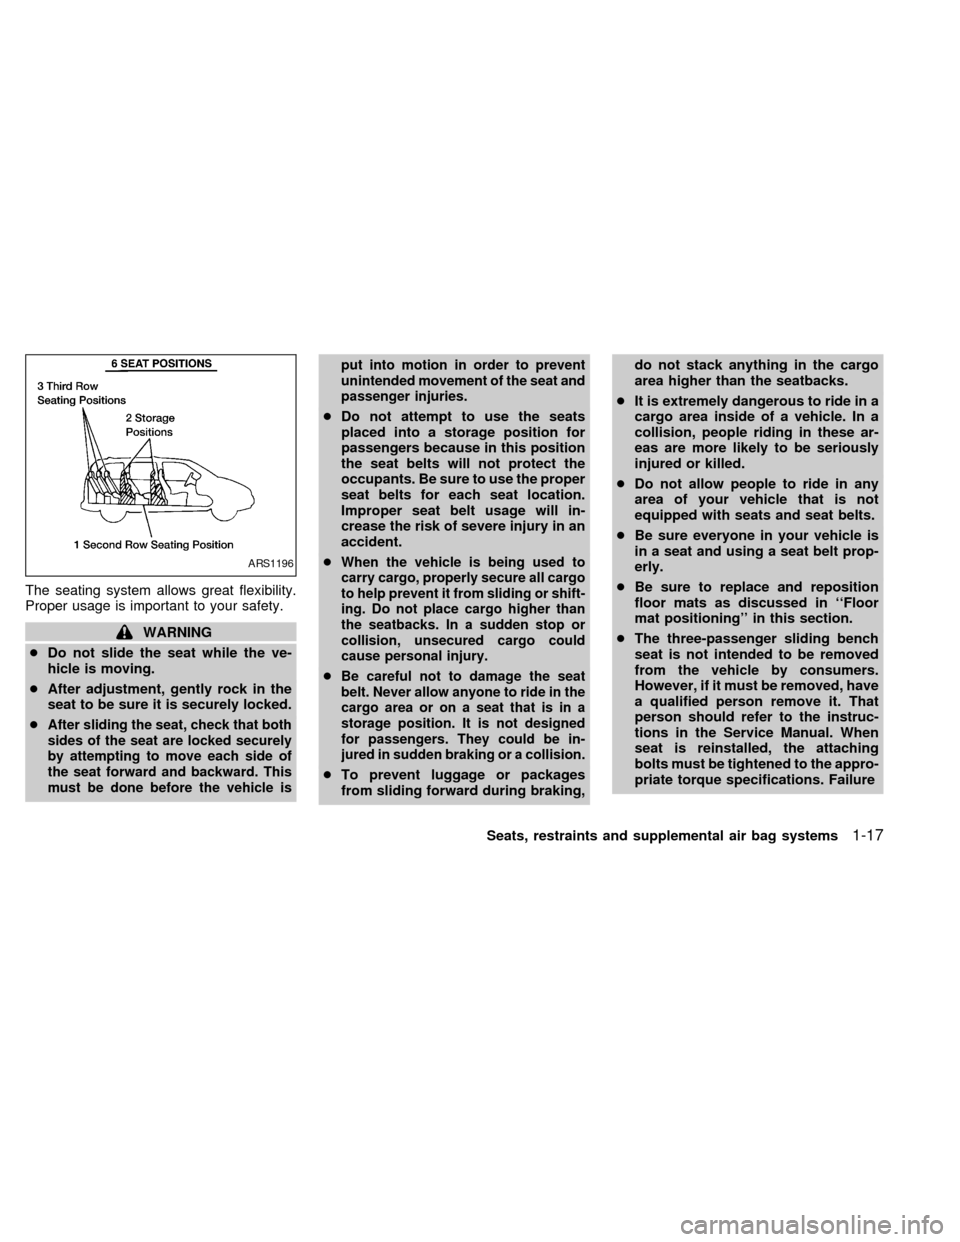
The seating system allows great flexibility.
Proper usage is important to your safety.
WARNING
cDo not slide the seat while the ve-
hicle is moving.
cAfter adjustment, gently rock in the
seat to be sure it is securely locked.
c
After sliding the seat, check that both
sides of the seat are locked securely
by attempting to move each side of
the seat forward and backward. This
must be done before the vehicle isput into motion in order to prevent
unintended movement of the seat and
passenger injuries.
cDo not attempt to use the seats
placed into a storage position for
passengers because in this position
the seat belts will not protect the
occupants. Be sure to use the proper
seat belts for each seat location.
Improper seat belt usage will in-
crease the risk of severe injury in an
accident.
c
When the vehicle is being used to
carry cargo, properly secure all cargo
to help prevent it from sliding or shift-
ing. Do not place cargo higher than
the seatbacks. In a sudden stop or
collision, unsecured cargo could
cause personal injury.
cBe careful not to damage the seat
belt. Never allow anyone to ride in the
cargo area or on a seat that is in a
storage position. It is not designed
for passengers. They could be in-
jured in sudden braking or a collision.
cTo prevent luggage or packages
from sliding forward during braking,do not stack anything in the cargo
area higher than the seatbacks.
cIt is extremely dangerous to ride in a
cargo area inside of a vehicle. In a
collision, people riding in these ar-
eas are more likely to be seriously
injured or killed.
cDo not allow people to ride in any
area of your vehicle that is not
equipped with seats and seat belts.
cBe sure everyone in your vehicle is
in a seat and using a seat belt prop-
erly.
cBe sure to replace and reposition
floor mats as discussed in ``Floor
mat positioning'' in this section.
cThe three-passenger sliding bench
seat is not intended to be removed
from the vehicle by consumers.
However, if it must be removed, have
a qualified person remove it. That
person should refer to the instruc-
tions in the Service Manual. When
seat is reinstalled, the attaching
bolts must be tightened to the appro-
priate torque specifications. Failure
ARS1196
Seats, restraints and supplemental air bag systems1-17
ZX
Page 38 of 286
To increase your confidence in the seat
belts, check their operation as follows.
cGrasp the shoulder belt and pull quickly
forward. The retractor should lock and
restrict further belt movement.
If the retractor does not lock during this
check or if you have any questions about
belt operation, see an authorized NISSAN
dealer.
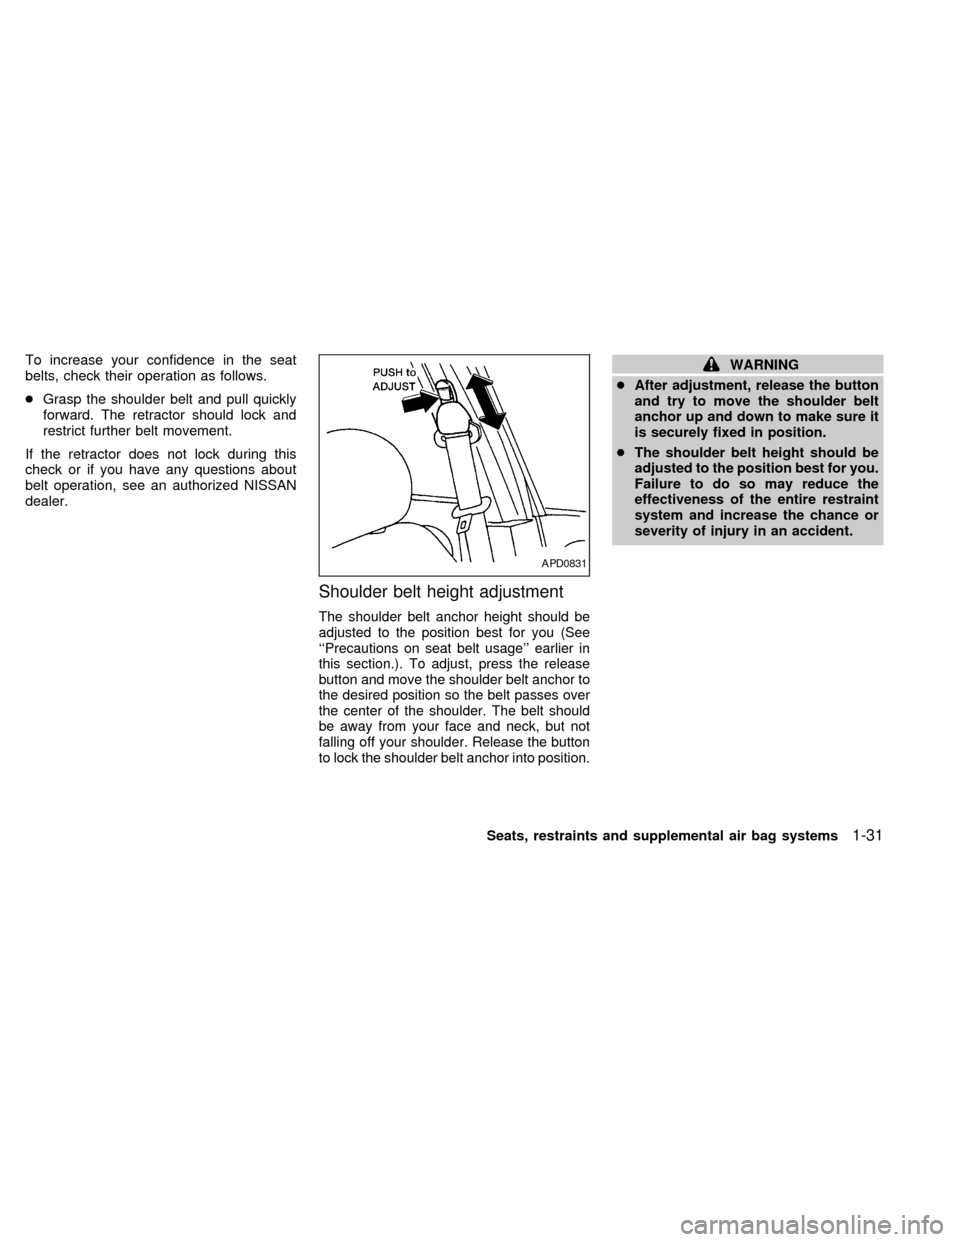
Shoulder belt height adjustment
The shoulder belt anchor height should be
adjusted to the position best for you (See
``Precautions on seat belt usage'' earlier in
this section.). To adjust, press the release
button and move the shoulder belt anchor to
the desired position so the belt passes over
the center of the shoulder. The belt should
be away from your face and neck, but not
falling off your shoulder. Release the button
to lock the shoulder belt anchor into position.
WARNING
cAfter adjustment, release the button
and try to move the shoulder belt
anchor up and down to make sure it
is securely fixed in position.
cThe shoulder belt height should be
adjusted to the position best for you.
Failure to do so may reduce the
effectiveness of the entire restraint
system and increase the chance or
severity of injury in an accident.
APD0831
Seats, restraints and supplemental air bag systems1-31
ZX
Page 41 of 286

positioned properly and fastened to the
buckle mounted in the middle of the seat.
When the two buckle seat belt system is not
in use, the webbing can be secured with the
seat belt clip. The seat belt clip should not
be used with a child seat or during seat belt
usage. The seat belt clip opening should
face the front of the vehicle.
A twisted belt may prevent the retractor
from working properly. If the two buckle seat
belt system is twisted, disengage the single
window tongue from the auxiliary buckle on
the side of the seat, remove the twist and
reinstall the tongue into the auxiliary buckle
until you hear a snap and feel the latch
engage.
Both tongues must be attached to their
appropriate buckles whenever someone
is riding in that seating position. If the
tongue are released to allow a third row
passenger to enter or exit, the tongues
must be reattached.When the two-passenger bench seat is re-
moved from the vehicle, you must detach
the single window tongue from the auxiliary
buckle.
If the three-passenger bench seat is
moved up to the second row position, the
outside passenger (near the passenger
side sliding door) only needs to use the
double window tongue and the standard
buckle. Because the three-passenger
bench seat is wider and closer to the
passenger side sliding door, the single
window seat belt tongue and the auxiliary
buckle are not necessary.
ARS1126
1-34Seats, restraints and supplemental air bag systems
ZX