1999 NISSAN QUEST child restraint
[x] Cancel search: child restraintPage 72 of 286
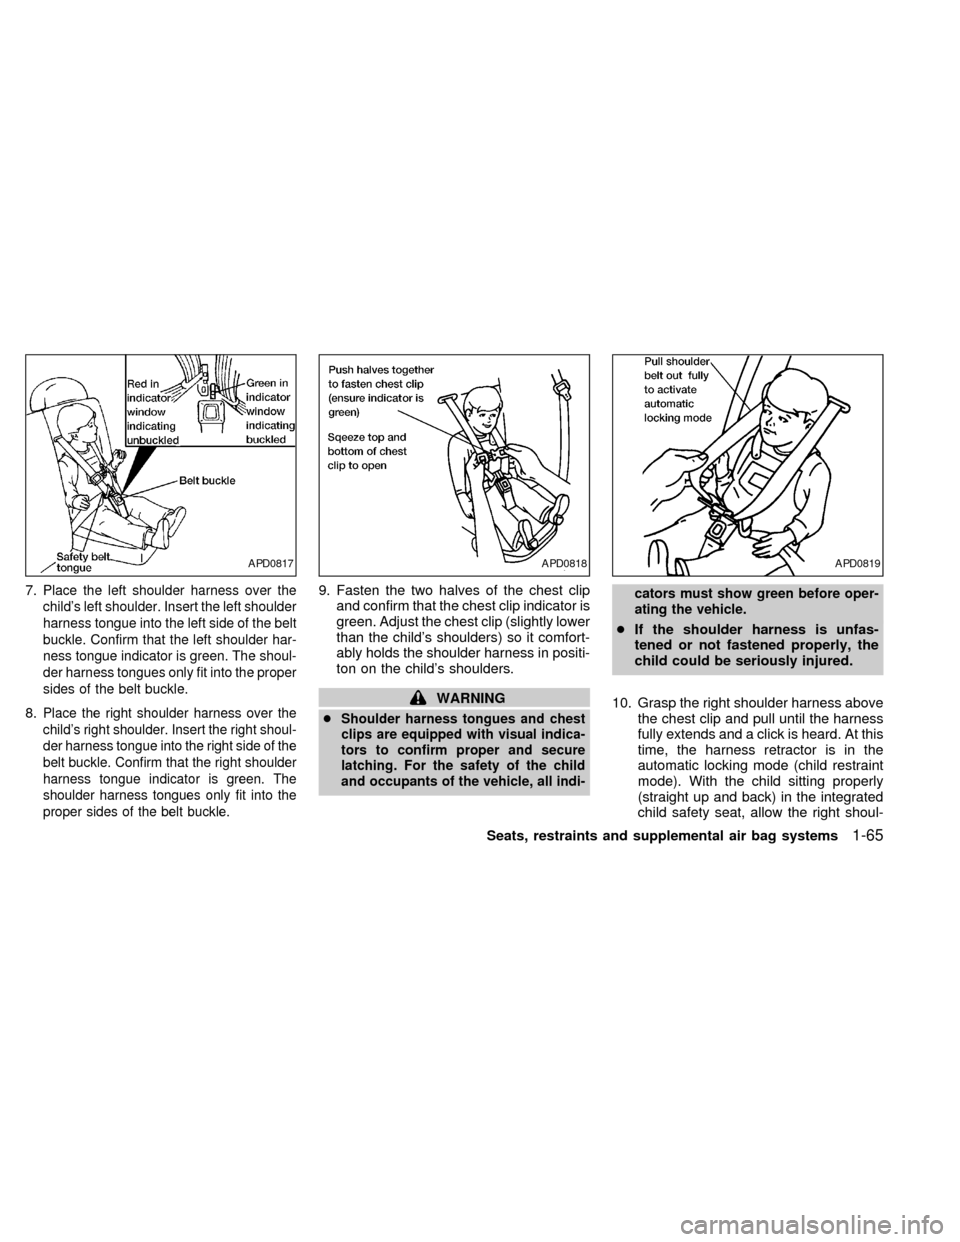
7.Place the left shoulder harness over the
child's left shoulder. Insert the left shoulder
harness tongue into the left side of the belt
buckle. Confirm that the left shoulder har-
ness tongue indicator is green. The shoul-
der harness tongues only fit into the proper
sides of the belt buckle.
8.Place the right shoulder harness over the
child's right shoulder. Insert the right shoul-
der harness tongue into the right side of the
belt buckle. Confirm that the right shoulder
harness tongue indicator is green. The
shoulder harness tongues only fit into the
proper sides of the belt buckle.
9. Fasten the two halves of the chest clip
and confirm that the chest clip indicator is
green. Adjust the chest clip (slightly lower
than the child's shoulders) so it comfort-
ably holds the shoulder harness in positi-
ton on the child's shoulders.
WARNING
cShoulder harness tongues and chest
clips are equipped with visual indica-
tors to confirm proper and secure
latching. For the safety of the child
and occupants of the vehicle, all indi-cators must show green before oper-
ating the vehicle.
cIf the shoulder harness is unfas-
tened or not fastened properly, the
child could be seriously injured.
10. Grasp the right shoulder harness above
the chest clip and pull until the harness
fully extends and a click is heard. At this
time, the harness retractor is in the
automatic locking mode (child restraint
mode). With the child sitting properly
(straight up and back) in the integrated
child safety seat, allow the right shoul-
APD0817APD0818APD0819
Seats, restraints and supplemental air bag systems1-65
ZX
Page 73 of 286
der harness to retract over the right
shoulder and securely restrain the child.
A clicking sound is heard as the har-
ness retracts, indicating that the retrac-
tor is in the automatic locking mode. Be
sure the left shoulder harness is also
properly positioned over the child's left
shoulder.
11. Check that the shoulder harness is in
the automatic locking mode by trying to
pull the shoulder harness out of the
retractor. If you cannot pull any of the
shoulder harness webbing out of the
retractor, the shoulder harness is in the
automatic locking mode. If the shoulder
harness is not locked, repeat step 10. If,
after repeated attempts, the integrated
child safety seat shoulder harness can-
not be placed in the automatic locking
mode, do not use the integrated child
safety seat and have it inspected by an
authorized NISSAN dealer.
To cancel the automatic locking mode, un-
buckle the chest clip and both shoulder
harness tongues. Allow the shoulder har-
nesses to retract completely. The automatic
locking mode is now canceled and theshoulder harness retractor is in the emer-
gency locking mode.
WARNING
The automatic locking mode (child re-
straint mode) must be reactivated each
time you place a child in the integrated
child safety seats.
In addition to the automatic locking retrac-
tors, the integrated child safety seat shoul-
der harnesses are equipped with emer-
gency locking retractors. The automatic
locking mode is best to use, especially for
children who need help staying properly
positioned in the seat and its harnesses (for
example, children who are younger and
smaller), because the belts are always
locked. In the emergency locking mode, the
shoulder belts only lock in a sudden stop or
accident, allowing a child more freedom of
movement. Use the emergency locking
mode only if you judge your child able to
remain properly positioned in the integrated
child safety seat.
Removing the child
1. Release the chest clip.
2. Release the left and right shoulder har-ness tongues from the belt buckle by
pressing the red belt buckle button.
3. Move the left and right shoulder har-
nesses aside and assist the child from
the integrated child safety seat.
Storing the Integrated Child Safety
Seat
1. Be sure the shoulder harnesses are fully
retracted and resting inside the inte-
grated child safety seat recess. It is not
necessary to reconnect the shoulder har-
nesses and belt buckle prior to storing
the integrated child safety seat.
2. While holding onto, but not pulling, the
cushion release strap, rotate the cushion
upward until it fits flush with the second
row seat back cushion and locks into
position.
3. Be sure the integrated child safety seat is
locked in the stowed position by grasping
the safety seat cushion and attempting to
lower it without pulling the cushion re-
lease strap. If the integrated child safety
seat is not locked in the stowed position,
repeat steps one through three.
1-66Seats, restraints and supplemental air bag systems
ZX
Page 74 of 286
Integrated Child Safety Seat main-
tenance
cTo clean the shoulder harnesses and belt
buckle webbing, apply a mild soap solu-
tion or any solution recommended for
cleaning upholstery or carpets. Then
brush the webbing, wipe it with a cloth
and allow it to dry in the shade. Do not
allow the shoulder harnesses to retract
until they are completely dry.
cThe integrated child safety seats cloth
removable pads may be cleaned with
mild soap and water. The cloth remov-
able pads are attached to the seats with
fastener strips, and may be easily re-
moved. The pads are machine washable.
Fo best results, machine wash in cold
water in the gentle cycle. Tumble dry on
low heat. Do not use chlorine bleach, and
do not dry clean.
CAUTION
Failure to follow the washing instruc-
tions provided on the cloth removable
pads may result in premature wear or
damage.cPeriodically inspect the belt and metal
components of the integrated child safety
seats, such as the buckles, tongues,
shoulder harness webbings, and latching
indicators. Periodically check the func-
tion of the integrated child safety seat
shoulder harness retractor functions. If
loose parts, deterioration, cuts, frays,
malfunctions or other damage to the belt
webbings or metal parts are found, see
an authorized NISSAN dealer for repairs.
Inspection after an accident
If your vehicle was involved in an accident,
before using the integrated child safety
seats, all related components should be
inspected for damage by an authorized NIS-
SAN dealer. Damage to the integrated child
safety seat or related components must be
repaired.
Seats, restraints and supplemental air bag systems
1-67
ZX
Page 108 of 286
Sun shade
Open and close the sun shade by sliding it
forward or backward. The shade opens
when the sunroof opens, but it must be
closed manually.
WARNING
cIn an accident you could be thrown
from the vehicle through an open
sunroof. Always use seat belts and
child restraints.
c
Do not allow anyone to stand up or
extend any portion of their body out of
the opening while the vehicle is in
motion or while the sunroof is closing.
CAUTION
c
Remove water drops, snow, ice or
sand from the sunroof before opening.
cDo not place any heavy object on the
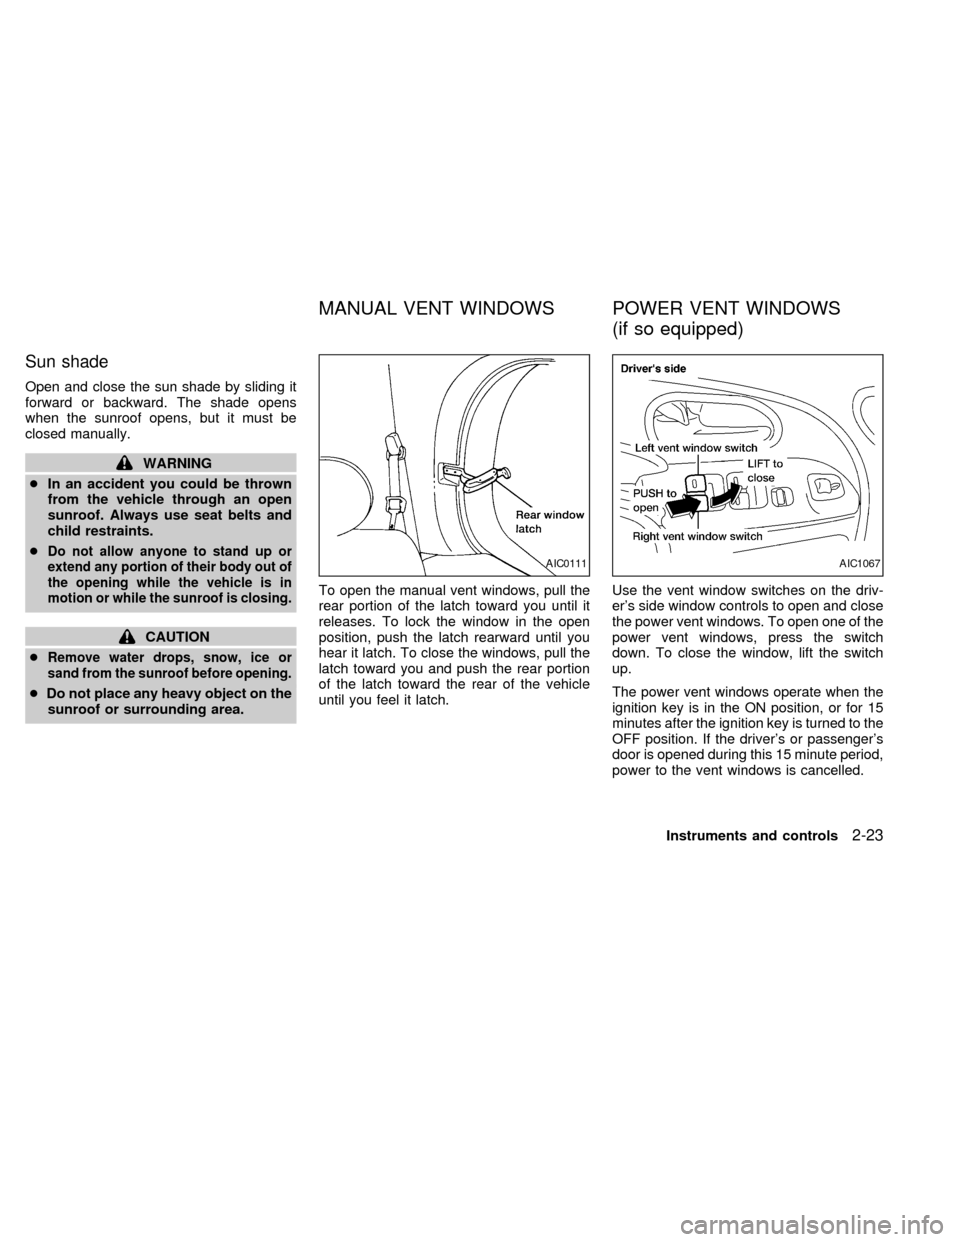
sunroof or surrounding area.To open the manual vent windows, pull the
rear portion of the latch toward you until it
releases. To lock the window in the open
position, push the latch rearward until you
hear it latch. To close the windows, pull the
latch toward you and push the rear portion
of the latch toward the rear of the vehicle
until you feel it latch.Use the vent window switches on the driv-
er's side window controls to open and close
the power vent windows. To open one of the
power vent windows, press the switch
down. To close the window, lift the switch
up.
The power vent windows operate when the
ignition key is in the ON position, or for 15
minutes after the ignition key is turned to the
OFF position. If the driver's or passenger's
door is opened during this 15 minute period,
power to the vent windows is cancelled.
AIC0111AIC1067
MANUAL VENT WINDOWS POWER VENT WINDOWS
(if so equipped)
Instruments and controls2-23
ZX
Page 132 of 286
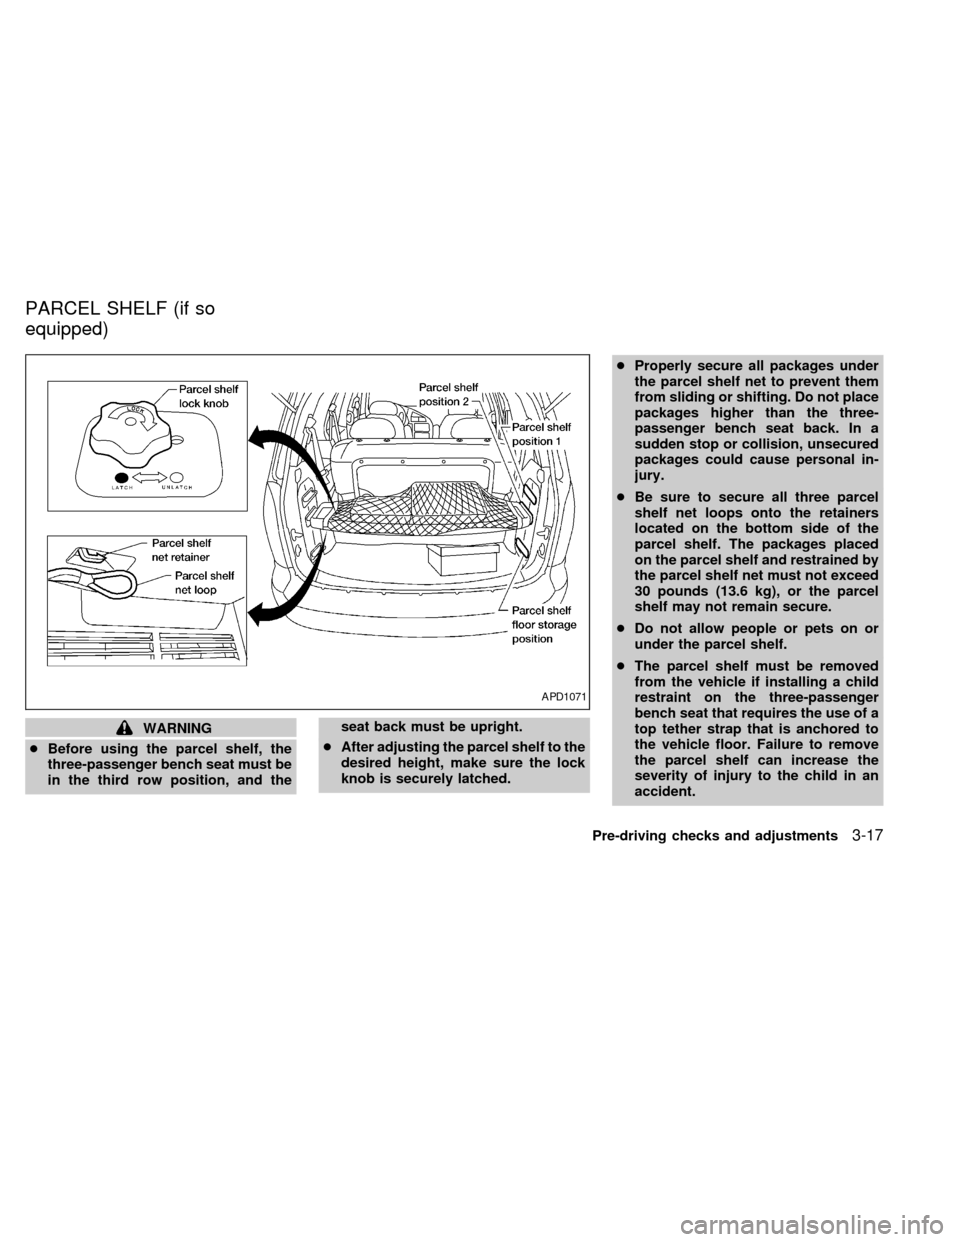
WARNING
cBefore using the parcel shelf, the
three-passenger bench seat must be
in the third row position, and theseat back must be upright.
cAfter adjusting the parcel shelf to the
desired height, make sure the lock
knob is securely latched.cProperly secure all packages under
the parcel shelf net to prevent them
from sliding or shifting. Do not place
packages higher than the three-
passenger bench seat back. In a
sudden stop or collision, unsecured
packages could cause personal in-
jury.
cBe sure to secure all three parcel
shelf net loops onto the retainers
located on the bottom side of the
parcel shelf. The packages placed
on the parcel shelf and restrained by
the parcel shelf net must not exceed
30 pounds (13.6 kg), or the parcel
shelf may not remain secure.
cDo not allow people or pets on or
under the parcel shelf.
cThe parcel shelf must be removed
from the vehicle if installing a child
restraint on the three-passenger
bench seat that requires the use of a
top tether strap that is anchored to
the vehicle floor. Failure to remove
the parcel shelf can increase the
severity of injury to the child in an
accident.
APD1071
PARCEL SHELF (if so
equipped)
Pre-driving checks and adjustments3-17
ZX
Page 280 of 286
11 Index
A
After an accident........................................ 6-11
Air bag (See supplemental restraint
system) ...................................................... 1-19
Air bag warning light .................................. 1-24
Air cleaner housing filter ............................ 8-13
Air conditioner
Air conditioner operation ........................ 4-5
Air conditioner service .......................... 4-14
Air conditioner specification label ....... 10-11
Air conditioner system refrigerant and
lubrication recommendations ................ 10-6
Heater and air conditioner (automatic)
(if so equipped)..................................... 4-11
Heater and air conditioner (manual)....... 4-3
Rear seat air conditioner ...................... 4-14
Air filter
Cabin air filter ....................................... 8-14
Air flow charts .............................................. 4-7
Alarm system (See theft warning) ............. 2-10
Anchor point locations ............................... 1-57
Anti-lock brake system (ABS).................... 5-15
Anti-lock brake warning light ....................... 2-8
Armrests....................................................... 1-6
Ashtray (See cigarette lighter and
ashtray) ...................................................... 2-17Audio system
AM-FM radio with cassette player ........ 4-16
AM-FM radio with cassette player and
compact disc player.............................. 4-22
Compact disc (CD) player ........... 4-28, 4-30
Autolamp switch......................................... 2-14
Automatic
Automatic power window switch .......... 2-21
Automatic transmission fluid (ATF) ........ 8-8
Driving with automatic transmission ....... 5-5
Transmission selector lever lock
release .................................................... 5-6
B
Battery........................................................ 8-11
Before starting the engine ........................... 5-5
Brake
Anti-lock brake system (ABS) .............. 5-15
Brake booster ....................................... 8-20
Brake fluid ................................... 10-2, 8-10
Brake light (See stop light) ................... 8-23
Brake pedal .......................................... 8-19
Brake system ........................................ 5-14
Brake warning light ................................. 2-7
Brake wear indicators ............................. 2-9
Parking brake check ............................. 8-19
Parking brake operation ......................... 5-9Self-adjusting brakes ............................ 8-19
Break-in schedule ...................................... 5-11
Bulb check/instrument panel ....................... 2-6
Bulb replacement ....................................... 8-23
C
Cabin air filter ............................................ 8-14
Capacities and recommended fuel/
lubricants.................................................... 10-2
Cargo net ................................................... 3-16
Cargo (See vehicle loading
information) .............................................. 10-12
Cassette player (See audio system) ......... 4-16
CB radio or car phone ............................... 4-33
Check engine indicator light
(See malfunction indicator light) .................. 2-9
Child restraint with top tether strap ........... 1-51
Child restraints ........................................... 1-41
Child safety sliding door lock....................... 3-6
Cigarette lighter (accessory) and
ashtray ....................................................... 2-17
Cleaning exterior and interior ...................... 7-2
Clock................................................. 4-16, 4-22
Cold weather driving .................................. 5-16
Compact disc (CD) player ................ 4-28, 4-30
ZX
Page 282 of 286
G
Gauge
Engine coolant temperature gauge ........ 2-4
Fuel gauge.............................................. 2-5
Odometer ................................................ 2-4
Speedometer .......................................... 2-4
Tachometer............................................. 2-4
Trip odometer ......................................... 2-4
General maintenance .................................. 9-2
Glove box................................................... 3-13
H
Hazard warning flasher switch .................. 2-16
Head restraints ............................................ 1-6
Headlight control switch............................. 2-13
Headlights .................................................. 8-22
Heater
Heater and air conditioner (automatic)
(if so equipped)..................................... 4-11
Heater and air conditioner (manual)....... 4-3
Rear seat air conditioner ...................... 4-14
Homelink Transceiver
Integrated HomeLinkTUniversal
Transceiver (If so equipped) ................ 2-27
Hood release ............................................. 3-12I
Ignition switch .............................................. 5-4
Important vehicle information label.......... 10-10
Increasing fuel economy............................ 5-12
Indicator lights and chimes (See warning/
indicator lights and chimes) ......................... 2-6
Inertial fuel shut off switch ......................... 6-11
Inside mirror ............................................... 3-24
Instrument brightness control .................... 2-16
Integrated child safety seats...................... 1-61
Integrated HomeLinkTUniversal Transceiver
(If so equipped).......................................... 2-27
Interior lights .............................................. 2-24
J
Jump starting ...................................... 6-8, 8-12
K
Key ............................................................... 3-2
Keyless entry system (See multi-remote
control system) ............................................ 3-9
L
Labels
Air conditioner specification label ....... 10-11
Emission control information label...... 10-10Engine serial number ......................... 10-10
F.M.V.S.S. certification label .............. 10-10
Vehicle identification number (VIN) ...... 10-9
Vehicle identification number (VIN)
plate ...................................................... 10-9
Warning labels (for SRS) ..................... 1-24
License plate
Installing the license plate .................. 10-11
Light
Air bag warning light............................. 1-24
Brake light (See stop light) ................... 8-23
Bulb check/instrument panel .................. 2-6
Bulb replacement.................................. 8-23
Cornering light ...................................... 2-15
Headlight control switch ....................... 2-13
Headlights ............................................. 8-22
Interior lights ......................................... 2-24
Light bulbs ............................................ 8-22
Luggage compartment lights ................ 2-24
Map lights ............................................. 2-25
Warning/indicator lights and chimes ...... 2-6
Lock
Child safety sliding door lock ................. 3-6
Door locks............................................... 3-2
Fuel filler lid lock opener lever ............. 3-20
Power door lock...................................... 3-7
Rear door lock ...................................... 3-15
Luggage compartment lights ..................... 2-24
Luggage rack ............................................. 3-19
Luggage (See vehicle loading
information ............................................... 10-12
11-3
ZX
Page 284 of 286

Seat belt extenders .............................. 1-40
Seat belt maintenance.......................... 1-40
Seat belts.............................................. 1-26
Three-point type with retractor .... 1-29, 1-32
Two-point type without retractor ........... 1-38
Seat belt warning light ................................. 2-7
Seat positions ............................................ 1-73
Seating arrangements ............................... 1-68
Seats
Five passenger seating ........................ 1-70
Five passenger seating with cargo
room...................................................... 1-71
Flexible seating....................................... 1-8
Integrated child safety seats ................ 1-61
Manual front seat adjustment ................. 1-3
Power support front seat ........................ 1-4
Seat positions ....................................... 1-73
Second row bench seat........................ 1-73
Second row bucket seats ..................... 1-77
Seven passenger seating ..................... 1-69
Sliding three-passenger seat................ 1-15
Three-passenger bench seat in fully
forward position .................................... 1-71
Three-passenger bench seat in storage
position ................................................. 1-69
Seats/floor mats ......................................... 1-68
Selector lever lock release .......................... 5-6
Self-adjusting brakes ................................. 8-19
Service manual order form ...................... 10-21
Seven passenger seating .......................... 1-69
Shifting
Automatic transmission .......................... 5-6Shift lock release ......................................... 5-6
Sliding three-passenger seat ..................... 1-15
Spark plug replacement............................. 8-12
Speedometer ............................................... 2-4
Spotlights (See map lights) ....................... 2-25
SRS warning label ..................................... 1-24
Starting
Before starting the engine ...................... 5-5
Jump starting................................. 6-8, 8-12
Precautions when starting and driving ... 5-2
Push starting......................................... 6-10
Starting the engine ................................. 5-8
Steering
Power steering fluid ...................... 10-2, 8-9
Tilting steering wheel............................ 3-21
Stop light .................................................... 8-23
Storage
Overhead storage compartment........... 2-20
Under seat storage tray.......................... 1-7
Storage compartment for garage door
transmitter .................................................. 2-25
Sun shade.................................................. 2-23
Sunroof ...................................................... 2-22
Supplemental restraint system
Information and warning labels ............ 1-24
Switch
Autolamp switch ................................... 2-14
Automatic power window switch .......... 2-21
Hazard warning flasher switch ............. 2-16
Headlight control switch ....................... 2-13
Ignition switch ......................................... 5-4
Overdrive switch ..................................... 5-7Rear window defogger switch .............. 2-13
Rear window wiper and washer
switches ................................................ 2-13
Turn signal switch................................. 2-15
Windshield wiper and washer switch ... 2-12
T
Tabletop seats ............................................. 1-7
Tachometer .................................................. 2-4
Theft warning ............................................. 2-10
Three way catalyst....................................... 5-2
Three-passenger bench seat..................... 1-37
Three-passenger bench seat in fully
forward position ......................................... 1-71
Three-passenger bench seat in storage
position....................................................... 1-69
Tilting steering wheel ................................. 3-21
Timing belt ................................................. 10-7
Tire
Flat tire.................................................... 6-2
Spare tire .............................................. 8-31
Tire chains ............................................ 8-29
Tire placard......................................... 10-11
Tire pressure .......................................... 5-6
Tire pressure ........................................ 8-27
Tire rotation .......................................... 8-29
Tool kit .................................................... 6-2
Types of tires ........................................ 8-28
Uniform tire quality grading ................ 10-18
Wheels and tires ......................... 10-8, 8-27
11-5
ZX