1999 NISSAN FRONTIER power steering
[x] Cancel search: power steeringPage 69 of 247

3 Pre-driving checks and adjustments
Key .........................................................................3-2
Door locks ..............................................................3-2
Power door lock (if so equipped) ...........................3-3
Multi-remote control system (if so equipped).........3-4
Battery replacement ...............................................3-7
Hood release ..........................................................3-8
Glove box ...............................................................3-9
Fuel filler cap ..........................................................3-9Tailgate latch ........................................................3-10
Tie down hooks ....................................................3-12
Tilting steering wheel (if so equipped) .................3-13
Outside mirror remote control (if so equipped) ....3-13
Outside mirrors .....................................................3-14
Inside mirror .........................................................3-14
Vanity mirror (if so equipped)...............................3-15
ZX
Page 81 of 247
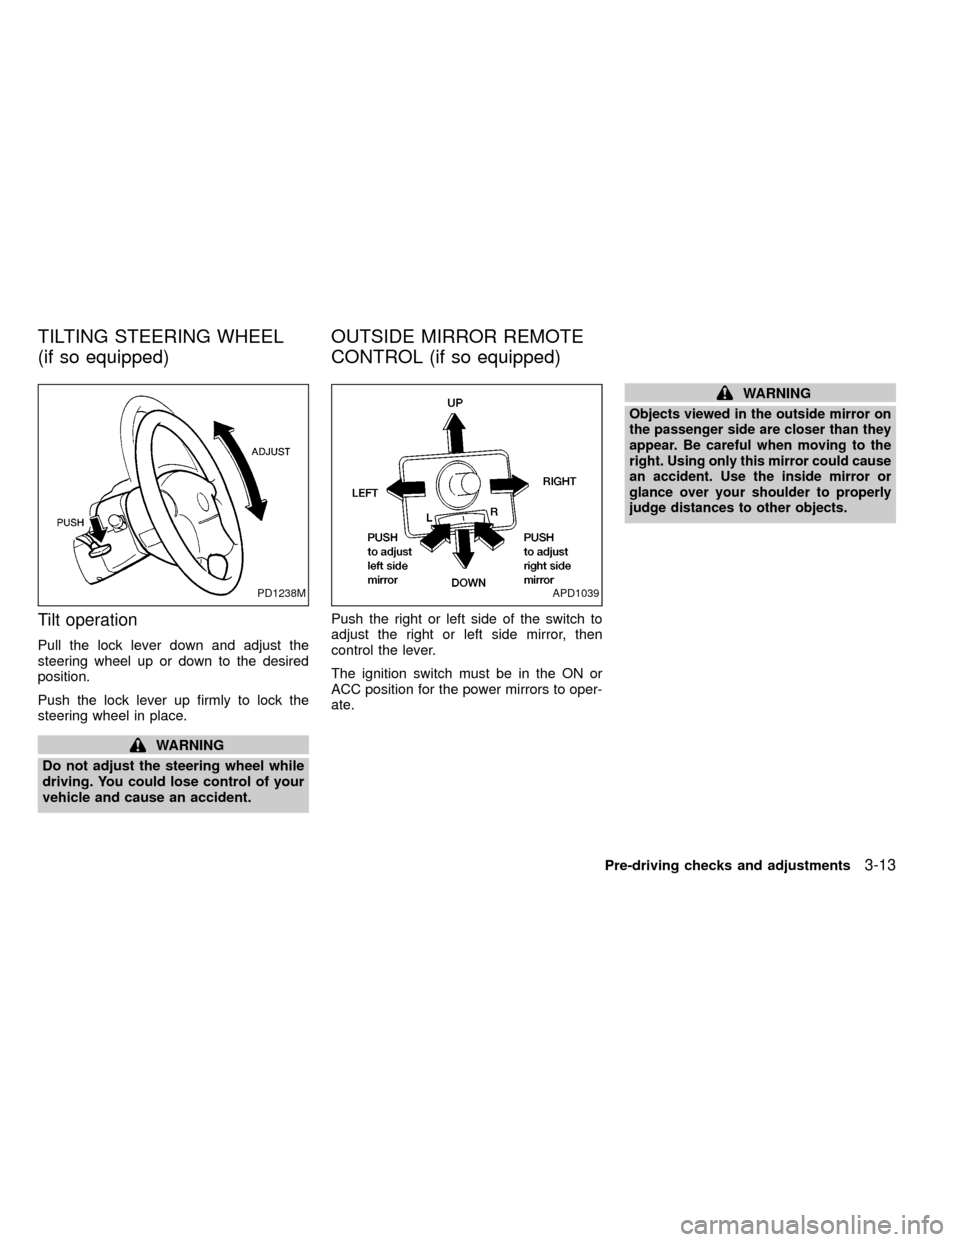
Tilt operation
Pull the lock lever down and adjust the
steering wheel up or down to the desired
position.
Push the lock lever up firmly to lock the
steering wheel in place.
WARNING
Do not adjust the steering wheel while
driving. You could lose control of your
vehicle and cause an accident.Push the right or left side of the switch to
adjust the right or left side mirror, then
control the lever.
The ignition switch must be in the ON or
ACC position for the power mirrors to oper-
ate.
WARNING
Objects viewed in the outside mirror on
the passenger side are closer than they
appear. Be careful when moving to the
right. Using only this mirror could cause
an accident. Use the inside mirror or
glance over your shoulder to properly
judge distances to other objects.
PD1238MAPD1039
TILTING STEERING WHEEL
(if so equipped)OUTSIDE MIRROR REMOTE
CONTROL (if so equipped)
Pre-driving checks and adjustments3-13
ZX
Page 109 of 247

5 Starting and driving
Precautions when starting and driving ...................5-2
Exhaust gas (carbon monoxide) ............................5-2
Three-way catalyst ..................................................5-2
On-pavement and off-road driving precautions......5-3
Avoiding collision and rollover ................................5-3
Drinking alcohol/drugs and driving .........................5-4
Ignition switch .........................................................5-4
Manual transmission...............................................5-4
Automatic transmission ..........................................5-5
Before starting the engine ......................................5-6
Driving with automatic transmission (if so
equipped) ...............................................................5-6
Driving with manual transmission.........................5-12
Starting the engine ...............................................5-14
Parking brake operation .......................................5-14Cruise control (if so equipped) .............................5-16
Break-in schedule ................................................5-18
Increasing fuel economy ......................................5-18
Transfer case shifting procedures for 4-wheel
drive vehicles........................................................5-19
Auto-lock free-running hubs .................................5-20
Manual-lock free-running hubs.............................5-22
Driving your four-wheel drive safely .....................5-24
Tires of four-wheel drive ......................................5-26
Parking/parking on hills ........................................5-27
Power steering system .........................................5-28
Brake system........................................................5-28
Anti-lock brake system (ABS) ..............................5-29
Cold weather driving ............................................5-30
ZX
Page 136 of 247
hill grade, place the gearshift lever in the
1st position.
Automatic transmission models:
Move the gearshift lever to the P (Park)
position.
3. To help prevent the vehicle from rolling
into the street when parked on an incline,
it is a good practice to turn the wheels as
illustrated.
IHEADED DOWNHILL WITH CURB:À
1
Turn the wheels into the curb and move
the vehicle forward until the curb side
wheel gently touches the curb.
IHEADED UPHILL WITH CURB:Á
2
Turn the wheels away from the curb and
move the vehicle back until the curb side
wheel gently touches the curb.
IHEADED UPHILL OR DOWNHILL, NO
CURB:Â
3
Turn the wheels toward the side of the
road so the vehicle will move away from
the center of the road if it moves.
4. Turn the ignition key to the LOCK posi-
tion and remove the key.The power assisted steering is designed to
use a hydraulic pump, driven by the engine,
to assist steering.
If the engine stops or drive belt breaks, you
will still have control of the vehicle. How-
ever, much greater steering effort is needed,
especially in sharp turns and at low speeds.
WARNING
If the engine is not running or is turned
off while driving, the power assist for
the steering will not work. Steering will
be much harder to operate.The brake system has two separate hydrau-
lic circuits. If one circuit develops a problem,
you will still have braking at two wheels.
Vacuum assisted brakes
The brake booster aids braking by using
engine vacuum. If the engine stops, you can
stop the vehicle by depressing the brake
pedal. However, greater foot pressure on
the brake pedal will be required to stop the
vehicle and stopping distance will be longer.
Wet brakes
When the vehicle is washed or driven
through water, the brakes may get wet. As a
result, your braking distance will be longer
and the vehicle may pull to one side during
braking.
To dry the brakes, drive the vehicle at a safe
speed while lightly pressing the brake pedal
to heat the brakes. Do this until the brakes
return to normal. Avoid driving the vehicle at
high speeds until the brakes function cor-
rectly.
POWER STEERING SYSTEM BRAKE SYSTEM
5-28Starting and driving
ZX
Page 137 of 247
Using the brakes
Avoid resting your foot on the brake pedal
while driving. This will overheat the brakes,
wear out the brake linings and pads faster,
and reduce gas mileage.
To help reduce brake wear, and to prevent
the brakes from overheating, reduce speed
and downshift to a lower gear before going
down a slope or long grade.
WARNING
IWhile driving on a slippery surface,
be careful when braking, accelerat-
ing or downshifting. Abrupt braking
actions or sudden acceleration
could cause the wheels to skid and
result in an accident.
IIf the engine is not running or is
turned off while driving, the power
assist for the brakes will not work.
Braking will be harder.
Normal Operation
The anti-lock brake system does not oper-
ate at speeds below 3 to 6 MPH (5 to 10
km/h). (The speeds vary according to road
conditions.)
When driving, the anti-lock brake system
controls the wheels so they will not lock
when braking abruptly or when braking on a
slippery road. Thus, difficult steering and
swerving of the vehicle due to locked
wheels is minimized. The system detects
the wheel rotation rate and electronically
controls the pressure applied to each brake.
Slight vibration on the brake pedal accom-
panied by noise usually occurs while the
ABS system is operating. Such vibration
and noise encountered during abrupt brak-
ing is not a problem, but indicates that the
system is functioning.
Self-test feature
The anti-lock brake system consists of elec-
tronic sensors and hydraulic solenoids con-
trolled by a computer. The computer has a
built-in diagnostic feature that tests the sys-
tem each time you start the engine and
move the vehicle at a low speed in forward
or reverse. When the self-test occurs, youmay hear a ``clunk'' noise and/or feel a
pulsation in the brake pedal. This is normal
and is not an indication of any malfunction. If
the computer senses any malfunction, it
switches the anti-lock brake system off and
turns on the ABS brake warning light in the
dashboard. The brake system then operates
normally, but without anti-lock assistance.
If an abnormality occurs in the system, the
anti-lock function will cease but the ordinary
brakes will continue to operate normally. The
ABS brake warning light will then come on.
If the light comes on while you are driving,
contact an authorized NISSAN dealer for
repair.
Using the System, 4WD Vehicles
(4 wheel ABS)
Depress the brake pedal and hold it down.
WARNING
Do not pump the brake pedal. Doing so
may result in increased stopping dis-
tances.
ANTI-LOCK BRAKE SYSTEM
(ABS)
Starting and driving5-29
ZX
Page 151 of 247
When towing your vehicle, U.S. States, Ca-
nadian provinces and local regulations for
towing must be followed. Incorrect towing
equipment could damage your vehicle. Tow-
ing instructions are available from an autho-
rized NISSAN dealer. Local service operators
are generally familiar with the applicable laws
and procedures for towing. To assure proper
towing and to prevent accidental damage to
your vehicle, NISSAN recommends having a
service operator tow your vehicle. It is advis-
able to have the service operator carefully
read the following precautions:
WARNING
INever ride in a vehicle that is being
towed.
INever get under your vehicle after it
has been lifted by a tow truck.
CAUTION
IWhen towing, make sure that the
transmission, axles, steering system
and powertrain are in working con-
dition. If any unit is damaged, a dolly
must be used.IWhen towing with the front wheels
on the ground:
Turn the ignition key to the OFF
position and secure the steering
wheel in a straight-ahead position
with a rope or similar device. Never
place the ignition key in the LOCK
position. This will result in damage
to the steering lock mechanism.
IWhen towing with the rear wheels on
the ground:
Release the parking brake and move
the gearshift lever to the N (Neutral)
position.
On automatic transmission models,
to move the shift lever to N (Neutral),
turn the ignition key to the ACC po-
sition. After moving the shift lever to
N (neutral), be sure to turn the igni-
tion key to the OFF position.
IFor four-wheel drive models:
Set the free-running hubs to the free
position. See ``
Auto-lock free-
running hubsº or ``Manual-lock
free-running hubsº as appropriate in
the ``Starting and driving'' section.Move the transfer case shift lever
into the 2H position and the trans-
mission shift lever into the N (Neu-
tral) position.
IAttach safety chains for all towing.
TOW TRUCK TOWING
In case of emergency6-11
ZX
Page 161 of 247

8 Do-it-yourself
Maintenance precautions .......................................8-2
Engine compartment check locations ....................8-3
Engine cooling system ...........................................8-5
Checking engine coolant level ...............................8-5
Changing engine coolant .......................................8-6
Engine oil ...............................................................8-9
Checking engine oil level .......................................8-9
Changing engine oil .............................................8-10
Changing engine oil filter .....................................8-12
Automatic transmission fluid (atf) .........................8-13
Temperature conditions for checking atf..............8-13
Power steering fluid..............................................8-14
Brake and clutch fluid ...........................................8-15
Window washer fluid ............................................8-15
Battery ..................................................................8-16
Jump starting ........................................................8-17
Drive belts ............................................................8-18Spark plug replacement .......................................8-19
Air cleaner housing filter ......................................8-21
Wiper blades ........................................................8-23
Parking brake check.............................................8-24
Brake pedal ..........................................................8-24
Brake booster .......................................................8-25
Clutch pedal .........................................................8-26
Fuses ....................................................................8-27
Light bulbs ............................................................8-28
Headlights ............................................................8-28
Bulb replacement .................................................8-29
Front fog light bulb replacement (if so
equipped) .............................................................8-31
Wheels and tires...................................................8-32
Four-wheel drive models ......................................8-35
Clutch housing .....................................................8-37
ZX
Page 174 of 247
CAUTION
IDO NOT OVERFILL.
I
Use ONLY NISSAN Matic `D' (Conti-
nental U.S. and Alaska) or genuine
NISSAN Automatic Transmission
Fluid (Canada). Dexron
TMIII/MerconTM
or equivalent may also be used. Out-
side the continental United States and
Alaska contact an authorized NISSAN
dealership for more information re-
garding suitable fluids, including rec-
ommended brands of Dexron
TM
III/MerconTM.
NOTE:
If the vehicle has been driven for a long
time at high speeds, or in city traffic in
hot weather, or if it is being used to pull
a trailer, the fluid level cannot be read
accurately. You should wait until the fluid
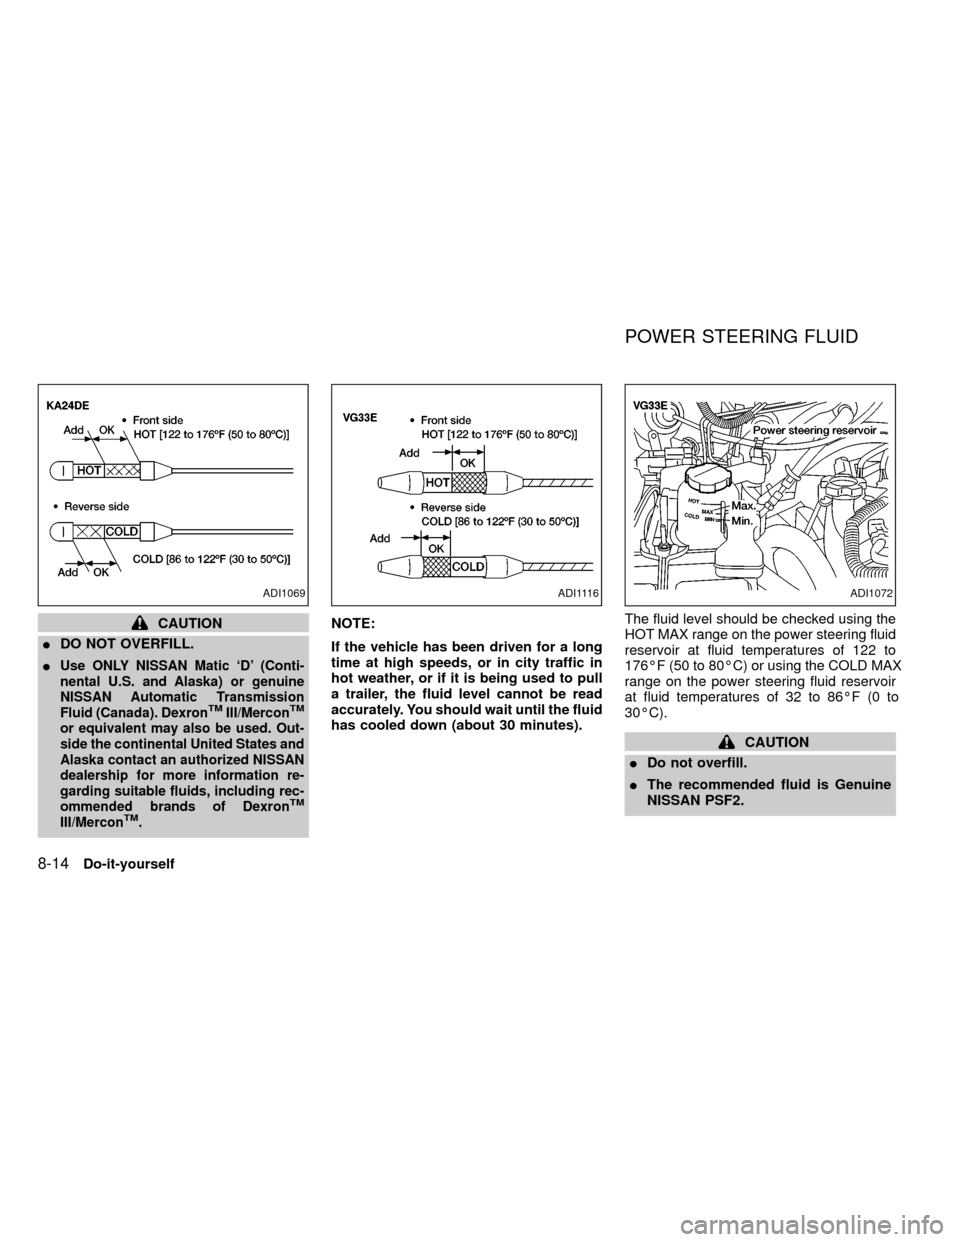
has cooled down (about 30 minutes).The fluid level should be checked using the
HOT MAX range on the power steering fluid
reservoir at fluid temperatures of 122 to
176ÉF (50 to 80ÉC) or using the COLD MAX
range on the power steering fluid reservoir
at fluid temperatures of 32 to 86ÉF (0 to
30ÉC).
CAUTION
IDo not overfill.
IThe recommended fluid is Genuine
NISSAN PSF2.
ADI1069ADI1116ADI1072
POWER STEERING FLUID
8-14Do-it-yourself
ZX