Page 1395 of 1529

IN CAR ENTERTAINMENT
86-6-28 DESCRIPTION AND OPERATION
Fault Finding
The following table details potential faults, possible causes and rectification suggestions.
Fault Possible Cause Rectification
System fails to power up Missing or blown fuse Check both fuses in passenger compartment fusebox
Battery voltage too low or too high Voltage protection system may be active. Check battery
voltage output
Faulty connections Check all DVD harness connections for security and
correct location of pins
Faulty overhead console Replace overhead console
Damaged DVD harness Check all DVD harnesses for damage and repair or
replace as required
Faulty noise filter connection Check power supply wires into and out of the noise filter
on the CD switch box
No picture or sound Missing or blown fuse Check both fuses in passenger compartment fusebox
Low or high battery voltage Check battery voltage output
Vehicle interior is too hot or too
coldAllow vehicle interior to warm up or cool down before
switching on the system
DVD parental rating system is
preventing DVD playRefer to DVD System Owner's Manual and check the
parental control rating setting
LCD monitor is pushed too far
forwardReturn LCD monitor to an angle for normal viewing
Good picture, no sound Volume setting on audio head unit
too lowCheck and adjust head unit volume control
Headphone not connected, faulty
headphone or headphone volume
control incorrectly setEnsure headphone is correctly connected.
Check headphone for correct operation.
check headphone remote volume control setting.
Faulty connections Check all DVD harness connections for security and
correct location of pins
CD switch box or harness fault Check all harnesses to and from the CD switch box. If
harnesses OK, replace CD switch
Faulty overhead console Replace overhead console
Good sound, poor or no
pictureVehicle interior is too cold Allow the vehicle interior to warm up before switching on
the system
Source mode set incorrectly Press the 'Source' button on the remote handset to set
the correct operating mode
Faulty overhead console Replace overhead console
Remote control handset
does not functionCheck batteries in remote control
handsetReplace batteries with new batteries
Ensure that infra-red sensor on
overhead console is not
obstructedLower LCD monitor and check that sensor is not
obstructed or dirty
Status LED on overhead
console is flashingVehicle interior is too hot allow vehicle interior to cool down before switching on
the system
Audio through vehicle
speakers but not through
wired headphonesFaulty headphones Check headphone for correct operation.
Faulty overhead console Replace overhead console
Audio through vehicle
speakers but not through
wireless headphonesFaulty batteries in wireless
headphonesReplace batteries
Faulty headphones Test with known operational headphones and replace
headphones if necessary
Faulty RF transmitter or connector Replace overhead console
Faulty overhead console Replace overhead console
Page 1396 of 1529

IN CAR ENTERTAINMENT
DESCRIPTION AND OPERATION 86-6-29
Audio through headphones
but not through vehicle
speakersFaulty connections a CD switch
boxCheck DVD harnesses and connectors into and out of
the CD switch box
CD switch box internal switches
incorrectly setCheck internal switches on CD switch box for correct
settings for vehicle audio head unit
Faulty CD autochanger (if fitted) Check and if necessary replace CD autochanger
Faulty CD switch box Check and replace CD switch box
Audio CD autochanger does
not operateMissing or blown fuse Check both fuses in passenger compartment fusebox
DVD system speaker setting
incorrectPress speaker button on overhead console or remote
control handset to switch from DVD audio to head unit
CD audio
Faulty audio connections Check all connectors from the audio head unit to the CD
autochanger
Faulty CD autochanger Replace CD autochanger
Faulty CD switch box connections Check CD switch box connectors for security and
correct location of pins
Faulty CD switch box Replace CD switch box
Faulty main DVD harness Check main DVD harness for damage and repair or
replace as necessary
Faulty overhead console Replace overhead console
Overhead console DVD
player will not accept discsMissing or blown fuse Check both fuses in passenger compartment fusebox
Faulty or damaged disc check disc and try a known operational disc
Faulty overhead console Replace overhead console
Page 1398 of 1529
IN CAR ENTERTAINMENT
REPAIRS 86-6-31
REPAIRS
Radio
$% 86.50.03
Remove
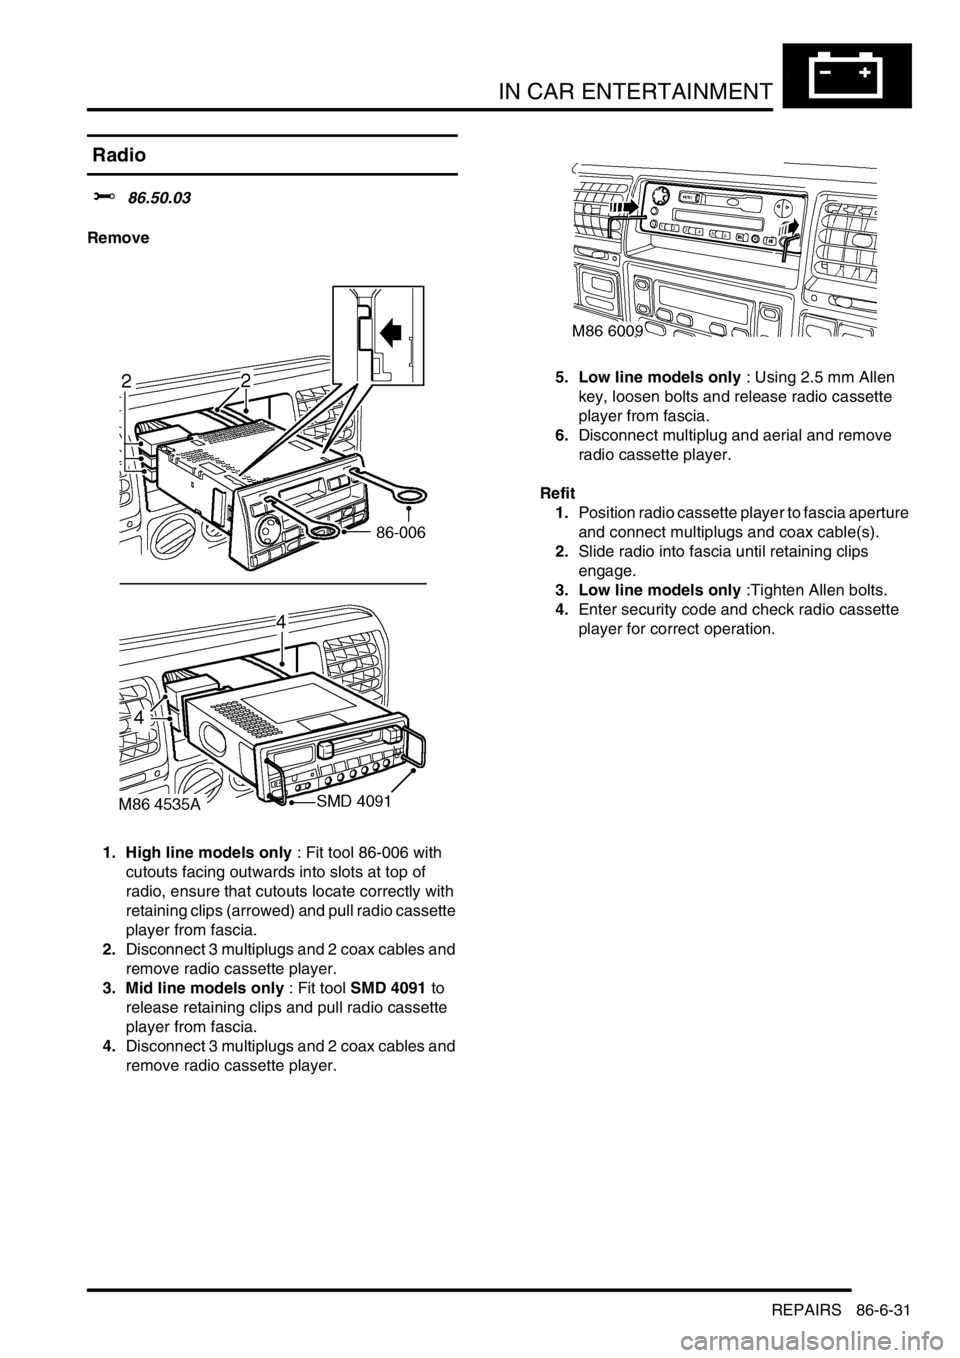
1. High line models only : Fit tool 86-006 with
cutouts facing outwards into slots at top of
radio, ensure that cutouts locate correctly with
retaining clips (arrowed) and pull radio cassette
player from fascia.
2.Disconnect 3 multiplugs and 2 coax cables and
remove radio cassette player.
3. Mid line models only : Fit tool SMD 4091 to
release retaining clips and pull radio cassette
player from fascia.
4.Disconnect 3 multiplugs and 2 coax cables and
remove radio cassette player.5. Low line models only : Using 2.5 mm Allen
key, loosen bolts and release radio cassette
player from fascia.
6.Disconnect multiplug and aerial and remove
radio cassette player.
Refit
1.Position radio cassette player to fascia aperture
and connect multiplugs and coax cable(s).
2.Slide radio into fascia until retaining clips
engage.
3. Low line models only :Tighten Allen bolts.
4.Enter security code and check radio cassette
player for correct operation.
Page 1399 of 1529
IN CAR ENTERTAINMENT
86-6-32 REPAIRS
Speaker - low/full range - front door
$% 86.50.10
Remove
1.Remove front door trim casing.
+ DOORS, REPAIRS, Trim casing -
front door.
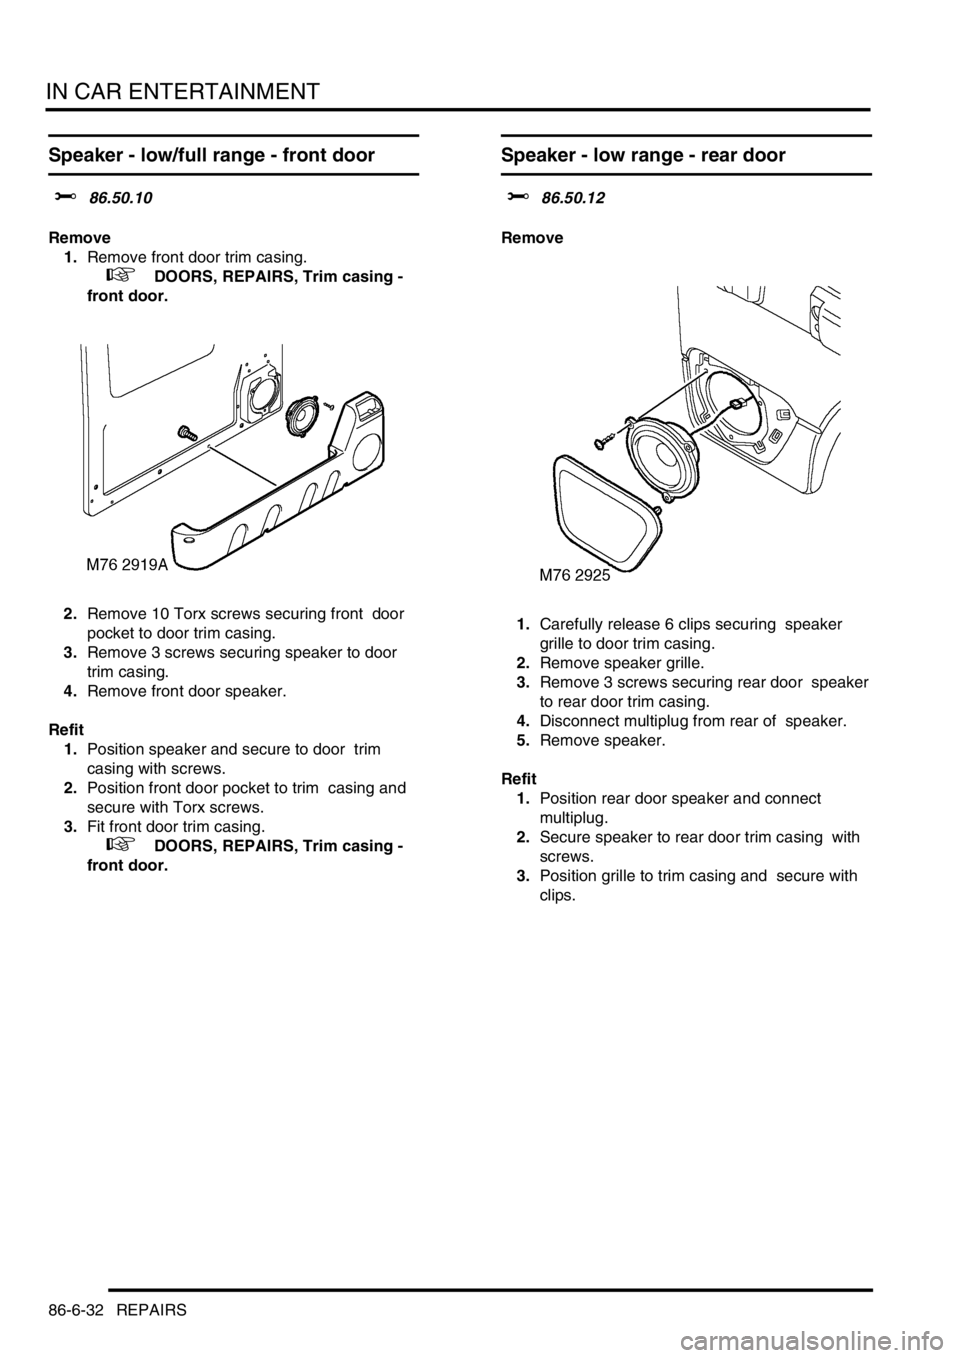
2.Remove 10 Torx screws securing front door
pocket to door trim casing.
3.Remove 3 screws securing speaker to door
trim casing.
4.Remove front door speaker.
Refit
1.Position speaker and secure to door trim
casing with screws.
2.Position front door pocket to trim casing and
secure with Torx screws.
3.Fit front door trim casing.
+ DOORS, REPAIRS, Trim casing -
front door.
Speaker - low range - rear door
$% 86.50.12
Remove
1.Carefully release 6 clips securing speaker
grille to door trim casing.
2.Remove speaker grille.
3.Remove 3 screws securing rear door speaker
to rear door trim casing.
4.Disconnect multiplug from rear of speaker.
5.Remove speaker.
Refit
1.Position rear door speaker and connect
multiplug.
2.Secure speaker to rear door trim casing with
screws.
3.Position grille to trim casing and secure with
clips.
Page 1400 of 1529
IN CAR ENTERTAINMENT
REPAIRS 86-6-33
Switches - remote control - ICE
$% 86.50.13
Remove
1.Remove the key from the starter switch.
Disconnect both battery leads, negative lead
first. Wait ten minutes before starting work.
2.Remove driver's airbag module.
+ RESTRAINT SYSTEMS, REPAIRS,
Airbag module - drivers.
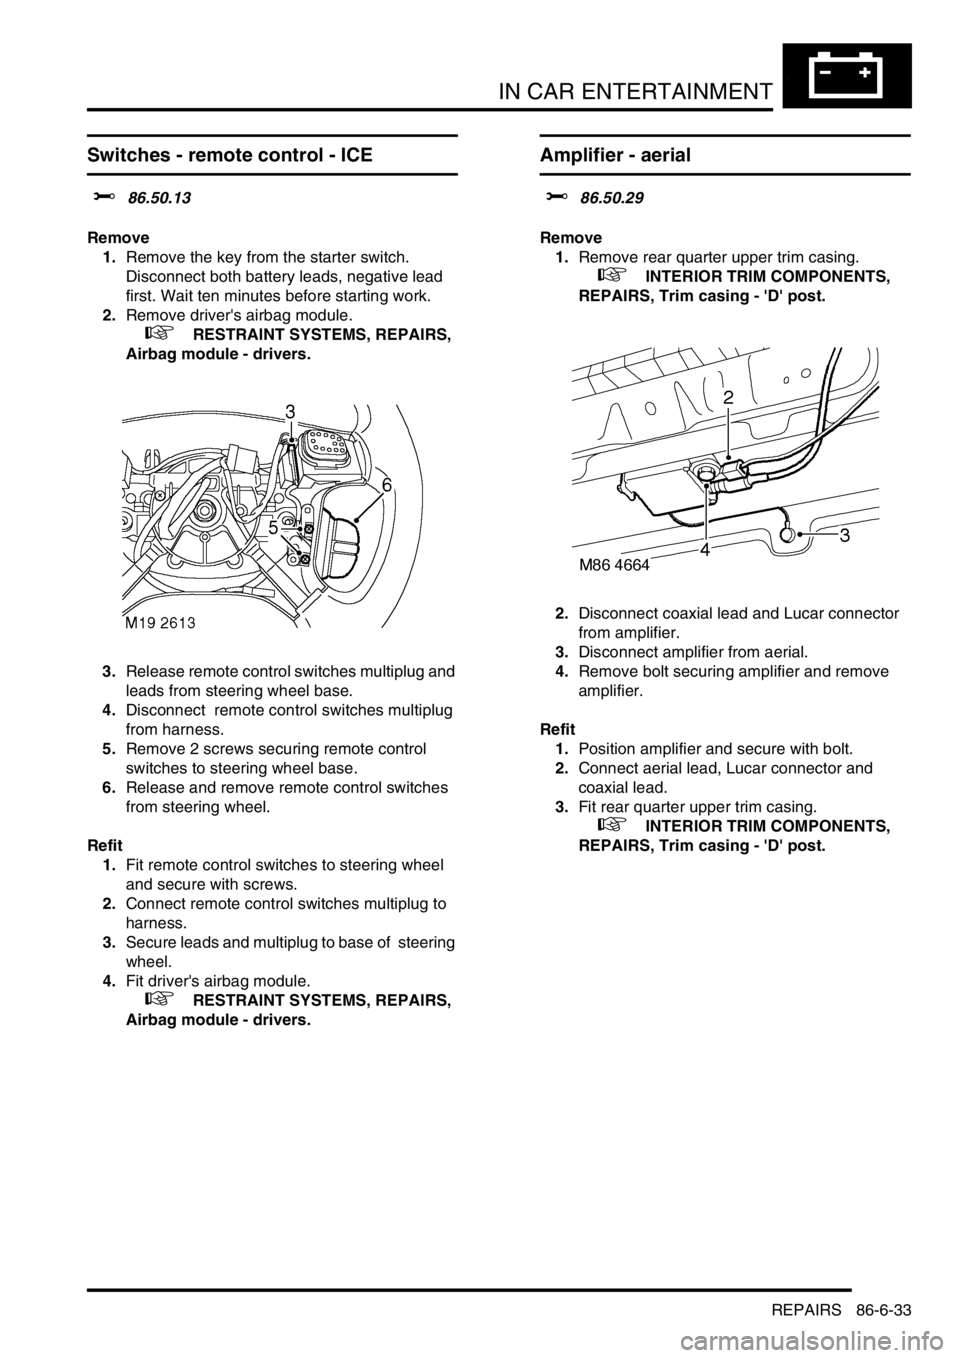
3.Release remote control switches multiplug and
leads from steering wheel base.
4.Disconnect remote control switches multiplug
from harness.
5.Remove 2 screws securing remote control
switches to steering wheel base.
6.Release and remove remote control switches
from steering wheel.
Refit
1.Fit remote control switches to steering wheel
and secure with screws.
2.Connect remote control switches multiplug to
harness.
3.Secure leads and multiplug to base of steering
wheel.
4.Fit driver's airbag module.
+ RESTRAINT SYSTEMS, REPAIRS,
Airbag module - drivers.
Amplifier - aerial
$% 86.50.29
Remove
1.Remove rear quarter upper trim casing.
+ INTERIOR TRIM COMPONENTS,
REPAIRS, Trim casing - 'D' post.
2.Disconnect coaxial lead and Lucar connector
from amplifier.
3.Disconnect amplifier from aerial.
4.Remove bolt securing amplifier and remove
amplifier.
Refit
1.Position amplifier and secure with bolt.
2.Connect aerial lead, Lucar connector and
coaxial lead.
3.Fit rear quarter upper trim casing.
+ INTERIOR TRIM COMPONENTS,
REPAIRS, Trim casing - 'D' post.
Page 1401 of 1529
IN CAR ENTERTAINMENT
86-6-34 REPAIRS
Speaker - mid range - front door
$% 86.50.34
Remove
1.Remove front door trim casing.
+ DOORS, REPAIRS, Trim casing -
front door.
2.Remove locknut securing speaker to front door
trim casing.
3.Remove speaker.
Refit
1.Position speaker and secure to door trim
casing using locknut.
2.Fit front door trim casing.
+ DOORS, REPAIRS, Trim casing -
front door.
Speaker - high range - rear door
$% 86.50.35
Remove
1.Remove rear door trim casing.
+ DOORS, REPAIRS, Trim casing -
rear door.
2.Remove speaker locknut.
3.Remove speaker from door trim casing.
Refit
1.Position speaker and secure withlocknut to
rear door trim casing.
2.Fit rear door trim casing.
+ DOORS, REPAIRS, Trim casing -
rear door.
Page 1402 of 1529
IN CAR ENTERTAINMENT
REPAIRS 86-6-35
Amplifier - power
$% 86.50.36
Remove
1.Release fixings and remove battery cover.
2.Disconnect battery earth lead.
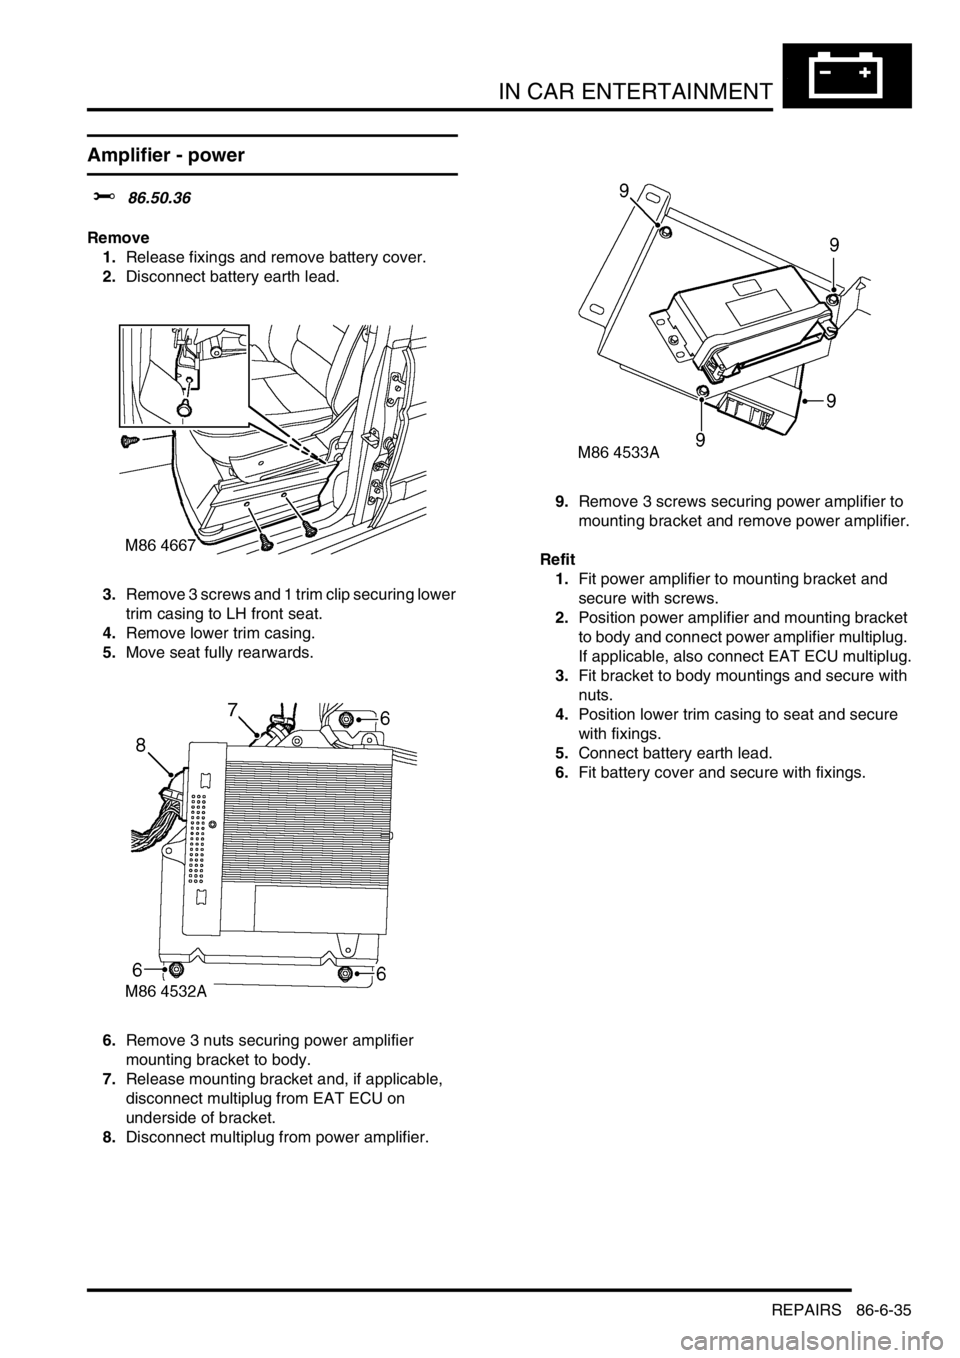
3.Remove 3 screws and 1 trim clip securing lower
trim casing to LH front seat.
4.Remove lower trim casing.
5.Move seat fully rearwards.
6.Remove 3 nuts securing power amplifier
mounting bracket to body.
7.Release mounting bracket and, if applicable,
disconnect multiplug from EAT ECU on
underside of bracket.
8.Disconnect multiplug from power amplifier. 9.Remove 3 screws securing power amplifier to
mounting bracket and remove power amplifier.
Refit
1.Fit power amplifier to mounting bracket and
secure with screws.
2.Position power amplifier and mounting bracket
to body and connect power amplifier multiplug.
If applicable, also connect EAT ECU multiplug.
3.Fit bracket to body mountings and secure with
nuts.
4.Position lower trim casing to seat and secure
with fixings.
5.Connect battery earth lead.
6.Fit battery cover and secure with fixings.
Page 1403 of 1529
IN CAR ENTERTAINMENT
86-6-36 REPAIRS
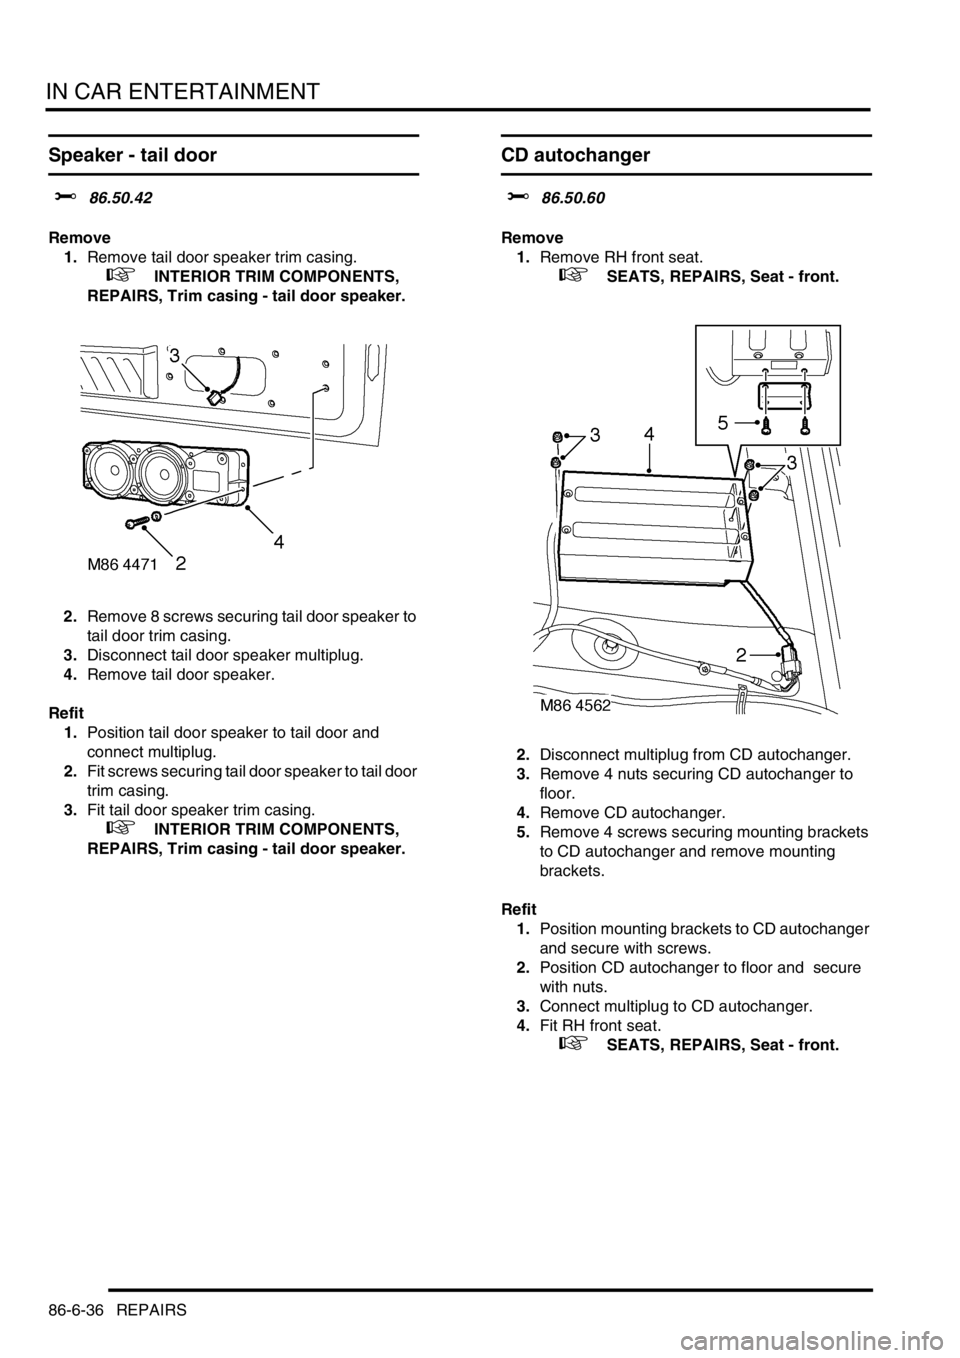
Speaker - tail door
$% 86.50.42
Remove
1.Remove tail door speaker trim casing.
+ INTERIOR TRIM COMPONENTS,
REPAIRS, Trim casing - tail door speaker.
2.Remove 8 screws securing tail door speaker to
tail door trim casing.
3.Disconnect tail door speaker multiplug.
4.Remove tail door speaker.
Refit
1.Position tail door speaker to tail door and
connect multiplug.
2.Fit screws securing tail door speaker to tail door
trim casing.
3.Fit tail door speaker trim casing.
+ INTERIOR TRIM COMPONENTS,
REPAIRS, Trim casing - tail door speaker.
CD autochanger
$% 86.50.60
Remove
1.Remove RH front seat.
+ SEATS, REPAIRS, Seat - front.
2.Disconnect multiplug from CD autochanger.
3.Remove 4 nuts securing CD autochanger to
floor.
4.Remove CD autochanger.
5.Remove 4 screws securing mounting brackets
to CD autochanger and remove mounting
brackets.
Refit
1.Position mounting brackets to CD autochanger
and secure with screws.
2.Position CD autochanger to floor and secure
with nuts.
3.Connect multiplug to CD autochanger.
4.Fit RH front seat.
+ SEATS, REPAIRS, Seat - front.