1999 LAND ROVER DISCOVERY charging
[x] Cancel search: chargingPage 1217 of 1529

AIR CONDITIONING
82-28REFRIGERANT RECOVERY, RECYCLING AND RECHARGING
Recharging
NOTE: When recharging, always make
allowance for refrigerant in the line between the
charging station and the vehicle. This is
calculated at 30 grammes/metre of charging
line. System charge weights are 700
± 25
grammes for front A/C system only and 900
±
25 grammes for combined front and rear A/C
system.
1.Close valves on refrigerant station.
2.Close valve on oil charger.
3.Disconnect yellow hose from refrigerant
station.
4.Remove lid from oil charger.
5.Pour same quantity of refrigerant oil into oil
charger as collected during recovery. If the
following components have been renewed, add
the following additional quantity of lubricating
oil:
lCondenser = 40 cm
3
lEvaporator = 40 cm3
lPipe or hose = 5 cm3/metre
lReceiver/dryer = 15 cm3.
6.Fit lid to oil charger.
7.Connect yellow hose to refrigerant station.
8.Open valve on oil charger.
9.Move pointer on refrigerant gauge to mark
position of refrigerant charge quantity.
+ CAPACITIES, FLUIDS,
LUBRICANTS AND SEALANTS, Capacities.
10.Slowly open correct valve on refrigerant station
and allow vacuum to pull refrigerant into
system.
11.Close valve on refrigerant station when correct
amount of refrigerant has been drawn into air
conditioning system.
12.Turn Main switch to 'OFF'.
13.Close valves on connectors.
14.Disconnect high and low pressure hoses from
connectors.
15.Fit dust caps to connectors.
Page 1218 of 1529
AIR CONDITIONING
REPAIRS 82-29
REPAIRS
Compressor - diesel
$% 82.10.20
Remove
1.Remove engine acoustic cover.
2.Depressurise air conditioning system.
+ AIR CONDITIONING, REFRIGERANT
RECOVERY, RECYCLING AND
RECHARGING, Refrigerant recovery,
recycling and recharging.
3.Remove auxiliary drive belt.
+ CHARGING AND STARTING,
REPAIRS, Belt - auxiliary drive.
4.Drain cooling system.
+ COOLING SYSTEM - Td5,
ADJUSTMENTS, Drain and refill.
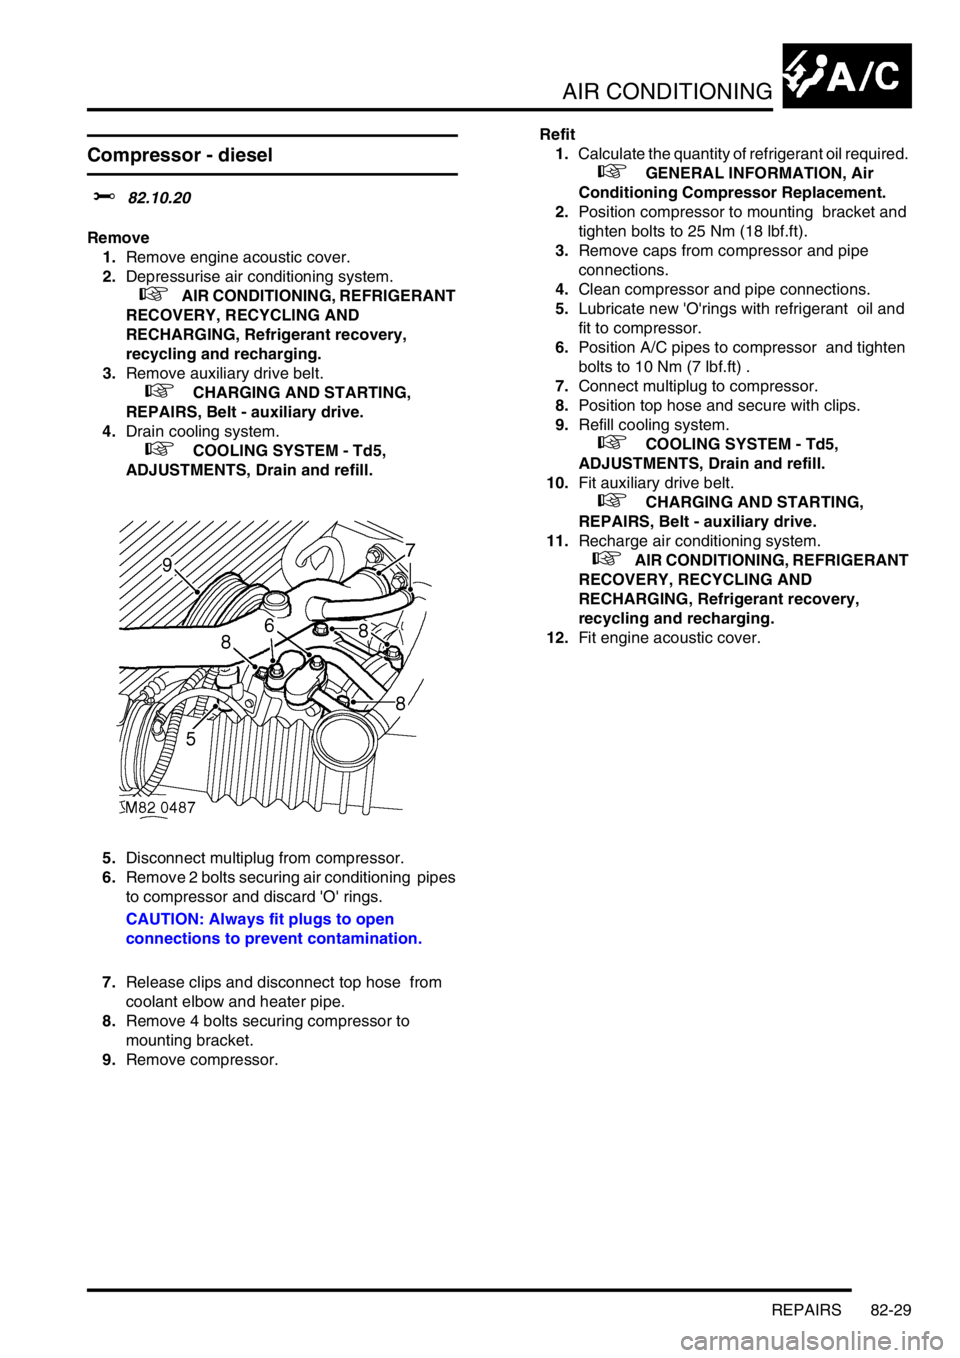
5.Disconnect multiplug from compressor.
6.Remove 2 bolts securing air conditioning pipes
to compressor and discard 'O' rings.
CAUTION: Always fit plugs to open
connections to prevent contamination.
7.Release clips and disconnect top hose from
coolant elbow and heater pipe.
8.Remove 4 bolts securing compressor to
mounting bracket.
9.Remove compressor.Refit
1.Calculate the quantity of refrigerant oil required.
+ GENERAL INFORMATION, Air
Conditioning Compressor Replacement.
2.Position compressor to mounting bracket and
tighten bolts to 25 Nm (18 lbf.ft).
3.Remove caps from compressor and pipe
connections.
4.Clean compressor and pipe connections.
5.Lubricate new 'O'rings with refrigerant oil and
fit to compressor.
6.Position A/C pipes to compressor and tighten
bolts to 10 Nm (7 lbf.ft) .
7.Connect multiplug to compressor.
8.Position top hose and secure with clips.
9.Refill cooling system.
+ COOLING SYSTEM - Td5,
ADJUSTMENTS, Drain and refill.
10.Fit auxiliary drive belt.
+ CHARGING AND STARTING,
REPAIRS, Belt - auxiliary drive.
11.Recharge air conditioning system.
+ AIR CONDITIONING, REFRIGERANT
RECOVERY, RECYCLING AND
RECHARGING, Refrigerant recovery,
recycling and recharging.
12.Fit engine acoustic cover.
Page 1219 of 1529

AIR CONDITIONING
82-30REPAIRS
Compressor - V8
$% 82.10.20
Remove
1.Depressurise air conditioning system.
+ AIR CONDITIONING, REFRIGERANT
RECOVERY, RECYCLING AND
RECHARGING, Refrigerant recovery,
recycling and recharging.
2.Remove auxiliary drive belt.
+ CHARGING AND STARTING,
REPAIRS, Belt - auxiliary drive.
3.Disconnect multiplug from compressor.
4.Remove 2 bolts securing air conditioning pipes
to compressor and discard 'O' rings.
CAUTION: Always fit plugs to open
connections to prevent contamination.
5.Remove 4 bolts securing compressor to
mounting bracket.
6.Remove compressor.Refit
1.Calculate the quantity of refrigerant oil required.
+ GENERAL INFORMATION, Air
Conditioning Compressor Replacement.
2.Clean compressor dowels and dowel holes.
3.Position compressor to mounting bracket and
tighten bolts to 25 Nm (18 lbf.ft).
4.Remove caps from compressor and pipe
connections.
5.Clean compressor and pipe connections.
6.Lubricate new 'O' rings with refrigerant oil and
fit to compressor.
7.Position A/C pipes to compressor and tighten
bolts to 10 Nm (7 lbf.ft).
8.Connect multiplug to compressor.
9.Fit auxiliary drive belt.
+ CHARGING AND STARTING,
REPAIRS, Belt - auxiliary drive.
10.Recharge air conditioning system.
+ AIR CONDITIONING, REFRIGERANT
RECOVERY, RECYCLING AND
RECHARGING, Refrigerant recovery,
recycling and recharging.
Page 1220 of 1529
AIR CONDITIONING
REPAIRS 82-31
Fan - condenser
$% 82.15.01
Remove
1.Remove front grille.
+ EXTERIOR FITTINGS, REPAIRS,
Grille - front - up to 03MY.
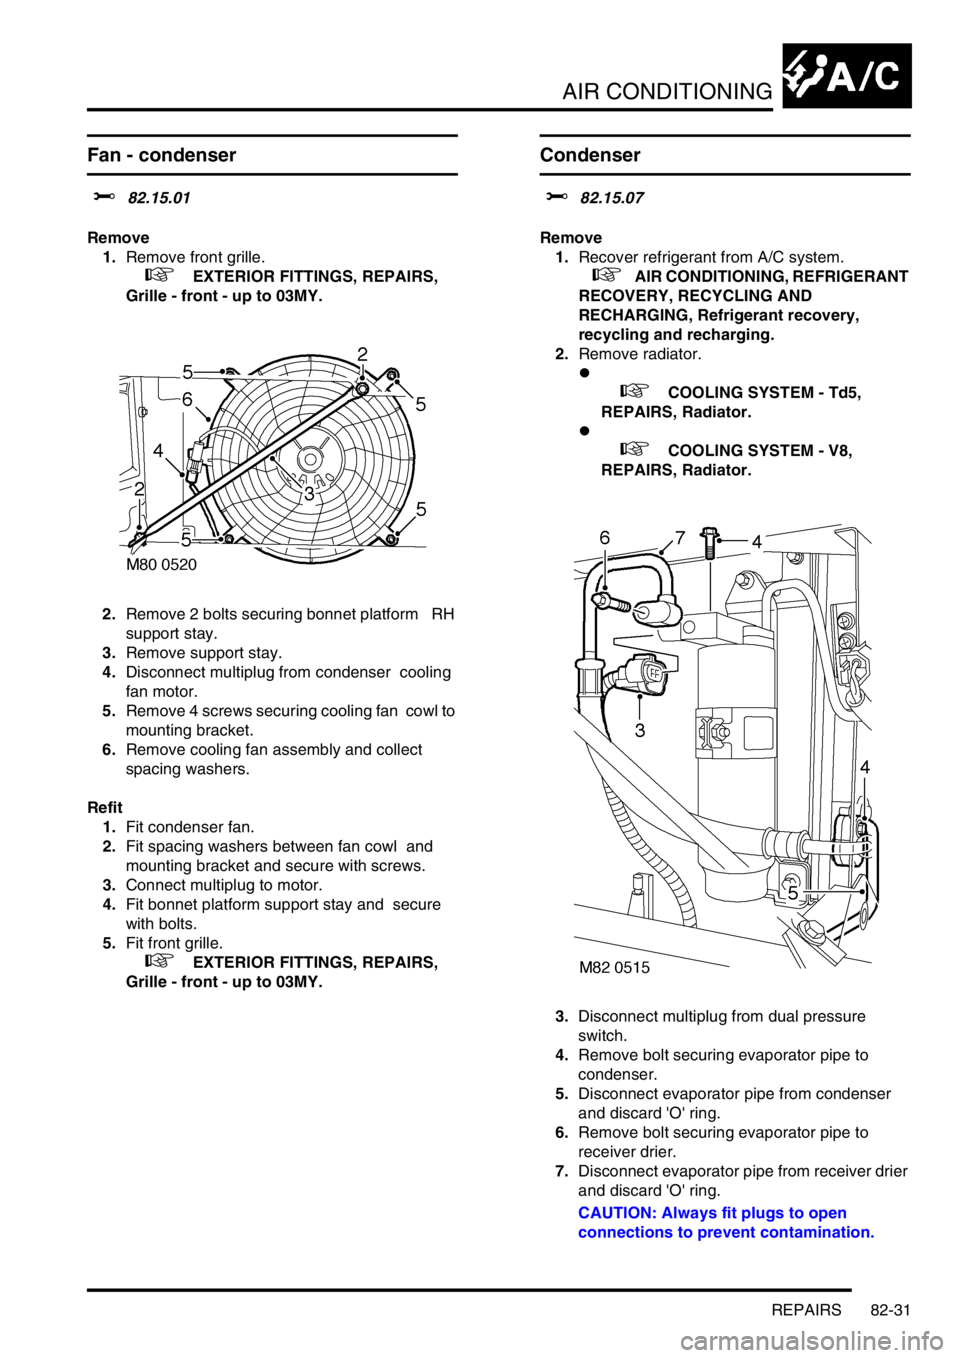
2.Remove 2 bolts securing bonnet platform RH
support stay.
3.Remove support stay.
4.Disconnect multiplug from condenser cooling
fan motor.
5.Remove 4 screws securing cooling fan cowl to
mounting bracket.
6.Remove cooling fan assembly and collect
spacing washers.
Refit
1.Fit condenser fan.
2.Fit spacing washers between fan cowl and
mounting bracket and secure with screws.
3.Connect multiplug to motor.
4.Fit bonnet platform support stay and secure
with bolts.
5.Fit front grille.
+ EXTERIOR FITTINGS, REPAIRS,
Grille - front - up to 03MY.
Condenser
$% 82.15.07
Remove
1.Recover refrigerant from A/C system.
+ AIR CONDITIONING, REFRIGERANT
RECOVERY, RECYCLING AND
RECHARGING, Refrigerant recovery,
recycling and recharging.
2.Remove radiator.
l
+ COOLING SYSTEM - Td5,
REPAIRS, Radiator.
l
+ COOLING SYSTEM - V8,
REPAIRS, Radiator.
3.Disconnect multiplug from dual pressure
switch.
4.Remove bolt securing evaporator pipe to
condenser.
5.Disconnect evaporator pipe from condenser
and discard 'O' ring.
6.Remove bolt securing evaporator pipe to
receiver drier.
7.Disconnect evaporator pipe from receiver drier
and discard 'O' ring.
CAUTION: Always fit plugs to open
connections to prevent contamination.
Page 1222 of 1529
AIR CONDITIONING
REPAIRS 82-33
Refit
1.Fit captive nut plates to new condenser.
2.Fit seal to condenser.
3.Fit RH mounting bracket to condenser and
secure with bolt.
4.Fit receiver drier bracket assembly and secure
with bolts.
5.Ensure condenser pipe and new receiver drier
connections are clean.
6.Lubricate new 'O' ring with refrigerant oil and fit
to condenser pipe.
7.Fit receiver drier to bracket and condenser
pipe. Tighten bolt securing condenser pipe to 5
Nm (3.7 lbf.ft). Fit clamping bolt securing
receiver drier to bracket and tighten to 5 Nm
(3.7 lbf.ft).
8.Ensure adaptor block and receiver drier
connections are clean.
9.Lubricate new 'O' ring with refrigerant oil and fit
to adaptor block.
10.Fit adaptor block to receiver drier and tighten
bolt to 5 Nm. (3.7 lbf.ft).
11.Fit condenser assembly.
12.Fit cooling fan to condenser and fit bolts to
secure support rails to condenser brackets.
13.Ensure connections of condenser, receiver
drier and evaporator pipes are clean.
14.Lubricate new 'O' ring seals with refrigerant oil
and fit one seal to each evaporator pipe.
15.Connect evaporator pipes and tighten bolts to 5
Nm (3.7 lbf.ft).
16.Connect multiplug to dual pressure switch.
17.Fit radiator.
l
+ COOLING SYSTEM - Td5,
REPAIRS, Radiator.
l
+ COOLING SYSTEM - V8,
REPAIRS, Radiator.
18.Recharge A/C system.
+ AIR CONDITIONING, REFRIGERANT
RECOVERY, RECYCLING AND
RECHARGING, Refrigerant recovery,
recycling and recharging.
Receiver drier and dual pressure switch
$% 82.17.03
Remove
1.Recover refrigerant from air conditioning
system.
+ AIR CONDITIONING, REFRIGERANT
RECOVERY, RECYCLING AND
RECHARGING, Refrigerant recovery,
recycling and recharging.
2.Remove front grille.
+ EXTERIOR FITTINGS, REPAIRS,
Grille - front - up to 03MY.
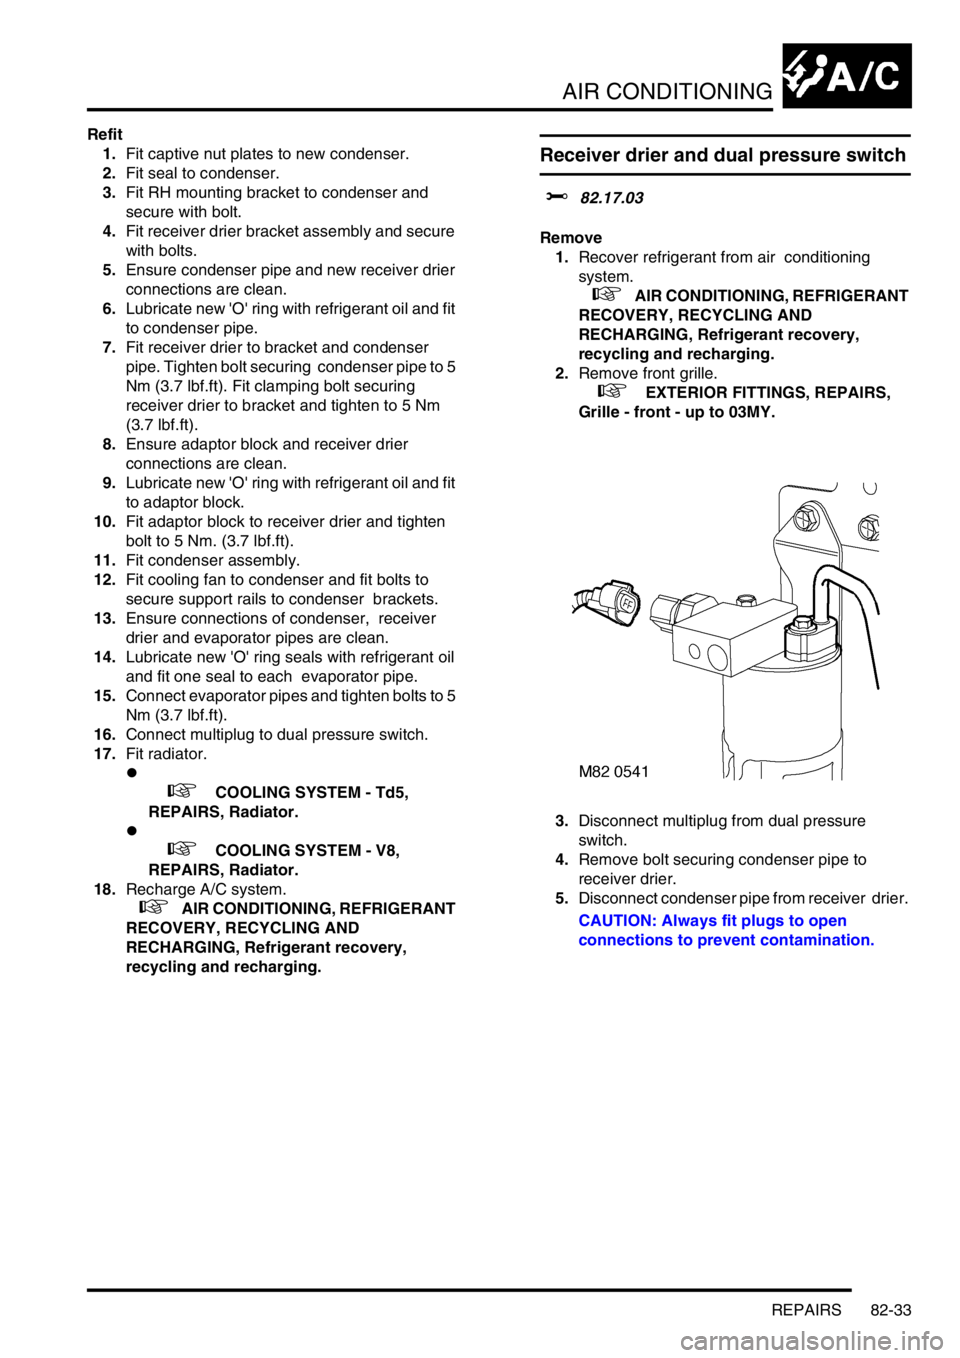
3.Disconnect multiplug from dual pressure
switch.
4.Remove bolt securing condenser pipe to
receiver drier.
5.Disconnect condenser pipe from receiver drier.
CAUTION: Always fit plugs to open
connections to prevent contamination.
Page 1223 of 1529
AIR CONDITIONING
82-34REPAIRS
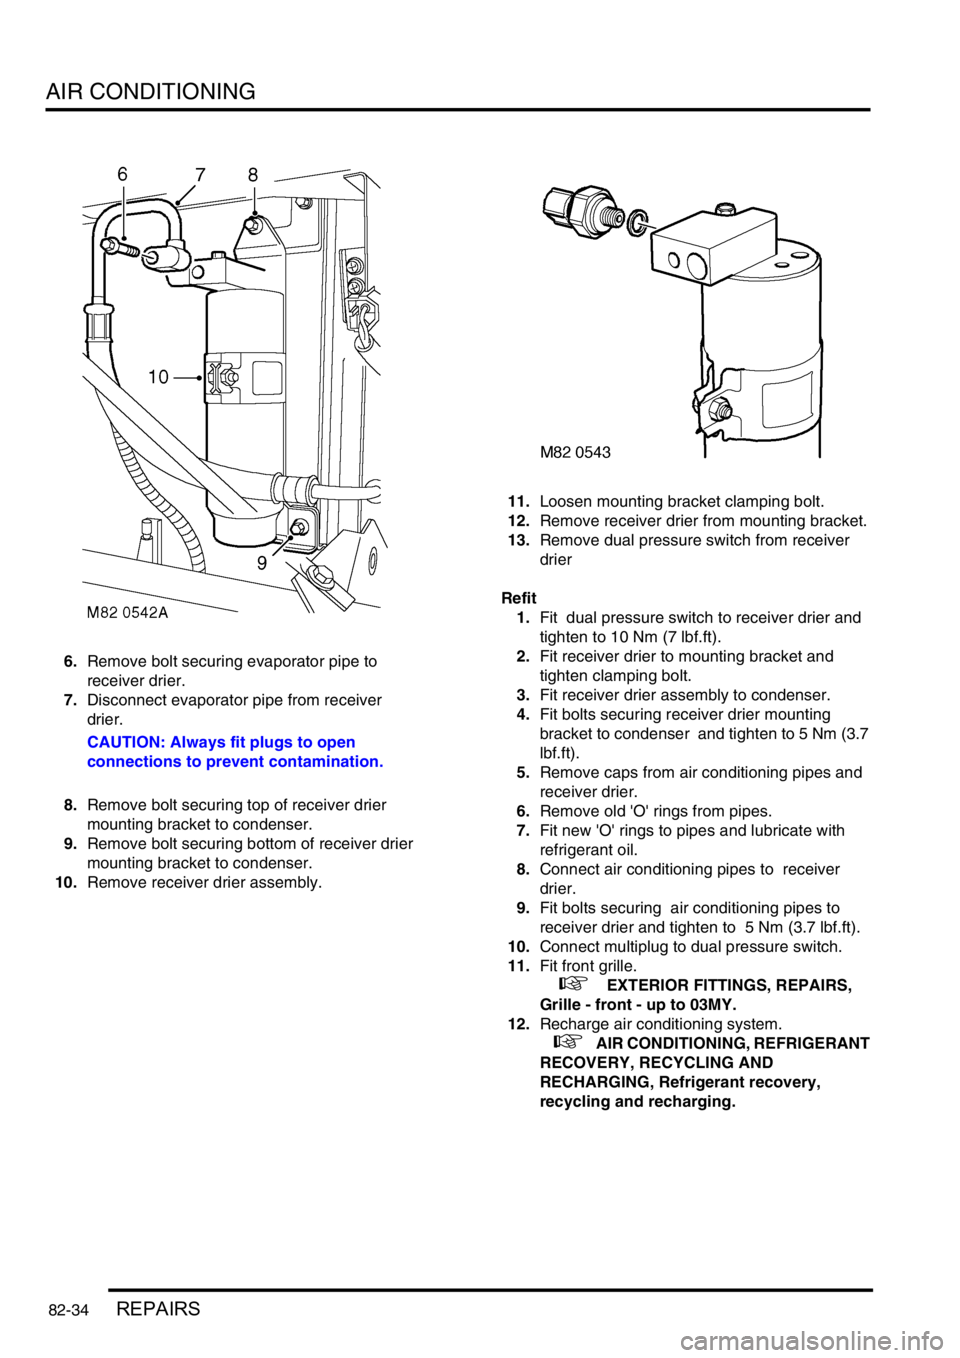
6.Remove bolt securing evaporator pipe to
receiver drier.
7.Disconnect evaporator pipe from receiver
drier.
CAUTION: Always fit plugs to open
connections to prevent contamination.
8.Remove bolt securing top of receiver drier
mounting bracket to condenser.
9.Remove bolt securing bottom of receiver drier
mounting bracket to condenser.
10.Remove receiver drier assembly. 11.Loosen mounting bracket clamping bolt.
12.Remove receiver drier from mounting bracket.
13.Remove dual pressure switch from receiver
drier
Refit
1.Fit dual pressure switch to receiver drier and
tighten to 10 Nm (7 lbf.ft).
2.Fit receiver drier to mounting bracket and
tighten clamping bolt.
3.Fit receiver drier assembly to condenser.
4.Fit bolts securing receiver drier mounting
bracket to condenser and tighten to 5 Nm (3.7
lbf.ft).
5.Remove caps from air conditioning pipes and
receiver drier.
6.Remove old 'O' rings from pipes.
7.Fit new 'O' rings to pipes and lubricate with
refrigerant oil.
8.Connect air conditioning pipes to receiver
drier.
9.Fit bolts securing air conditioning pipes to
receiver drier and tighten to 5 Nm (3.7 lbf.ft).
10.Connect multiplug to dual pressure switch.
11.Fit front grille.
+ EXTERIOR FITTINGS, REPAIRS,
Grille - front - up to 03MY.
12.Recharge air conditioning system.
+ AIR CONDITIONING, REFRIGERANT
RECOVERY, RECYCLING AND
RECHARGING, Refrigerant recovery,
recycling and recharging.
Page 1230 of 1529
AIR CONDITIONING
REPAIRS 82-41
Expansion valve - (TXV) - rear
$% 82.26.01
Remove
1.Depressurise air conditioning system.
+ AIR CONDITIONING, REFRIGERANT
RECOVERY, RECYCLING AND
RECHARGING, Refrigerant recovery,
recycling and recharging.
2.Remove rear lower trim casing.
+ INTERIOR TRIM COMPONENTS,
REPAIRS, Trim casing - side - loadspace.
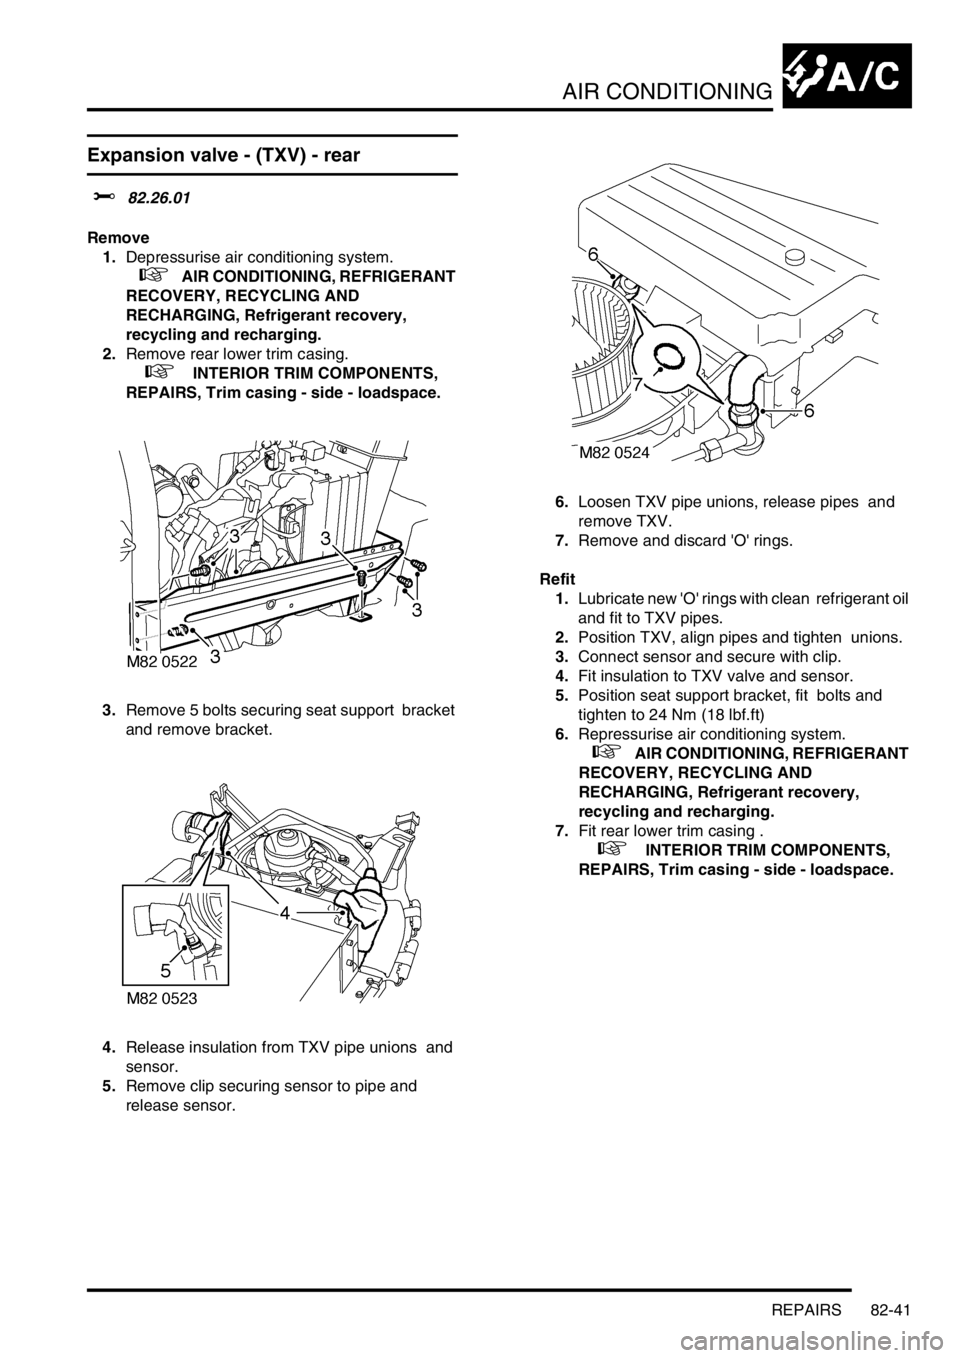
3.Remove 5 bolts securing seat support bracket
and remove bracket.
4.Release insulation from TXV pipe unions and
sensor.
5.Remove clip securing sensor to pipe and
release sensor. 6.Loosen TXV pipe unions, release pipes and
remove TXV.
7.Remove and discard 'O' rings.
Refit
1.Lubricate new 'O' rings with clean refrigerant oil
and fit to TXV pipes.
2.Position TXV, align pipes and tighten unions.
3.Connect sensor and secure with clip.
4.Fit insulation to TXV valve and sensor.
5.Position seat support bracket, fit bolts and
tighten to 24 Nm (18 lbf.ft)
6.Repressurise air conditioning system.
+ AIR CONDITIONING, REFRIGERANT
RECOVERY, RECYCLING AND
RECHARGING, Refrigerant recovery,
recycling and recharging.
7.Fit rear lower trim casing .
+ INTERIOR TRIM COMPONENTS,
REPAIRS, Trim casing - side - loadspace.
Page 1232 of 1529
AIR CONDITIONING
REPAIRS 82-43
Evaporator and motor assembly - rear
$% 82.26.21
Remove
1.Depressurise air conditioning system.
+ AIR CONDITIONING, REFRIGERANT
RECOVERY, RECYCLING AND
RECHARGING, Refrigerant recovery,
recycling and recharging.
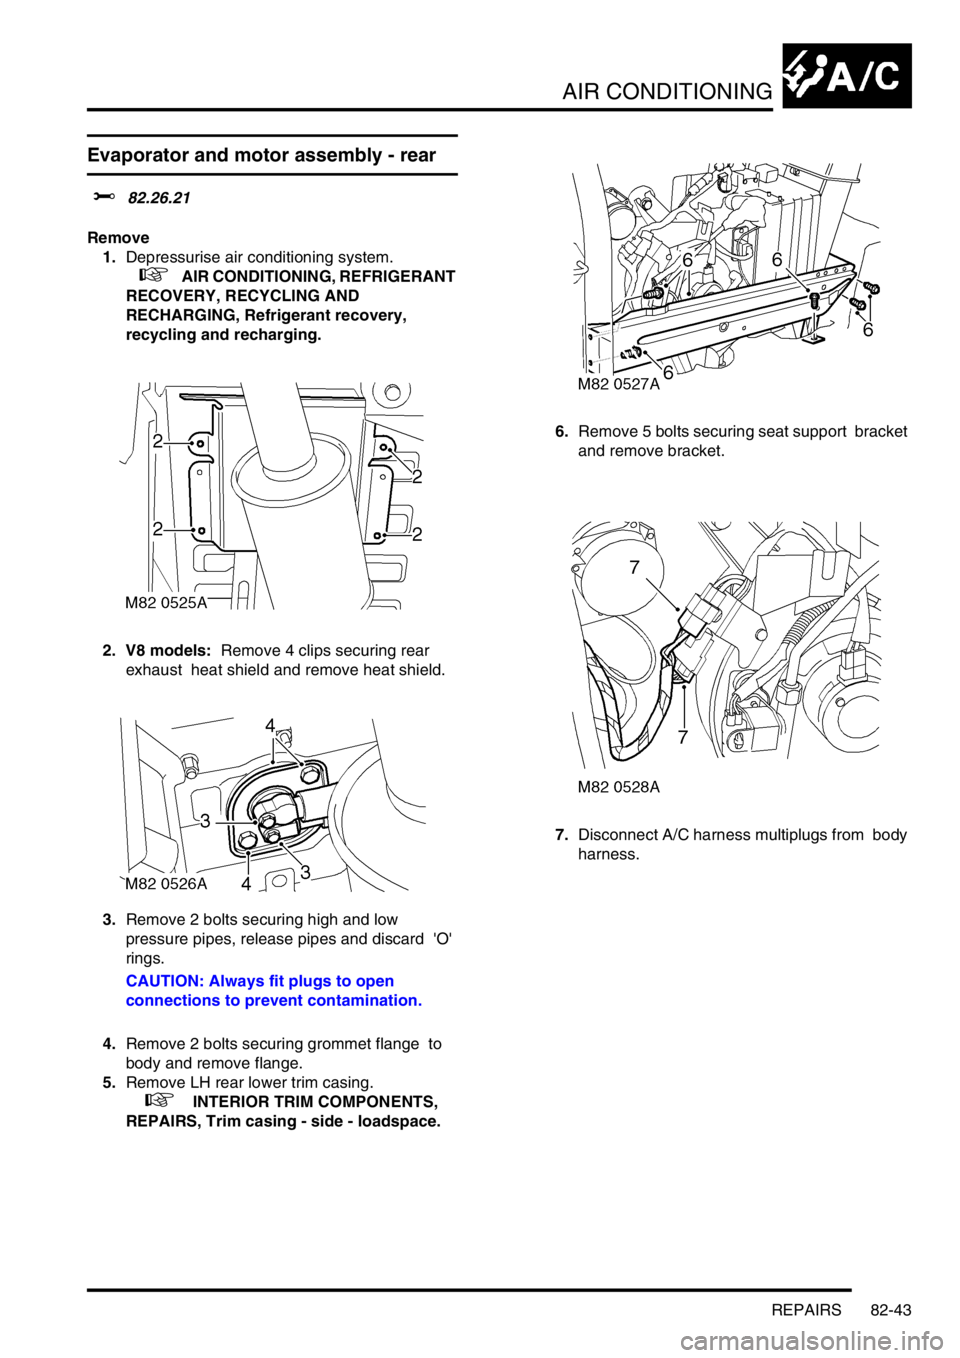
2. V8 models: Remove 4 clips securing rear
exhaust heat shield and remove heat shield.
3.Remove 2 bolts securing high and low
pressure pipes, release pipes and discard 'O'
rings.
CAUTION: Always fit plugs to open
connections to prevent contamination.
4.Remove 2 bolts securing grommet flange to
body and remove flange.
5.Remove LH rear lower trim casing.
+ INTERIOR TRIM COMPONENTS,
REPAIRS, Trim casing - side - loadspace.6.Remove 5 bolts securing seat support bracket
and remove bracket.
7.Disconnect A/C harness multiplugs from body
harness.