1999 LAND ROVER DISCOVERY CD player
[x] Cancel search: CD playerPage 1433 of 1529

HARNESSES
86-7-28 REPAIRS
50.Feed harness through to front panel.
51.Secure fog lamp multiplug.
52.Connect headlamp level motor, headlamp and
side lamp multiplugs.
53.Fit indicator lamp.
+ LIGHTING, REPAIRS, Lamp - front
repeater - up to 03MY.
54.Secure harness to RH front panel.
55.Connect cooling fan and horn multiplug.
56.Secure harness to lower support rail.
57.Connect receiver drier and air temperature
sensor multiplugs.
58.Fit front bumper.
+ EXTERIOR FITTINGS, REPAIRS,
Bumper assembly - front.
59.Fit battery tray.
60.Fit air filter assembly.
+ ENGINE MANAGEMENT SYSTEM -
V8, REPAIRS, Air cleaner assembly.
61.Position both lower 'A' post trims and secure
with studs.
62.Fit heater assembly.
+ HEATING AND VENTILATION,
REPAIRS, Heater assembly - models with
air conditioning.
+ HEATING AND VENTILATION,
REPAIRS, Heater assembly - models
without air conditioning.
Harness - main - DVD unit
$% 86.70.25
Remove
1.Remove battery cover and disconnect the
battery earth lead.
2.Remove CD switch box.
+ IN CAR ENTERTAINMENT,
REPAIRS, Switch box - CD/DVD player.
3.Remove DVD player unit.
+ IN CAR ENTERTAINMENT,
REPAIRS, DVD screen/player unit.
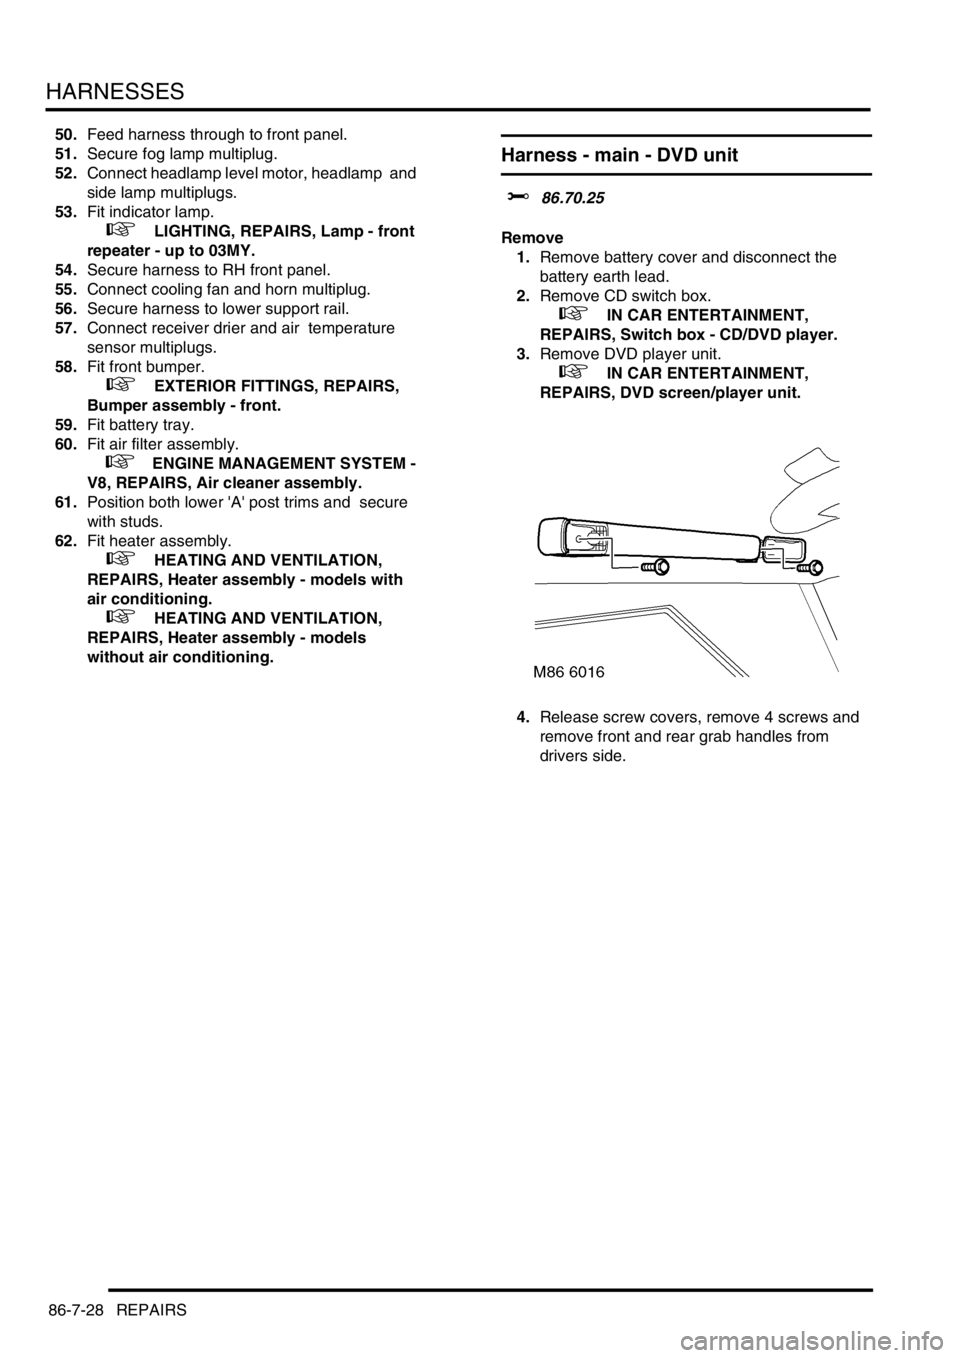
4.Release screw covers, remove 4 screws and
remove front and rear grab handles from
drivers side.
Page 1436 of 1529

HARNESSES
REPAIRS 86-7-31
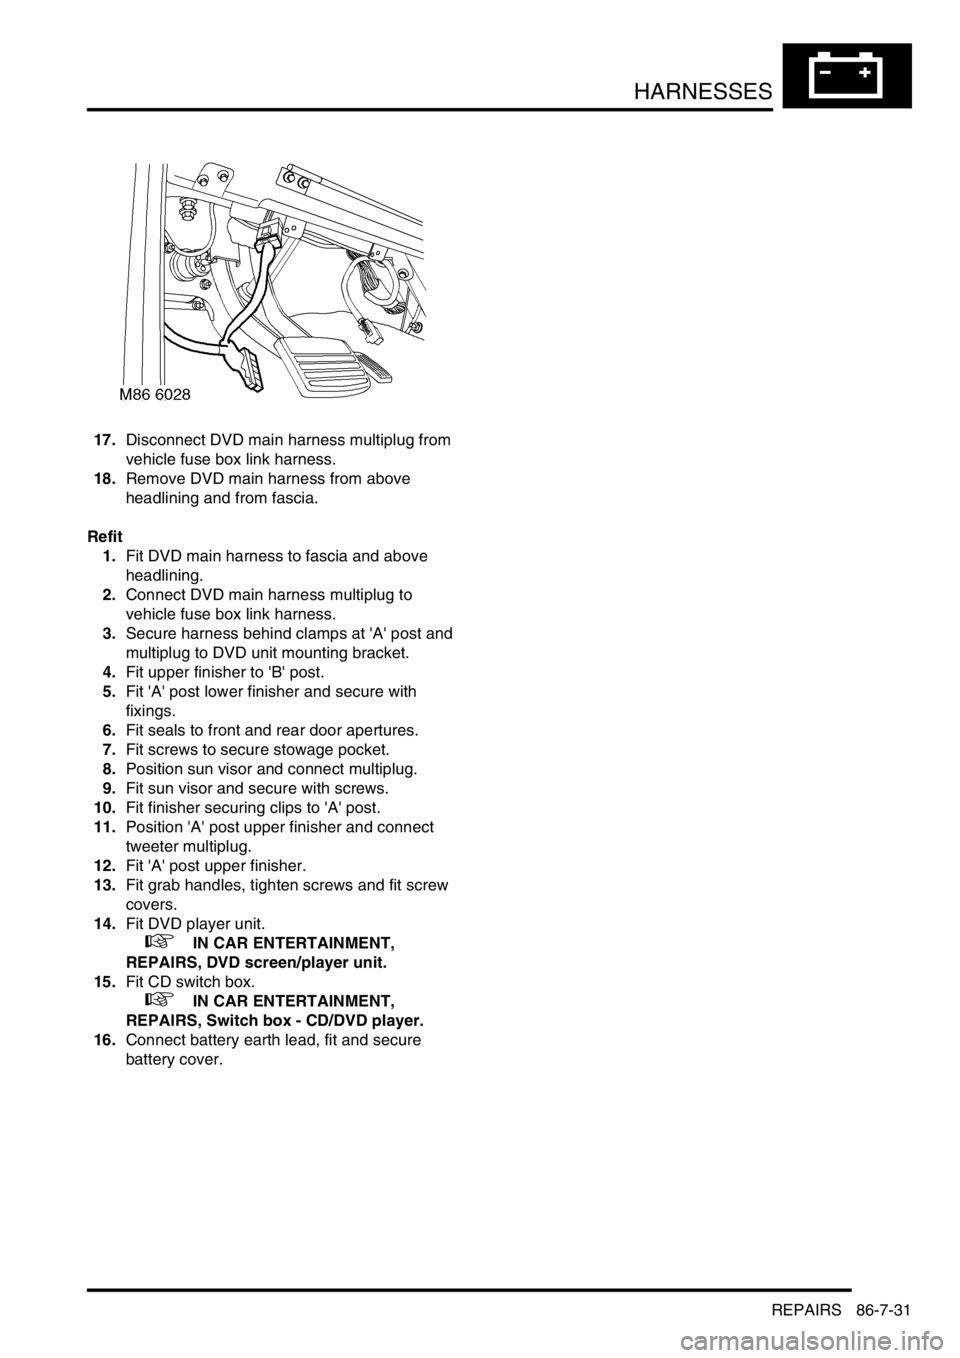
17.Disconnect DVD main harness multiplug from
vehicle fuse box link harness.
18.Remove DVD main harness from above
headlining and from fascia.
Refit
1.Fit DVD main harness to fascia and above
headlining.
2.Connect DVD main harness multiplug to
vehicle fuse box link harness.
3.Secure harness behind clamps at 'A' post and
multiplug to DVD unit mounting bracket.
4.Fit upper finisher to 'B' post.
5.Fit 'A' post lower finisher and secure with
fixings.
6.Fit seals to front and rear door apertures.
7.Fit screws to secure stowage pocket.
8.Position sun visor and connect multiplug.
9.Fit sun visor and secure with screws.
10.Fit finisher securing clips to 'A' post.
11.Position 'A' post upper finisher and connect
tweeter multiplug.
12.Fit 'A' post upper finisher.
13.Fit grab handles, tighten screws and fit screw
covers.
14.Fit DVD player unit.
+ IN CAR ENTERTAINMENT,
REPAIRS, DVD screen/player unit.
15.Fit CD switch box.
+ IN CAR ENTERTAINMENT,
REPAIRS, Switch box - CD/DVD player.
16.Connect battery earth lead, fit and secure
battery cover.
Page 1456 of 1529

NAVIGATION SYSTEM
DESCRIPTION AND OPERATION 87-3
Navigation Computer
The navigation computer is installed in the DIN radio slot in the fascia. A spring loaded catch on each side of the
navigation computer secures it in position. Slide tools, installed in slots at the bottom front corners of the navigation
computer, are required to unlock the catches during removal.
The navigation computer contains all the hardware and software required for control of the navigation, radio and CD
systems, including the GPS receiver and a solid state piezo gyro for the navigation system. The piezo gyro measures
the motion of the vehicle around its vertical axis.
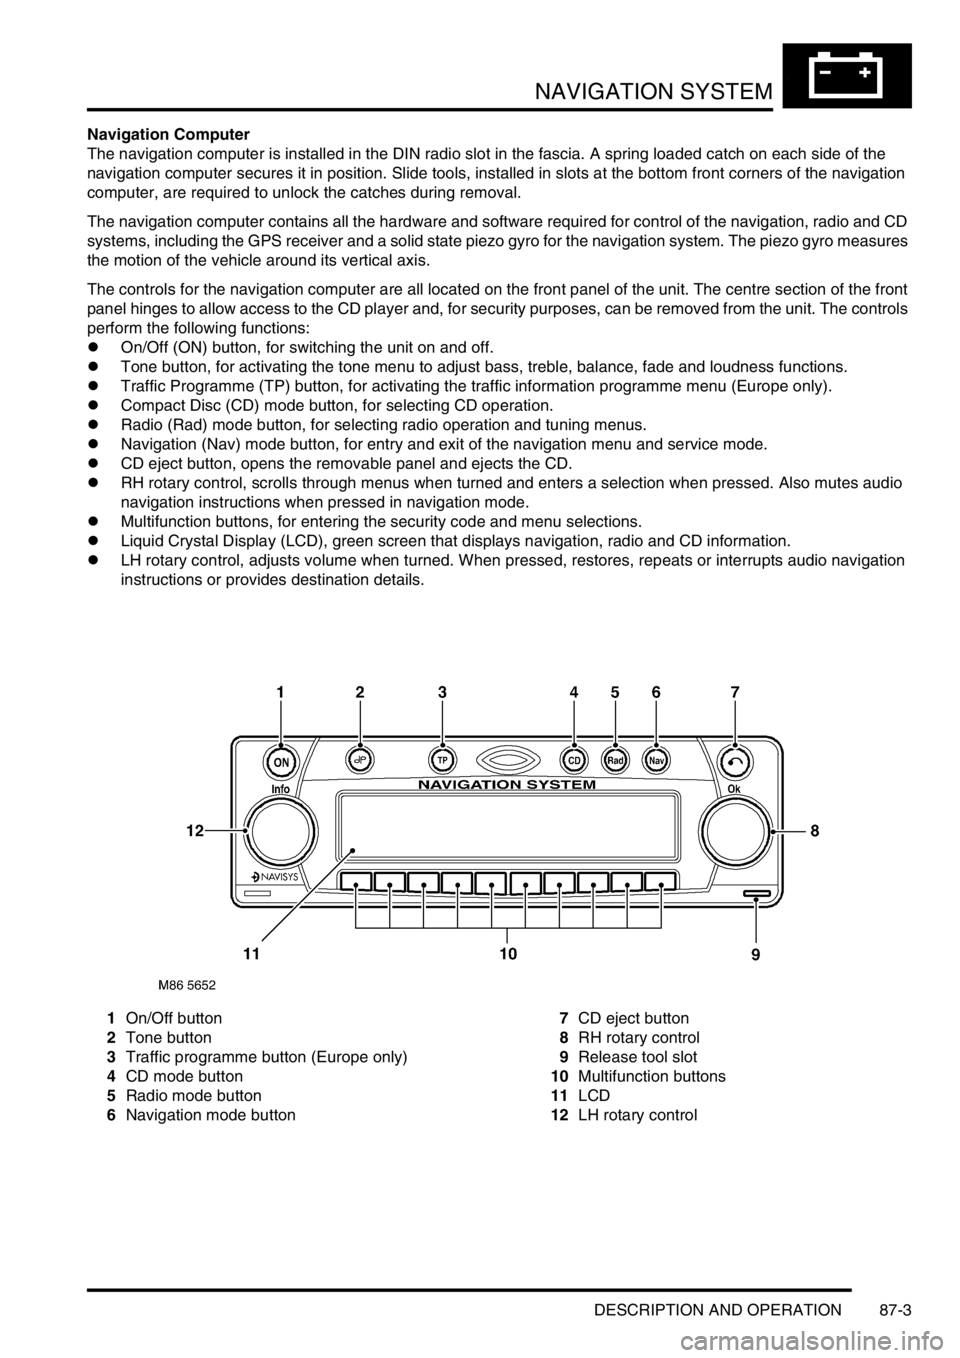
The controls for the navigation computer are all located on the front panel of the unit. The centre section of the front
panel hinges to allow access to the CD player and, for security purposes, can be removed from the unit. The controls
perform the following functions:
lOn/Off (ON) button, for switching the unit on and off.
lTone button, for activating the tone menu to adjust bass, treble, balance, fade and loudness functions.
lTraffic Programme (TP) button, for activating the traffic information programme menu (Europe only).
lCompact Disc (CD) mode button, for selecting CD operation.
lRadio (Rad) mode button, for selecting radio operation and tuning menus.
lNavigation (Nav) mode button, for entry and exit of the navigation menu and service mode.
lCD eject button, opens the removable panel and ejects the CD.
lRH rotary control, scrolls through menus when turned and enters a selection when pressed. Also mutes audio
navigation instructions when pressed in navigation mode.
lMultifunction buttons, for entering the security code and menu selections.
lLiquid Crystal Display (LCD), green screen that displays navigation, radio and CD information.
lLH rotary control, adjusts volume when turned. When pressed, restores, repeats or interrupts audio navigation
instructions or provides destination details.
1On/Off button
2Tone button
3Traffic programme button (Europe only)
4CD mode button
5Radio mode button
6Navigation mode button7CD eject button
8RH rotary control
9Release tool slot
10Multifunction buttons
11LCD
12LH rotary control
Page 1458 of 1529

NAVIGATION SYSTEM
DESCRIPTION AND OPERATION 87-5
System Settings Menu
The system settings menu provides access to features that can be changed to suit market and personal preferences
and to navigation system operating features. On European systems, the system settings menu also includes
computer games and a currency converter. While the navigation computer is in the navigation mode, the system
settings menu can be accessed by pressing the Nav button. Using the RH rotary control, the following features can
be selected and adjusted:
lTIME – Allows the navigation system clock to be set to local time as opposed to the Greenwich Mean Time (GMT)
transmitted from the GPS satellites. The local time setting is necessary for correct navigation on routes with time
restrictions and for Estimated Time of Arrival (ETA) calculations. The time can only be adjusted in 30 minute
steps.
lSAVE POSITION– Allows the current vehicle position to be saved and allocated a name in the navigation
destination memory.
lGAMES – Provides access to a selection of computer games.
lLANGUAGE– Allows the navigation system language and voice (where applicable) to be changed.
lANIMATIONS– Allows the LCD animations to be switched on and off.
lMEASURING UNIT – Allows the route guidance distances displayed on the LCD to be switched between metric
and Imperial units.
lANNOUNCEMENT ETA – Allows the route guidance ETA announcement to be switched on and off.
lCALCULATE EURO – Provides access to a currency converter.
User Menu
The user menu provides access to further features that can be changed to suit personal preferences. While the
navigation computer is in navigation, radio or CD modes, the user menu can be accessed by pressing and holding
the tone button for more than 2 seconds. The user menu is displayed over two screens, which can be toggled between
using the ⇒ multifunction button. Using the appropriate multifunction button or the RH rotary control, the following
settings can be selected and adjusted:
Screen 1
lGal – Automatic volume control setting (see above).
lTel – If a handsfree telephone system is connected to the navigation computer, allows either mute (telephone
mute mode) or audio signal (telephone conversation via the ICE speakers) to be selected.
lLcd – The LCD can be set to appear negative, positiveor automatic. In automatic, the display will be positive or
negative, depending on the setting of the exterior lamps.
lLed – A Light Emitting Diode (LED) in the display can be set to off or blinking. When set to blinking, the LED
flashes when the navigation computer is switched off.
lM/S – Radio reception can be set to Stereo, Mono or Auto, to suppress interference and reflections and so
optimise reception. Stereo is for exceptionally good reception conditions. Mono is for poor reception conditions.
In auto, the normal setting, the navigation computer automatically switches between stereo and mono depending
on reception conditions.
Screen 2
lNav – Sets how audio navigation instructions are delivered. In onl, other audio sources are suppressed and only
the navigation instruction is output to the speakers. In mixed, the volume of any other audio source is reduced
and the volume of the navigation announcement is the same as the original audio source +/– 6 dB (adjustable).
In independ, the audio source and navigation announcement can be set to independent volume levels.
lAux – Used to switch auxiliary CD AF connections between Aux mode on and Aux mode off. If no CD
autochanger is installed, an external cassette or CD player can be connected to the navigation computer and
powered by switching on the auxiliary CD AF connections.
lCmp – Allows a compass to be shown on the LCD when route guidance is not active.
lBeV – Used to adjust the signal tone volume. Signal tones sound to confirm storage confirmation etc. and can
be set between 0 (quiet) and +5 (loud).