1999 LAND ROVER DISCOVERY light
[x] Cancel search: lightPage 1093 of 1529
PANEL REPAIRS
77-2-26 REPAIRS
9.Fit headlamp.
+ LIGHTING, REPAIRS, Headlamp - up
to 03MY.
10. Diesel models: Fit gearbox fluid cooler.
11. Models with A/C: Fit condensor.
+ AIR CONDITIONING, REPAIRS,
Condenser.
12.Fit bumper assembly.
+ EXTERIOR FITTINGS, REPAIRS,
Bumper assembly - front.
13.Connect leads/multiplug to alternator.
14.Connect battery leads, negative lead last.
Headlamp mounting panel - LH
Remove
1.Disconnect both battery leads, negative lead
first.
2.Disconnect leads/multiplug from alternator.
3.Remove washer reservoir.
+ WIPERS AND WASHERS, REPAIRS,
Reservoir - washer - up to 03MY.
4. Models with A/C: Remove condensor.
+ AIR CONDITIONING, REPAIRS,
Condenser.
5. Diesel models: Remove gearbox fluid cooler.
6.Remove headlamp.
+ LIGHTING, REPAIRS, Headlamp - up
to 03MY.
7.Remove repeater lamp.
+ LIGHTING, REPAIRS, Lamp - front
repeater - up to 03MY.
8.Release headlamp levelling motor and position
aside.
9.Release headlamp wiring and position aside.
10.Remove air filter assembly.
+ ENGINE MANAGEMENT SYSTEM -
Td5, REPAIRS, Air filter assembly.
+ ENGINE MANAGEMENT SYSTEM -
V8, REPAIRS, Air cleaner assembly.
11.Remove 2 earth leads from LH of front
bulkhead.
12.Release and remove A/C pipes.
13.Remove crush can.
14.Remove bonnet release cable.
15.Remove 2 bolts securing front bulkhead
assembly to chassis.
16.Remove centre brace.
Page 1094 of 1529
PANEL REPAIRS
REPAIRS 77-2-27
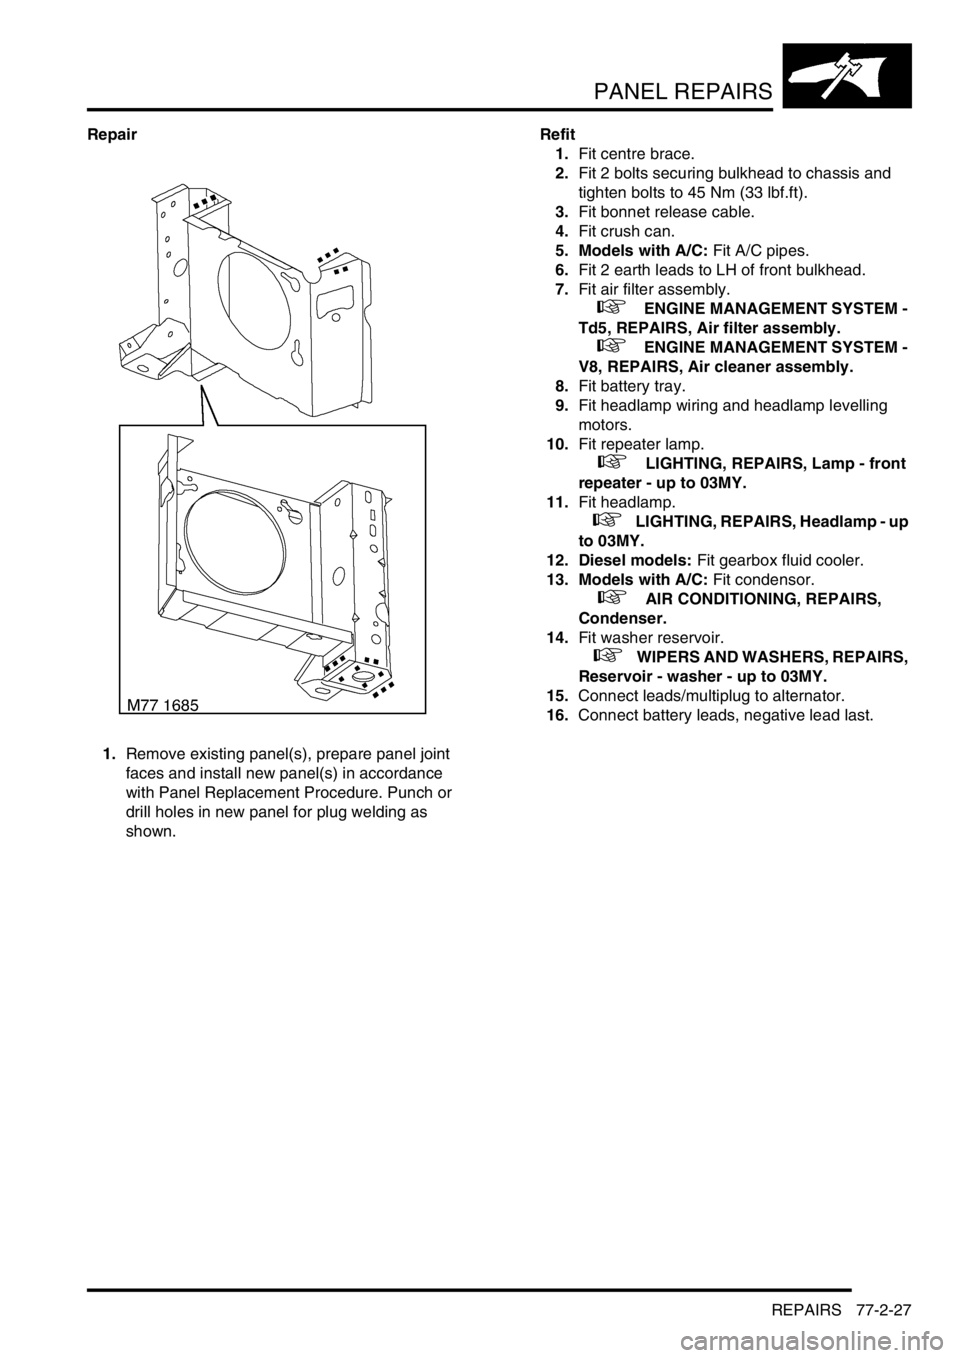
Repair
1.Remove existing panel(s), prepare panel joint
faces and install new panel(s) in accordance
with Panel Replacement Procedure. Punch or
drill holes in new panel for plug welding as
shown.Refit
1.Fit centre brace.
2.Fit 2 bolts securing bulkhead to chassis and
tighten bolts to 45 Nm (33 lbf.ft).
3.Fit bonnet release cable.
4.Fit crush can.
5. Models with A/C: Fit A/C pipes.
6.Fit 2 earth leads to LH of front bulkhead.
7.Fit air filter assembly.
+ ENGINE MANAGEMENT SYSTEM -
Td5, REPAIRS, Air filter assembly.
+ ENGINE MANAGEMENT SYSTEM -
V8, REPAIRS, Air cleaner assembly.
8.Fit battery tray.
9.Fit headlamp wiring and headlamp levelling
motors.
10.Fit repeater lamp.
+ LIGHTING, REPAIRS, Lamp - front
repeater - up to 03MY.
11.Fit headlamp.
+ LIGHTING, REPAIRS, Headlamp - up
to 03MY.
12. Diesel models: Fit gearbox fluid cooler.
13. Models with A/C: Fit condensor.
+ AIR CONDITIONING, REPAIRS,
Condenser.
14.Fit washer reservoir.
+ WIPERS AND WASHERS, REPAIRS,
Reservoir - washer - up to 03MY.
15.Connect leads/multiplug to alternator.
16.Connect battery leads, negative lead last.
Page 1108 of 1529
PANEL REPAIRS
REPAIRS 77-2-41
Refit
1.Fit side drip rail finisher.
2.Fit wiring to 'B/C' post and sill areas.
3.Fit front and rear door door aperture seal.
4.Position carpet and secure with fixings.
5.Fit tread plates to front and rear door apertures.
6.Fit head lining.
+ INTERIOR TRIM COMPONENTS,
REPAIRS, Headlining.
7.Fit rear seat.
+ SEATS, REPAIRS, Seat - rear.
8.Fit front seat belt.
+ RESTRAINT SYSTEMS, REPAIRS,
Seat belt - front.
9. LH side: Fit CD autochanger.
+ IN CAR ENTERTAINMENT,
REPAIRS, CD autochanger.
10. RH side: Fit power amplifier.
+ IN CAR ENTERTAINMENT,
REPAIRS, Amplifier - power.
11.Fit RH or LH front seat.
+ SEATS, REPAIRS, Seat - front.
12.Fit sill finisher.
13.Fit front door striker to B/C post, fit Torx bolts
and tighten to 26 Nm (19 lbf.ft).
14.Fit rear door.
+ DOORS, REPAIRS, Door - rear.
15.Connect leads/multiplug to alternator.
16.Connect battery leads, negative lead last.
Panel body side assembly
Remove
1.Disconnect both battery leads, negative lead
first.
2.Disconnect leads/multiplug from alternator.
3.Remove loadspace side trim casing.
+ INTERIOR TRIM COMPONENTS,
REPAIRS, Trim casing - side - loadspace.
4.Remove head lining rear trim finisher.
5.Remove rear head rests, if fitted.
6.Remove body side rear glass.
+ SCREENS, REPAIRS, Glass - body
side - rear.
7.Remove rear bumper assembly.
+ EXTERIOR FITTINGS, REPAIRS,
Bumper assembly - rear - up to 03MY.
8.Remove rear bumper finisher.
9.Remove rear wheel arch liner.
+ EXTERIOR FITTINGS, REPAIRS,
Liner - wheel arch - rear.
10.Remove mud flap.
11.Remove tread plate from rear door aperture.
12.Remove rear door aperture seal.
13.Remove rear door striker from 'D' post.
14.Remove 'D' post outer trim finisher.
15.Remove wheel arch trim finisher.
16.Remove side drip rail finisher.
17. RH side: Remove tail door.
18. LH side: Remove tail door striker and setting
block from 'E' post.
19.Remove tail door tread plate.
20.Remove loadspace carpet retainer.
21.Remove tail door aperture seal.
22.Remove tail lamp.
+ LIGHTING, REPAIRS, Lamp - tail.
23. RH side: Remove fuel filler flap.
24. RH side: Remove fuel filler tube.
+ FUEL DELIVERY SYSTEM - V8,
REPAIRS, Filler tube - fuel.
25.Remove aerial amplifier.
26.Remove relevant wiring from body side area.
Page 1109 of 1529
PANEL REPAIRS
77-2-42 REPAIRS
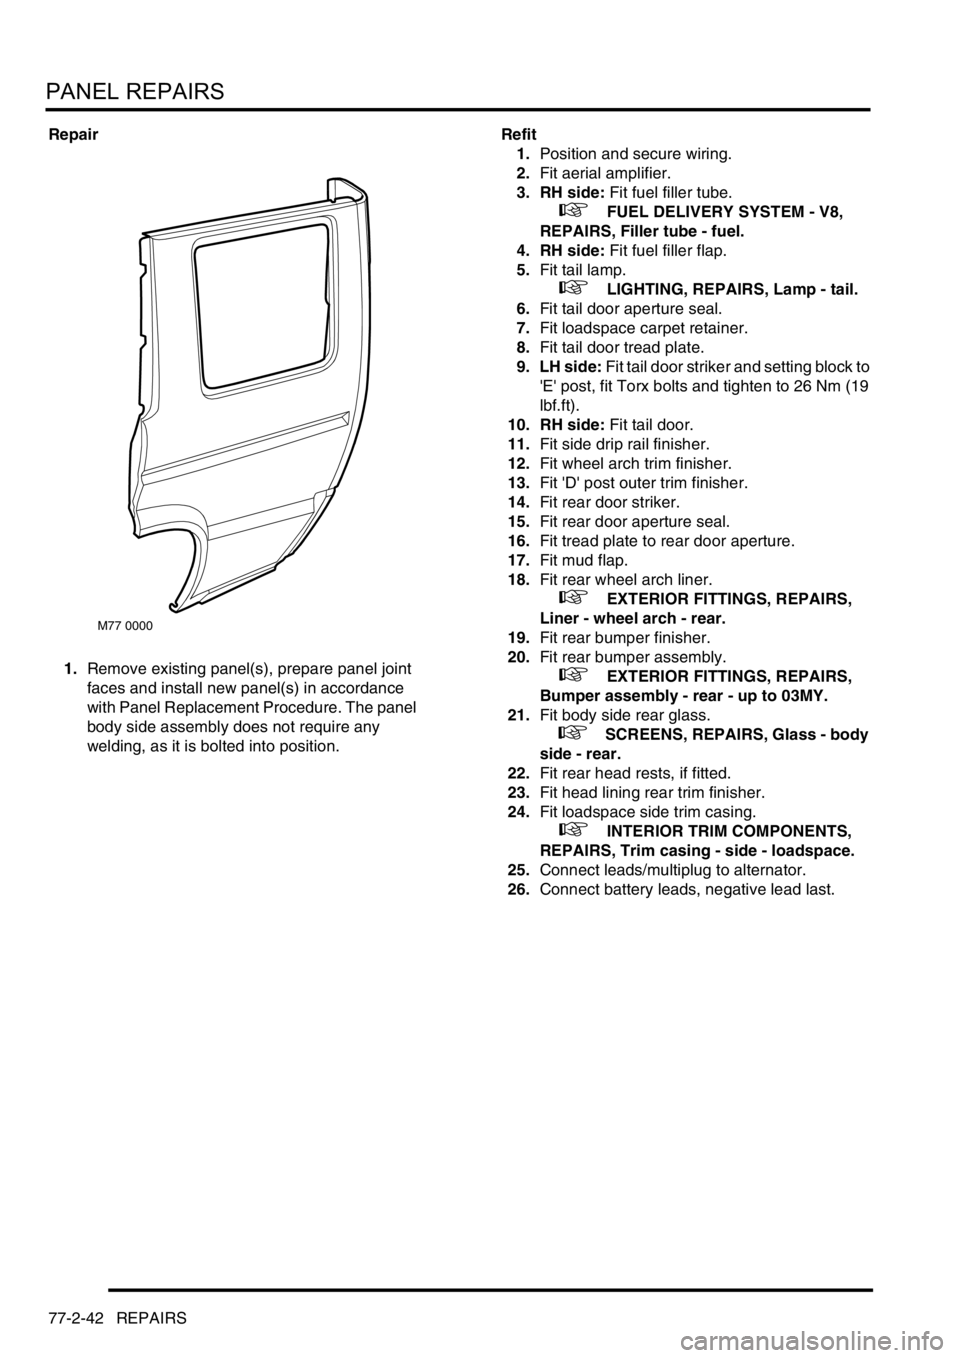
Repair
1.Remove existing panel(s), prepare panel joint
faces and install new panel(s) in accordance
with Panel Replacement Procedure. The panel
body side assembly does not require any
welding, as it is bolted into position.Refit
1.Position and secure wiring.
2.Fit aerial amplifier.
3. RH side: Fit fuel filler tube.
+ FUEL DELIVERY SYSTEM - V8,
REPAIRS, Filler tube - fuel.
4. RH side: Fit fuel filler flap.
5.Fit tail lamp.
+ LIGHTING, REPAIRS, Lamp - tail.
6.Fit tail door aperture seal.
7.Fit loadspace carpet retainer.
8.Fit tail door tread plate.
9. LH side: Fit tail door striker and setting block to
'E' post, fit Torx bolts and tighten to 26 Nm (19
lbf.ft).
10. RH side: Fit tail door.
11.Fit side drip rail finisher.
12.Fit wheel arch trim finisher.
13.Fit 'D' post outer trim finisher.
14.Fit rear door striker.
15.Fit rear door aperture seal.
16.Fit tread plate to rear door aperture.
17.Fit mud flap.
18.Fit rear wheel arch liner.
+ EXTERIOR FITTINGS, REPAIRS,
Liner - wheel arch - rear.
19.Fit rear bumper finisher.
20.Fit rear bumper assembly.
+ EXTERIOR FITTINGS, REPAIRS,
Bumper assembly - rear - up to 03MY.
21.Fit body side rear glass.
+ SCREENS, REPAIRS, Glass - body
side - rear.
22.Fit rear head rests, if fitted.
23.Fit head lining rear trim finisher.
24.Fit loadspace side trim casing.
+ INTERIOR TRIM COMPONENTS,
REPAIRS, Trim casing - side - loadspace.
25.Connect leads/multiplug to alternator.
26.Connect battery leads, negative lead last.
M77 0000
Page 1120 of 1529
PANEL REPAIRS
REPAIRS 77-2-53
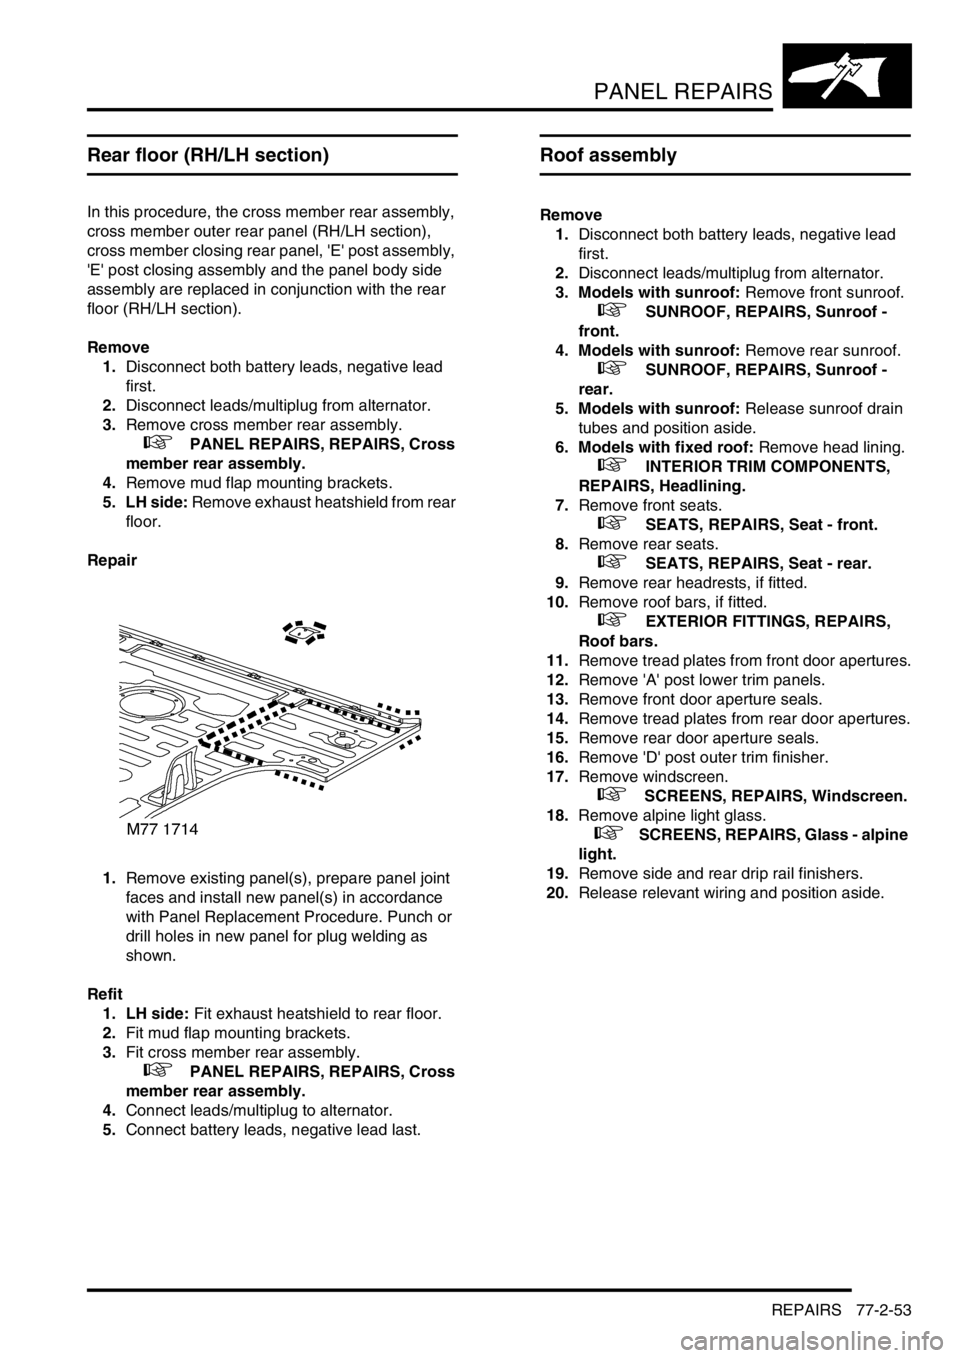
Rear floor (RH/LH section)
In this procedure, the cross member rear assembly,
cross member outer rear panel (RH/LH section),
cross member closing rear panel, 'E' post assembly,
'E' post closing assembly and the panel body side
assembly are replaced in conjunction with the rear
floor (RH/LH section).
Remove
1.Disconnect both battery leads, negative lead
first.
2.Disconnect leads/multiplug from alternator.
3.Remove cross member rear assembly.
+ PANEL REPAIRS, REPAIRS, Cross
member rear assembly.
4.Remove mud flap mounting brackets.
5. LH side: Remove exhaust heatshield from rear
floor.
Repair
1.Remove existing panel(s), prepare panel joint
faces and install new panel(s) in accordance
with Panel Replacement Procedure. Punch or
drill holes in new panel for plug welding as
shown.
Refit
1. LH side: Fit exhaust heatshield to rear floor.
2.Fit mud flap mounting brackets.
3.Fit cross member rear assembly.
+ PANEL REPAIRS, REPAIRS, Cross
member rear assembly.
4.Connect leads/multiplug to alternator.
5.Connect battery leads, negative lead last.
Roof assembly
Remove
1.Disconnect both battery leads, negative lead
first.
2.Disconnect leads/multiplug from alternator.
3. Models with sunroof: Remove front sunroof.
+ SUNROOF, REPAIRS, Sunroof -
front.
4. Models with sunroof: Remove rear sunroof.
+ SUNROOF, REPAIRS, Sunroof -
rear.
5. Models with sunroof: Release sunroof drain
tubes and position aside.
6. Models with fixed roof: Remove head lining.
+ INTERIOR TRIM COMPONENTS,
REPAIRS, Headlining.
7.Remove front seats.
+ SEATS, REPAIRS, Seat - front.
8.Remove rear seats.
+ SEATS, REPAIRS, Seat - rear.
9.Remove rear headrests, if fitted.
10.Remove roof bars, if fitted.
+ EXTERIOR FITTINGS, REPAIRS,
Roof bars.
11.Remove tread plates from front door apertures.
12.Remove 'A' post lower trim panels.
13.Remove front door aperture seals.
14.Remove tread plates from rear door apertures.
15.Remove rear door aperture seals.
16.Remove 'D' post outer trim finisher.
17.Remove windscreen.
+ SCREENS, REPAIRS, Windscreen.
18.Remove alpine light glass.
+ SCREENS, REPAIRS, Glass - alpine
light.
19.Remove side and rear drip rail finishers.
20.Release relevant wiring and position aside.
Page 1121 of 1529
PANEL REPAIRS
77-2-54 REPAIRS
Repair
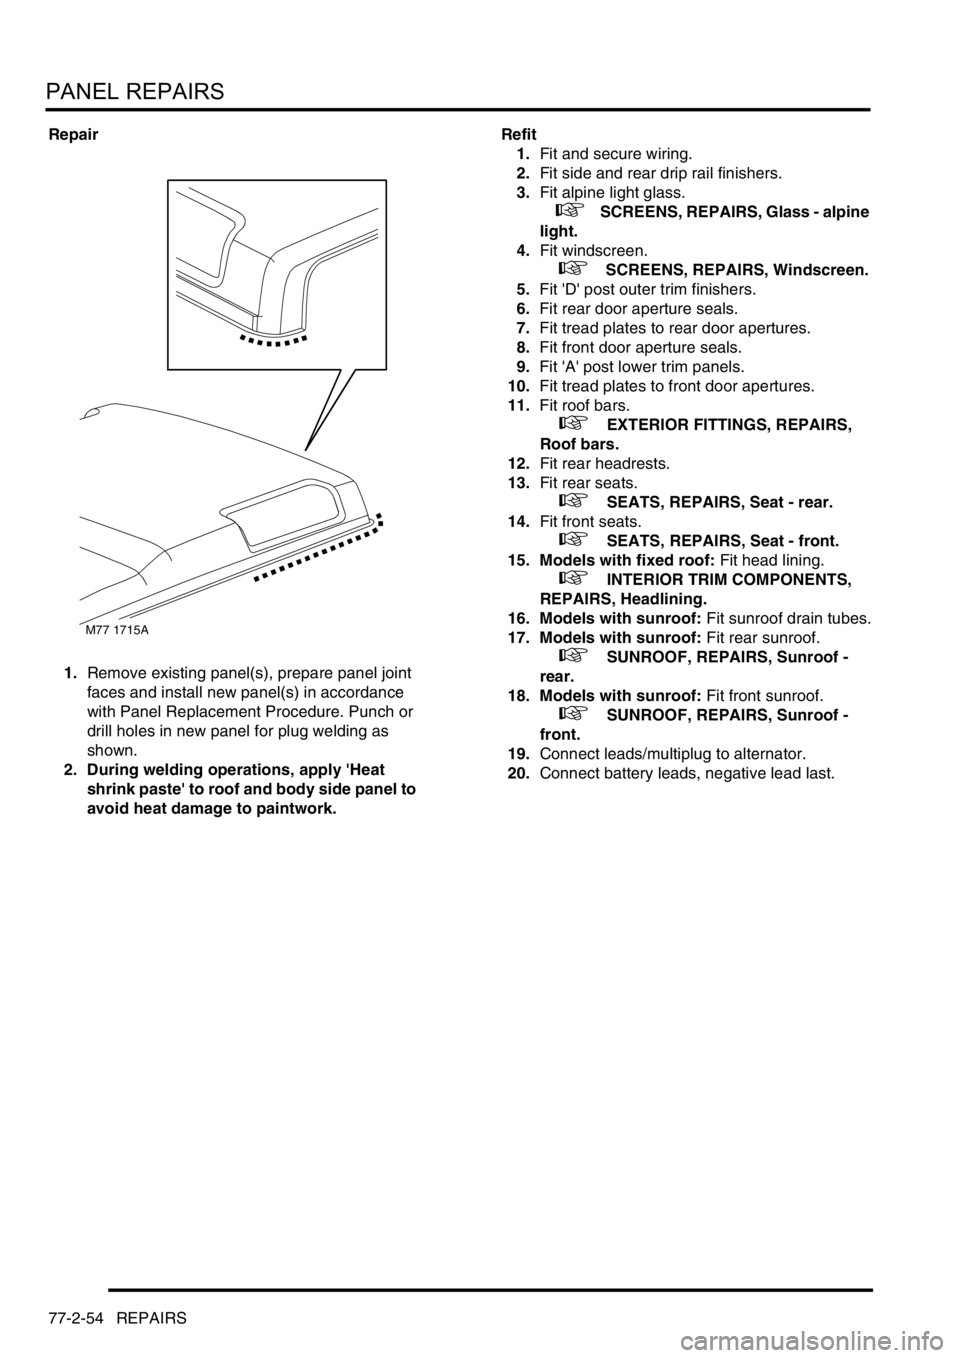
1.Remove existing panel(s), prepare panel joint
faces and install new panel(s) in accordance
with Panel Replacement Procedure. Punch or
drill holes in new panel for plug welding as
shown.
2. During welding operations, apply 'Heat
shrink paste' to roof and body side panel to
avoid heat damage to paintwork.Refit
1.Fit and secure wiring.
2.Fit side and rear drip rail finishers.
3.Fit alpine light glass.
+ SCREENS, REPAIRS, Glass - alpine
light.
4.Fit windscreen.
+ SCREENS, REPAIRS, Windscreen.
5.Fit 'D' post outer trim finishers.
6.Fit rear door aperture seals.
7.Fit tread plates to rear door apertures.
8.Fit front door aperture seals.
9.Fit 'A' post lower trim panels.
10.Fit tread plates to front door apertures.
11.Fit roof bars.
+ EXTERIOR FITTINGS, REPAIRS,
Roof bars.
12.Fit rear headrests.
13.Fit rear seats.
+ SEATS, REPAIRS, Seat - rear.
14.Fit front seats.
+ SEATS, REPAIRS, Seat - front.
15. Models with fixed roof: Fit head lining.
+ INTERIOR TRIM COMPONENTS,
REPAIRS, Headlining.
16. Models with sunroof: Fit sunroof drain tubes.
17. Models with sunroof: Fit rear sunroof.
+ SUNROOF, REPAIRS, Sunroof -
rear.
18. Models with sunroof: Fit front sunroof.
+ SUNROOF, REPAIRS, Sunroof -
front.
19.Connect leads/multiplug to alternator.
20.Connect battery leads, negative lead last.
M77 1715A
Page 1127 of 1529
BODY SEALING MATERIALS
77-3-2 MATERIALS AND APPLICATIONS
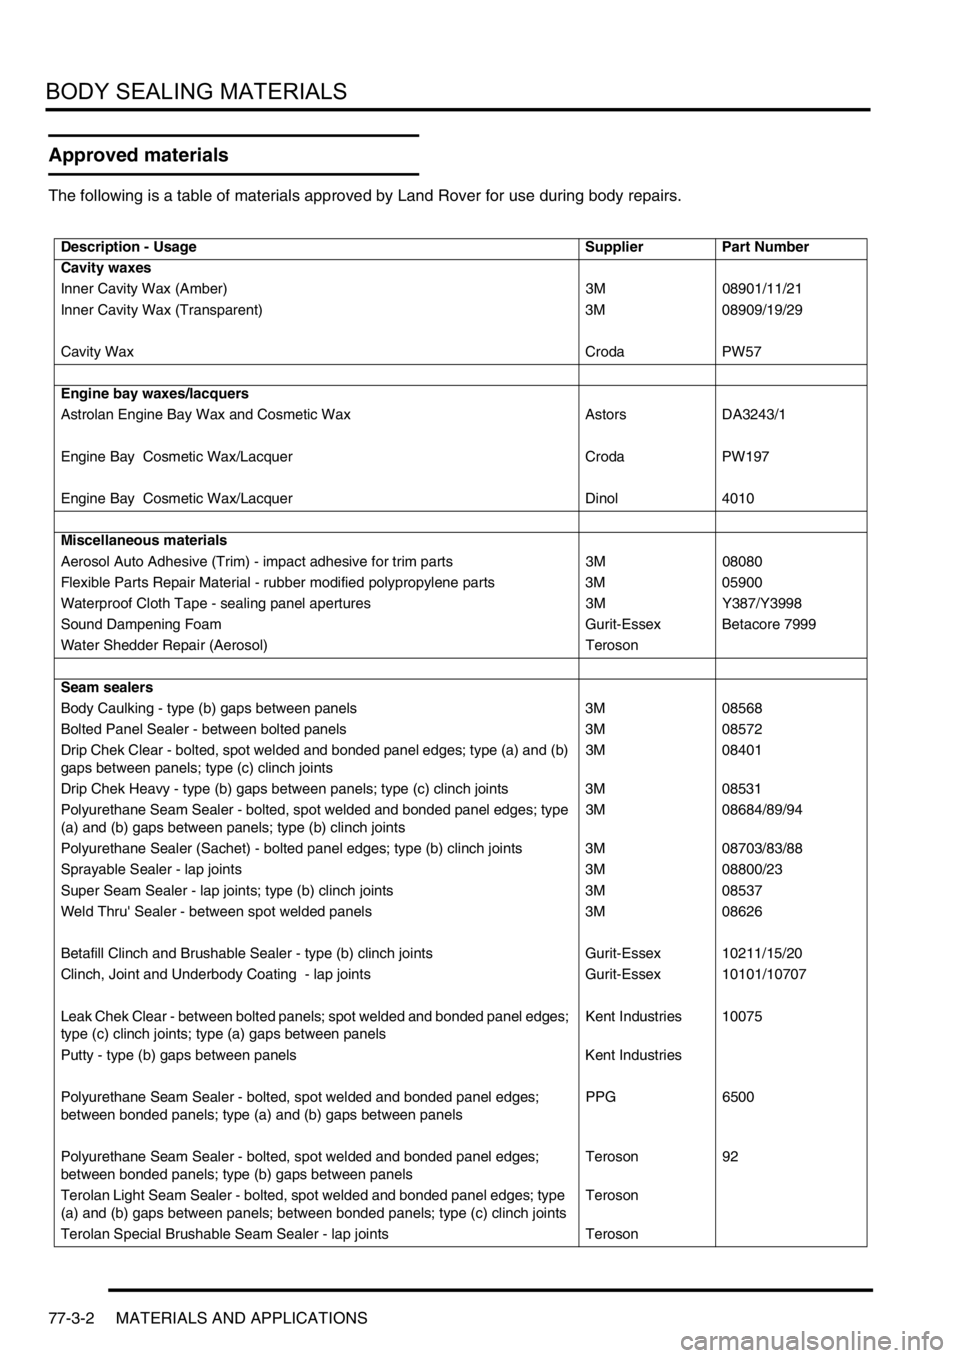
Approved materials
The following is a table of materials approved by Land Rover for use during body repairs.
Description - Usage Supplier Part Number
Cavity waxes
Inner Cavity Wax (Amber) 3M 08901/11/21
Inner Cavity Wax (Transparent) 3M 08909/19/29
Cavity Wax Croda PW57
Engine bay waxes/lacquers
Astrolan Engine Bay Wax and Cosmetic Wax Astors DA3243/1
Engine Bay Cosmetic Wax/Lacquer Croda PW197
Engine Bay Cosmetic Wax/Lacquer Dinol 4010
Miscellaneous materials
Aerosol Auto Adhesive (Trim) - impact adhesive for trim parts 3M 08080
Flexible Parts Repair Material - rubber modified polypropylene parts 3M 05900
Waterproof Cloth Tape - sealing panel apertures 3M Y387/Y3998
Sound Dampening Foam Gurit-Essex Betacore 7999
Water Shedder Repair (Aerosol) Teroson
Seam sealers
Body Caulking - type (b) gaps between panels 3M 08568
Bolted Panel Sealer - between bolted panels 3M 08572
Drip Chek Clear - bolted, spot welded and bonded panel edges; type (a) and (b)
gaps between panels; type (c) clinch joints 3M 08401
Drip Chek Heavy - type (b) gaps between panels; type (c) clinch joints 3M 08531
Polyurethane Seam Sealer - bolted, spot welded and bonded panel edges; type
(a) and (b) gaps between panels; type (b) clinch joints3M 08684/89/94
Polyurethane Sealer (Sachet) - bolted panel edges; type (b) clinch joints 3M 08703/83/88
Sprayable Sealer - lap joints 3M 08800/23
Super Seam Sealer - lap joints; type (b) clinch joints 3M 08537
Weld Thru' Sealer - between spot welded panels 3M 08626
Betafill Clinch and Brushable Sealer - type (b) clinch joints Gurit-Essex 10211/15/20
Clinch, Joint and Underbody Coating - lap joints Gurit-Essex 10101/10707
Leak Chek Clear - between bolted panels; spot welded and bonded panel edges;
type (c) clinch joints; type (a) gaps between panels Kent Industries 10075
Putty - type (b) gaps between panels Kent Industries
Polyurethane Seam Sealer - bolted, spot welded and bonded panel edges;
between bonded panels; type (a) and (b) gaps between panels PPG 6500
Polyurethane Seam Sealer - bolted, spot welded and bonded panel edges;
between bonded panels; type (b) gaps between panels Teroson 92
Terolan Light Seam Sealer - bolted, spot welded and bonded panel edges; type
(a) and (b) gaps between panels; between bonded panels; type (c) clinch jointsTeroson
Terolan Special Brushable Seam Sealer - lap joints Teroson
Page 1129 of 1529
BODY SEALING MATERIALS
77-3-4 MATERIALS AND APPLICATIONS
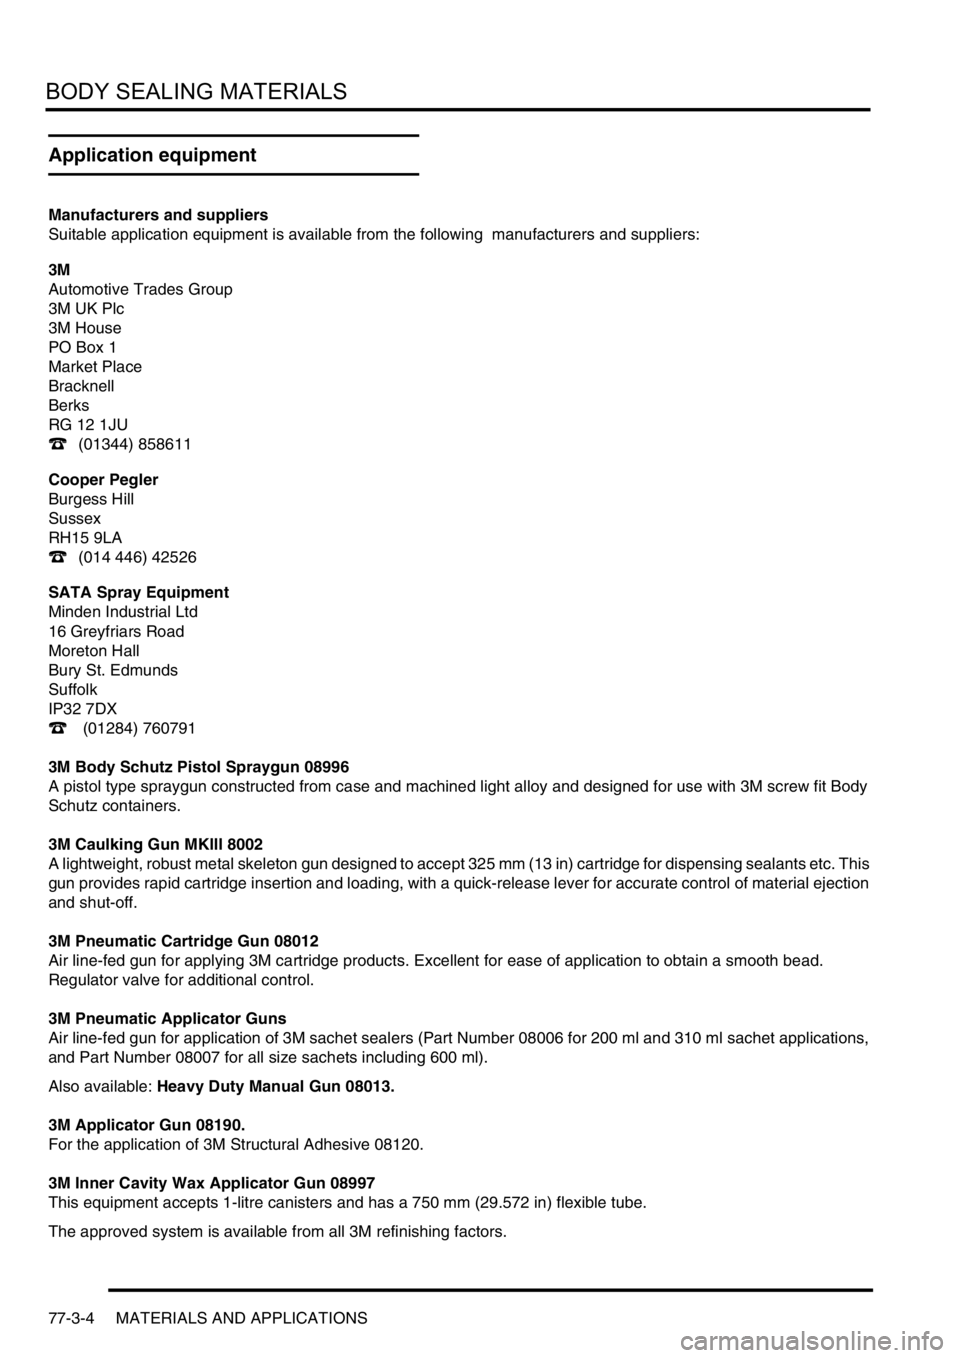
Application equipment
Manufacturers and suppliers
Suitable application equipment is available from the following manufacturers and suppliers:
3M
Automotive Trades Group
3M UK Plc
3M House
PO Box 1
Market Place
Bracknell
Berks
RG 12 1JU
( (01344) 858611
Cooper Pegler
Burgess Hill
Sussex
RH15 9LA
( (014 446) 42526
SATA Spray Equipment
Minden Industrial Ltd
16 Greyfriars Road
Moreton Hall
Bury St. Edmunds
Suffolk
IP32 7DX
( (01284) 760791
3M Body Schutz Pistol Spraygun 08996
A pistol type spraygun constructed from case and machined light alloy and designed for use with 3M screw fit Body
Schutz containers.
3M Caulking Gun MKIII 8002
A lightweight, robust metal skeleton gun designed to accept 325 mm (13 in) cartridge for dispensing sealants etc. This
gun provides rapid cartridge insertion and loading, with a quick-release lever for accurate control of material ejection
and shut-off.
3M Pneumatic Cartridge Gun 08012
Air line-fed gun for applying 3M cartridge products. Excellent for ease of application to obtain a smooth bead.
Regulator valve for additional control.
3M Pneumatic Applicator Guns
Air line-fed gun for application of 3M sachet sealers (Part Number 08006 for 200 ml and 310 ml sachet applications,
and Part Number 08007 for all size sachets including 600 ml).
Also available: Heavy Duty Manual Gun 08013.
3M Applicator Gun 08190.
For the application of 3M Structural Adhesive 08120.
3M Inner Cavity Wax Applicator Gun 08997
This equipment accepts 1-litre canisters and has a 750 mm (29.572 in) flexible tube.
The approved system is available from all 3M refinishing factors.